Hello. Today I’ll tell you how to replace the heater gear motor on a Priora at home. This step-by-step photo report will allow you to make such repairs yourself, that is, with your own hands.
Before getting started, a few words about the signs of malfunction of this unit.
Signs of a malfunction of the heater gearmotor Lada Priora
Most often, breakdowns of the heater gear motor manifest themselves as follows - the stove, despite the set temperature, blows either cold or warm. In addition, quite often there are cases when a malfunction of the gear motor of the Priora stove manifests itself in the form of characteristic knocking sounds after you turn on the heater.
Causes of malfunction
The main reason is that the gear is broken, this can be either a crack that prevents the gear from rotating, or a broken tooth that causes the gearmotor to jam. It also happens that the unit fails due to a faulty motor.
How to replace the gearmotor on a Priora?
Note. There are many different instructions on the Internet on how to do this work easier. Some argue that to replace the gearmotor you do not need to remove the reservoir and wiper trapezoid, others argue that you only need to remove the reservoir. This method involves the complete dismantling of all parts that limit access to the stove gear motor.
This video is a clear example of how you can replace a gear motor without removing anything.
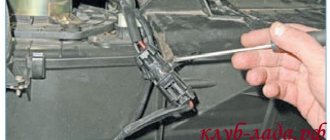
1. First of all, you need to open the hood and remove the wipers. Then you should remove the frill (plastic cover).
2. Next, you need to unscrew the three screws that secure the trim (sound insulation) of the engine compartment.
3. After this, disconnect the hose that passes through the trim of the engine compartment to the expansion tank. To do this, loosen the clamp using a screwdriver.
4. When the pipe is disconnected, you can remove the tank by pulling it up and move it to the side so that it is not in the way.
5. Now you can remove the engine compartment trim. To do this, gently pull it up.
6. The next step is to dismantle the expansion tank mounting bracket. To remove it you will need to unscrew the two mounting bolts marked in the photo.
7. Now it’s time to dismantle the wiper motor, as well as the trapezoid; to do this, unscrew one bolt and two nuts marked in the photo.
8. After all the above steps have been completed, we can easily remove the heater gear motor. To do this, you only need to unscrew the three bolts that secure it.
9. After the fastening bolts are unscrewed, you can safely remove the heater gear motor. Turn off the power and replace the faulty unit with a new one.
This completes the replacement process. Assembly is carried out in reverse order. Before starting assembly, check the new gear motor for serviceability.
Who remembers my last fart-bursting BZ, welcome to the continuation)) Well, in general, this, let’s say, the second part is precisely for those who are faced with the same problem and want to get by with a little blood. A year ago I already changed the gear motor and for this I disassembled, so to speak, the entire motor shield. Namely, I cut half the stove body and, bending it, changed the gear motor. This method is much simpler than what some do, namely with the removal of the GTZ and vacuum. But this time I decided to try to make it even simpler. I think the experience will be useful to someone. I was surprised how quickly I did everything. What’s nice is that you don’t need to unscrew, remove or move the stove.
I’ll describe step by step how I did it:
1.
Unscrew and remove the wiper arms and frill;
2.
In my case, I unscrew the spacer of the glasses, unscrew the small air venting pipe from the expansion barrel (nothing will flow out):
We pull this pipe out of the upholstery and bend it back somewhere to the left, towards the receiver, just so it doesn’t get in the way. 3.
Now you can safely pull out with your hands a small part of the engine shield upholstery, which is behind the expansion tank:
4.
Next, without unscrewing the pipes or draining anything, pull the expansion tank up and move it to the side. Now is the most convenient time to unscrew and pull out the trapezoid. We turn on the ignition, wave the wipers, and when they are in the maximum vertical position, turn off the ignition. In this “position”, the trapezoid is most conveniently pulled out. After removing the trapezoid, unscrew the mounting area for the expansion barrel on the side of the wing (two 10mm bolts). There is no need to remove it completely. We also bend it, it is very soft. We see this picture:
5.
Next, bend the small bracket that holds the wiring:
6.
At this moment, the very notorious gear motor is revealed to us:
7.
Next we need a short Phillips screwdriver. We will unscrew it in place:
8.
In theory, it was possible not to remove the expansion tank, not to unscrew the platform under it, but then we would not have taken out the trapezoid, and with it it is not possible to get to the gearmotor.
Plus, I couldn’t rip off one of the self-tapping screws of the gearmotor with a screwdriver. It's cramped there, you know)) I used 2-3 extension cords, a cross cue ball and a ratchet, passing all this just from the side of the expansion barrel. Having torn off the screws, I then unscrewed them in place with a screwdriver. I note:
you need to unscrew the screws very carefully, without losing them. There are no ordinary bedbugs there. You can pick these up in a store without any problems, but you don’t want to go buy a self-tapping screw, this is the time...
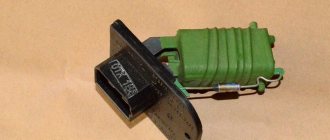
Purpose of the heating gear motor on the Lada Priora
A gearmotor is a device consisting of several plastic gears driven by a small electric motor. The main task of the gearmotor is to open and close the heater damper depending on the position of the regulator on the dashboard.
Geared motors on Priora are made only in plastic, non-separable housings
The plastic from which the gears are made deteriorates quite quickly. After which the driver is forced to change the gearbox. This device cannot be repaired, because, firstly, it is not possible to find spare parts for it, and secondly, it is not so easy to open the plastic housing of the gearbox without breaking it. So there is only one option left: replacement.
Gearmotor location
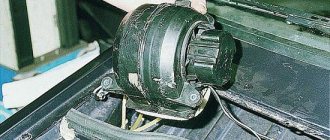
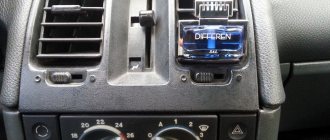
The gearmotor on the Lada Priora is located near the expansion tank, under the windshield.
The gearmotor on the Priora is located under the windshield near the expansion tank
It is built into a niche on the wall of the engine compartment and covered with a thick layer of sound-insulating material. This material will have to be removed, since otherwise it will not be possible to get to the gearmotor.
Principle of operation
First of all, you need to understand the principle of operation of the Priora heating system. The SAUO unit, which controls the heater, receives appropriate instructions from the temperature sensor located in the car's interior lamp. After that, it compares these readings with the temperature set by the driver.
If this difference is significant, the ACS sends a control pulse to the heater micromotor reducer, which controls the rotation of the damper. The direction and power of the flow of air supplied from the heater radiator to the passenger compartment depends on the magnitude of this rotation.
Signs of malfunction
If the air distribution damper does not work, this can lead to the following malfunctions in models without air conditioning:
- Only hot or cold air enters the car interior (regardless of the position of the heater control knobs);
- Instead of hot air, cold air enters the cabin.
In cars with Panasonic air conditioning, these cases are compounded by improper distribution of cooled air flows.
Replacement: how to remove (change) the stove on a Priora with and without air conditioning
Replacing a stove completely is rarely done; components are mostly changed. Often the main reason for disassembling the heater on a Priora car is replacing the heater radiator. When it ceases to be airtight and no longer works as efficiently, it is necessary to begin repairs. In order to remove the heater on a Priora car without air conditioning, you will need a set of wrenches (socket and socket wrenches) and a Phillips screwdriver. As the system is disassembled, it is worth inspecting all parts and replacing worn ones. Perform the work according to the instructions:
- Remove the negative from the battery.
- Remove the lower windshield seals and engine sound insulation.
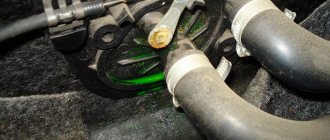
- Loosen the clamps that hold the pipes adjacent to the heater core, and then disconnect them. First place a basin under the pipes to drain the coolant. After the liquid has poured out, cover the pipes with a rag.
- Start wiring. Unclip the latch and disconnect the motor wires. Then de-energize the additional resistor.
- The wires that go to the damper drive motor are secured with a clamp. You need to bite it and then disconnect the wire.
- Next, we proceed to dismantling the heater itself. Take a “ten” socket wrench, remove three screws with it, and remove another screw with an “8” wrench.
- Next, move the wiring harness from the heater to the side (attached to a small bracket).
- Now, from the passenger compartment under the dashboard, unscrew the third nuts securing the brake pedal with the “13” key, and then move it to the side.
- Pull the block towards you.
- Install a new heater instead of the old one if necessary.
- When you are concerned that the heating is not blowing correctly - not in the required mode - you will have to check everything again during dismantling.
- To remove the heater on a car with air conditioning, follow these steps:
- Also remove the negative terminal, then the lower windshield seal, and the engine sound insulation.
- Unscrew the screws covering the heater radiator.
- Also carefully remove the pipes: the coolant must be drained into a prepared basin.
- Slowly and smoothly pull the radiator up until it comes out of the mounts.
- Install the new radiator in the reverse order.
Types of breakdowns
Failure of the distributor to take the desired position may be due to:
- with loosening of its fastenings and the gear motor drive;
- its deformation from hot air or breakage;
- adhesion to sealant residues.
In these cases, the Priora stove damper is blocked in one position. At the same time, clicks of the rotating mechanism are heard inside the car (the gearmotor that controls its position is knocking).
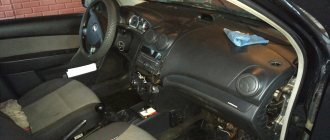
Lada Priora heater damper: how to remove and check. To repair, check and replace it, you will have to remove the plastic panel - the torpedo.
How to get to this mechanism without such difficulties? You can try to change the position of the regulator with a long screwdriver through the air duct grilles.
Some car enthusiasts, in order to avoid deformation, replace the standard one with a metal or wooden one.
In one of the issues of the automobile magazine "Behind the Wheel" it was proposed to replace the electronic control of the damper position with a simpler one - mechanical. As in old VAZ car models, its rotation can be adjusted using a system of levers and cables. It's not as convenient, but it's much more reliable.
The stove does not work on the Lada Priora (reasons and repairs)
With the onset of cold weather, the first malfunctions of the Lada Priora heater begin to appear. Situations may be different; in one case there may be problems with the fan, in another with the dampers, etc. Today we will tell you how to properly repair a stove on a Priora with your own hands.
Engine cooling system problems?
As practice shows, most problems with the Priora stove occur due to the ESD (engine cooling system).
In this case, the procedure is as follows:
1.
We check the coolant level in the expansion tank so that it is between o and “MAX”. If coolant has to be added all the time, then the cooling system is leaking somewhere. You should carefully inspect all pipes for leaks, and also tighten the clamps. By the way, in order for warm air to enter the cabin faster, many car enthusiasts in winter specially add coolant only to the “MIN” mark. After all, the less liquid there is in the system, the faster it will heat up.
2.
We check the coolant circulation in the SOD, paying attention to the expansion tank.
If there is no antifreeze circulation, or it is not sufficient, then the pump may be faulty (it should be replaced) or the cooling system may be clogged.
3.
Checking the thermostat. We warm up the engine to 75 degrees and feel the upper radiator pipe (in diagram No. 13), if it is cold, then the coolant circulates only in a small circle, the thermostat should be replaced with a new one.
Repair, diagnostics and replacement of the heater damper on Lada Priora
A comfortable temperature in the interior of the Lada Priora at low temperatures is maintained using a stove. If it breaks down, noise appears in the heater operation, and the ability to adjust the temperature, direction and intensity of the air flow is lost. In most cases, the sources of problems are the motor or damper of the Lada Priora stove, which fail.
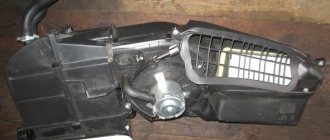
Heater device on Priora
The liquid-type heating system on the Lada Priora is structurally connected to the engine cooling system and includes:
- radiator or heat exchanger of the heating system;
- a fan supplying air to the cabin;
- damper that regulates air temperature;
- heater damper reducer;
- damper for flow distribution on deflectors;
- deflectors.
A failed heater damper on a Priora does not close completely, so the warm flow mixes with cold air without warming up to the required temperature and the cabin is always cool and uncomfortable. To fix the problem, you need to remove, replace or repair the heater damper gear motor.
Replacing the gearmotor
If the damper does not work, hot or cold air blows from the heater, and the ability to adjust it is lost. In such a situation, the cabin heater gearmotor must be replaced.
Replacing the damper on a Priora begins with raising the hood and removing the wipers. To do this, remove the plastic caps and unscrew the nuts with a 14 wrench, after which they are easily removed. Next, the left and right frills are dismantled by removing the rubber pad, protective plastic caps and unscrewing six screws. Then the plastic soundproofing of the engine compartment is removed, the cooling system hose passing through it is carefully disconnected from the expansion tank, then the tank itself is removed. To avoid draining the coolant, the holes in it must be plugged.
To inspect the heater gear motor, remove the expansion tank mounting bracket by unscrewing two bolts under the wing and removing the protection above the left front wheel. After this, the wiper motor and trapezoid are dismantled.
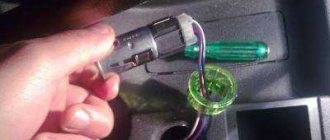
Now the unit is being dismantled; first you need to carefully disconnect the heater damper sensor and the power supply contacts. After this, install and check the new spare part, reassemble everything in the reverse order, and the replacement of the stove gear motor is completed.
Video: Replacing the gearmotor of the Lada Priora stove (Lada Priora)
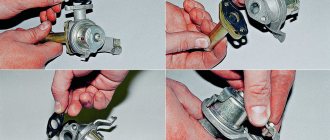
Gearmotor repair
In most cases, the extraneous sounds produced by the heater damper drive on a Priora are associated with cracking of the plastic gear. When its teeth are cut off, the mechanism stops working normally. Replacing it is quite difficult, but possible. After dismantling the gearbox, release the compressed plastic cover and bend it, then carefully remove it.
After carefully inspecting the mechanism, determine which gears are faulty and install new ones. Determine the condition of the commutator, bearings and brushes of the mechanism. Lubricate the bearings with silicone grease, which does not harm other structural elements. If after assembly the system functions normally, replacing the heater gear motor will not be necessary.
Adjusting the heater damper
Sometimes the reason that the car interior remains cold is that the heater damper does not open, despite the fact that the gear motor is trying to turn it to the desired position. In most cases, the damper regulator, which is responsible for setting it to the desired position, is to blame.
This is possible on the heater dampers both with and without air conditioning due to a clogged cabin filter, which needs to be changed in a timely manner. Dust and leaves prevent the damper mechanism from opening normally.
Another reason is that the thin plastic of the damper simply warps at high temperatures in the heating line, and it stops reaching the desired position. As a result, the stove does not switch to different modes or the flows are distributed unevenly. Most often, the damper regulator remains in the “in the face” position, but the glass does not blow.
If the damper does not switch, you can remove the panel between the driver and passenger seats; it is located directly behind the central heater grilles. Sometimes you just need to change the seal to which it is pressed, or remove debris that has accumulated in it. After this, you need to check the heater damper in operation and you can assemble the panel.
The stove on the Priora does not work - possible causes and their elimination
January 16, 2017
The Lada Priora car enjoys the well-deserved love and respect of our compatriots. Good value for money, availability of spare parts and excellent maintainability make it the leader of the domestic automotive market. However, being the result of a Russian design, this car also has some disadvantages.
As you know, “Priora” is a deep restyling of the previous model – the 2110th. Therefore, most components and assemblies moved from the “ten”, including the design of the heating and ventilation systems for the interior. Most of the main parts of this system are “decimals”.
Therefore, such unification is very helpful during repairs. Unfortunately, this feature backfires when malfunctions occur. There are quite frequent cases when the stove on a Priora does not work. The situations are different. In one case there may be problems with the fan, in another - with the dampers, etc.
Preparatory stage
Troubleshooting the heater should begin provided that the power unit and engine cooling system are in order to eliminate their influence. To do this, you need to make sure that the antifreeze is poured in the proper amount, the engine is in good condition and is functioning normally. And after that, find out why the stove on the Priora does not work. First, check the coolant level in the expansion tank. Next, you need to start the engine and warm it up to operating temperature. After this, you need to check the serviceability of the thermostat - feel the thick hoses that go from it to the car radiator.
The top one should gradually become hot. If the rubber hose is still cold, the thermostat is faulty. In this case, you can continue working only after replacing this element. Fortunately, its cost is low.
Another reason why the engine may not warm up to operating temperature is a leaky expansion tank cap. It should keep excess pressure in the system. Often, simply replacing this cover can completely eliminate the problem.
On the Priora, unlike the Tens, the cooling system is organized differently. And the formation of an air lock there is practically excluded. It can occur when the system is leaking or when antifreeze is poured into a completely empty expansion tank. This can be fixed quite simply. You need to drive your front wheels up some hill in a warm car and vigorously apply the gas in place. The expansion tank cap should be removed.
Replacing the gear motor of the Lada Priora stove with your own hands
Hello. Today I’ll tell you how to replace the heater gear motor on a Priora at home. This step-by-step photo report will allow you to make such repairs yourself, that is, with your own hands.
Before getting started, a few words about the signs of malfunction of this unit.
Signs of a malfunction of the heater gearmotor Lada Priora
Most often, breakdowns of the heater gear motor manifest themselves as follows - the stove, despite the set temperature, blows either cold or warm. In addition, quite often there are cases when a malfunction of the gear motor of the Priora stove manifests itself in the form of characteristic knocking sounds after you turn on the heater.
Causes of malfunction
The main reason is that the gear is broken, this can be either a crack that prevents the gear from rotating, or a broken tooth that causes the gearmotor to jam. It also happens that the unit fails due to a faulty motor.
How to replace the gearmotor on a Priora?
Note. There are many different instructions on the Internet on how to do this work easier. Some argue that to replace the gearmotor you do not need to remove the reservoir and wiper trapezoid, others argue that you only need to remove the reservoir. This method involves the complete dismantling of all parts that limit access to the stove gear motor.
This video is a clear example of how you can replace a gear motor without removing anything.
1. First of all, you need to open the hood and remove the wipers.
Then you should remove the frill (plastic cover). 2. Next, you need to unscrew the three screws that secure the trim (sound insulation) of the engine compartment.
3. After this, disconnect the hose that passes through the trim of the engine compartment to the expansion tank. To do this, loosen the clamp using a screwdriver.
4. When the pipe is disconnected, you can remove the tank by pulling it up and move it to the side so that it is not in the way.
5. Now you can remove the engine compartment trim. To do this, gently pull it up.
6. The next step is to dismantle the expansion tank mounting bracket. To remove it you will need to unscrew the two mounting bolts marked in the photo.
7. Now it’s time to dismantle the wiper motor, as well as the trapezoid; to do this, unscrew one bolt and two nuts marked in the photo.
8. After all the above steps have been completed, we can easily remove the heater gear motor. To do this, you only need to unscrew the three bolts that secure it.
9. After the fastening bolts are unscrewed, you can safely remove the heater gear motor. Turn off the power and replace the faulty unit with a new one.
This completes the replacement process. Assembly is carried out in reverse order. Before starting assembly, check the new gear motor for serviceability.
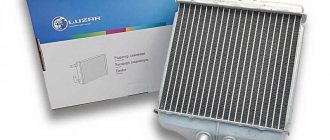
Heater radiator malfunctions
Another reason why the heater in a Lada Priora car does not work (cold air blows from the deflectors) may be the accumulation of dirt in the heat exchanger. When the cooling system operates, deposits accumulate in the engine block itself over time, which are then spread throughout the entire system, including into the heater radiator. These deposits prevent it from working effectively. The system will heat the air worse. In this case, the heater radiator can be replaced entirely. It is removed from the engine side. Before starting work, be sure to drain the antifreeze from the cooling system. Then dismantle the windshield wiper arms, the frill trim and move aside part of the soundproofing shield. After this, disassemble the stove body, disconnect the wires, remove the fan motor along with the impeller and remove the heat exchanger, disconnecting the supply hoses from it.
Problems with the damper gear motor or fan motor
A common malfunction on a Lada Priora car is that the heater does not work. No air blowing at all.
First, you should make sure that the heater motor is working - at least cold air should be blowing from the deflectors. If not, then you need to check the integrity of fuse F9.
If it is intact, it means the stove fan is not working. "Priora" is equipped with a "ten" fan. Therefore, removing it exactly repeats the procedure on the “ten”. In some cases, the fan does not spin because leaves or other foreign objects have gotten between the impeller and its housing, which can block rotation. In this case, you can hear a characteristic hum.
Cold air can also come out of the deflectors because the gear motor that controls the damper that blocks the flow of hot air is not working. It is also accessible from under the hood.
Often the cause of gearmotor failure is oxidation of conductive contacts. They need to be cleaned with sandpaper by disassembling the body. You should also pay attention to the strength of the air flow. If even at maximum speed the air is blowing weakly, it may be a clogged cabin filter. It is located under the hood in the heater housing and creates additional interference.
Fixing a problem caused by a broken flap
Sometimes you hear that various debris gets into the car, or more precisely, into the heater, in particular dust and leaves, which clog the heater filter and, therefore, prevent the damper from working properly.
In such a situation, the problem on the Priora can be eliminated by reconstructing the damper switching mechanism. If a motorist does not know where the heater damper is located on a Priora, he can look at the place where the driver’s right foot usually stands. Where the plastic of the torpedo is located, the necessary device is located.
The device you are looking for is a plastic damper, which is made of a fairly thin material, which can become deformed over time of active use under the influence of hot air. If the warranty period for the car has already expired and it is not possible to install a new unit under warranty, the damper can be sprayed with Vedashka. You can understand in what position the device is currently located if you reach the damper regulator on the panel with your right hand, and determine its location under the plastic casing with your left hand. You can process the mechanism blindly, having previously determined the position of the unit. Only first you need to get rid of the section of the casing located next to the gas pedal, attached using several self-tapping screws.
Additional resistance fault
There are often situations when the heater switch on a Priora does not work - the motor operates only at fourth speed or only at first. The reason here may be additional resistance, which slows down the rotation speed of the stove fan.
This resistance is a block of resistors (the fourth speed is direct, without deceleration). It is located in the heater housing on the left side and is secured with two screws. This resistance is also unified with many domestic models (2110, Kalina, Chevrolet Niva).
Incorrect operation of the cabin temperature sensor
There is another reason why the stove on the Priora does not work correctly. It occurs due to a malfunction of the cabin temperature sensor. It is located in the ceiling lamp.
The element, measuring the air temperature in the cabin, gives a command to the damper gearbox to open or close. This way the microclimate in the cabin is regulated. Its serviceability should also be checked.
Malfunctions of the heater control unit
The operation of the heating system is completely dependent on the heater control unit. It distributes air flows, the intensity of airflow to different zones of the cabin and the temperature regime. If it fails, the stove naturally stops working.
There may be malfunctions of the switches (“twisters”). The malfunction of the control unit should be checked last, since this unit is electronic and can rarely be repaired. Therefore, to check it, it is advisable to temporarily replace it with one that is known to work, borrowing it from a friend or in a store with a deposit.
Features of the heater in a Priora with air conditioning
A common reason why the stove (Priora with air conditioning) does not work is the failure of the speed control unit (RFV), which is located on the heater housing under the hood. It regulates the intensity of the fan motor. If it fails, the stove stops functioning altogether or operates only at fourth speed.
The cause of the malfunction is often prolonged operation of the heater in recirculation mode (with the air damper closed) and, as a consequence, its overheating. Therefore, its performance should also be checked.
Repair of devices on Lada Priora
As practice shows, it is more difficult to get to repairing a gearmotor; more precisely, it is more difficult to perform, since it is practically impossible. But, if a motorist wants to leave his Priora with the same heater element, he should carefully bend the pressed side, then remove the gear motor cover.
It is extremely important to pay close attention to the commutator, brushes and bearings. If possible, you can replace directly non-functioning parts. Then the bearings should be lubricated; silicone grease is best suited for this, as it can have a beneficial effect on the service life of all elements of the system.