Cars of models 2108-09 are truly legendary developments of the Volga Automobile Plant; it was with them that the production of front-wheel drive passenger cars began in the USSR. Also for these cars, a VAZ-2109 Solex carburetor was created and put into production, providing economical fuel consumption and excellent dynamic characteristics.
The carburetor unit (CU) is quite simple to set up and has a generally simple design compared to other similar devices, but it has its own characteristics and characteristic “diseases”. Here we will look at the structure of the carburetor, its dismantling and installation, the specifics of adjustment, adjusting the gasoline level, and debugging the starting mechanism.
The design of the VAZ-2109 carburetor
The first front-wheel drive VAZ cars went into production in 1985. The Togliatti plant began producing three-door 2108 models equipped with a 1.3-liter gasoline engine. Somewhat later, conveyor production of 5-door “nines” was established, and new 1.1 and 1.5 liter engines (modifications 21081 and 21083) also appeared.
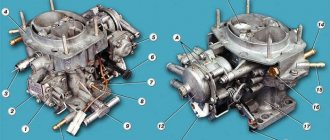
AvtoVAZ has developed its own carburetor for each engine size, but externally the CUs are practically no different from each other, the difference lies only in the metering elements located inside the body and the nameplate with the model designation. Unlike classic Ozones, Solexes have a body of only two parts, and not three - this is the main section with a platform for installation on the engine and the top cover.
The design of the VAZ-2109 carburetor has its own characteristics, but in general it contains the same parts as another similar unit for domestic passenger cars of the nineties and early two thousand. This HRSG is an emulsion type, two-chamber, with sequential opening of the chambers, for more stable operation it is equipped with liquid heating (antifreeze or antifreeze poured into the cooling system is used).
For full operation in any mode and optimal dosing of the air-fuel mixture, the following systems are provided:
- the main dosing one is the main one, its elements are present in both chambers (air and fuel supply nozzles, diffusers, emulsion tubes);
- idle speed (idle), ensures stable operation of the internal combustion engine at low speed, economical consumption of gasoline;
- transition from the first chamber to the second, serves to prevent jerks and failures when the valve of the second chamber opens;
- accelerator pump supplies an additional portion of fuel at the moment of sharp acceleration of the car, due to which the speed is gained smoothly, without jerking;
- economizer, enriches the fuel mixture at high speeds of the internal combustion engine (ICE) and increased loads;
- starting device allows the engine to start without problems in any cold weather:
- float chamber maintains the required level of gasoline regardless of load and speed.
When parts of the carburetor unit wear out, become clogged or fail, various malfunctions appear, such as loss of power, uneven engine operation, increased fuel consumption, engine stopping when releasing gas, etc. Only a specialist can independently deal with all the intricacies of the repair, but many drivers are able to clean, adjust and tune the carburetor with their own hands.
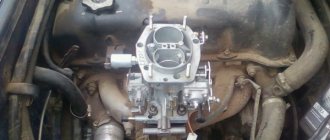
Removing and installing the carburetor
Installation and dismantling is carried out in case of repair of this unit, its complete replacement, as well as for thorough washing and cleaning. The AHU can become clogged if the car is driven on dusty roads, as well as as a result of untimely replacement of the air filter element.
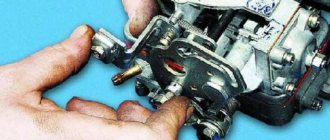
Removing and installing a VAZ-2109 carburetor is very simple; even with the initial skills of a car mechanic, almost any driver (car owner) can do such work with his own hands. We perform the dismantling operation as follows:
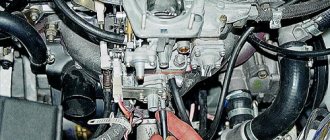
- turn off the ignition, open the hood, remove the top cover, the filter element, then unscrew the four nuts securing the air filter housing (AFC);
- loosening the clamps, disconnect the fuel hoses, unscrew the two fastenings of the choke cable, move the cable to the side, disconnect the wire chips of the solenoid valve and the throttle valve closing sensor;
- We also disconnect the throttle cable, having previously removed the return spring, the ignition angle advance hose, and unscrew the nuts securing the carburetor itself (also 4 pieces);
- in order not to lose antifreeze and not to disconnect the coolant pipes, it is easier to unscrew the screw securing the heating unit, but it is located at the back of the housing, not in the most accessible place;
- in this case, lift up the unscrewed carburetor, move it forward, find a position in which it would be convenient to dismantle this fastener;
- Now nothing prevents you from removing the entire assembly.
If the KU is thoroughly stuck to the studs and does not pull off, you can gently tap it at the base with a small hammer and shake it with your hands from side to side. As a rule, after several attempts the device gives in; after removing it, you can begin further planned operations; installation of the unit is carried out in the reverse order.
How to remove the carburetor assembly from a VAZ 2108/2109
Dismantling the carburetor is necessary in almost all cases of repair work. It is recommended to remove the device when the engine is cool, since all work is carried out in the immediate vicinity of the intake manifold and its pipes, on which you can easily get burned.
Video: DIY carburetor dismantling on a VAZ
To make work easier, it is best to immediately unscrew the screws securing the air filter box, as it will interfere with dismantling and prevent direct access:
- After this, you will need to disconnect two drives from the carburetor body (one goes to the air damper, the other goes to the throttle). In addition, it is immediately recommended to disconnect the return spring and its retainer from the drive.
- Next, the wire is disconnected from the forced idle economizer screw.
- After loosening the clamps, you will need to remove the fuel supply pipe and the hose that works “for return”.
- The screw securing the heating block is unscrewed and the block is removed.
- The ventilation hose and vacuum hose are disconnected from the fitting at the top of the carburetor.
- After disconnecting all lines, it is possible to dismantle the carburetor assembly itself. To do this, you will need to unscrew the four nuts that secure the carburetor with studs to the intake manifold. The device is pulled out along with the gasket.
It is recommended to close the resulting hole with a plug or a clean cloth while working to prevent dirt and dust from getting inside the motor.
Basic faults
Any malfunctions of the 2109 carburetor affect the performance of the engine: the engine may stall when the speed is reduced, run intermittently, not develop power, and consume gasoline beyond the norm. There are many reasons for problems with this unit, but the most typical of them are:
- clogging of the HDS and idle jets, both air and fuel, and in the solenoid valve (EMV);
- rupture (defect) of the accelerator pump diaphragm;
- failure of the EMG itself;
- loose fit of the locking mechanism needle to the seat;
- air leakage through the junction of the body and the cover;
- leakage of the float in the float chamber;
- clogging of the accelerator pump nozzle with dirt;
- misadjustment of screws XX.
Of course, various types of malfunctions can occur not only due to the carburetor, the engine itself is often faulty, and the ignition may also be set incorrectly, especially if the installation was carried out by an inexperienced technician without a strobe light. Problems with idle speed can occur due to a lack of power to the solenoid valve, so before disassembling the HRV, you should first check for voltage on this wiring.
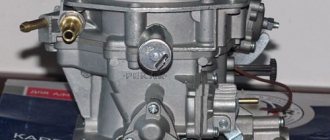
Solex design
The carburetor mechanism of all modifications on the VAZ 2108/2109 is emulsion and consists of two internal combustion chambers. At the top of the carburetor there is a cover that prevents dirt from entering the cavity of the device, and fittings - fuel lines are supplied to them. The middle part is the body itself, into which diffusers and cameras are mounted. At the bottom of the carburetor are the float chamber and throttle valves.
The key elements of the system are:
- accelerator pump;
- float;
- throttle thrust;
- forced idle economizer;
- main dosing system;
- trigger mechanism;
- econostat;
- vehicle idle system.
The principle of operation of the Solex carburetor is that gasoline is supplied through the inlet valve in the fitting. The fuel is directed directly into the float chamber. The fuel level in the cavity must always be at a certain level to avoid dips and jerks in engine operation. Level control is carried out through the movements of a needle valve mechanism.
After the chamber, gasoline is sent to emulsion wells, where it is supplied in strictly limited quantities through fuel nozzles. It is in the wells that air flows break up large drops of gasoline, forming a single air-fuel mixture with it.
If you are interested in repairing the fuel pump in VAZ 2108/2109 cars, it is recommended that you study the following material in detail: https://vazweb.ru/desyatka/pitanie/remont-benzonasosa-vaz-2109-karbyurator.html
The mixture is supplied to diffusers, and through them to the power unit device. Thus, the main task of the carburetor is to form the air-fuel mixture in the desired consistency and direct it to the engine.
The interaction of many elements ensures smooth operation of the motor
Adjusting the fuel level in the float chamber
Maintaining a normal level of gasoline in the float chamber is an important condition; if it is not met, malfunctions in the operation of the car occur:
- if the level is below normal, the engine does not have enough speed, power decreases, and gasoline consumption increases;
- if it is higher than required, fuel consumption also increases, and even more.
Setting the fuel level for the VAZ-2108-09-099 is quite simple, and in this case it is not at all necessary to remove the carburetor. The procedure for adjusting the position of the floats is as follows:
- remove the KVF assembly with the filter element;
- disconnect the choke cable, fuel hoses, EMG power cable;
- unscrew the five screws securing the carburetor cover;
- turn the lid over, take a drill with a thickness of 1 to 2 mm and take a measurement between the gasket and the lower surface of the floats - this distance should be exactly within these limits, and the same.
You can also measure the fuel level, but before carrying out such a procedure, it is necessary for the engine to idle for several minutes. The distance from the upper edge of the housing to the surface of the gasoline is measured; according to factory conditions, it should be 25-26 mm. Another way is to measure the distance from the gasket to the top edge of the floats with a caliper; it is 34 mm (with the cover upside down).
Another measurement method is using a specially made template.
Important conditions when setting the level:
- the floats must be located parallel to each other, along the lid;
- they are installed strictly vertically, without distortions;
- when lifting the float pair all the way up, the distance from their lower corners to the gasket should be within 15 mm;
- the adjustment of the extreme positions during adjustment is carried out by bending the tabs on both sides;
If the floats inside the chamber are installed skewed or not strictly vertical, they may rub against the walls of the housing, causing gasoline to overflow as a result of sticking.
Adjusting the float of the "nine" carburetor
Setting up floats in Solex chambers is a simple procedure that does not require the use of specialized tools or special skills.
However, in the factory, this procedure is partially automated and is performed using a special template, which significantly simplifies the adjustment. But if you do the work yourself, you don’t need a template, but we will need the following tools and equipment:
- two screwdrivers, with a flat head and a Phillips head;
- a caliper or ruler (it is better not to use metal, wood or plastic);
- a piece of wire with a diameter of no more than 2 mm (you can use a thin drill or a similar round rod).
This set is sufficient to perform the entire range of adjustment procedures.
Classic method
In accordance with the recommended method, adjusting the fuel level of a Solex carburetor is carried out in stages in the following sequence:
- start the engine and let it run for a couple of minutes to fill the carburetor chambers with gasoline;
- Structurally, access to the carburetor is blocked by the air filter, so it must be removed along with the housing. This is done simply: unscrew the top nut, unfasten the side fasteners to remove the cover, remove the filter itself, and then dismantle the air filter housing by unscrewing the 4 fastening nuts;
- after lifting the case, it is necessary to disconnect the rubber pipes from it;
- now we perform the same operation with the fuel pipes connected to the carburetor; when removing them, there is a risk of spilling gasoline remaining in the system, this circumstance must be taken into account;
- now you need to disconnect the wire going to the solenoid valve of the XX system;
- the turn has come to disconnect the air damper drive (the cable coming from the choke handle);
- you can begin to remove the Solex cover, which is secured with five screws;
- After the carburetor cover is put aside, you can immediately measure the current fuel level in the PC using a caliper depth gauge or simply lowering the ruler down all the way. Normally, this distance should be within 2.5-2.6 cm; if this is the case, subsequent adjustment of the fuel level of the Solex carburetor is not required;
- if the gasoline level is less or more, you need to inspect the mechanism for attaching the floats, and if everything is normal, adjust them;
- to do this, place the previously removed cover on a horizontal surface, the floats will be at the top;
- We carefully examine the relative position of the elements. The outer sides of the floats must be strictly parallel to the imprints made on the gasket. If there are distortions, this may cause the floats to come into contact with adjacent surfaces and parts, which leads to a change in the fuel level. The problem is solved by bending the fastening levers so that after this the floats move freely and do not touch anything;
- if this is not the case, measure the distance between the gasket and the floats. This gap should be equal to two millimeters, for which we needed a wire of the appropriate diameter. If the distance does not correspond to the standard, bend the tongue through which the float pushes the valve (needle). After this, we measure the height of the floats (guideline - 3.4 cm). If it was not possible to achieve the specified distance, we repeat the procedure with bending the tongue until we achieve the goal;
- The final stage of the procedure is measuring the working chord of the floats. The principle is simple: we install a caliper near the float, measure the distance from the surface of the Solex cap to the lower edge of the float, and then lift the float with our hands until it stops. We fix where its lower corner is now located. Normally, the working stroke should be 1.5 cm, if it is more/less, we again turn to the procedure of bending the float tongue.
Alternative way
Most drivers know how to adjust the Solex with their own hands in a simpler way, without resorting to a large number of manipulations.
The initial checking procedure is identical to what we have already described: we place the Solex cover on a flat surface and carefully examine the stampings on the side surfaces. If the floats are adjusted properly, these strips will be exactly parallel to the lid.
If this is the case, we move on: we manually raise the floats all the way (without fanaticism) and carefully examine their bottom. If all is well, the bottom of the floats should also be parallel to the surface of the lid. If this is not the case, bend the tongue without any rulers or measurements, repeating the first or second procedure until positive results are obtained.
All that remains is to reassemble the carburetor in reverse order (do not forget to mount the air filter).
Idle speed adjustment
The most common problem with a Solex carburetor is the disappearance of normal idle speed; the engine begins to operate intermittently at low speeds. Very often, the cause of such a malfunction is either a clogged EMG jet or the solenoid valve itself. It is very easy to check this - while the engine is running at idle, we disconnect the wiring from the EMG; if the nature of the internal combustion engine does not change at all, and when the valve is unscrewed, the speed increases noticeably, then the defect is present.
You can try to restore normal operation of the XX without removing the entire assembly, and this procedure is quite simple:
- With the engine off, remove the air filter with housing:
- disconnect the EMG wire, unscrew the valve itself;
- we start the engine, plugging the “idle” channel with a finger, “accelerate” several times;
- we stop the engine, do not forget to blow out the EMG and its nozzle using a compressor or hand pump, separating these parts from each other;
- we put the parts in place, do a test start of the internal combustion engine: if the idle speed has stabilized, and when the wiring was removed, the speed changed, it means that the reason was precisely the blockage, and now the idle speed has “returned to normal.”
But it is not always possible to clean the channel in this way; specks may get stuck in the area of the quality screw. Here you already need to remove and disassemble the carburetor, dismantle the screw, which in general is not very difficult, since it is located deep in the channel and is held there by a rubber sealing ring.
Adjusting the ignition angle
Sluggish acceleration of the car and instability of the idle speed are also often associated with incorrectly set ignition; this procedure is mainly carried out in car repair shops using special equipment. But if you wish, it’s easy to make the adjustment yourself, and without a strobe, and quite accurately:
- with the engine stopped, loosen the three nuts securing the distributor (the third fastening is located at the bottom, it is not visible from above);
- we start the car, turn the distributor-distributor clockwise (to “+”), and if the ignition was late, the idle speed will increase noticeably;
- we select the optimal position of the distributor (the operation of the internal combustion engine should be smooth, without failures), reduce the speed using the quantity screw, turn off the engine, fix the distributor-distributor with one nut for now, and check the results of the ignition adjustment on the fly.
If, under heavy load and sharp acceleration, your fingers begin to noticeably “knock” (engine detonation appears), you should move the distributor a little to “minus”, then check the car again while driving. This way you can set the ignition quite accurately, and sometimes even better than with a strobe light.
Features and malfunctions of the starting device
With the onset of frost, many owners of “nines” are faced with the problem of poor cold starting of the engine, and the cause of the malfunction is often the starting device (PU), which is designed to enrich the fuel mixture in a certain proportion. When the choke cable is pulled, the air damper closes, but under the influence of vacuum it changes its position, opening slightly and to some extent allowing air to pass into the carburetor. The position of the air intake is also adjusted using a diaphragm device, which is mechanically connected to the damper by a system of rods.
Of course, a cold engine may not start in cold weather due to a weak battery, a bad starter, or because of the engine itself, if it is already worn out, but the carburetor unit is also often the culprit of the problem. The causes of the malfunction in this case:
- the air damper opening screw on the diaphragm device is incorrectly adjusted;
- the diaphragm itself is torn or has lost elasticity (there may also be an air leak);
- the choke cable is poorly secured or incorrectly installed;
- the return spring is missing or stretched;
- another spring, which is located inside the diaphragm mechanism, is incorrectly selected.
In order for the engine to start smoothly at low temperatures, it is important to adjust the starting gap (the angle of the air intake during startup). We perform the adjustment as follows:
- fully extend the choke cable;
- using a screwdriver, pressing the rod, forcefully open the air intake;
- loosen the lock nut on the diaphragm mechanism, use the adjusting screw to adjust the damper so that it is installed in the position with the specified starting gap (2.5-3 mm depending on the modification of the KU);
- tighten the locknut, use the throttle valve opening screw to increase the number of revolutions;
- pumping the gas pedal twice so that gasoline enters the carburetor, we try to start the engine;
- after starting, use the opening screw to reduce the speed, bringing it to the desired level (for the winter period - approximately 2700-3000 rpm);
- If the air damper is closed too tightly, and the engine twitches, by adjusting the engine while the engine is running, we again adjust the thermal gap.
Having achieved the desired result, tighten the locknut, do a second cold start, this time the car should start almost immediately.
Quality screw removal method
With Solex carburetors, the XX channel in the body itself often becomes clogged, and in order to clear it thoroughly, it is necessary to remove the quality screw. But this screw, as mentioned above, has a very tight fit and is not easy to get out. There are several methods for dismantling a part; we will consider only one option.
We take a piece of an old antenna from any radio receiver, select the outer diameter so that the tube fits into the channel of the carburetor body, usually the outer thickness of the “puller” is about 4 mm. We cut off a small piece, make a cut at one end (about 1 cm deep), use another quality screw (a spare one, or you can buy it specially in a store), and check how tightly the tube fits onto the head of the screw.
Now you can unscrew the screw and use a homemade puller to remove it from the KU body.
Related articles:
- Carburetor DAAZ 2107 1107010 design and adjustment At the Dimitrovograd Automotive Unit Plant, the DAAZ carburetor is manufactured in three modifications: Ozone, Oka, Solex. In modern conditions, few people produce cars with carburetor […]
- Design and adjustment of the DAAZ 4178 1107010 carburetor on a UAZ The modified DAAZ 4178 carburetor replaced the outdated K-151V, which was installed on UAZ vehicles. The product is manufactured at the Dimitrovgrad auto-aggregate […]
- Features of adjustment and tuning of VAZ-2106 carburetors VAZ classic cars with carburetor engines are gradually disappearing from our lives, since they are no longer produced by industry, but similar machines are still in use [...]
Models of carburetors for VAZ 2108/2109
Carburetor mechanisms of the Solex series are produced at the Dimitrovgrad Automotive Accessory Plant. The designs are intended for use with front-wheel drive VAZ vehicles, in which the engine unit is located transverse to the body.
The standard model for equipping the VAZ 2108/2109 is the DAAZ 2108–1107–10 carburetor. It is paired with a 1.3-liter engine. Carburetors 21083–1107010 are installed on 1.5 liter engines.
The DAAZ carburetor is used to equip all cars of the eighth and ninth models
Modern equipment of the VAZ 2108/2109 is provided by carburetors of more advanced models, since they are equipped with a starting device in automatic mode:
- modification 21083–1107010–31 has one stage of automatic control and start in a given mode;
- modification 21083–1107010–35 is equipped with two stages of air damper control, which ensures more stable operation of the power unit;
- modification 21083–1107010–62 is similar to the previous version of the carburetor mechanism, but has the addition of an electrical air-fuel mixture mixing system.