When replacement is necessary
Signs by which you can determine that the valve stem seal needs to be changed:
- The more worn the cap is, the more oil the engine consumes.
- The exhaust smoke turns blue, which indicates oil has entered the cylinders.
The longer a car owner delays replacing oil seals, the more engine power decreases.
You can replace the valve stem seals on a VAZ-2110 yourself by assembling the following devices:
- open-end and socket screwdrivers;
- hexagons;
- hammer;
- tin rod with a diameter of 8 millimeters;
- a device to dry out the valves;
- tweezers;
- collet;
- new caps (it’s better to take extra).
After all the tools are collected, you can begin.
conclusions
As practice shows, you can actually do it yourself by replacing the valve stem seals on a 16-valve VAZ-2112 without removing the cylinder head . Of course, the procedure will take a sufficient amount of time and effort. So, usually inexperienced car enthusiasts go to a car service center and pay 4,500 rubles. for a replacement, but those who are braver save this amount of money.
Dear friends, today we will tell you in detail and with photographs how to independently replace valve stem seals on VAZ-2112, 2111 and 2112 equipped with a 16-valve engine. The beauty of our story is that in order to replace the oil caps we will not remove the head from the engine, and this is a significant saving of time and labor costs, there is no need to drain the antifreeze, unscrew the manifold, etc.
At the same time, we will do this without using an expensive valve depressurizer, which allows us to do this, but will use a regular valve depressurizer for the VAZ-2110, which can be bought on the car market for 200 rubles. Even before starting work, I recommend purchasing this desiccant, if you have little experience in desiccaning and drying, then take a stock of heels of crackers, we will also need an anaerobic (do not use silicone) sealant, unlike conventional silicone, when in contact with oil, it does not clog the channels but dissolves in it, and also buy a key for tensioning the timing pulley for 50 rubles, since the belt will have to be removed and then set according to the marks. By the way, it wouldn’t hurt to replace the timing belt and rollers at the same time, ideally. If you are ready to do it yourself - no problem, if you lack determination - I can recommend contacting the guys in Minsk to replace the timing belt, they will definitely do it well and inexpensively.
Disconnect sensors, hoses, cables
Well, if you’re ready to do everything yourself, then let’s get started. First, remove the plastic cover from the engine and gain access to the “intake manifold”
Replacement algorithm for an 8-valve engine
- It is necessary to remove the terminal with the minus sign from the battery of the immobilized car.
- Next, the air filter trim, fuel pump, ignition distributor and auxiliary equipment drive housing are removed from the engine. This applies to the rear of the car. From the front, you need to remove the housing that protects the camshaft drive.
- The next step is to unfasten the camshaft drive belt, timing pulley and key.
- Then you need to unfasten the valve cover from the head of the block and from its rear part. To do this, you first need to unscrew the ground nuts, remove the wiring, then disconnect the fastening and remove it.
- Under the valve cover there are fasteners that hold the camshaft. The screws must be unscrewed and then dismantled.
- Next, you need to remove the camshaft along with the oil seal, and replace it with a new one during assembly.
- Now on the cylinder (in order for the operation to proceed smoothly and without problems), on which the replacement will take place, the piston is installed at TDC. To do this, a tin rod must be inserted into the gap located under the spark plug.
- When the piston is installed at TDC on the cylinder, the rod must be positioned so that it is between the piston and the throttle (where the replacement will take place). This is necessary so that the valve does not drop after desiccation.
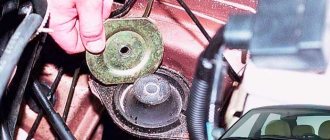
- Next, you need to place a desiccation device on top of the head. They also squeeze the springs at the required throttle, and use tweezers to remove the crackers. Then the plate and springs are dismantled.
- Now use a collet to press the oil seal onto the throttle guide.
- Before installing a new oil seal, it is recommended to remove the spring from the cap, lubricate it with oil and press it onto the guide. And only after that you can put on the spring.
- Next, you need to replace the plate and springs, then use a special device to clamp them and return the crackers to their place. To ensure they fit neatly into the connectors, it is recommended to lightly hit the end of the valve with a hammer.
The valve stem seals are changed in the same way. You need to raise the piston to TDC, install the rod, dry it, remove the cap, then install a new one in its place, dry it and move on to the next valve.
After replacing all valve stem seals, you can reassemble the car. Upon completion, it is necessary to check and, if necessary, adjust the valve distances and ignition. And only after this can you assemble the engine.
Instructions
You can replace the oil seals on a VAZ yourself. To do this, you should find a place where the operation will be performed; it is better to use an inspection hole or overpass.
Required Tools
To perform the procedure you need to prepare:
- set of sockets and keys;
- screwdrivers with bits;
- container for draining the working fluid;
- new cuffs;
- sealant.
Stages
The procedure for replacing the front crankshaft seal consists of the following steps:
- The negative terminal of the battery is disconnected to de-energize the car.
- We remove the timing belt and engine protection.
- Then you should loosen the timing belt tension and remove it. In this case, you need to ensure that the marks match.
- Next, unscrew and dismantle the right front wheel.
- Now remove the generator drive belt.
- Then you need to unscrew the mounting bolt and remove the crankshaft pulley.
- Drain the oil from the engine.
- We dismantle the oil pump on which the front oil seal is installed.
- We replace the front cuff with a new one, lubricating it on the outside with sealant and on the inside with machine oil.
- Assembly is carried out in reverse order.
Replacing the back cuff is a little more complicated and involves the following steps:
- First of all, the negative terminal from the battery is disconnected.
- Then you need to remove the clutch basket.
- Next, the flywheel is dismantled.
- Remove the clutch housing protective cover.
- Unscrew the bolts securing the rear oil seal holder and remove it together with the seal.
- Having secured the clamp in a vice, remove the seal.
- We inspect the cuff retainer. If defects are found, the part must be replaced.
- Using a suitable mandrel, insert the new cuff into the holder with the working edge inside the retainer.
- We change the holder gasket and put it in place, having previously lubricated the crankshaft edge and flange with engine oil.
- When mounting the holder, you need to carefully tuck the working edge of the seal ring onto the shaft flange using a wooden stick.
- Next we carry out the reverse assembly.
After replacing the shaft seals on a VAZ, you should check after a while for oil leaks.
Replacement process on a 16-valve engine
Here the process is a little different. It is not possible to use a rod here. The head must be removed from the engine to be able to press the valve against the seat during replacement. In all other respects, by and large, the work is carried out similarly.
The differences in replacement between carburetor and injection engines lie in the features of disassembly performed in order to get to the oil seal. But the replacement sequence itself is identical.
As for tools, you can exclude the collet, but be sure to have a device for loosening the valves. To compress the seals, pliers are sometimes used. But in this case, during removal, you need to pull the cap exclusively vertically and make sure that the oil seal does not rotate, otherwise there is a high probability of scratches on the surface of the guide.
In conclusion, we note that the process is quite labor-intensive, but you can cope with this task yourself if you wish.
Replacing valve stem seals with your own hands
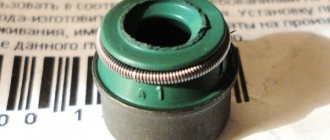
Valve seals (VSC) are made of special rubber, which ages over time, begins to deteriorate and peel off from the base. All this leads to the fact that the cap begins to leak more oil, and therefore there is a high consumption of engine oil. Other symptoms of replacing oil seals may be the presence of blue smoke during over-gassing and low compression in the cylinders.
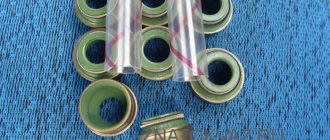
Oil seal replacement tool:
Stories from our readers
“Fucking basin. "
Hi all! My name is Mikhail, now I’ll tell you a story about how I managed to exchange my two-wheeler for a 2010 Camry. It all started with the fact that I began to be wildly irritated by the breakdowns of the two-wheeler, it seemed like nothing serious was broken, but damn it, there were so many little things that really started to irritate me. This is where the idea arose that it was time to change the car to a foreign car. The choice fell on the melting Camry of the tenth years.
Yes, I had matured morally, but financially I just couldn’t handle it. I’ll say right away that I am against loans and taking a car, especially not a new one, on credit is unreasonable. My salary is 24k a month, so collecting 600-700 thousand is almost impossible for me. I started looking for different ways to make money on the Internet. You can’t imagine how many scams there are, what I haven’t tried: sports betting, network marketing, and even the volcano casino, where I successfully lost about 10 thousand ((The only direction in which it seemed to me that I could make money was currency trading on the stock exchange, they call it Forex. But when I started delving into it, I realized that it was very difficult for me. I continued to dig further and came across binary options. The essence is the same as in Forex, but it’s much easier to understand. I started reading forums, studying trading strategies. I tried it on a demo account, then opened a real account. To be honest, I didn’t manage to start earning money right away, until I understood all the mechanics of options, I lost about 3,000 rubles, but as it turned out, it was a precious experience. Now I earn 5-7 thousand rubles a day. I managed to get the car buy after half a year, but in my opinion this is a good result, and it’s not about the car, my life has changed, I naturally quit my job, I have more free time for myself and my family. You’ll laugh, but I work directly on the phone)) If If you want to change your life like me, then here’s what I advise you to do right now: 1. Register on the site 2. Practice on a Demo account (it’s free). 3. As soon as you get something on the Demo account, top up your REAL ACCOUNT and go to REAL MONEY! I also advise you to download the application to your phone, it’s much more convenient to work from your phone. Download here.
Purpose and design of valve seals
A worn oil seal allows oil to enter the cylinder along the valve stem, causing it to burn along with the mixture, forming carbon deposits on the valve plates, as well as on the rings and cylinder walls. In advanced cases, coking leads to a drop in compression due to stuck rings and loose valve closure. It is generally accepted that the cost of timely replacement of oil scraper bushings is incommensurate with the repair of the piston group.
The design of the oil seal is quite elementary, it consists of only three basic elements:
- The base is a steel bushing, which represents the frame of the oil seal and gives it strength.
- Spring – ensures the tightest possible fit of the edge of the rubber seal to the valve stem.
- Oil seal - made of rubber or secondary rubber and serves to remove excess lubricant from the valve stem.
It is important to take into account that to replace valve stem seals on a VAZ 2110 8-valve car, it is better to buy appropriate high-quality consumables. First of all, this will affect the service life of the parts; they will not have to be changed ahead of time.
How to understand that it's time to change
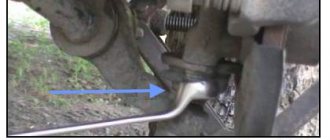
The dense crankshaft rings are encased in a hard shell and consist of two parts - the front and rear oil seals. They prevent dust and dirt particles from entering the car crankcase and causing oil leakage.
Typically, the mileage of a part is designed to last one hundred and fifty thousand kilometers, but they can wear out earlier due to poor quality of the part or if the VAZ operates under high loads. The same can happen if there is constant overheating or if you do not change the oil and filter in a timely manner.
You can tell that a problem has arisen by the appearance of oily smudges on the gearbox or engine. It is worth considering that such problems with oil are fraught with rupture of the timing belt, which, as a rule, will lead to the risk of damage to the valves. This, in turn, already threatens serious repairs to the car’s engine, and therefore you cannot let the situation go on the brakes without doing anything to eliminate leaks.
Causes and signs of wear of rubber seals
During engine operation, oil removal seals are subjected to serious loads, because the valve performs more than 1000 operating strokes per minute. If we add to this the factor of the chemical effects of hot oil and exhaust gases, then it is not at all surprising that the rubber does not withstand and wears out. And the point here is not the quality of the product, although this is important, it’s just that the seal is a consumable material that should be changed after a run of about 100,000 km.
If you detect the wear of valve seals in time and replace them at an early stage of the malfunction, you will be able to avoid problems with the internal combustion engine. The primary signs of failure of rubber seals include the following symptoms:
- The candle thread is coated with oil.
- Smoke from the oil filler neck.
- Smoke coming from the exhaust pipe.
- The electrodes of the spark plug are covered with carbon deposits.
- Increased fuel consumption.
- Rapid oil contamination.
The presence of oil on the threaded part of the spark plugs does not always indicate the need to urgently change the seals. It happens that the thread is still dry, because a small amount of lubricant still gets into the chamber, and it has time to burn.
Maintenance frequency
The manufacturer of these cars hoped to offer consumers a reliable and inexpensive car. Therefore, even if you have a good automobile platform, the rest of the VAZ car’s equipment leaves much to be desired and does not meet accepted standards, and this significantly reduces the level of complexity of all repair work, if required.
Maintenance is performed regularly, depending on the manufacturer's recommendations for replacement. In this case, the oil seal is a component that is susceptible to technical wear and requires regular replacement. Usually they are changed every 10-15 km. Such frequent replacement allows you to avoid failure of functional units in time.
Oil seals are sensitive to leaks; if present, they fail faster and do not meet operating requirements. Untimely replacement of gaskets may require more serious and inexpensive repair of the machine, and the structural simplicity of the oil seals allows these skills to cope with the replacement without outside help.
How to organize the replacement of valve stem seals for a VAZ 2110 8-valve car in a garage?
Even an ordinary motorist can easily install new valve seals. If we consider that dismantling the cylinder head is not included in the technological list, then the repair does not present any difficulties at all.
When purchasing spare parts, it is important to pay attention to the internal profile of the seals. Quite often, parts that are not equipped with a reinforcing sleeve have an annular protrusion on the landing plane in their design. During installation it may be damaged, but otherwise the process is no more complicated than changing the damper support on a “ten”.
Preparatory stage
First of all, it is worth noting that replacing valve stem seals on a VAZ 2110 with an 8-valve engine uses the same technology for both carburetor and injection engines. Therefore, the tool set is similar in both cases:
- Set of wrenches and socket wrenches.
- Device for pressing valve springs.
- Mandrel and puller for valve seals.
- Tin rod with a cross section of 7-9 mm.
- Tweezers, hammer, screwdrivers and pliers.
Before starting work, it is advisable to clean the cylinder head with kerosene, after which the air filter, fuel pump and ignition distribution device should be removed. Next, use a No. 5 hexagon to unscrew the screw that secures the auxiliary device drive housing. Be sure to remove the negative terminal from the battery, as well as the toothed pulley from the camshaft.
Preparatory dismantling stage
- Unscrew the nuts securing the cylinder head cover and remove it.
- Unscrew the two nuts securing the ground wires and remove them from the studs.
- Unscrew the two nuts and bolt of the rear cylinder head cover and remove it from the head.
- Alternately loosen the four nuts securing the front camshaft bearing housing and the six rear ones. Remove both housings.
- The key should be removed from the camshaft groove immediately so as not to be lost.
- Dismantle the camshaft and remove the seals from it.
Removing the old seal
This stage of replacing deformed valve stem seals for VAZ 2110 8 valves includes installing the piston where the work is being done to the TDC position. Further actions are performed according to the following scheme:
- Remove the appropriate spark plug and insert a tin rod into the hole to prevent the valve from falling through.
- Using a special tool, compress the valve spring.
- Use tweezers to remove two crackers and remove the device.
- Install a collet to remove the caps and hit the fixture bushing with a hammer. This will allow the seal to be pressed off the bushing.
- Remove the oil seal from the collet. If you don't have a collet, you can use pliers. Do not rotate the seal; this will damage the valve guide.
Installation of a new seal
- Place the cap in the oil and install it in the mandrel.
- Carefully press the oil seal into the lower plate until it stops.
- Install the spring onto the seal. Carry out similar actions with the remaining parts.
- Install the crackers and hit the ends of the valve with a hammer through a metal rod. So the crackers will return to their normal place.
- Lubricate the camshaft cams and journals with oil, and treat the bearing surfaces under the journals in the same way.
- Place the shaft in the supports so that the cams of the first cylinder are directed away from the pushers.
- Treat the area of the outer shaft supports with sealant.
- Install the camshaft bearing housings, then put the washers on the studs and screw the nuts. They need to be tightened in two stages - first until they touch the bearing housings. Then check whether the guide bushings fit into the corresponding holes in the bearing housings. Only then finally tighten the nuts in order.
Final stage
The replacement of oil seals on a VAZ 2110 8-valve car is completed by installing camshaft seals. Be sure to check the clearances in the valve drive assembly. At the end of the process, all hoses and wires are installed in the reverse order.
If there is a suspicion that the car has been driven on faulty seals for quite a long time, then the experts recommend making repairs by dismantling the cylinder head. This will allow you to perform a full repair with thorough cleaning of engine components from carbon deposits.
Necessary tool
In order to change the seals, you need to prepare the following set of tools:
- A set of keys or sockets. Among them there must be keys for 10, 13 and 19.
- Several screwdrivers.
- Pliers.
- Prepare a special container for draining the oil. It can be made from a plastic canister, which is cut into two parts. Cut-up five-liter water bottles will also work.
- New seals.
Front crankshaft oil seal.
Rear crankshaft oil seal.
Articles
As for new oil seals, it is better to change the front and rear at once. They are also called big and small.
- The most popular parts are from AvtoVAZ, with article numbers 21080100516000 and 21081005034.
- A better quality seal kit is from ESPRA, with catalog number E07418. A foreign manufacturer costs twice as much.
A set of branded ESPRA oil seals.
Replacement algorithm
In order to replace a part, you need to perform the following sequence of actions:
- First of all, you need to drain the oil from the engine. To do this, you will need an empty container of at least four liters.
- Next, remove the front timing belt cover.
Unscrew the two bolts on the sides of the cover.
Unscrew one bolt in the center of the cover.
Remove the timing cover.
- You need to raise the right front part of the car using a jack and remove the front wheel.
Jack up the front and remove the wheel.
- The camshaft must be turned clockwise by the bolt. You need to align the marks on the pulleys.
Align the mark on the pulley with the installation tab on the cover.
- The crankshaft must be fixed.
You can fix the crankshaft with a screwdriver...
...or lock the camshaft pulley.
- The generator drive pulley is removed.
First, under the hood, loosen the tension of the generator belt, then through the wheel arch, using a 17-mm spanner, unscrew the bolt and remove the pulley.
- Next you need to remove the timing belt. To do this, the tension roller must be turned so that the belt is in its loosest position.
Loosen the roller and remove the timing belt.
- The toothed pulley is removed. For this, two screwdrivers are used.
Usually the pulley can be easily removed.
But you may need a puller.
Only after this can the old oil seal be removed. For this you also need to use a screwdriver.
Under the pulley we see oil and an old oil seal.
We take out the worn oil seal and clean the surfaces.
Before installing a new oil seal, you need to lubricate its edge with machine oil. Only after this is it pressed in.
If the toothed pulley is completely rusted and there is no puller at hand, watch a video on how to remove the gear using the third method:
Rear oil seal
In addition, to replace it you will need to remove additional components and parts. If the VAZ-2110 car owner has already had to change various oil seals, then he will definitely cope with this task. An inexperienced car enthusiast can ask a friend who has had to do similar work for help.
The procedure goes as follows:
- You need to drain the oil from the gearbox.
Using a 17 key, unscrew the plug and drain the oil into a container; when finished, put the plug back in place.
- The wheel is removed. It is for this reason that it is recommended to change two oil seals at once in order to avoid unnecessary disassembly procedures.
- The CV joint is brought out.
To remove the drive, you need to unscrew the bolts securing the ball joint.
- The drive shaft is taken out along with the CV joint.
We push out the hinge using a mounting spatula.
- The gearbox is removed. Before doing this, you need to disconnect the drive rod.
We unscrew the jet rod.
Remove the clutch housing cover.
We unscrew the bolts securing the box.
Together we move the gearbox to the side.
- Now you need to remove the flywheel.
Before removing the flywheel, put marks.
- Having removed the flywheel, we see the oil seal.
View of the seal.
- The old oil seal is removed using a screwdriver.
We clean the seat from dirt and install a new oil seal.
Next you need to lubricate with oil and install a new crankshaft oil seal. Assembly occurs in reverse order.
It happens that the old oil seal cannot be pulled out with a screwdriver, then self-tapping screws will come to the rescue. More details are shown in the video:
We change valve stem seals on a VAZ-2110 with an 8-valve engine
Many car enthusiasts were faced with the fact that the time had come to change valve seals on a VAZ-2110. These seals are also popularly called caps. The change process itself is quite simple, but it will require some knowledge of car design, as well as the availability of tools.
Video material
Video material about replacing valve stem seals, as well as the subtleties and nuances of the procedure.
Product selection
The choice of valve stem seals should be taken seriously, since the normal operation of the power unit will depend on this.
A visual inspection is required before installation.
Typically, the manufacturer recommends installing only original (factory-produced) parts. As for AvtoVAZ, for 2110 it will be under catalog number 2112-1007026 . The average cost will be 700 rubles.
Reasons for replacement
There are direct and indirect reasons that indicate that the valve stem seals are worn out and need to be replaced. So, let's look at the signs of wear on valve seals:
- The engine consumes a lot of oil, more than 1 liter per 1000 km .
- Blue smoke from the exhaust pipe.
- The threaded part of the spark plugs is coated with oil.
- Black carbon deposits on candles.
- Increased smoke when over-gassing.
- New oil quickly becomes contaminated.
- Power drops, engine failures.
- The car doesn't start well when it's hot.
- Worn guide bushings and valves. Characteristic knocking of valves .
Why is it necessary to change on time?
Naturally, timely repair of parts that have become unusable will extend the life of both the engine and the VAZ-2110 vehicle itself. The time after which it is necessary to change the oil seal directly depends on how old or new the car is, on the driving style of the car owner and operating conditions.
If you change them in a timely manner, this will help reduce the cost of car repairs, because such measures eliminate engine oil leaks, which negatively affect the operation of the engine.
If you do not change it in time, the VAZ-2110 car will “eat” more motor oil, and the engine itself will begin to collect dirt and dust, which cannot but affect the stability of its operation. Engine oil leaks negatively affect car parts that are not made of metal, and the contact in the terminals will become much worse, which, in turn, will affect how the car starts.
We replace valve stem seals on VAZ 2110
Replacing the valve stem seals of a VAZ 2110 can be easily done independently. To do this, you do not have to remove the head from the cylinder block. You must have it to work.
- Set of socket and wrenches.
- Device for clamping valve springs.
- Cap puller.
- Mandrel.
- Tin rod with a diameter of 7-9 mm (solder can also be used).
- Steel rod.
- Probes.
- Motor oil.
- New valve stem seals.
- Sealant.
- Hammer.
- Pliers.
- Screwdriver.
Before starting the main work, you need to remove the fuel pump, air filter, and ignition switchgear. After this, unscrew the screw securing the drive housings of additional devices using a No. 5 hex key. These operations are performed only if the valve stem seals of the VAZ 2110 are being replaced. If the car model is different, for example, 2111, then such procedures are not necessary.
Oil seal removal technology
To do this, you will need to perform a series of sequential operations.
- First you need to disconnect the wire from the negative terminal of the battery.
- The pulley with teeth is removed from the distribution shaft.
- Then you need to remove the cover from the block head.
- Unscrew the fixing nuts on the bulk wires (there are two of them) and remove the conductor tips from the studs. Unscrew the nuts (2 pieces) from the 2nd and 3rd fastenings of the rear cover of the cylinder heads. There are O-rings under the screw head. After this, you need to remove the cover from the block heads.
- Unscrew six nuts from the rear and four from the front housing of the distribution shaft bearings by the same amount. Then remove the washers. At the next stage, both bodies must be removed.
- In order not to spoil the key on the camshaft, you need to find out whether it fits snugly into the groove or not. If the connection is loose, then this part must be removed.
- Now comes the turn to remove the distribution shaft - it is removed from the block head.
- The oil seal must also be removed from the shaft.
- At the next stage of work, the crankshaft is turned to such a position that the piston reaches its top “dead” point. It is necessary to ensure that the dimensions of the piston and the valve stem seals being replaced are identical.
- The candle is turned out and a tin rod is inserted into its hole. This must be done so that the valve does not fall down.
- Next, you need to use a device to compress the valve springs. To do this, it is recommended to use a nut that does not have a toothed mandrel. All valve springs must be compressed.
- You need to get two crackers out with tweezers and the device can be removed.
- Remove the inner and outer valve springs and their upper plate.
- The valve stem seals are located on its guide sleeve, so they must be compressed until they stop. In order to carry out this operation, it is necessary to install a puller collet for removing VAZ caps directly on these parts. Apply a sharp blow to the sleeve of the device and the striker of its handle. These steps remove the valve stem seals.
- Then you need to remove them from the puller collet. If this setting is not available, then you can use pliers, but there is a great danger of damaging the valve stem seals, since you will have to apply force strictly vertically upward, without turning the parts to the side.
- It is recommended to remove the springs from them before installation, otherwise the caps may be damaged when passing through the grooves under the crackers on the valve.
The main thing when disassembling parts is to follow the order, because when they are subsequently installed back, they all need to fall into place. It is recommended to lay them out on cardboard in the order they were removed, then there will be no mistakes.
Work order
- First of all, we disconnect the negative terminal, as a result of which we de-energize the VAZ-2110. After this procedure, it is necessary to remove the protection of the timing belt and the car engine.
- We loosen the tense timing belt, and then simply remove it, making sure that the marks match.
- We remove the right wheel in front of the VAZ. After completing the manipulations with the wheel, the generator drive belt is also removed, after which you must unscrew the bolt securing the crankshaft pulley.
- The engine oil is drained and the oil pump, to which the front oil seal is attached, is dismantled. We replace the cuff and carefully coat it with sealant.
- The cuff on the inside is generously coated with oil, then remove the seal and take out the front cuff of the car. We collect all this in the reverse order of the above steps.
Replacing the rear cuff will be much more difficult. The procedure for carrying out repair actions is as follows:
- We remove the negative terminal from the battery, after which it is necessary to remove the clutch basket. After these procedures, we proceed to dismantling the flywheel, and then to removing the crankcase casing.
- The rear oil seal holder is removed by unscrewing the tightened bolts securing it. We unscrew the bolts that secure the flywheel.
- While holding the latch, you need to pull out the seal. To do this, you can use a vice and inspect the fixing part of the cuff. If there are any defects in it, this part is also replaced, and then the working edge of the new cuff is placed inside the retainer and the gasket is replaced.
- The edge of the crankshaft together with the flange is generously coated with oil. We install the holder, very carefully tucking the working edge of the sealing ring onto the flange. Reassembly after repair is carried out in the reverse order. After making repairs, you need to check from time to time to see if engine oil is leaking.
Putting parts in place
First, the cap is dipped in engine oil, installed in the mandrel and carefully hammered into the lower plate. The spring is returned to its place. All existing caps must be installed in the same way. In the same order as was done during removal, return all the springs and upper plates to their places. Then install the crackers back so that they fit exactly into the grooves for the rods on the valve.
A tin rod is removed from the hole from which the candles were removed. After installing the crackers, you need to hit the ends of the valve with a hammer or heavy object using a steel rod. They should fall into place. Lubricate the distribution shaft journals, cams and the places under them in the heads on the cylinder block with engine oil.
Install the camshaft into the head supports. In this case, it is necessary to install the cams of the 1st cylinder in the opposite direction in relation to the valve tappets. The area of the last support of the distribution roller is covered with sealant. The housings of its bearings are returned to their place and the studs are fixed in two stages with nuts, which are first tightened until the bearings touch the head.
It is necessary that the bushings fit exactly into the holes on the housings, and only then tighten the nuts until they stop. An oil seal is installed on the camshaft. At the last stage of work, the valve clearances are checked and adjusted. After this, the previously removed parts and devices are returned to their place. If everything described above seems difficult to perform, then you need to contact a car service center - where this work will be done by professionals.
It's easy to replace the caps yourself. The main thing is not to deviate from the above recommendations and follow the order of operations to replace parts. With timely prevention, the car will serve its owner for a long time.
Useful tips
- There are additives for restoring seals. When you are tempted to use one of them instead of changing the caps, remember that there are no miracles in the operation of the internal combustion engine and natural wear and tear. These additives soften hardened rubber and supposedly restore the quality of the seals. Experience shows that these additives either have no effect on the rubber, or soften it too much, and as a result, the size of the working edge increases, and oil consumption after using the additive increases significantly. So you better think about how to change the valve stem seals. How much it will cost you depends on the type of internal combustion engine. But you will definitely be sure that the caps perform their function. Additives, alas, cannot guarantee you such an effect. You should not try such additives on your car.
- If you haven't found a device with a collet clamp for removing caps, but that hasn't stopped you. Remember that the landing step under the cap has a wall thickness of just over a millimeter and is very fragile, and when you try to remove the cap with pliers, this part of the valve guide is broken very often, and the repairs that are necessary after this (replacing the guide, milling the seat and lapping the valve) are much more expensive more expensive than replacing caps and related devices.
Valve seals perform an important function in the timing mechanism of a car; they remove excess oil from the valve stems as they move and prevent foreign substances from entering the combustion chamber. When the valve stem seals wear out, it is very important to replace them in a timely manner to avoid increased oil consumption and carbon deposits on car parts and mechanisms. Car owners with no repair experience will learn from this article how to replace the caps without removing the cylinder head.