A newborn's gaze lingers longer than others on the brightest and largest toys. The attention of adult “children”, that is, men and women, is attracted by fashionable, bright, unusual things. Most car enthusiasts want to make the facade of their “four-wheeled” friend more stylish, for example, with the help of an installation. However, branded linings from the RIF or ARB brands are expensive. For drivers who know how to work with their hands, a solution to the problem of how to make a power bumper with your own hands is proposed.
This article discusses the process of decorating a car using the front part of the bumper as an example, although there are options for strengthening the sills, roof, rear bumper, radiator and other parts of the car.
Sequence of manufacturing power bumpers
The most common place where linings are assembled is a cottage or a garage. The base used is sheet metal (2-3 mm thick), a round pipe or a box beam (similar to the one that makes up the frame of a car).
In order to change the appearance of the body, it is necessary to carry out a number of measures.
Part 1. Preliminary preparation
1. Dismantling the front part of the car body.
2. Making a layout.
In order to accurately develop a complex spatial structure, programmers can use the Solid Works complex (or simpler software: Katina, AutoCad or Compass). However, most car enthusiasts prefer to use the “scientific poke” method, that is, trying them on “by eye”.
To make a pattern, take a piece of cardboard of a suitable size and tape. The technology is not difficult: try it on, cut it, assemble it into pieces of tape, and apply it again to the intended place. Make the final version and expand the sketch. Especially carefully check the dimensions and coordinates of elements located symmetrically.
3. Strengthening the side members.
Please keep the following in mind in advance. Depending on the intended shape, a power bumper will weigh down the car’s structure by 15-25 kg (and sometimes more, it depends on the number of pipes). It’s worth asking about the durability of your car’s frame. For example, a Niva car needs to increase the rigidity of the power structure.
Special plates are attached to the protruding part of the side members, which are necessary to prevent deformation during screeding. They are pre-coated with an anti-corrosion compound, and drilled holes are also protected from destruction. The plates are used to hold the assembled power bumper on the car.
Example of a drawing of a power bumper:
Part 2. Installation work
1. Assembling the frame frame.
Using a pre-made paper pattern, a frame and grooves are cut out of a metal sheet, and the sides are bent. Depending on the thickness of the source material, metal scissors, a drill or a gas torch are used to make the slots and holes. The final shape of the overhead box is obtained after using a welding machine.
If the frame is assembled only from rectangular pipes, they are cut from the inside and bent to size according to the paper pattern. First, the parts of the central crossbar are connected, then the sides. Welded.
Subsequently, the frame is attached to the plates (see point No. 3 “Reinforcing the side members”).
2. Manufacturing of additional elements from pipes.
The best equipment for giving round metal a neat shape is a pipe bender. If there is none, the structure is carefully heated with a gas burner along the bend axis so as not to burn a hole. In this case, one of the ends of the pipe is gradually directed in the desired direction.
3. Welding the frame element by element and assembling it.
If there are U-shaped components protecting the radiator, holes are burned for them in the base of the frame. They are then welded in place.
Part 3. Degreasing and painting the finished product
In order to bring the power bumper to a presentable appearance, it is necessary to carry out a painting process (using traditional technology). Upon completion of the process, the power bumper, made by yourself, will take its rightful place on the front of the car.
It is worth keeping in mind that all places where holes are drilled in the factory structure must be properly treated with anti-corrosion compounds and then covered with paint, varnish, and a preservative. Otherwise, very soon the eyes of passers-by will be attracted not by the original power bumper, but by the rust spots corroding the structure.
Keep up with modern fashion trends and equip your car with fashion installations. Many car enthusiasts can make power bumpers!
Source
Did you like the article? Subscribe to the channel to stay up to date with the most interesting materials
We will make the bumper from a 12 mm wide channel. We bought a 2 meter piece for the front bumper. I will mount it on standard tubes for a standard bumper. The first fitting of a two-meter channel as a bumper on a cornfield, photo below.
I removed the standard bumper and simply hung a channel in its place
Nuances of car preparation
Before constructing a power body kit for the field, the following preparations are carried out:
- The standard buffer and the main components of the front part of the vehicle are dismantled.
- The working surface is thoroughly washed and corrosion is removed from the bottom of the vehicle. Afterwards, the car is driven onto an overpass, inspection hole, or a jack is used.
- Create a mock-up of the future product.
Upon completion of preparation, you can proceed directly to constructing a power buffer for the Niva.
Bending cuts
Based on the results of the calculation, it turned out that it would be too close to the “muzzle” and the winch might not fit in the future. Therefore, I welded the channel pieces in this way. In the photo below, a cut has already been made to bend the edges of the bumper a little back.
The cut was initially made by eye, it looks like this before the bend
It is bent by the method of “jumping” onto it, previously supported on a stump or any other hill
Now we have this design, let’s estimate it on a car.
Ways to solve problems
To solve the problem of replacing a basic bumper with a power one, you can use two methods:
- Purchase a factory model of a security officer;
- Make it at home.
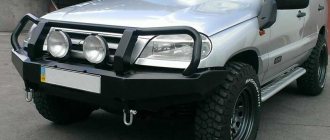
The Russian presented a factory design of the security force called “Reef”. SUV owners have been waiting for this model for quite a long time, since before this almost no factory options were offered. The company has long been engaged in the production of analogues for UAZs and Nivas.
“Reef” is a steel structure coated with a special paint (several layers) that prevents corrosion at the joints of the structure. A winch can be built into the product, which increases its efficiency and durability. The design also provides additional elements, such as:
- towing eyes;
- additional stiffeners;
- protective grille for the front of the car.
In general, this design is an excellent solution for arranging a car from the SUV class. A photo of the “Reef” security force is presented below.
The only drawback of this factory element is its high cost, which is about 25,000 rubles. Not everyone can afford the pleasure at such a price, so the only solution is to make a power bumper with your own hands.
Making a security officer on a Chevrolet Niva
Creating a power kit yourself is not an easy task. After all, it is necessary to take into account and calculate many points. For example, it is important to take into account that the new design does not have too much weight, as this will affect the front suspension of the car. So, the process of making a security officer has its own characteristics:
- Material selection;
- Creation of drawings;
- Manufacturing of the structure;
- Final stage: putty, painting.
Bumper drawing example
The materials from which the power kit will be made can be varied. The main part of the structure is made of 3 mm thick steel plates (there is no need to use thick iron, as this will affect the weight of the structure). Additional protective elements are made of tubes with a diameter of 8-12 mm. The tubes must be empty inside to reduce weight. Making a power bumper at home is not an easy task and will require a lot of work from a welder.
Drawing a sketch. At the second stage, it is necessary to create sketches (drawings) of the future car part. The drawing is created either on a computer or by hand using pencil and paper. After the sketches are ready, it is necessary to transfer the drawings to a mock-up, which is made of cardboard. To connect the parts of the cardboard bumper structure, you need to use tape.
When creating sketches, it is necessary to take into account an important point - the power body kit must have streamlined edges. Firstly, this is necessary to reduce resistance while moving. Secondly, so that the exterior of the car has the appropriate appearance.
Once the manufactured model meets all the parameters (fastening, shape and decorative cutouts), you can proceed to the third stage.
Manufacturing. At this stage, you should convert the mock-up structure from cardboard to steel. To do this, you need to use the help of a welder or hire a special company that deals with these types of work.
It is worth considering that if you give the material for the manufacture of a body kit to a specialized company, it is important that the sketches have a detailed description and designation of each element. To do this, it is recommended to use the help of a programmer who will make a design drawing of the security force.
Once the base is ready, you can move on to the final stage.
Preparing for painting. The body kit is ready for installation, but first you need to bring it back to normal. It is necessary to remove rust, chips, weld joints and other defects. To do this, you can use special means: sandpaper, wire brush, degreaser, etc. Now all that remains is to paint the power body kit and wait for it to dry. To do this, it is recommended to purchase a special paint that protects the metal from corrosion. Powder dye is usually used. It is best to paint the bumper black; it is suitable for any color of the car and fits perfectly into the overall exterior of the Chevrolet Niva.
At this point, the work on manufacturing the silovik for the Chevy Niva is completed; all that remains is to wait for the structure to dry and begin installation. The cost of self-production will be about half cheaper than a factory design.
Installation of a reinforced bumper on a Chevrolet Niva
Installation of the newly manufactured bumper on the car is carried out in standard holes. If we consider the installation, then there are installation features. Therefore, let’s look at how the “Reef” security system is installed on a Chevrolet Niva.
Installation is carried out in the following sequence:
- The plastic bumper is removed (you can find out how it is removed in the section on removing the front bumper).
- Using a grinder, you need to cut off the front plates of the side members, as shown in the photo below.
1 – cut plate; 2 – what should happen after cutting out the plates.
The radiator grille and other parts that were removed are installed. Installation is complete, you can proceed to testing on the road.
Cooking kangaroo
Next we make the radiator protection, or the guard itself on the bumper, from a 60*60 corner (you could have taken 50*50)
I would like to make it so that the kangaroo itself protrudes forward a little, so again we cut the notches and bend
Next, we weld and weld, saw directly on the machine, so we cover it with a piece of OSB
We make the height of the radiator protection just below the hood
On the other side, we do the same thing and weld the top cross member from a profile pipe; of course, a round pipe would probably look better, but it was not available.
A few more photos of the bumper on a cornfield made of channel
Another angle
Next, we install a middle partition to protect the radiator, also from a profile pipe, weld it to the corner
The rain does not allow us to work outside, so we remove the bumper and go to the garage to weld the ends of the channel and weld all the tacks, here the work is about an hour with smoke breaks
The scalding was successful, all joints were welded
Preparatory work
A reinforced bumper for a Chevrolet Niva can be purchased at a car store, since the manufacturer of this vehicle produces such bumpers. However, it is still impossible to boast of a large production of reinforcing and protective elements, so Niva bumpers can rather be considered as scarce materials than those that are on sale.
It is also impossible for many Niva owners to abandon the idea of becoming the owner of a reinforced bumper, since they realize that its presence prevents serious damage to the body and effectively protects passengers in an emergency. For this reason, the only way out is that you will have to create a reinforced bumper for the Niva with your own hands, borrowing the drawings from those who have already performed such practical actions.
Preparation of basic materials
If you have a diagram according to which you can cut sheets of metal, you can assume that all other actions will be completely simple to perform. So, you should initially prepare the materials from which you will create.
To carry out such work you will need:
- sheet metal, the thickness of which should not be less than 3 mm;
- round or box profile;
- cardboard;
- automotive putty, primer;
- car paint.
In addition to materials, you will also need some tools and equipment, without which performing certain actions will simply be impossible. In particular, you need a grinder and a welding machine. If you don’t have such devices and have nowhere to borrow them, you will have to create a reinforced bumper for your Niva, resorting to the help of specialists.
Bumper modification and painting
Next, I welded the sheets to visually thicken the bumper, I didn’t take any photos of the process, but the meaning is clear in the next photo
Next, nuts were also welded in to screw in the ears for transportation.
Next, we prime the bumper from a can with black primer, having previously, of course, polished the welds using an angle grinder.
We prime on the street, it’s easier to see there and there’s less stink.
Closer
Next, after the primer on the bumper has dried, we also paint it from a can, it’s a pity we didn’t have matte paint, we had to buy a glossy one
By the way, the profile tube welded between the nuts for the hooks on the bumper protects the license plate from damage from pushed obstacles, because this is a power bumper.
Now we put on our homemade bumper for the Niva all the necessary goodies and belongings, namely the round PTF and license plate, and we also screw in the towing eyes.
12345678
Recommendations from specialists for installing a bumper on a Chevrolet
In advance, experts recommend:
- Calculate the weight of the bumper on a Chevrolet Niva car. If the value of this indicator is high, then new shock absorbers will need to be installed.
- Provide space for installing additional lighting devices and a winch.
The installation of a power bumper is carried out taking into account the current legislation of the Russian Federation. In this case, the owner of the Niva Chevrolet car must have an installation permit and a certificate for the reinforced structure.
The finished front bumper "RIF" is equipped with an integrated platform for a winch. Due to the presence of stiffening ribs, the driver can use the Hi-Jack. If necessary, you can make an aluminum rear bumper for the Chevrolet Niva.
To make a reinforced bumper for a Niva with your own hands, you will need metal, tape measure, welding, and bolts. When manufacturing the structure, it is recommended to follow safety precautions. To independently calculate the dimensions of the body kit for the Chevrolet Niva, we use graphic editors. The structure is made of metal 3-4 mm thick. To do this, use a piece of metal pipe or channel and a 40 angle.
Selection of power bumper material
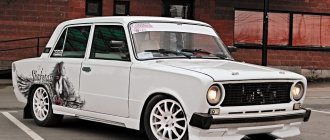
If you decide to install the bumper on the Niva yourself, we hope that our advice will be useful to you. Several decades ago, the structure to enhance impact resistance was made from an ordinary channel, but now it is a complex structure with arches, fasteners for a winch, a place for a sign and additional lighting, as well as other useful additions, the quantity and quality of which you can control.
Many owners of such cars want to install a power bumper on their car
If we compare a homemade front bumper for a Niva 2121 car and one purchased in a store, then both have pros and cons:
- a purchased power bumper has a certificate of conformity, but a home-made one needs to be obtained (needless to say, it makes no sense to buy a power bumper without a certificate);
- when making a power body kit yourself, you control the quality of the materials used and the work performed, but in a purchased product you have to rely on the manufacturer’s quality control system;
- An important aspect is the price of such a product; in the purchased product, in addition to the price for the material and labor, you pay for the brand and the work of the store. In fact, the overpayment is at least 2 times - a homemade power bumper for a Niva 2121 will cost you from 2,500 rubles. purchased - from 6,000 rubles.
When purchasing a power bumper in a store, pay attention to the following:
- Take it in your hands and evaluate the weight of the structure; metal cannot be light.
- Plastic in power bumpers is unacceptable.
- Test the chrome coating; it should not peel off when touched with a fingernail; it should be shiny with a light gray, bluish or milky tint.
- Find out the country of origin (China - not right away).
- Consider whether the mounting system shown on the product is suitable for you;
- Buy a power bumper in the middle price category, discard those that are too expensive or cheap.
- Choose a store with a wide range of products.
- Before purchasing, analyze the market and price offers using Internet resources.
The fully finished structure can be mounted on factory mounts
If you decide to install a power bumper on your Niva, be sure to consider a few points.
I would include the most significant installation nuances:
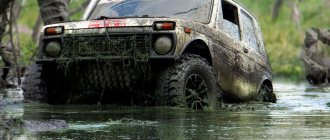
- Winch and the possibility of its installation. It will be indispensable if you get into a mud trap. The winch allows you to get out of a difficult situation without outside help;
- Hi-jack. An interesting device, also necessary for getting out of difficult road situations. The operating principle is similar to a jack that lifts wheels stuck in the mud;
- Additional optics. Its installation is not always mandatory, but sometimes it turns out to be useful. A prime example is fog lights;
- Place for mounting a license plate.
I can’t say that self-assembly is preferable to buying a factory body kit. But creating reinforced bumpers with your own hands is not so easy. You will need certain skills, accurate drawings, free time and quality supplies.
Purchasing ready-made structures is usually more expensive, but they are ideal for the Chevy Niva, do not require lengthy and complex assembly activities and guarantee the reliability and attractive appearance of the SUV. In Moscow and any other city the assortment is extensive, and don’t forget about the opportunity to order a part via the Internet. The choice is yours.
Preparatory work
A reinforced bumper for a Chevrolet Niva can be purchased at a car store, since the manufacturer of this vehicle produces such bumpers. However, it is still impossible to boast of a large production of reinforcing and protective elements, so Niva bumpers can rather be considered as scarce materials than those that are on sale.
It is also impossible for many Niva owners to abandon the idea of becoming the owner of a reinforced bumper, since they realize that its presence prevents serious damage to the body and effectively protects passengers in an emergency. For this reason, the only way out is that you will have to create a reinforced bumper for the Niva with your own hands, borrowing the drawings from those who have already performed such practical actions.
Preparation of basic materials
If you have a diagram according to which you can cut sheets of metal, you can assume that all other actions will be completely simple to perform. So, first you should prepare the materials from which you will create reinforced bumpers for the Niva-2121.
To carry out such work you will need:
- sheet metal, the thickness of which should not be less than 3 mm;
- round or box profile;
- cardboard;
- automotive putty, primer;
- car paint.
In addition to materials, you will also need some tools and equipment, without which performing certain actions will simply be impossible. In particular, you need a grinder and a welding machine. If you don’t have such devices and have nowhere to borrow them, you will have to create a reinforced bumper for your Niva, resorting to the help of specialists.
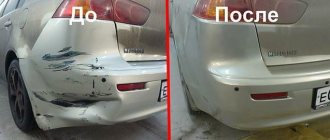
Repairing complex dents
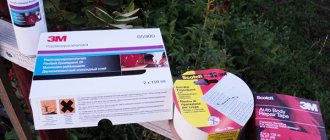
It happens that deeper dents appear on the bumper than those left after contact with snowdrifts. The reasons for their occurrence can be different, ranging from children playing with a ball to road accidents. To level out such a dent, it is not at all necessary to contact specialists. All work can be done with your own hands.
There is an effective and simple method. To straighten a dent, you will need a powerful hair dryer, which heats the area around the damage for a couple of minutes. Next, the heated dent is sprayed with a can of compressed air until traces of frost from the liquefied air appear. Afterwards, you should wait for the frost to disappear and observe the surface straightening on its own. All that remains is to wipe the dent until a natural shine is formed.
So, you can always fix a dent that appears on the bumper with your own hands, which will save significant money.
hello to everyone who stopped by) I somehow like the fact that my rear bumper is a little dented less and less.
Price tag: 0 ₽ Mileage: 59000 km
A little history
Niva 21213 and 21214 appeared quite a long time ago. Chevrolet Niva is considered a more modern car. But the Niva brand itself has been around for decades. There has long been such a thing as reinforced bumpers or body kits.
Apparently, the first copies appeared about 40 years ago. Initially, these were the simplest metal structures made of channel bars. They turned out to be surprisingly reliable, despite their simplicity. Everyone could weld something similar with their own hands in the garage.
Already with the advent of more modern SUVs, entire industries and large companies began producing reinforced bumpers. Therefore, now, instead of welding metal structures yourself, it is preferable to take a ready-made factory bumper. I would call the products of the OJ and Reef brands the optimal choice.
Also interesting: Aerodynamic body kit for Niva: pros and cons
Letter of the law
Another controversial issue regarding power kits is the legality of their installation.
Just recently, car owners were shocked by the fact that in Russia the government banned the use
metal kenguryatniks. This is what beginners call literally everything that protrudes from the front of the car and is made of metal.
But remember that there is nothing in common between a bumper and a power bumper. These are different concepts with their own nuances. Regarding legislation, there is no clear law that would prohibit you from putting a body kit on your car. But if you want to make such a change to the design, you will have to take care of the corresponding entry in the PTS. It's not that difficult, don't worry.
Just recently, car owners were shocked by the fact that in Russia the government banned the use
What to pay attention to during installation
Installing a kenguryatnik on a field has the following nuances:
- In the process of designing the body kit, you need to provide for mounting the winch on the Chevrolet Niva, and also leave room for the high jack.
- It must be taken into account that the spars require strengthening. To strengthen the structure, metal plates are welded to them and coated with an anti-corrosion compound.
- To correctly install a homemade body element, you will need to identify the mounting locations for the standard bumper.
A guard or reinforced bumper on a Niva is a necessary accessory to ensure more effective safety of the driver and passengers, as well as protection of the vehicle’s lighting devices, radiator grille, fenders, hood and body. You can create an element yourself, and if you follow the technology for performing the work, the part will be in no way inferior to factory-made analogues.
It is easy to install a power bumper on a field with your own hands. Before installing the bumper, determine the need for a winch. If you need it, you will have to cut out a space in the middle of the bumper. Set the size of the cutout for the winch after purchasing it; this will help you avoid making mistakes with the size of the cut hole. Next, we should begin to test attach the finished bumper to the metal plates that we installed on the side members.
Next, we treat all the holes of the installed bumper with an anti-corrosion agent and proceed to painting the bumper. If the car is intended more for city traffic, painting it in the color of the car is quite suitable. If you are an ardent lover of extreme recreation, make a bumper from stainless steel. We do not recommend attaching the bumper to the car's factory mounts, as they may not withstand the heavy weight of the new design.
Required set of tools
- Sheet metal 3 mm. (dimensions depend on the chosen bumper shape and Niva model);
- Cardboard (will be used to make a template);
- A grinder saw with a sufficient supply of discs;
- Welding apparatus;
You can replace the metal with a 150 mm profile pipe. width with thickness 3-4 mm. It's a matter of appearance and personal preference. In addition to everything you will need:
Such necessary tools can be found in any home, so there is no need to list everything in detail.