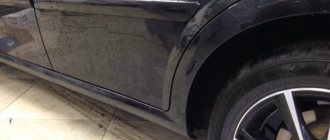
During operation, the paintwork of a car body gradually loses its original appearance - the color becomes dull, and scratches, abrasions and other damage appear on the enamel. Polishing the body will help to update the appearance of the car and give it a radiant shine, and if there are serious defects and a change in aesthetic tastes, the only solution will be repainting.
It is advisable to repaint the “iron horse” in the color of the factory body coating, since repainting it in a different color leads to the need to coordinate the procedure with the traffic police and make changes to the technical passport of the vehicle.
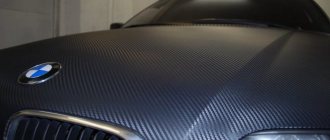
How to repaint a car a different color
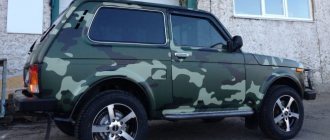
Today you can see more and more cars with non-standard colors appearing on the roads.
Such techniques for changing appearance can be considered a kind of tuning. It is especially popular to change the color of your car at the same time as applying some original airbrushing.
Although a simple motorist may also get tired of the color of his car. It even happens that the color change is carried out immediately after purchasing the car. For example, this is done when there is a significant amount of body work.
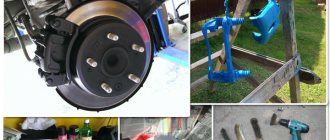
How to prepare a car door for painting
In this article we will look at an example of preparing a car door for painting.
For example, we will consider preparing the door of a VAZ 2106 car for painting. From this article you will learn how to prepare a car door for painting, what is needed for this, what tools and skills. I will not describe all the materials and equipment needed to prepare the painting; we will deal with everything in the process. Preparation should begin with disassembling the door, preferably completely. “Fashionable and beautiful” moldings were glued to our doors, peeling them off I peeled off the paint along with the double-sided tape... Hmm, I remembered the one who glued it all not very well :). Along the way, I used a brush and gasoline to remove the adhesive from the tape; it gets in the way when preparing for painting. Although wait, first there must be a theory of preparation...
Is it possible to repaint a car a different color?
There are special car coloring options that ordinary drivers cannot repaint their car with. These are the colors of ambulances, as well as fire and law enforcement vehicles.
Before you start painting the entire car, you should find the places where the VIN number is written. It will need to be left as is. This measure helps to avoid some problems with the traffic police in the future. It should be noted that repainting one color takes place without complications.
However, when using several or applying airbrushing, the car registration procedure causes some complications.
There are simply regulations that contain a description of the main colors of a car that are acceptable for registration. Documents may indicate several colors or one predominant one. There is a “multi-color” recording option.
How to paint a new door?
Eh, I’ll be honest, even though it’s Saturday. Domestic doors, so-called “cars” (God forgive me), are sold either in oil or in black transport primer. The first option is 99% substandard or “cooperative creativity”. When buying “black” parts, you also cannot relax the buns. Very smart hucksters paint parts from the designated group with some kind of black paint and sell them under the guise of “original.” The correct parts are primed using the dipping method, traces of which are easy to guess by the drips and snot on the edges. So, having made sure that we are not being told blatant bullshit, we choose a specific trick. Despite the fact that the prices for bodywork for various TAZs have long been competing with hardware for normal cars, our [censored] manufacturers have not been able to afford packaging. Due to the unpleasant properties of thin metal, it is easy to wrinkle and scratch; you need to look very carefully when choosing. The task is complicated by the matte surface of the part, which can be overcome by wiping the surface with a damp cloth and looking at the glare at an angle of 45 degrees. For pros, in principle, it’s enough to move your palm over the surface. Having chosen and paid for the piece of iron, we try to deliver it to its destination without adding damage. And now the most important thing. The black muck, which for some reason is called “soil,” must be removed from all accessible places. The quickest way to do this is to use strips of P-80-120 “used” on putty, a MEDIUM sponge and gloves made of split leather, however, you can use any other suitable piece of foam rubber in the form of a “soft spacer”. Using a drill with a stone and files, we remove all burrs from stamping and spot welding. Low-alcohol or non-alcoholic beer is recommended as an antidepressant for such “creative” work. Next, we cover with thin putty the defects that were not noticed at the time of purchase and sand them dry with P 120. Optionally, you can use polyurethane sealant to seal the joints, as it was on factory parts. It polymerizes for a day, so the decision “to be or not to be” is made depending on the situation. We hang the part on a special tripod (so that we can paint on all sides at once) and apply an etching primer, the so-called. Wash Primer. For example 820R from DuPont. Further options are possible, let's consider the simplest one. After a little air drying, prime again with acrylic filler in two full layers, dry it until complete polymerization. We rub with developing powder or spray a thin “fog” of quick-drying liquid paint, so that later we can see where the surface has been polished with high quality, and where there are undone holes and scratches. You can’t relax when grinding, even though the sanding paper is fine, for manual grinding with water use P1000, or P-600 for dry mechanical grinding, wipe the primer down to the metal on the edges and ribs - there’s nothing to do. In such cases, before painting, you will have to dust the “strip” with either an etching or a cleverly mixed acrylic primer, which does not add quality to the work. Having achieved a clean and smooth surface of the primed part, we return it back to the tripod and proceed to painting. Mix the paint according to the manual and apply it to the part. First, the edges and secondary surfaces are painted, and the “face” is painted last. Spray painting, contrary to ancient tradition, should not be done from top to bottom, but vice versa. Firstly, when working, you don’t have to look through the stream of paint. Secondly, obeying the forces of gravity and ventilation, droplets of material sink into the already applied layer, rather than creating dust on an unpainted surface. By the way, about smudges. It is very difficult to remove them without a trace; a certain “influx” remains on the surface. A piece of tape may help. Place a strip of adhesive tape directly over the wet paint, holding the ends in your hands, and remove the excess. Important point. The adhesive tape must be of high quality so that the liquid paint sticks to the paper, and not the dissolved glue to the paint. Then we dry it, polish it if necessary, and put it in afto. After partial assembly, we spray anticorrosive into the hidden cavities.
aPPLOADSMENTS