Today we will talk about tuning the instrument panel on a VAZ 2109. In this case, by tuning I will mean reworking the instrument panel itself, and not replacing light bulbs. Everyone wants his swallow to stand out from the crowds of other nines, and not only that. After this material and your implementation of it in the car, even the owners of foreign cars will look at your panel. After all, we will invest our souls, not huge amounts of money.
1. So, let's begin. First, we need any trim on the instrument panel. I would recommend a light transmitting one. It has more effect and looks unusual. In our case, we take this one:
2. Remove the instrument panel itself and the standard trim on it. We need to make cutouts in it to make the lighting brighter. I advise you to take a soldering iron. Then we glue the new cover to the old one.
3. Then we take an LED strip for every taste. Which one do you like? And we attach 3 LEDs to the instrument panel, speedometer and tachometer for brightness, and one LED to the fuel and oil levels. For better light output, I recommend using foil on the panel itself.
4.Now we connect everything as expected, i.e. to the original backlight (do not confuse the polarity). We collect and voila.
If, however, the new lighting seems too bright to you, then it can be tinted with a marker or tinted. The color will be richer and will please the eye. Well, that’s it, tuning the instrument panel of the VAZ 2109 with your own hands is completed.
Tuning the dashboard of VAZ 2108, 2109, 21099 cars. How to make the scale backlight with your own hands?
The dashboards of VAZ 2109 and VAZ 2108 cars are equipped with lamps that illuminate the dial from the outside, i.e., from the arrow side. Such illumination does not always satisfy drivers because the brightness is low and the detail is unclear.
This article will look at how you can illuminate the dashboard from the inside using the example of tuning a VAZ 2109 yourself. Of course, you can turn to a specialized company for tuning, they will quickly make a backlit panel like on foreign cars, but the cost of such work will be high. In order to save a lot on your car and create the desired lighting, you need to modify the instrument panel yourself, especially since there is nothing very complicated about it.
Making a DIY LED panel for a VAZ 2109
To tune the lighting of your car, you will need a light-transmitting cover suitable for the instrument panel.
We remove and disassemble the instrument panel from the car. We remove all the arrows and the old trim; it will no longer be needed. Using a heated knife or soldering iron, you need to make cutouts on the purchased trim so that the light from the backlight hits the instrument panel from the inside.
The lighting itself will be made of LED strip. The tape must be cut into pieces of three diodes. To distribute light evenly over the entire surface, you will need regular foil, which we distribute over the entire panel under the devices.
Algorithm for tuning the VAZ 2109 interior
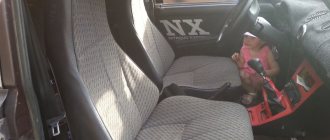
VAZ 2109 tuning in the cabin
You can, of course, entrust the tuning of a car's interior to professionals, but still, work done with your own hands looks truly magnificent and your soul is always happy.
What you need to buy
If the modification work will be carried out on your own, then you must purchase the following materials:
- Vibroplast M2;
- New instrument scales (color selected depending on the owner’s preferences);
- Automotive LEDs designed for all devices;
- Self-adhesive film;
- Fluorescent paint;
- Cartridges and sockets;
- New wires;
- A new steering wheel, preferably from a famous and expensive manufacturer;
- Regular foil;
- Necessary tools and so on.
Popular methods for changing a torpedo
To begin with, here is a list of the most popular methods for changing the front panel. We include:
1. Complete replacement. Installing a new torpedo, which was taken from another car, can be called a rather difficult job. Note that if instrument panels and other small tuning parts can be found on sale, then suppliers of such parts do not create a torpedo (it can be found on sale extremely rarely). This is due to the fact that such tuning is carried out quite rarely. However, only by completely replacing the panel can you get rid of cheap plastic and put an end to the crickets that can make long-distance travel simply unbearable.
2. Quite often, partial modifications are carried out, which is represented by the creation of additional niches for the multimedia system, a control unit for new functions, and so on. Such work cannot be called difficult, since plastic is used in the manufacture of the torpedo - a material that can be easily processed using available tools. The main thing is to carry out such work carefully, since if mistakes are made, important electrical elements and so on can be damaged.
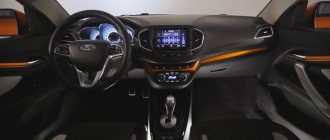
Instrument panel and its tuning
VAZ 2109 tuning interior and panels
As a rule, any interior tuning begins with the instrument panel, which needs to be given a delightful and stylish appearance. Of course, we should not forget about the practicality of this part of the car.
Backlight
VAZ 2109 interior tuning with low panel
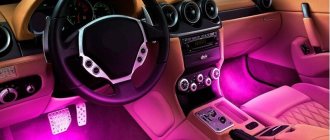
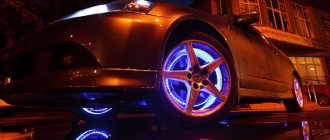
Probably every VAZ 2109 owner dreamed of having the same lighting on his car as on imported models.
Note. The appearance of the car interior largely depends on the lighting.
- We remove the standard dashboard and disassemble it.
- We remove the instrument needles, as well as the old trim.
Note. In order for the backlight to shine better on the overlay, it is recommended to make cutouts yourself from the inside. They are easy to make using a heated knife or soldering iron.
- Take the LED strip.
- We cut it into pieces of three diodes.
- Using regular foil, the glow is uniform.
Communities › VAZ: Repair and Modification › Blog › Gluing high panel 2109
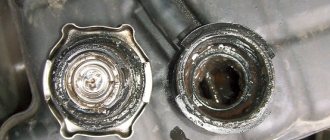
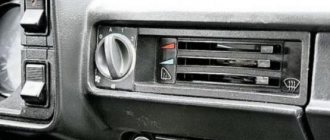
Good afternoon Surely everyone knows the terrible rattle of a torpedo on nines, especially the so-called “high” (21083) panel. I bring to your attention a small manual on sizing. So, the main source of squeaks and rattles is the instrument panel (below in the photo):
It can creak due to loose fixation to the longitudinal lining of the air ducts: (Reasons: broken lower latches, or bent upper hooks, as well as protruding stiffening ribs along the edge).
The lining itself can also make an unpleasant grinding noise against the air duct itself:
The torpedo itself (the main part) makes practically no sounds if it is correctly attached to the body (on 5 fastenings with self-tapping screws, and, a very important point, with a seal under the windshield). Inside the torpedo itself, wiring can make extraneous sounds.
So, the necessary material for gluing the panel is, of course, anti-squeak foam and any cushioning material. I used all the materials from the STP company: bitoplast A5K and madeline. This is the minimum set. If you wish, you can weigh down large areas of plastic with some kind of vibration absorber.
Let's get to work!
The first step, of course, is to remove the panel. Important point! It can be partially disassembled (it is not even necessary to remove the torpedo itself, just the trim and shield and unscrew the air duct).
On the dashboard itself, the first thing you need to do is lay madeline in the places where the air duct, trim, glove compartment lid, and other rubbing areas come into contact (for example, the headlight hydrocorrector frame):
And on the reverse side, it is also advisable to glue the seats on the stove with madeleine, for a tighter fit to the stove body:
Next is the air duct itself. Along the entire edge (including side deflectors), instead of factory foam rubber, we glue bitoplast:
Sound insulation and cladding
VAZ 21093 salon tuning
After the dashboard has been tuned, it’s time to start soundproofing the interior. So:
- We dismantle all interior elements and standard trim.
- We cover all the necessary surfaces with sheets of vibroplast (how to carry out high-quality sound insulation is described in detail in the article “VAZ 2109 interior sound insulation”).
Note. Typically it takes about 14 pieces of insulating material measuring 0.6 x 0.9 meters.
- After soundproofing, we trim the interior.
- First of all, we change the covering on the ceiling (professionals advise gluing it twice, leaving an interval of 5 minutes).
Note. When upholstering the interior, it is imperative to take into account the color scheme and do not forget to glue the doors, dashboard, area next to the gearbox and other parts of the car.
Modification of the rear of the car
Tuning the trunk of a VAZ 2109 includes the following work:
- making your own shelves;
- lighting.
To make a shelf, you will need plywood, cardboard, upholstery, glue, 2 furniture hinges, handles. We first determine the location of the shelf. Then we make holes. On the template of the future design we mark the moving part. We attach the model to the plywood. We first cut out the lifting part of the structure. We connect it to the stationary part of the shelf (hinges).
Then the structure is installed. We use any material for its upholstery. The shelf is covered with PVA glue in 2 layers. We carefully place the upholstery on top of the structure. To secure the fabric at the edges, use double-sided tape. If the glue has dried, install LED lighting in the trunk. Similar tuning can be done in the VAZ 21099 model. The electrical circuit of the vehicle is first studied. To illuminate the luggage compartment you will need an indicator, 5 m of two-core wire, pliers, electrical tape, a pipe, and a 5A fuse.
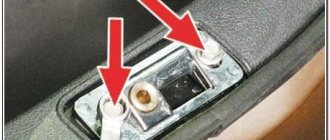
We install a button with an on/off indicator in the shelf for the rear speakers. To make a hole, use a drill. An LED strip is glued to the trunk threshold. An additional wire is laid under the floor covering; it is connected through a fuse to the power supply. The ground of the limit switch is connected to the backlight. The advantages of such tuning include:
- Multiple sources ensure uniform illumination of the luggage compartment.
- The light turns on only after pressing the corresponding button.
- Saves battery charging.
Tuning the trunk on the VAZ 21099 involves reworking the floor. For this, plywood, piano hinges, an electric jigsaw, and glue are used. The trunk is pre-lined with fiber (2 mm thick). Then we cut the plywood to the size of the carpet and the hatch for the spare tire. The next stage is making a frame from 20x30 mm bars. The resulting structure is fixed to the trunk floor. Then splen and soundproofing material are laid. Sheathing is being installed.
Tuning VAZ 2109 headlights comes down to tinting the factory lights.
The downside of this modernization is the accumulation of condensation inside the optics. This is due to the low quality of the material and lack of tightness. At the same time, black headlights, unlike their standard counterparts, are less efficient (by 30%). To partially solve this problem, we install more powerful light bulbs in the tuned headlights of the VAZ 2109. High power lamps should not be used. Otherwise, the lights will overheat or begin to melt. You can make your own optics. But such tuning is recommended for the rear lights (to reduce the risk of accidents).
Steering wheel and its tuning
All experts and professionals believe that the safest is the stock steering wheel of the vehicle. It is this wheel that was developed by the manufacturer and it is this wheel that has passed the necessary tests in accordance with the design of the car. As a last resort, it is recommended to replace the steering wheel with a wheel from the same manufacturer, a newer model. In particular, comfortable and “grippy” steering wheels from the VAZ 2115, etc. are perfect for the VAZ 2109. On the other hand, if the owner wants more, then you can always purchase any “steering wheel” on the market, both from a renowned manufacturer and a steering wheel handicraft wheel.
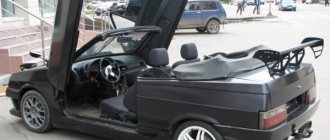
External modernization
External tuning of the VAZ 2109 includes modifications to various body elements, including optics. A simple modernization of the external parameters of a car is presented in the form of installing aerodynamic body kits. This kind of work can easily be done at home.
To protect the car from damage, we install cut moldings. When choosing moldings, we take into account that the degree of protection depends on the thickness of the product. Experts advise buying oval-shaped rubber pads. To install them, we use glue or double-sided tape. If the “Nine” is equipped with plastic moldings, then we use caps to fix them. We first drill holes in the body. Complex tuning of a VAZ body includes repainting the car. In this case, it is recommended to trust the professionals.
Tuning a VAZ hood includes replacing the standard radiator grille, performing airbrushing, and installing various additional parts. In the first case, the factory radiator grille is replaced with a styling analogue. To carry out such work, you will need a standard product, a soldering iron, a hacksaw, a mesh and a needle file. The partitions located inside the frame are first removed. We remove the remaining protrusions from the partitions with a soldering iron. A mesh of suitable size is installed in the frame. To attach it, use a soldering iron or liquid nails. The tuned radiator grille is painted.
Can be installed on VAZ 21099 and 2109 hatch. The prepared template for the future design is applied to the roof of the car. Mark the cutting lines. It is recommended to take into account that the hatch opening should be 2 mm larger than the frame. The next stage is dismantling the interior lighting and wiring. You can cut the roof with a grinder.
We process the edges of the sawn stiffener with a file. Then we make holes in the ceiling upholstery. The template is applied to the structure and the cutting line is marked. The ceiling upholstery is cleaned of dust. The next step is to fix the rubber gasket and apply silicone sealant around the edges. The hatch is installed in the prepared place. The bottom bar is tightened with self-tapping screws. After 24 hours the hatch should be dry.
Installation of a multimedia system and other elements
With the spread of touch screens, they have become quite often used in the production of multimedia systems that are installed in cars. Of course, you can purchase a GPS navigator that will be mounted on top of the panel. But still, this design option is impractical, as it takes up a lot of free space and impairs visibility.
If desired, you can implement a multimedia system into the torpedo. For this:
1. Select a multimedia system. 2. Find out its exact dimensions. 3. We mark the area on the dashboard. 4. We cut out the plastic. 5. Install the multimedia system. 6. Connect the system. 7. We carry out decoration.
In the same way, you can install control units for additional functions, for example, self-installed fog lights or interior lighting. In order to significantly simplify the work, you can buy a disassembled control panel from another car, also mark the location on the dashboard and cut out a place to install the panel.
In general, we can say that it is possible to modify a factory torpedo almost beyond recognition.