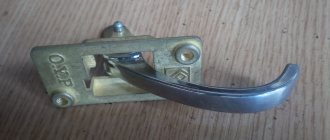
For a long time, I was annoyed by the peeling molding on the door, people often said - now everything will fall off here. While the weather is warm, I decided to bother with this issue. Initially I wanted to glue the part that had come off, then I saw that the other side was also starting to fall off, so I decided to remove everything, clean it and put it on new tape. I had to look for adhesive tape, but in the end I found 3M, recommended by everyone, in a paint store for 550 rubles.
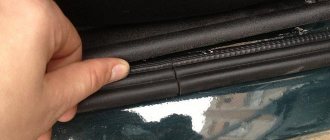
I cut off the old molding with a utility knife, removed the remnants of the old tape from the molding with a knife and put it in the sun to warm up. I removed large pieces from the body with my hands, and small items and remaining glue with a rag with gasoline. Of course, I had to tinker, if anyone has a drill with a rubber attachment, it will help save a lot of time.
Next, I took the molding home and prepared a regular hairdryer (exorbitant temperatures are not needed). Meanwhile, I placed the car with the right side facing the sun so that the door would also heat up. I applied adhesive tape to the molding in pieces of 20-30 cm for convenience, after preheating the area with a hairdryer. After applying the sticker, I pressed it firmly with my fingers over the entire surface. It turned out something like this.
An hour later I returned to the car with the door already hot, tore the liner off the tape, once again degreased the area on the door and then glued the molding on, pressing it firmly with my hands over the entire surface.
I hope it lasts for a long time. The whole operation took about 2.5 hours.
If you've ever had to shell out a ton of money to have your doors and body repainted after a scratch was left by a careless car owner in a nearby parking space, then you know how frustrating it can be. To prevent this from happening again, there is a special tool: car moldings. They will not only protect your car, but also add some zest to its appearance. In addition, they are very easy to install without any outside help. All you need to do is choose the right type of trim and the means to glue it to the car.
What are car moldings for?
The word “molding” comes from the English molding or molding, which translates as “cast part” or “molding”. The translation quite accurately explains the purpose of this part. It is used in many fields: architecture and construction, design and decoration, as well as the automotive industry. It is this category that interests us most.
In the automotive industry, a molding is a functional plastic or metal lining on any part of the car, which has two main functions:
As for the decorative function, everything is clear: what driver wouldn’t want to diversify the appearance of his iron horse, make it stand out among the traffic and attract the views of people around him. The parts are made from various materials and come in a variety of shapes and colors. With their help, you can delimit the body into sections, make it visually more elongated or more squat. You can choose contrasting or close to the main shades. Often moldings cover scratches and chipped paint. By the way, by choosing a part in the color of the body, you will make it visually more streamlined. Therefore, while driving, a car with them looks quite impressive.
moldings can give your car an unusual appearance
However, molding is not only an original decoration, but also a useful part that can protect your car from external mechanical damage. If the owner of a neighboring car opens the door carelessly, it will hit this part, and not the body itself. So, leaving your car in a tight parking lot, you no longer have to worry about the upcoming visit to the auto repair shop.
Installation is carried out on various parts of the car:
- bumper;
- front, rear and side windows;
- roof;
- wheel arches.
- rear and front doors:
This part can be installed on both the rear and front bumpers. In this case, it will be protected from light impacts, for example, on a sidewalk curb, as well as chips and scratches.
molding can protect the car bumper from external damage
Window moldings protect against dust particles and water droplets getting between the body and the glass. Usually these places are difficult to clean, so dirt accumulates in them. You can also use window molding to seal car windows. The element is made mainly of rubber.
It is not uncommon to find cars with such a detail on the roof. Their function is mainly decorative. On some car models, rubber roof moldings cover an unsightly weld.
roof molding may be covering an unsightly weld.
Moldings on wheel arches are very useful in rainy weather, when there is a lot of dirt on the street, as well as during frequent off-road trips. They limit the entry of debris and road vehicles into the wheel mechanism.
moldings on the wheel arches protect the car's mechanisms from dirt
But the most popular type is the molding installed on the car door, because in most situations it protects the paintwork from scratches. You can install the part only on the front doors, but protecting the rear ones will also not be superfluous. Such moldings can be made of rubber or plastic, but metal ones are considered to be of the highest quality: steel and aluminum.
the molding will protect the paintwork of the door from mechanical damage
It is this type of overlay that we will talk about next.
Types of overlays
Moldings are more serious trims that are usually attached along the entire car. They are fixed either on special pads or with glue (or sealant). Today on sale you can find universal products or specialized accessories, which differ depending on the location. Based on this, moldings are:
- Lower ones. Although these elements are practically invisible to the eye, they perform a very important protective role, preventing damage to the paintwork of the doors. As you know, this area accounts for the largest number of pebbles, sand and other debris flying from under the wheels.
- Average. These elements, located in the center of the door, are designed to protect the hinged structures from possible damage in difficult parking conditions. If the driver of another car opens the door sharply and wide, then thanks to the linings on the car doors, the paintwork will not be damaged. As a rule, such moldings are selected according to the design of the car, since they are always in a visible place.
- Tall. Elements of this type are also located on car mounted structures, only on top. The main purpose of these moldings is to prevent rainwater, snow from the roof, and other things from entering the car interior. However, as practice shows, these products are not able to completely prevent the ingress of moisture, but they can indeed significantly reduce its volume.
It is also worth considering that moldings can be decorative or decorative-protective. The first ones are made of any material, for example, it can be a reflective strip with built-in LEDs. Formally, the description of such accessories says that they are able to protect the paint from damage, but in reality this is not the case. Therefore, if the goal is precisely to prevent the formation of scratches, then you should pay attention to decorative and protective products, which are:
- plastic (usually vinyl);
- rubber-metal;
- aluminum;
- combined (rubber and plastic).
However, moldings are not able to protect the edges of doors. They perform the function of a protector of the body itself. This means they will prevent you from hitting another car door. If you need to protect the edges of your car doors, which may hit someone else’s car, then small protectors are installed.
As a rule, motorists choose the cheapest plastic covers. Is there any point in purchasing them? On the one hand, oversized accessories do not require special skills to install. They do not need to be selected depending on the car model (like moldings), since usually these elements (which are also sold under the name door edge protectors or protective tuning) are universal and suitable for any make of car. The cost of products ranges from 250 to 1,500 rubles. If you choose the cheapest plastic models, they will not last long (until the first frost); rubber products are more wear-resistant.
Choosing molding for a car
There are different classifications of moldings: by location of installation (we talked about it earlier), by material, method of use, originality of manufacture, and even by appearance. In order to choose a part for your car, you need to consider the advantages and disadvantages of each type.
Let's start with the simplest thing: originality of production. Based on this principle, they can be divided into two types:
- factory-made, supplied with the car or purchased for a specific model from official distributors;
- universal, suitable for all car models and differing only in length and appearance.
Of course, it is better to purchase an original part, but this is not always possible. Well-known car brands often carry out restyling and discontinue production and sale of old models, and along with it all the accompanying parts. Molding from a newer generation of the same model may not be suitable in length, width or other indicators.
Therefore, many people prefer to immediately purchase universal models. After all, their price is much more attractive than the factory ones, and their appearance is practically indistinguishable. In addition, by choosing a universal spare part, you have a greater variety of colors, materials and fastening methods. However, you should not save on such molding: unscrupulous manufacturers can falsify the results of laboratory examinations and sell low-quality goods. As a result, the purchased part, especially one made of rubber, will not fit tightly enough, move away in the corners and shrink at low temperatures.
Kinds
All moldings that are used on cars can be installed:
- on the door;
- in the area of the windshield;
- on the rear bumper;
- along the rapids;
- near the radiator grille, etc.
That is, almost any body surface can potentially be used for mounting moldings. Most often they can be seen at the bottom of the doors. Although some people mount them on the roof surface or other unusual places.
How NOT to do it
But that's not the point. All these moldings are divided into two types:
- protective and cosmetic;
- decorative.
How do they differ and which one is better to choose for installation on a car?
- Protective and cosmetic type. Such elements protect vulnerable parts and cover defects formed on the body. They are usually placed on doors, glass and body joints, and radiator grilles. These are useful devices that allow you to protect your car and prevent damage to the body. Plus, they can have good external characteristics, decorating the car.
- Decorative type. The assortment is simply huge. Therefore, you can easily find the desired option by shape, color, size, and so on. At the same time, decorative ones are divided into subcategories - reflective and LED. The second option is very popular among street racers, as it gives the car a stunning appearance at night. But reflective ones are placed on the side or back of the car so that the car remains clearly visible at night and provides a visual effect.
Personally, I support reflective products. They look beautiful during the day, and at night they also help with traffic safety issues.
What are they made from?
Before you buy and install a brand new molding on the front side doors, lower levels of the rear door, on the bumper or in the trunk area, I advise you to decide on the material. I think you care what decorates the surface of the trunk lid or how long the element can last.
By the way, I recommend immediately buying a set made of the same material in the same style.
When purchasing for the front door of your car from VAZ, Nissan, Audi, Opel, Ford or Kia, pay attention to what the moldings are made of
- Rubber molding with metal components. It is quite flexible with a high degree of strength. On the surface of a wing or other area of the car, if everything is glued correctly, the rubber-metal element will last a very long time. Moreover, it shows itself excellently both for decorative and protective purposes.
- Aluminum. Lightweight and durable material with a high degree of flexibility. The level of popularity is lower compared to rubber-metal ones, since it is more difficult to install and adjust. But in terms of protective properties it is noticeably ahead of its competitor.
- Rubber with plastic. The plastic version using rubber is aimed at protecting glass and door edges. It is better to choose models with acrylic additives. Not the most durable molding, but its low price plays into the hands of the manufacturer.
- Polyurethane. Protects the outer surfaces of doors. Good characteristics and affordable price. A universal choice for those who want quality for little money.
- Vinyl. Rarely used for decoration. And in general, such a molding can only be mounted on a bumper. It has no special advantages.
- Rubber. Rubber moldings are simply placed at the joints where water, moisture and snow potentially penetrate. They will also be a good solution for connecting the body to the door. Can be black or made in another color. Dark ones are universal, and therefore the most popular.
- Film moldings in rolls. They are also classified as moldings, and very popular ones at that. Installed to protect against water. But, to be honest, it’s better to take rubber molding instead.
They also sell very beautiful chrome parts. But chromium is used as a coating, and is not made entirely from this expensive material. Although, for sure, with a huge budget and an expensive car, finding pure chrome linings will not be a problem.
How are these elements fastened, you ask. Before gluing moldings, I would advise you to find out how to remove old elements.
This is relevant for those who want to change old worn-out moldings with their own hands, but do not know how to remove these protective and decorative things.
What to stick on the door
It is especially nice that to install the molding you do not need to drill holes in the body and other parts of the car. These elements are easily installed in place using adhesives.
However, you should not use regular Moment glue for these purposes. It does not bond “non-breathing” surfaces together well. This molding will fall off very soon. And it’s good if you notice this before you move far enough from the place of loss.
Specialized cyanoacrylate adhesives have proven themselves best in this regard. They firmly hold the car's overlays. The only negative: if you were careless during the installation process and spilled a few drops of product on the paintwork, it will be quite difficult to remove them. Most likely, you will have to resort to the help of special removal compounds or even the services of auto repair shops. Therefore, be extremely careful while working.
cyanoacrylate glue is the best tool for installing moldings
An alternative to adhesives can be conventional automotive sealants. As a rule, they are used when installing parts on windows, but they are also good for other parts of the car.
The sealant will reliably hold the car's coating and molding together.
Another option is to use “liquid nails”. However, when using them, you will have to hold the molding tightly pressed against the door for a long time. Think in advance how you will fix the part.
Liquid nails are good for gluing molding
Some motorists use double-sided tape. This method has a right to life, but it is better to play it safe and add a couple of drops of glue. This way you will be sure that the molding will not blow off when driving fast.
Double-sided tape is best used together with glue
Dismantling
If the appearance of the old molding in the area of the hood or side doors only causes tears, you can remove it and install a new element. But there are also parts that can be updated by repainting.
I think there will be no problems with how to paint the molding. Take cleaning products and detergents, remove all dirt and apply a coat of paint.
But if you need a full replacement, then answer the first question - how are the moldings fixed. When using glue, two dismantling methods are used.
- Heating method. You will need a regular household hair dryer. It is better for construction workers not to heat in the area of the paintwork, otherwise it may be damaged. Then you will need either a wider molding or several hundred dollars to repaint the body. The molding should be heated at approximately 40 degrees Celsius. Most adhesive compositions lose their adhesive properties due to such heat, and therefore you can easily remove the molding manually after a few minutes of gradual heating.
- Solvent method. It is considered safer, but also more expensive. This method protects the paint from exposure to temperature. Plus, if you're just removing the moldings to repaint your car and then put them back in place, the heat could simply ruin the trim. Take a soft cloth, moisten it with solvent and apply it to the joints. After a few minutes, the reaction will begin and the glue will easily release the pad.
But sometimes moldings are mounted using special tendrils. They fit into small holes in the body and are therefore tightly fixed.
If you bother, then you will have to remove the inner lining and trim the antennae from the inside. But when planning to throw away these pads, just break off the antennae and that’s it.
How to install
If you have already decided on the type of molding and even purchased it, and also found a suitable adhesive, it’s time to start installing the part. Fortunately, this process is not at all complicated.
- Wash your car thoroughly. You should not limit yourself only to the area where the molding will be attached. Dust from neighboring parts may accidentally fall into the cleaned area and ruin everything for you.
- Determine in advance the location where you will install the molding.
- In order to ensure better adhesion between the door surface and the adhesive layer, degrease this area of the door by wiping it with microfiber soaked in a special product.
- In the same way, degrease the side of the molding that will be attached to the car.
- Apply a thin bead of adhesive to the molding. You should not use too much of the product: excess glue squeezed out from under the glued part can ruin the appearance of the doors.
- Place the molding evenly on the selected area and press. Some types of products require long fixation. The instructions for use will tell you about this.
- If drops of product still appear from under the molding, remove them before the glue has time to harden.
Do not touch the grease-free surface with your bare hands, even if they are absolutely clean! To be on the safe side, you can wear medical silicone gloves.
Video: how to glue molding to a car door
That's all! A protective and decorative trim, selected according to your preferences and principle of use, is installed on the car.
Installing a molding is such a simple process that it’s simply ridiculous to go to specialized automotive workshops for it. The only thing you can do wrong is to glue the part not perfectly level to the ground, but with a slight bevel. To prevent your eye from letting you down, make discreet notes or call an assistant. Even if something goes wrong, the cover can be removed. This is done under the influence of hot air, which dissolves the adhesive layer. And if you are not indifferent to the fate of your paintwork, do not delay the process of installing moldings.
How to choose the right pads and how they differ
Automotive stores offer two types of overlays depending on the task that the element solves. This is a decorative decoration and body protection.
Decorative molding is necessary to make the body look as impressive as possible. The part copes with this task fully. But the protective function here is poorly implemented. If there is a significant impact, the pad will break.
Decorative designs are used more for tuning. They can be additionally equipped with various reflective inserts, LED lighting, and LED strips.
Protective pads are made from the following materials:
- Plastic;
- Vinyl;
- Metal-rubber composition;
- Aluminum;
- Rubber-plastic.
The protective molding does not have such a spectacular appearance; more often it is decorated with an inscription with the car brand. Sometimes such elements can be additionally equipped with a chrome strip along the entire length.
Depending on the class of car and the financial capabilities of the owner, moldings are selected according to the quality of materials. Aluminum parts are of the highest quality. But more often they buy plastic options - they are the most affordable. One of the disadvantages of plastic is its short service life. Rubber also has limitations - in the cold winter, the material of the product freezes and breaks.
Why attach moldings to doors?
There are several reasons why motorists have the desire or need to install decorative stickers, including stripes, on car doors:
- The moldings were glued on by the car manufacturer, but began to fall off due to a long service life or came off due to external mechanical influence (for example, an accident).
- There is a need to repaint the door or the entire body. Then all the external elements are torn off and then re-glued.
- When you need to change old stickers that have lost their appearance.
- At the request of the car owner, seeking to improve the appearance of his “iron horse”.
Loose edge of molding
Important point. Moldings installed on doors do not protect them from corrosion, and if they are applied incorrectly, they even contribute to its formation under the paintwork. But in some cases they are used by car resellers to hide body defects during the sale.
Simple plastic covers on a car
Sticking protruding decorative elements provides the following advantages:
- the car looks more elegant and prettier;
- in a tight parking lot, passengers of a neighboring car will not damage your paint if the doors are opened carelessly; the molding will take the blow;
- the same thing will happen in a cramped garage if you suddenly open the door.
Having a decorative and protective function, plastic or rubberized strips create some inconvenience when washing a car. All the dirt flowing down from above along with the water tends to linger at the junction of the body with the molding and has to be washed thoroughly. That is why it is important to properly glue the latter to the surface of the door.
Car with chrome moldings
How to attach the seal
To install a seal on their car, car owners have tried many types of glue, including “Moment” and “Montazh”. They, despite their adhesive ability, greatly disappointed drivers, as they did not provide sufficient adhesion to the surface.
Among the options that are popular among car owners today are:
- Liquid Nails. When using, they require strong pressure, as well as preliminary degreasing of the surface. Able to glue the molding tightly. To make their work easier, some car enthusiasts resorted to this method to ensure pressure: they placed the car close to the wall, glued a seal and propped it up using improvised means (for example, wooden blocks). You need to work carefully so as not to damage the body.
Liquid Nails
- Glass sealant. They can be used to glue the windshield. The sealant must be applied within an hour - for this you can use mounting tape (it will not leave marks on the body).
Glass sealant
- Cyanoacrylic glue. It will glue the seal effectively and for a long time, but you need to carefully monitor its quantity: drops that appear due to the molding will subsequently be difficult to remove without damaging the car’s paintwork.
Cyanoacrylic glue
Before applying any adhesive, clean the surface with a degreaser and remove any traces of previous adhesive, if any. The glue can be removed from the molding using fine sandpaper. White spirit or gasoline is suitable for the car body.
Recommendations for selection
Covers for car doors are conventionally divided into 2 groups - decorative and protective and purely decorative. The latter are used as tuning elements and are equipped with a reflective strip or an inserted LED strip. Formally, they also protect the paint from mechanical damage, but upon impact they fail themselves, so they are used by car enthusiasts quite rarely.
Decorative and protective moldings are made from various materials and their combinations:
- plastic, in particular vinyl;
- rubber-metal parts;
- aluminum;
- combination of rubber and plastic.
Set of plastic door trims
Reference. Often, some kind of inscription is applied to the surface of the linings, for example, indicating the car model. Another common option is a chrome insert along the entire length of the product.
Most often, inexpensive plastic elements that have good protective properties are installed on cars. Their disadvantage is their limited service life, since the plastic “dumbs” over time due to temperature changes, begins to warp and lag. Therefore, vinyl moldings are often attached not only with glue, but also with special latches inserted into the holes provided by the manufacturer.
Chromed aluminum moldings
The most durable and durable are aluminum and rubber-metal linings, although they are clearly more expensive than plastic ones. Products made of rubber and plastic are installed on some budget brands of cars by the manufacturer, but they cannot boast of durability and long service life. Such moldings are purchased when there are no other options for a specific car model.
When choosing decorative and protective overlays, you need to take into account the following characteristics:
- how well the trim fits the doors of your car in terms of length and dimensions of the recess (if there is one);
- product material;
- compatibility by installation method (adhesive or fasteners);
- Does the molding visually match the color of the car?
Rubber-metal linings for VAZ 2101-07
Advice. Consider your personal wishes for the appearance of decorative strips last. The main thing is that the part fits well and is made of high-quality material that will not warp or come off after 2-3 months of driving.
Installation procedure
Before starting work, you need to remove the old molding, prepare the mounting area and begin installation.
Work is carried out at temperatures above 10 degrees Celsius. In the warm season, you can install it outside; in winter, you should choose a special insulated garage, box or auto repair shop. At low temperatures, the quality of adhesion will be extremely low.
We recommend watching a video on installing moldings:
Dismantling old elements
If the trim begins to move away from the door, then gluing it is pointless. It is recommended to remove the molding and attach a new or old one, but maintaining a tight seal.
To remove you will need:
- Powerful hair dryer.
- Long iron ruler.
- Drill with a rubber attachment for cleaning the surface.
- Masking tape.
- Degreaser.
- Old rags.
Wash and dry the vehicle.
Dismantling steps:
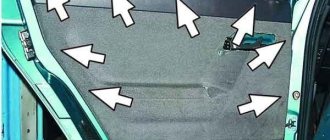
- Painting tape is applied to the areas around the trim to protect the paint.
- Using a hairdryer, heat the molding evenly, starting from the peeling area.
- Place a ruler vertically under the free edge.
- Slowly move the ruler under the pad, periodically warming it with a hairdryer.
- When finished, remove any remaining tape.
- The remaining glue is sanded off with a drill and rags soaked in degreaser.
The fastening design has latches that will interfere with movement. Move the ruler a couple of centimeters forward and continue moving, periodically warming it up with a hairdryer. The clips are easily removed after removing the adhesive layer.
The surface of old linings requires cleaning if reuse is planned.
Preparation of tools and surface
Maximum set of tools:
- Roulette.
- Marker.
- Knife for cutting paper.
- Hair dryer.
- Masking tape.
- Degreaser.
- Antistatic wipes.
- Double-sided tape.
In the summer, you can heat the body by placing the car in direct sunlight. If there are special recesses for the linings, then markings are not required.
The surface is pre-cleaned and degreased. The area with peeling paint and traces of rust must be treated, the coating removed, painted and a protective layer of varnish applied.
Installation of prepared moldings
If the manufacturer does not initially provide for the presence of linings, then the operating technology is as follows:
- Carefully inspect the lower part of the door; installation of moldings is carried out on convex areas. You need to measure the required distance from the highest point to the bottom edge of the door.
- Make a mark on the resulting distance on two sides - in front and behind the door. Masking tape will visually limit the area of work.
- Treat the mounting points with a degreaser. On one side of the tape you need to remove the protective film.
- Heat the area for mounting the molding, apply a decorative element, and gently press down for good adhesion to the tape.
- Press evenly along the entire length of the lining, remove the protective layer of masking tape and proceed with installation on another door.
We invite you to watch a video on the technique of installing molding:
It is necessary to work with double-sided tape carefully; after unfastening the incorrectly glued molding to the car, it will be impossible to glue it a second time. Moisture will accumulate between the spaces of the tape, so the piece should always be in one piece. Use only a new roll or make sure there are enough leftovers.
What is the best way to glue moldings to a car?
Motorists who have tried to install moldings with ordinary glue such as “Moment” or its analogues know well that the result is disastrous. From exposure to moisture, vibration and temperature changes, decorative elements begin to come off literally after 1-2 months. Therefore, to install door trims, it is necessary to use a special adhesive that is resistant to numerous external influences. The most popular options look like this:
- sealant for gluing car windows;
- construction adhesive called “liquid nails”;
- cyanoacrylic glue;
- Double-sided tape.
Sealant used for gluing auto glass
Note. In practice, car enthusiasts often combine double-sided tape with one of the presented adhesives. According to reviews, the results are positive, the moldings hold tightly.
While the sealant hardens, the moldings are held on with tape
Glass sealant is a fairly effective product, but it requires fixing the parts to be glued for a long time. During the drying period, the strips must be securely attached to the doors with masking tape, which does not damage the varnish surface.
Liquid nails and tools for applying them
With “liquid nails” the situation is different. When using this composition, it is important to ensure good clamping of the element over the entire plane, which is not easy to achieve in practice. You need to come up with some kind of supports or press down the product with your hands, but this is not very effective. Cyanoacrylic glue has no such disadvantages and is quite often used for installing decorative parts, but it must be handled carefully to avoid drips on the body. Once hardened, they are difficult to remove without damaging the varnish surface.
Important point. Any liquid compositions applied to the back side of the molding for gluing do not always ensure the tightness of the internal cavity of the element. In some place you did not apply enough glue and there were small pores there, where in the first rain water would get in, promoting corrosion under the lining.
This is how rust paint swells under the decorative elements.
Double-sided tape is good because it is distributed evenly over the surfaces to be joined and creates a sealed joint. The reliability of the connection depends only on the quality of the adhesive material and compliance with the installation technology. Therefore, on sale you often find moldings with strips of adhesive tape already glued on, or it is included with the products. In addition, double-sided tape can be removed without damaging the paintwork.
This is what double sided tape looks like
Advice. If you do not know how the old trims are secured to the doors of your car, then do not buy new ones until you remove them. It may turn out that the plastic strips are held on by additional latches, which are visible only when the door is disassembled.
No. 10. How to remove liquid nails?
When installation is carried out carefully and slowly, the likelihood of glue getting on the front side of the surface is low. If this still happens, then try to wipe off the glue as soon as possible . While the composition has not yet dried, you can remove it with a damp sponge or mineral-based solvent. When the glue has completely dried, special cleaners or a rough mechanical method using a scraper will help, but you must act very carefully so as not to damage the surface. Another way out is heating to a temperature of 55-60 degrees, for example, with a hair dryer - the nails will turn into a liquid state and they can be removed much easier.
The most important thing is to be careful when purchasing and not to trust tempting offers from little-known manufacturers. At best, the glue will be weak; at worst, it will cause harm to health.
How to remove old moldings
There are several ways to dismantle decorative trims. In this case, both the element and the car’s paint will not be damaged.
This can be done with:
- Heating with a hairdryer. You need to heat it up to 40 degrees. Usually at such temperatures the glue loses its properties, the connection weakens, the element is removed without damage to the paintwork;
- Special solvents. These liquids are sold in auto stores and are designed to dissolve adhesives. In order to remove the old molding, you need to apply liquid to the fabric and wipe the areas around the part.
Then it is important to remove any remnants of old adhesives from the door. The same solvent will help with this. After using solvents, you need to clean and degrease the treated area.
Decorative trim made of aluminum or stainless steel is attached using special clamps. Regardless of the material of the clamp, you should not try to pry them off with screwdrivers or other unsuitable tools.
As a result, you can only ruin the molding or scratch the door. A special device for dismantling such clamps will cost less.