How to repair the heated rear window with your own hands (photos and videos)?
Good afternoon. Today we will talk about how to repair the heated rear window. Traditionally for our site, the article contains a lot of photos and videos and is a step-by-step troubleshooting algorithm.
How does glass heating work?
I think everyone remembers physics from high school. When electric current flows through a conductor, it heats up. It is on this principle that the heated rear window works.
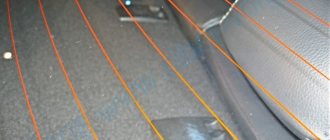
If you look closely at the glass, you will see contacts and power supply wires on the sides.
When voltage is applied to these terminals, an electric current flows through the heating filaments and heats the glass, preventing it from fogging up.
Accordingly, glass heating does not work in only two cases:
- heating threads are faulty
- no voltage at terminals
How to repair heating if one or more heating threads are faulty?
The error looks like this:
For repairs we will need:
- sandpaper with a number from 1500 to 2500, 1 sheet with any grit. It is needed to remove oxides and varnish from damaged threads.
- alcohol, preferably isopropyl (we will use it to wipe off dust from the glass and degrease damage)
- napkins, microfiber, cotton swabs or rags (for wiping).
- electrically conductive glue, it is not always available in stores, so if you are willing to wait, I recommend ordering it directly from China (we will use it to restore damaged threads).
Repair procedure:
We carefully inspect the faulty heating filaments and look for damage; they usually look like this:
We carefully clean the damaged areas with sandpaper, trying not to touch the glass; we clean only the heating filaments themselves, and then next to the damage. If you rub the glass itself with sandpaper, it will become matte, and it will not be possible to polish it, since the heating threads are not applied to it.
We wipe the cleaned surfaces with alcohol using a cotton swab. At the same time, we will remove sandpaper dust and degrease the surface.
Carefully apply electrically conductive glue to the damaged areas. In order to apply the glue directly and not in a spot, it is better to use electrical tape or masking tape. As shown in the video at the end of the article.
Apply electrically conductive glue with a brush.
We wait for the glue to dry, check, make sure that everything works and enjoy the money saved...
What if the heating does not work at all?
If the heating does not work at all, there are two options. Or all the heating threads are faulty (this is unlikely, even on cars that are 30-40 years old, only one or two heating threads heat up)... Or the wiring is faulty.
A person without special education can only check 3 things:
- Fuse
- Power button
- Heating relay
The location of these items can be found in your vehicle's owner's manual.
If, after checking using the replacement method, your heating still does not work, it is better to contact an electrician at a service station. service.
How to repair the heating if the windows are tinted?
I don’t want to upset you, but most likely the answer is no! Since to apply electrically conductive glue, you will have to remove the tint locally (locally) in any case. I'm not sure if it's possible to cut a piece of tint from just a damaged thread. In any case, you will end up with an unsightly hole in the tint...
Therefore, if you need to repair one or more heating filaments on tinted glass, the tint, unfortunately, will have to be removed.
If you are too lazy to read and are used to watching, here is a short video about repairing heating filaments:
Conclusion.
As you can see, repairing heated glass is not difficult, of course, with due care and desire.
Obviously, the simplest option is not to repair the threads, but to replace the glass, but think about how to sell the car, because if the buyer sees glass from different years of manufacture, then at least they will tell you that the car was broken.
That's all for me today. I hope that you have no questions about how to repair the heated rear window. If you have any questions, or if you want to add to the article, write comments.
Heated rear window. Repair without film.
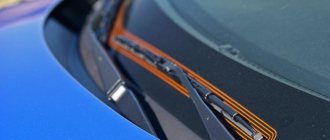
How to determine the exact location of thread damage? First of all, when you drive, you turn on the rear heating lines. You can see the place of the rupture with the naked eye.
First, degrease the rupture area with solvent. Then apply two strips of electrical tape. One piece of glue is exactly under the line. And the second one is above the line. Under no circumstances should the electrical tape touch the heating filament.
The more carefully you do it, the less noticeable the repair marks will be!
After you have applied the tape, use sandpaper. Fold the paper in half. Then, carefully clean the heating thread at the bend, but do not overdo it. After you have cleaned, degrease again with solvent.
We take conductive glue and apply it to the damaged area. With a full thread of 10 mm in one direction and 10 mm in the other.
Once you have applied a thin layer of glue, remove the excess with a knife. Simply running the knife along the electrical tape (as if leveling it).
And now leave your work for a day so that the glue dries. A day later, you must still use the same stationery knife to walk along the heating line. First from the top side of the line, then from the bottom.
With this procedure, you separate the adhesive on the heating line from the electrical tape. So that the tape would be easy to remove later. If you did everything correctly, you can safely remove the electrical tape. You get a perfectly smooth, working heating thread.
I recommend using electrical tape rather than tape. The tape is then difficult to remove from the glass and often leaves behind glue.
If you do everything correctly, the heating lines will work perfectly!
Operating principle and circuit of rear window heating
As mentioned above, heating can fail on any car, regardless of class, make and model. Moreover, all types of rear window heating are similar to each other. This means that heating the rear window of a VAZ will not differ much from a similar solution on any foreign car.
The general rear window heating circuit includes the following main elements:
- heating switch;
- heater fuse and relay;
- heating threads;
When the driver presses the heating button, voltage goes to the relay winding, then the relay is activated and its contacts close. After connecting the relay terminals, the electric current goes to the heater, passes through the heating filaments (connected in parallel), after which the current returns through the car body to the negative terminal of the battery.
Symptoms of a problem
The rear window heating filaments break after the vehicle has been in use for a long time. Mechanical damage also leads to their breakdown. As a result, the driver is faced with a lack of heating of the glass fragment. This provokes the appearance of condensation during significant temperature fluctuations inside and outside the cabin. This usually happens during the winter season.
It is worth considering that fogged glass significantly reduces visibility of the road. As a result, the risk of road accidents increases. It is quite possible to cope with the problem with your own hands. To do this, you should use a special adhesive or paste. In order to identify a malfunction in a timely manner, you should pay attention to some signs.
See also
Description and technical characteristics of KS glue, instructions for use
Slow defogging of glass
The appearance of a defect in the structure of the threads is indicated by slow defogging of the glass.
Horizontal stripes on glass
If the heating system is damaged, the glass becomes covered with horizontal streaks of fogging. There is also a risk of icing.
No heating
If a defect appears, the heated rear window may disappear completely.
How to find a broken rear window heating filament
Inspection of thread performance in winter
Repairing the rear window heating system on a car begins with searching for specific fault locations. When some threads do not work, you need to clearly understand where the contacts are broken in order to fix it.
The easiest way to find damaged areas of metal heating threads on the glass is when it is raining or frosty outside. In this case, just turn on the heated rear window and you will immediately see which threads are not heating. However, it is already too late. Washing will help monitor the health of the system. Each time after such a procedure, use the heating to dry, and as soon as you see that it does not dry out equally, it’s time to use other methods available to everyone.
Visual check for clearance
This method is convenient when one or two threads are damaged and is suitable for initial inspection. We turn on a flashlight (on a phone or a regular one) and, highlighting the glass, carefully examine where the damage appeared. We mark it with a marker or a piece of electrical tape or masking tape. The good thing about this method is that it does not require any special skills or tools. But it does not allow you to detect very small tears or abrasions.
Inspection with a magnifying glass
It can be considered a modified version of the first method for cases where the break is very small and difficult to find. Take a magnifying glass (by the way, you can install it as an application on your smartphone) and inspect the threads for breaks. The disadvantage of this and the previous methods of searching for places of damage is that it is difficult to find a burnt but undamaged thread.
Heated rear window. Repair with film.
Place a ruler under the heating thread and carefully cut through the film. Do this procedure over the heating filament as well.
Once you have done this, you need to make a small cut. Make an incision directly at the site where the thread is damaged. This will make it convenient for you to pick up the film on both sides.
Remove unnecessary pieces of film (this will not be visible from the outside). Then do the same as when repairing glass without film. Apply electrical tape, apply glue, remove excess glue with a knife, etc.
Doesn't work, what's the reason?
Actually, there are only two main reasons, and both of them lie in the power system:
- Fuse. YES it can really burn out. This happens for various reasons, maybe it’s just a minor short circuit and that’s all. Thus, your heating will not work completely. You need to find the fuse and check it . This is the first and mandatory step.
- If it is intact, then we need to check the voltage on the wires that go to the main “buses” (wide side strips). As a rule, they have ordinary metal contacts. We just take a multimeter and measure it, if there is voltage and it’s about 12 Volts, that means the power is suitable here, everything is fine.
- The thin lines themselves. To be honest, they can’t all burn out at once. As a rule, from one to three, or at most four, “threads” burn out. Therefore, if part of your window comes off (from fogging or ice), but part does not. It is the non-working threads that need to be looked at.
- Examine this thin strip and you will see the break point. This will be the burnt part, there may be a little black around it (although the thread is originally brown). Also, the thread will seem to open, this place needs to be connected in order to restore functionality.
On my own behalf, I would like to add that the fuse rarely lights up, mostly it is a break in the “threads” of the glass; they need to be restored.
Identifying the location of damage
To promptly identify problems, you can use available methods.
Visually
The causes of failure can be identified visually. A faulty fuse will be indicated by a non-functioning rear window defroster indicator when the button is pressed. If the indicator is on and the heating filaments are not functioning, you may suspect defects in the relay. Loss of contacts in the system provokes delayed sweating.
If inspection of the rear window does not help to identify a broken heating line, it is worth proceeding with complex procedures.
At first, it is recommended to simply turn on the heating. In the area of no heating, you can see a characteristic stripe.
Voltmeter
To use this method, you need to take a voltmeter and activate the heated rear seats. In this case, it is recommended to place one dipstick on the ground of the car, and wrap the second one in foil. After this, you should slowly move along each line until the middle is reached. The standard voltage should be 5 Volts. With a lower value, we can say that the break area has been found. Increasing the value to 12 Volts also means a break.
There is also another method of using a voltmeter. To do this, it is recommended to connect the plus terminal to a specific heating contact. The second probe should be moved smoothly along the line. This must be done from the side where the negative terminal is located. A decrease in voltage indicates a break zone.
Ohmmeter
Experts advise using an ordinary device with arrows. When turning on the device, it is recommended to select the mega mode. The probes should be connected to the heated rear window terminal. Ordinary cotton wool is used as a connection element. It is moistened in distilled water. After this, it is recommended to draw along the line and evaluate the reaction of the arrow. It is she who will show the cliff area.
Symptoms of a malfunctioning rear window defroster
This malfunction is almost always detected at the moment when there is a great need for transparency of the rear window.
The presence of such a breakdown can be determined by the following signs:
- The glass defrosts too slowly.
- Horizontal streaks of fogging or icing appear on the glass.
- There is no heated rear window at all.
In the first two cases, only partial damage to some threads is possible, which can be restored using electrically conductive glue.
If the rear window does not heat up at all, it may indicate a problem with the wiring or the defroster switch.
Visual inspection and diagnostics of heater tires
You can begin repairing the rear window defroster only if the location of the damage is identified.
How to fix a heated rear window with your own hands
p, blockquote 32,0,0,0,0 –>
To repair the heated rear window, you should purchase a special conductive adhesive or ready-made heater repair kits. It is necessary to carefully read the repair technology, which should be described on the packaging or attached instructions in Russian. The success of repair work is determined by strict adherence to the technology specified in the instructions.
p, blockquote 33,0,0,0,0 –>
Video - do-it-yourself repair of rear window heating threads:
p, blockquote 34,0,0,0,0 –>
p, blockquote 35,1,0,0,0 –>
Adhesive Manufacturers
Adhesive for conducting current is produced by the following manufacturers, whose products you can find on the market:
- Keller . It produces Kontaktol, a set that contains tiny particles of silver. Presented as a one-component mixture, low-toxic, hypoallergenic, waterproof, heat-resistant;
- Loctite . Sold as a set with a stencil, applied using the brush included in the set;
- Russia . It produces Kontaktol, which is applied to the surface in a layer of 0.2 mm. Withstands temperatures up to +110 degrees. It has low elasticity and is water resistant.
Russia conductive glue Kontaktol 2g