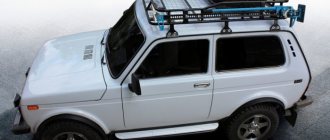
Imagine that you are going camping or fishing for several days. You take a lot of things with you, but all of them do not fit into the main trunk of the Niva. What to do in this case? The Niva Expedition Rack will help you with this.
But don’t rush to immediately run to the store and spend a lot of money on the purchase. If you have enough time, you can design an expedition rack for the Niva yourself.
Advantages and disadvantages
An expedition rack has many advantages and several disadvantages.
Advantages:
- When properly constructed, it has a large capacity.
- High strength (depending on material).
- Frees up space in the car interior.
- Serves as a good decoration for your car
Flaws:
- Deterioration of the aerodynamic qualities of transport.
- Inability to protect things from weather conditions.
Progress
Firstly, without knowing certain measurements of the machine, it will not be possible to build this installation. It is necessary to take measurements of the car roof and transfer them to the drawings. The next step is the process of assembling the installation itself: First, you need to weld the frame of the future trunk from pipes. The shape can be any (both round and square) as desired. For greater strength, thin plates are used, which must be installed inside the frame. To add aerodynamic properties, a trapezoidal structure is welded, the angle of inclination of which is 35-40 degrees.
A grinder is used to cut out seven-millimeter triangular cutouts. After this, the trapezoidal structure is installed on the frame.
Then the sides are attached to the frame, the height of which is at least seven centimeters according to the drawing. Bolts with screwed-in studs are screwed into the holes drilled earlier. To secure the crossbar, bushings are screwed in, and a part of the pin is attached to the side and back.
How to make a trunk with your own hands
Many motorists think about how to make a trunk. After all, it is better to transport large-sized and inconvenient things for transportation in a special compartment, and the purchase of such structures is quite expensive.
It’s not difficult to do this kind of work; you just need to follow a number of sequential steps:
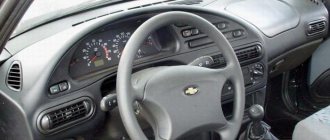
- Preparation. Depending on whether the trunk is installed on a Chevrolet Niva or on a classic model, the dimensions of the trunk also differ. Therefore, first of all, measure the roof and determine the locations of future supports. Then select the main parameters, decide on the future design: think over the mounting locations, calculate the frames and components. Draw up a drawing of the platform with data related to the technical specifications for the vehicle;
- production of a supporting frame. Cut the racks and weld them into a rectangle, and attach the rods to the middle of the resulting frame. Add a few more stiffeners made of professional metal to the inner plane at equal distances. You will receive a lattice frame with parallel crossbars;
- strengthening the structure. Weld small sections of profile pipe inside the frame so that square cells are formed;
- improving the aerodynamic qualities of the structure. Weld a trapezoid-shaped structure of selected dimensions to the front part: its base should be equal to the width of the platform, and the smaller part should be chosen arbitrarily. To make a grinder, divide the profile pipe into sectors, and then heat and bend to obtain the desired shape. Treat the corners with gas welding and connect them to the platform. At the end, install 2 – 3 jumpers;
- production of boards. Make the side trapezoidal crossbars according to the principle described above. Makes sure that the angle of inclination of both trapezoids is the same. Weld sections of studs on the front and back sides, and a sleeve at the obtuse corner of the trapezoid. Pass the ends of the studs into the bushings and weld again;
- attachment to the main frame. Drill holes at the points intended for supports and reinforce them with bushings. Insert them into the drilled grooves and weld them to the metal base. Drill several grooves in the profile with a diameter of no more than 10 mm, insert a threaded rod into each and weld them. Cut the liner to the required length and secure with threads;
- giving a presentable appearance to the trunk. Clean the platform from scale, remove burrs, degrease and prime. Wait a day and cover the surface with a layer of paint or enamel.
This device can be equipped with additional accessories - for example, headlights or load securing straps. They can be installed according to your own developed projects. However, it is important to take into account the technical capabilities of the car, otherwise its operation may be disrupted.
We improve aerodynamic qualities
To do this, it is necessary to weld a trapezoidal structure (a kind of arc) to the front part of the security device. The size of its base will be equal to the width of the welded trunk body, and it is recommended to make an overlap along the edges of 5 cm. The smaller part of the finished trapezoid can be arbitrary, and the angle of inclination should be 35-40 degrees.
At the bend points, it is necessary to cut out triangular sectors with a grinder, so that a jumper 5-7 mm long remains to the end of the profile. After this, the structure must be heated and bent so that a trapezoid emerges.
After this, the resulting structure is welded to the platform. To strengthen the frame, you can install 2-3 removable jumpers on the trapezoid side. To secure the sides, you need to make holes into which special bushings of the required diameter will be inserted. Weld them in such a way that the frame does not begin to bend when the bolts are tightened.
Next, we make the sides themselves. To do this, you need to cut 8 racks about 6.5 cm long.
To secure the studs:
- drill 2 holes 8 cm each;
- insert pins into them;
- weld the parts;
- cut off the required amount of thread from it;
- screw the studs into the resulting holes.
Also interesting: Why do headlights sweat from the inside and what to do about it
Next you need to construct the side upper crossbar. Bend the resulting part at the front in the same way as the front frame. A paired element is made using the same principle. To secure the front top rail, weld a bushing to the bend of the side rail. But a piece of stud is welded onto the front beam. The rear crossbar is arranged in exactly the same way.
Read news about the new Niva
- How to install fog lights on a Chevrolet Niva
- How to install fog lights on a Chevrolet Niva
- LADA Niva – Operating manual – Official LADA website
- UAZ or Niva - which is better, car characteristics and features ::
- FROST car air conditioners // Online store // Prices // Air conditioners for cars Lada VAZ, VolksWagen Polo, Daewoo Matiz
- Electrical diagrams of Chevrolet Niva VAZ-2123, wiring harnesses
- Expedition rack for Niva 2121 drawings
- How to make an expeditionary trunk for a field
How to install a trunk
Before installing the roof rack on the Niva, it is important to clean it of dust and dirt. You can also coat the car with protective compounds. Then wrap the parts and fasteners with insulating materials. After this, follow the following sequence of actions:
- drill slots for the trunk in the roof;
- insert the key into it and turn 90 degrees;
- remove the support cover and install the support fasteners into the arc slot. To do this, use the cam, pressing it upwards towards the arc;
- try on the arch on the roof and, if necessary, adjust its position;
- secure the supports to the arches so that the support pads are located as close to the center of the car as possible;
- Use an L-shaped wrench to tighten the fastenings;
- insert the rubber gasket into the groove of the arc;
- close the arc on top with a plastic plug.
After installing the roof rack on the Niva is completed, be sure to check the reliability of the fastenings and the rigidity of the structure. If at least something makes you distrustful, it is better to repeat the operations.
Budget models
This group lists inexpensive luggage sections costing up to 1,700 rubles. Despite the low price, the models proved themselves to be practical and received the greatest number of positive reviews from users.
3rd place - Atlant car trunk on Chevrolet Niva steel (8914)
Design of 2 transverse slats with fastening to doorways. The Economy series is suitable for transporting lumber, rolled metal or inflatable boats in an inflated state. Some owners complain that due to the incorrect thickness of the supports, the upper frame of the door rests against the bracket, and, as a result, the paintwork of the body is damaged. To eliminate the defect, you have to sharpen the supports with a file, after which the defect disappears. At a speed of 80 km/h a hum appears. Otherwise there are no complaints.
Atlant trunk for Chevrolet Niva steel (8914)
Table 1. Characteristics of the roof rack "Chevy Niva" Atlant (8914)
| Developer | "Atlant" |
| Material | Steel |
| Weight, kg | 5,6 |
| Profile parameters, mm | 20 x 30 x 1,250 |
| Load capacity, kg | 75 |
| price, rub. | 1 350 |
According to user reviews, the luggage section copes well with transporting cargo up to 125 kg when it is evenly distributed across the slats.
2nd place - Atlant car rack of the Economy series on the roof of GAZ, VAZ 2121 Niva (20x30, aluminum)
A universal system for transporting goods on vehicles without roof rails. Light alloy profile pipes are used as slats. The roof rack is attached to the roof of a Niva 2121 or GAZ car using metal clamps to the gutters through rubber seals. Supports and clamps made of steel 2 mm thick. The design of the system allows you to transport long items and install car boxes.
Car rack Atlant series "Economy" on the roof of GAZ, VAZ 2121 "Niva"
Table 2. Characteristics of the Atlant car rack of the Economy series
| Developer | "Atlant" |
| Material | Aluminum |
| Weight, kg | 4,9 |
| Profile parameters, mm | 20 x 30 x 1,350 |
| Load capacity, kg | 75 |
| price, rub. | 1 690 |
1st place - Atlant universal roof rack "Niva", "Volga" (steel 20x30)
A practical system for transporting oversized loads for vehicles with gutters. The design is based on 2 rack arches. The device is fixed in place using 2mm thick clamping mechanisms. To protect the metal surface from aggressive environments, the surface of the arcs is treated with a black polymer composition. The slats and supports are connected to each other by screws with knobs. The trunk fits on the roof of a Niva, VAZ 2101-21099, Volga car.
Atlant universal roof rack "Niva", "Volga" (steel 20x30)
Table 3. Characteristics of the Atlant universal luggage section
| Developer | "Atlant" |
| Material | Steel |
| Weight, kg | 6 |
| Profile parameters, mm | 20 x 30 x 1,350 mm |
| Load capacity, kg | 75-100 |
| price, rub. | 922 |
Rules for using a homemade trunk
Even if you rarely transport cargo in a homemade trunk, you need to periodically check its condition and the integrity of the fastening. It is imperative to do this immediately before traveling, especially over long distances. And also follow the following recommendations:
- secure the protective edging so that it does not come into contact with any of the doors;
- do not transport cargo in the trunk during the first 24 hours after installation;
- make sure that the metal brackets are not deformed;
- distribute the load evenly so that it is close to the edges;
- secure the load fairly securely;
- adhere to the maximum permissible load capacity;
- do not exceed the speed of 130 km/m;
- Do not make sudden accelerations, lane changes or braking with a loaded trunk, because in this case the center of gravity shifts and the car may behave unpredictably.
Making and installing a roof rack on a Chevrolet Niva or Lada 2121 4×4 Niva is not difficult. As a last resort, you can purchase one of the many design models in specialized stores. In any case, such a detail will greatly simplify the transportation of goods when traveling out of town, hunting or fishing.
What are the advantages
- The ability to transport a load weighing about 110 kg, without damaging the smooth roof.
- The price range is significantly lower compared to the same trailer.
- The cargo is securely secured, so there is no need to worry about it.
- You can come up with many other devices.
- Whatever the burden, it will not interfere with looking at the road when moving.
A few years ago, the choice was small; universal roof racks were produced that fit any make of car, both sedans and SUVs, and were attached using a drain. Now technology has moved forward, therefore, the choice has become more diverse and wider. You can choose a foreign manufacturer if you trust the West more, or you can try to work with domestic production.
An additional compartment for transporting things can be individual or suitable for all cars.
Advantages and disadvantages of an expeditioner
There are two types of racks designed for Niva: closed box or expeditionary. The latter belongs to the power type due to the following characteristics:
- large capacity (up to 200 kg);
- possibility of installing additional headlights and other elements.
It is also worth noting the appearance of the security officer, which looks much more harmonious on an SUV than the box, which is more suitable for passenger cars.
Almost any fastener can be installed on the expedition vehicle, making it possible to transport any type of cargo.
However, such an accessory also has a number of disadvantages, namely:
- the expeditionary trunk worsens the aerodynamics of the car;
- the cargo will be open, which is not very convenient when transporting things that should not get wet or dirty;
By and large, all these problems can be solved. For example, the aerodynamic characteristics of the luggage compartment can be improved through an improved design, and the cargo itself can be covered with polyethylene. In addition, Niva owners rarely care about aerodynamics, since for trips to the countryside or on a hike, a speed of 90 km/h will be enough (at this speed the trunk will not affect handling).
Increased noise effects are often attributed to the shortcomings of security forces, but these accusations are not justified, since with high-quality hermetic welding and plugging of the ends there cannot be such a problem.
And if we talk about the cost, then the security officer will cost the same as boxing - about 15,000 rubles. However, the latter is clearly inferior to the expeditionary option in many respects. In addition, making a box yourself will be much more difficult than making an expedition rack with your own hands, the drawings of which will be presented below.
Also interesting: Which tires to choose for Niva in winter
So, where to start creating an expedition ship? First of all, you need to decide on the material and make the necessary calculations.
Optional equipment
You can improve the functionality of the expedition rack by installing additional equipment. The type of accessories and installation method may differ and are selected individually by each motorist. Additional equipment installed on the UAZ 469 vehicle:
- Lighting. Car owners install additional lighting lamps into the structure. This allows maximum illumination of the space in front, behind and on the sides of the car at night.
- Windshield protection. Made in the form of cables connected to the trunk and the edge of the front fender of the car. When driving in the forest, branches hit the cable without touching the windshield.
- Ladder. Used for easy access to the trunk. Can be installed both at the rear and on the side of the car. At the rear of the car, the ladder is mounted on movable hinges. This allows you to open the door if necessary.
Selecting the material from which the trunk will be made
When choosing the main material for an expedition trunk, car enthusiasts often cannot decide between aluminum and steel. Both of these metals have their own pros and cons, so before you start making a security device, it is important to know that:
- Aluminum and its alloys are lightweight, which saves fuel. In addition, this material is flexible and has high tear resistance. However, aluminum will not withstand heavy loads, which is why it will not be possible to transport heavy loads in such a trunk.
- The weight of steel is much higher than its aluminum counterpart. Among the advantages of this material, it is worth noting the strength of the structure (even in a situation where the car rolls over, such a security force will be able to protect the roof from severe damage). In addition, aluminum racks are assembled with bolts, and steel ones are welded, so you don’t have to worry that the rack will simply fall apart due to shaking or vibration.
Another option is to use profile pipes with thin walls. They will cost less, and are distinguished by good strength and low weight. Stainless steel is also popular due to its ease of processing, but its weight is also “not ideal”.
It all depends on the type of cargo you plan to transport, so before making calculations, try to decide which of the materials described above is best for you.
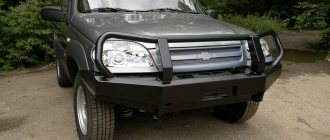
The purpose of the stairs to the Niva
When driving through a forest, the possibility of getting hit in the ass is small, but for city traffic it becomes quite real. To do this, you can install a body kit on the car that will protect the rear bumper. Among their varieties are:
- Metal pipe
- Pipe with additional corners under the headlights.
- Just corners.
- Protection with a tread - you can stand on it to, for example, get some things from the rear trunk.
- Protection with cover in the form of a grille for the rear lights.
- Ladder.
Of course, protecting the rear bumper is not the main purpose of such a ladder. First of all, it serves for the convenience of climbing to the roof, where the expeditionary roof rack is installed . In addition, this design can be used to climb higher if the car sinks into, say, a swampy area. It’s no secret that the Niva’s popularity is due to its cross-country ability on various surfaces. And they often buy it for hunting, fishing or trophy raids - off-road racing, supplementing it with the necessary tuning.
The ladder to the roof is made of metal and installed together with expeditionary roof racks . They carry cargo and equipment that does not fit in the car itself. Such a tuning element, when properly manufactured and fastened in several places, can withstand a weight of up to one hundredweight.
Calculations and preparation
When creating an expedition trunk for the field with your own hands, you need to study the drawings carefully and compare them with the dimensions of your car. Niva models are different, so take the time to measure the roof and decide on the supports.
To create a drawing of the future trunk, you need to clarify the following data:
- dimensional parameters;
- approximate frame weight;
- luggage capacity;
- estimated weight of the entire homemade external luggage compartment.
As a result, you should have a drawing approximately like this.
You also need to prepare:
- welding machine;
- grinder;
- pipes with a diameter of 20x20 mm, with a square cross-section;
- fasteners.
Also interesting: Chevrolet Niva fuse box with description (up to 2009 model year)
After you have double-checked all the measurements, you can move on from theory to practice.
A smart person won't go uphill, a smart person will go around the mountain
Since it was not possible to successfully solve the problem head-on and immediately equip the trunk with my own hands, I began to look for workarounds. Came to the following conclusions:
- The shelves must be secured in such a way that they can be easily and quickly dismantled, if possible without the use of tools.
- Purchased shelves for the trunk of a VAZ need to be modified so that the space above the arches in the trunk can be used for storing essential items.
- To eliminate misunderstandings when developing the design of the shelves, you need to make a mock-up.
We make a supporting frame
Based on the previously created drawing, make racks that need to be welded in the shape of a rectangle. Attach ponds along the inner perimeter of the frame. To prevent deflection when loading the trunk, it is recommended to add additional stiffeners made of profile metal (2-3 pieces), which will be located at equal distances in the resulting free plane.
In order to further strengthen the structure, cut small pieces from the profile pipe. They must be cut so that square-shaped cells are formed inside.
After this, you can move on to the next stage of work - ensuring aerodynamics and fixing the sides of the trunk.
Design measurements
When you have decided on the type of material that you will use for the trunk, then you next need to move on to making measurements and calculations. This way, you can clearly determine the weight of the future product, the approximate price and, of course, how much and what you need when building a trunk for a car.
It is necessary first of all to determine such indicators as the length and width of the entire roof. Moreover, you can even create a project in the form of a plan and drawings, which will include:
- The supporting panel (the trunk itself, or rather its bottom);
- Frame;
- Jumpers (special amplifiers for the structure);
- Boards.
In addition, you can come up with various additional details at your discretion. For example, this could be a special lining on the front part of the trunk, which will prevent strong resistance to oncoming air.