Fuel pressure in the car system is one of the important parameters that is used in engine diagnostics. The behavior of the car in various operating modes depends on the pressure. How to measure the pressure in the fuel system with your own hands
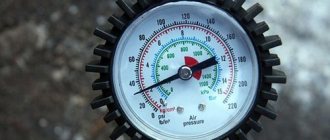
For example, buy a device to check fuel pressure. A kit with a fuel pressure gauge, adapter and drain will cost you 1400-1500 rubles. Pay 300-400 rubles to the service station and take measurements there. You can also measure the pressure in the fuel system with an air pressure gauge, which is used to measure tire pressure. Here at this point in more detail. Let's take the example of the tenth VAZ 2110 family. Otherwise, the procedure is similar to any other car. The peculiarity of pressure gauges is that their initial scale values have relative inaccuracy. What does it mean ? If the air pressure gauge has a scale of up to 16-20 atm (when the measurement limit for fuel is 5-7 atm), then pressure measurements will not be accurate due to this error, which will fall within the initial values of the instrument scale. Therefore, it is correct to check the fuel pressure with a fuel pressure gauge with a limit of 6-7 atm.
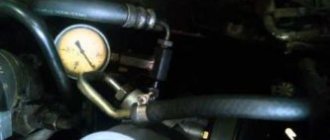
We take a pressure gauge and wrap a piece of foam (plumbing flax) under the pipe and put on an oxygen hose with an internal diameter of 9 mm. Secure with clamps. Place a rag on the generator (so as not to start a fire under the hood). Unscrew the plastic cap on the fuel rail.
If desired, you can relieve the pressure in the vehicle's fuel system. To do this, you need to remove the fuel pump fuse and wait until the running car stalls.
We put the second end of the hose on the ramp hole and secure it with a clamp. We remove the rag from the generator and start the engine. Don’t forget to cover the generator with a rag again before removing the hose from the ramp. That's it, now you know how to check the pressure in the fuel system in the field.
What pressure should be in the VAZ 2110 fuel system? 2.8–3.2 bar (2.8–3.2 atm)
How to measure fuel pressure in a system where there is no return? On VAZ 2110 with 1.6 liter engines, the pressure in the ramp is constant and amounts to 3.6-4.0 atm. Otherwise, the measurement technique is similar. Alternative ways:
It is measured at the outlet fitting of the fuel pump module - this is the one with one tube. You will need a flexible gas-resistant hose with an internal diameter of about 8 mm and a pressure gauge (you need to remove the tube and put on a hose with a pressure gauge instead). The pressure should be 5-7 atm. Close the return line, as is done on an internal combustion engine with a drain ramp, but you must turn it off again at the fuel pump itself. We pull off the second hose (double) and insert a plug into the removed hose, made, for example, from an old fuel filter (saw off the nipple from it and plug it). A single hose must be put on the pump fitting, and now the measurement must be made at the fuel rail. According to the power system diagram, everything will be clear.
Car diagnostics using fuel pressure
Problems in the operation of the car's fuel system are expressed by failures at high speeds, jerking of the car, or the car does not move when you need to accelerate sharply, and sometimes it simply stalls. Now knowing how to check the pressure in the fuel system of a car, we can diagnose the car ourselves. We can determine which component of the fuel system has failed (fuel pump, fuel pressure regulator (FPR), injectors, filters, etc.), but first we need to understand how the fuel system works: The fuel pump continuously pumps fuel while the engine is running. Excess gasoline is stupidly dumped through the RTD into the return line. The pressure in the ramp changes (increases) not so much with the speed, but at the moment of accelerating (this is clearly visible in the video), because at this moment, the vacuum (vacuum) in the receiver drops and the RTD adds pressure to the ramp. If you turn off the engine, the pressure in the ramp will slowly begin to decrease exponentially. The rate of decline (from several minutes to several hours) depends on the quality of the check valve, which is located on the back of the fuel pump motor.
When diagnosing, pressure measurements in the system are made in different ways:
Measurement with the ignition on, how much the needle jumps Measurement at XX Measurement with the tube off the RTD Measurement with the return line pinched
What is the permissible pressure in the fuel rail? The bigger, the better. You can't spoil porridge with oil. An example when there are no problems in the fuel system: when idling the pressure is 2.5 atm, when removing the tube from the regulator it is 3.3 atm, and when the drain pipe is pinched it is 7 atm. When accelerating, it jumps up to 3 atm and is restored back to 2.5 atm. How to determine the status of the fuel pressure regulator (FPR)? connecting the fuel pump without starting the engine. There are two ways to determine whether the RTD is faulty:
If the pressure with the engine not running with the fuel pump turned on is below 2.8 atm. To turn on the fuel pump directly without starting the engine, then on the diagnostic block we close the closest contacts to the gear shift lever. Turn off the fuel pump. The pressure in the ramp should drop by about 0.7 atm and remain at this level. If the pressure in the fuel system does not hold and immediately drops to zero, then the RTD or the pump check valve is faulty (located on the back side of the fuel pump motor; it is not advisable to change the pump because of it). Do not rule out cracks in the fuel line or poor condition of the injectors (gasoline flows inside). How to determine the condition of the fuel pump? In order to determine a fuel pump malfunction, you need to check the fuel pump “at the wall” (zero supply pressure or “at the plug”). In simple terms, this is the pressure that the fuel pump develops. It is by this parameter that the service life of the fuel pump can be determined. As the pump wears out, this parameter gradually decreases. When the pressure is “into the wall”:
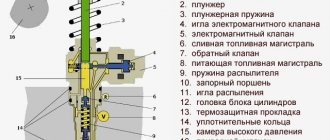
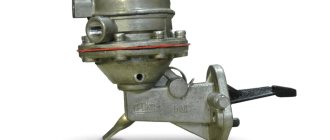
Fuel rail VAZ 2110 device and purpose
Injector fuel rail
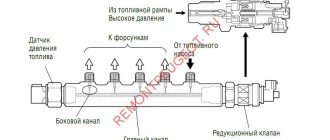
The fuel rail (rail) is a mandatory element of the fuel system of an internal combustion engine with distributed injection. It is a section of a hollow tube, the ends of which are closed on both sides and are distinguished by the presence of bends for connecting tubes of smaller diameter. Through these tubes, fuel flows to the nozzles that are located on it. In addition, there is a pressure regulator on it. The fuel that enters the ramp is moved through injectors into the intake pipe. In addition to the outlet pipes, this design also contains a shut-off fitting and a hole.
Details on how to independently measure fuel pressure on a VAZ 2110
Fuel pressure in the power supply system of a VAZ vehicle plays an important role in the operation of the power unit under various loads. What should be the pressure in the fuel rail and the reasons for its violation in the fuel system of a VAZ 2110 car, as well as how to solve this problem, you will learn from this publication.
If the VAZ 2110 engine starts to stall at idle, and when driving uphill there is a loss of power, most likely the fuel pressure in the system is not normal. In such cases, it is necessary to carry out diagnostics and identify the causes of the malfunction. To check the fuel pressure, you will need a special device with a pressure gauge, which is connected to the fuel line and the corresponding measurements are taken at different engine operating modes. An alternative to such a device can be the most common pressure gauge for checking the pressure in car tires with a rubber hose with an internal diameter of 9 mm connected to it.
How to check the pressure in the fuel rail of a VAZ 2110
- There is a fitting on the fuel rail of the VAZ 2110 engine, which is closed with a plastic cap. It is to this fitting that we will connect the pressure gauge to measure the fuel pressure. After removing the cap, unscrew the nipple and put on the hose, securing it with a metal clamp. Details on how to independently measure the fuel pressure on a VAZ 2110. Be careful if there is excess pressure; when unscrewing the nipple, a certain amount of gasoline may spill out. To prevent this from happening, you can relieve the pressure in the VAZ 2110 fuel system in advance by removing the fuel pump fuse, start the engine and let it stall on its own, then return the fuse to its place.
- After the pressure gauge has been connected, you can start the engine and check the readings at idle and with the vacuum hose removed.
Allowable fuel pressure values for VAZ 2110
- Idle speed - 2.8–3.2 bar (2.8–3.2 atm)
- With the vacuum hose removed, the VAZ 2110 fuel pressure may rise by 0.2–0.7 bar (0.2–0.7 atm), which indicates that the pressure regulator is working properly.
Find out more about self-repair of VAZ cars
How to check the pressure in the fuel rail, methods of checking
This parameter can be measured using several methods. One of the most common is the purchase of a special kit, which includes a special adapter for connection, a pressure gauge (it is thanks to this that the measurement is carried out) and a drain. You will have to allocate approximately 1,500 rubles to purchase these devices. But you can do it differently - go to a service station, where specialists cost 300-500 rubles. will carry out the required measurements.
However, there is a more sophisticated method that does not require additional costs - you can measure fuel pressure using an ordinary pressure gauge used to check tire pressure. In this case, it is advisable to use pressure gauges for measurements, the limit of which is minimal (about 6-7 atmospheres). This will reduce the error to a minimum.
Checking the pressure in the engine power supply system of the VAZ 2170 Priora
- Repair manuals
- Repair manual for VAZ 2170 (Priora) 2004+.
- Checking the pressure in the engine power supply system
The main indicator of the health of the engine power system is the fuel pressure in the fuel rail.
If the fuel pressure is insufficient, the following may occur:
– unstable engine operation;
– stopping the engine at idle speed;
– reduced crankshaft rotation speed at idle;
– insufficient acceleration of the car (the engine does not develop full power);
– failures in engine operation when the vehicle is moving.
To begin with, we recommend checking the reliability of the electrical contacts in the ECM wiring harness blocks responsible for the fuel supply (fuel pump module, injectors, fuel relay and corresponding fuses).
The fuel pressure in the power system is checked using a professional pressure gauge and a hose with an original fitting for connection to the valve located on the fuel rail.
1. Turn on the ignition and listen: within a few seconds you should hear the sound of the electric fuel pump. If you can't hear it, check the electric fuel pump power supply circuit.
| Note If you turn on the ignition three times without attempting to start the engine, the electric fuel pump will not turn on again, which is not a sign of a malfunction. It will turn on simultaneously with the starter starting the engine. |
2. Reduce the pressure in the power system (see “Reducing fuel pressure in the engine power system” ).
3. Unscrew the protective cap of the fitting for monitoring the fuel pressure at the end of the fuel rail. Please note that the cap has an O-ring. If the ring is torn or has lost elasticity, replace it or the entire cap.
| Note For clarity, the operation is shown with the decorative engine cover removed. |
| Helpful advice If it is not possible to use a professional pressure gauge, use a regular pressure gauge with a hose and clamp. The pressure gauge must have a measurement scale of no more than 1000 kPa (10 kgf/s m 2 |
4. Using a metal tire valve protective cap, unscrew the valve spool (the same as in the tire)…
| Note When turning the spool valve out, a small amount of fuel may leak out, so first place a rag under the fitting. |
| 5. ...and remove it from the fitting. | 6. Connect a hose with a pressure gauge to the fitting. Secure the hose to the fitting with a clamp and check the reliability of its fastening. Start the engine and check the pressure using the pressure gauge. It should be 380–400 kPa (3.8–4.0 kgf/cm2). |
The following reasons for decreased pressure are possible:
– the fuel pressure regulator is faulty;
– the fine fuel filter or fuel inlet filter is clogged;
– the electric fuel pump is faulty.
7. Stop the engine and reduce the pressure in the power system (see “Reducing fuel pressure in the engine power system” ).
8. Disconnect the pressure gauge from the pressure control fitting, screw the spool into the fitting and install the protective cap on the fitting.
↓ Comments ↓
1. Car structure
1.0 Car structure 1.1 General information about the car 1.2 Passport data 1.3 Car keys 1.4. Controls 1.5. Heating and ventilation of the cabin 1.6 Ensuring a comfortable air temperature in the cabin 1.7. Doors 1.8. Passive safety equipment on the car 1.9. Seats
2. Recommendations for use
2.0 Recommendations for use 2.1. Safety rules and recommendations 2.2 Running in the car 2.3 Operating the car during the warranty period 2.4. Preparing the car for departure
3. Problems along the way
3.0 Malfunctions along the way 3.1. The engine does not start 3.2 Malfunctions of the fuel injection system 3.3 Idle speed has disappeared 3.4. Interruptions in the operation of the 3.5 engine. The car moves jerkily 3.6 The car accelerates poorly 3.7 The engine stalled while driving 3.8. Oil pressure dropped to 3.9. Engine overheating 3.10. The battery does not recharge 3.13. Knocks in the engine 3.16. Wheel puncture
4. Maintenance
4.0 Maintenance 4.1. General provisions 4.2. Inspection work 4.3. Lubrication and filling works 4.4. Diagnostic work 4.5. Repair and adjustment work
5. Engine
5.0 Engine 5.1 Design features 5.2 Possible engine malfunctions, their causes and solutions 5.3 Useful tips 5.4 Checking compression in the cylinders 5.5 Removing and installing the decorative engine casing 5.6 Removing and installing the engine splash guard 5.7 Installing the piston of the first cylinder to the TDC position of the compression stroke 5.8 Replacing the drive belt gas distribution mechanism and tension roller 5.9 Replacing the power unit supports 5.11. Replacing engine seals 5.13. Engine cylinder head 5.15. Engine repair 5.16. Lubrication system 5.17. Cooling system 5.18. Power supply system 5.19. Design Features
6. Transmission
6.0 Transmission 6.1. Clutch 6.2. Gearbox 6.3. Front wheel drives
7. Chassis
7.0 Chassis 7.1. Front suspension 7.2. Rear suspension
8. Steering
8.0 Steering 8.1 Design features 8.2 Possible steering malfunctions, their causes and solutions 8.3. Steering column 8.4. Steering linkage 8.5. Steering gear
9. Brake system
9.0 Brake system 9.1 Design features 9.2 Possible malfunctions of the brake system, their causes and solutions 9.3 Bleeding the brake system hydraulic drive 9.4 Removing and installing the vacuum brake booster 9.5 Replacing the brake pedal axle bushings 9.6. Main brake cylinder 9.7. Front wheel brakes 9.8. Braking mechanisms of the rear wheels 9.9. Pressure regulator 9.10. Brake hoses and tubes 9.11. Parking brake
10. Electrical equipment
10.0 Electrical equipment 10.1 Design features 10.2. Battery 10.3. Mounting block (relays and fuses) 10.4. Generator 10.5. Starter 10.6. Ignition switch (lock) 10.7. Electronic engine control system (ECM) 10.8. Ignition system 10.9. Lighting, light and sound signaling 10.10. Windshield cleaner 10.11. Washer reservoir 10.12. Electric fan of the engine cooling system 10.13. Electric motor of the heating and ventilation system fan 10.15. Cigarette lighter 10.16. Instrument cluster 10.18. Electronic anti-theft remote control system 10.19. Immobilizer 10.21. Replacing sensors and switches
11. Body
11.0 Body 11.1 Design features 11.2 Possible body malfunctions, their causes and solutions 11.3 Removing and installing windshield frame lining 11.4 Removing and installing soundproofing upholstery in the engine compartment 11.5. Removing and installing bumpers 11.6 Removing and installing the fender liner and protective wing cover 11.7 Removing and installing the front fender 11.8 Removing and installing decorative sill trims 11.9. Hood 11.10. Trunk lid 11.11. Doors 11.12. Seats 11.13. Seat belts 11.14. Rear view mirrors 11.15. Interior fittings 11.16. Instrument panel 11.17. Heater 11.20. Body care
12. Applications
12.0 Appendix 12.1 Appendix 1. Tightening torques of threaded connections, Nm 12.2 Appendix 2. Fuels, lubricants and operating fluids 12.3 Appendix 3. Nominal filling volumes 12.4 Appendix 4. Basic data for adjustments and monitoring 12.5 Appendix 5. Spark plugs used on vehicles 12.6 Appendix 6. Lamps used on a car 12.7 Appendix 7. What you need to have in a car 12.8 Appendix 8. Tools used when repairing a car
13. Electrical diagrams
13.0 Electrical Diagrams 13.1 Diagram 1. Instrument Panel Harness Connections 13.2 Diagram 2. Vehicle Front Wire Harness Connections 13.3 Diagram 3. Engine Electronic Control System (ECM) Harness Connections 13.4 Diagram 4. Vehicle Rear Wire Harness Connections 13.5 Diagram 5. Light Harness Connections license plate light 13.6 Diagram 6. Left front door wiring harness connections 13.7 Diagram 7. Right front door wiring harness connections 13.8 Diagram 8. Rear door wiring harness connections
How to check the fuel pressure of a VAZ 2110 1.6 engine without return flow, check diagram (step by step)
On a VAZ 2110 with a volume of 1.6, the pressure indicators in the fuel rail are unchanged and vary between 3.6-4 bars. In this case, measurements are often carried out according to the same principles as described above. However, there are several other non-standard methods.
Method 1:
- We prepare the above-described structure - a hose at the end with a pressure gauge.
- The diameter of the hose should be approximately 8 millimeters.
- Measurements are taken at the outlet of the fuel pump module.
- The normal parameter is considered to be a pressure of 5-7 atmospheres.
Method 2:
- Remember how the return line is closed on engines with a drain ramp. In this case, it is better to turn off directly at the fuel pump.
- The double hose should be dismantled and a plug inserted (instead of the plug, you can use a “nipple” from the fuel filter).
- Pull the single pipe onto the pump fitting. Measurements are taken directly on the ramp.
Troubleshooting
No pressure in the fuel rail? Causes:
If the pressure in the fuel rail gradually drops, the cause may be:
- leaking fuel pump connections;
- leaking injectors;
- fuel pump malfunction.
Let's check it like this. We clamp the leading rubber hose of the fuel rail:
- the pressure has become stable - the fuel module is leaking or the pump is faulty;
- the pressure drops - the injector(s) are leaking.
Checking the RTD. Connect the pressure gauge hose to the outlet fitting of the fuel pump and turn on the ignition:
- the pressure is low but stable - this means the RTD is faulty and is releasing pressure too intensely.
Signs of breakdown
If for some reason the fuel pressure regulator does not perform its functions, then this can be understood by the following signs:
- The engine's operation has become unstable, it may begin to stall when idling, although it would seem that the fuel level is sufficient and all systems are in working order;
- The crankshaft at idle speed has increased or, conversely, decreased speed;
- The engine, as they say, “loses throttle response”;
- While driving, dips and jerks occur in a running engine;
- Gasoline consumption increases compared to what it was before;
- The content of CO and CH in the exhaust increases;
- The engine starts with difficulty. Although this property does not always appear.
If the regulator has become completely unusable, then an increase in fuel pressure is observed. Instead of the norm for the VAZ 2110, which ranges from 2.5 to 3.3 kg/cm2, it reaches 4 – 5 and even more.
Consequently, the fuel pump supplies more gasoline by volume, which is not completely burned, and overconsumption is guaranteed. Of course, such a regulator needs replacement, and the sooner the better.
If the fuel pressure regulator does not provide the required pressure, or simply does not hold, then the lack of fuel pressure leads to the fact that normal supply does not occur, and the VAZ 2110 “chokes” when you need to increase the speed.
In addition, the starter cannot quickly spin the engine; it has to be turned on many times.
It is quite clear that we first learn about excessive consumption of gasoline by readings from the level sensor. However, sometimes the FLS also starts to lie, and then the true consumption cannot be known.
There may be a situation when you still have half a tank of gasoline, but the FLS says that the fuel is almost empty. That is, the flow sensor itself may confuse you, and before rushing to replace the regulator, make sure that the FLS is working properly, remember that the VAZ 2110 has problems with it very often.
If you notice that it is lying, the fuel sensor may need adjustment or even replacement.
How to check and adjust the pressure of the Priora fuel pump
Normal pressure of the Priora fuel pump is necessary for the process of supplying the combustible mixture to the carburetor and its normal spraying through the nozzles. The slightest disruption in the operation of this system leads to the fact that either an excessively saturated or lean mixture is supplied to the combustion chamber, which is why the engine operates abnormally. How to check the fuel pump pressure, and what should be done if it is abnormal?
Checking the fuel pump pressure
The first thing to do is to specifically check the operation of the pump. To do this, just turn the ignition key not to the extreme position and listen to whether the electric fuel pump turns on (and this is exactly the variation that is installed in the Lada Priora car). If you hear a noise for a few seconds, followed by a click, everything is fine.
Using a pressure gauge, the check is performed on the ramp - this is where the protective valve cap is hidden, which does not allow air to get in, but presses the fuel out with pressure. The first step is to unscrew the cap and check whether the rubber in it is broken - this may be the main reason for the inoperability of the fuel pump. If it is damaged, it is better to completely replace it; fortunately, it is cheap. Then the spool is twisted. Next, a pressure gauge is connected to the outlet of the safety valve from the pump. Normal pressure is in the range of 380-400 kPa. If it is lower, then either the pump has failed or there is a blockage in the system. If it is more, then it is quite possible that the internal pressure gauge of the fuel pump is faulty and it is simply pumping fuel excessively to the carburetor. Replacing it is easy.
Naturally, before checking the pressure, the ignition is turned on, but the engine itself is not. The pump itself will equalize the pressure to the desired parameter. If this is not done, then the pressure will be at the level of 1 atmosphere with a slight deviation, because pumping is not performed.
It should also be taken into account that all manipulations are carried out at reduced fuel pump pressure. To do this you will need:
- remove the rear seat and gain access to the pump (by removing several screws on the rubberized cover);
- release the lock and let the fuel run out completely (the engine will be in neutral gear and will stall literally after a few seconds);
- Next, you need to turn on the ignition and equalize the pressure;
- It is also recommended to turn on the starter for 2-3 seconds and immediately reset the ignition key to its original position (turn off the ignition).
What happens if the pressure deviates from the norm?
If the pressure in the fuel pump is too high, too much fuel will be supplied to the carburetor.
The air will mix with it through the filter and burn in the cylinder. But if there is a lot of fuel and not enough oxygen, the mixture will not burn completely. At the same time, black smoke comes out of the exhaust pipe, and fuel drips from its end (may even be mixed with soot).
If the pressure in the system is very low, the mixture will be lean. There is too much oxygen. At the same time, the engine power is radically reduced; at idle speed the engine simply stalls, and the choke, of course, will not help, since it only regulates the operation of the throttle valve in the carburetor.
It is interesting that the on-board computer will not report a breakdown of the fuel pump - this is truly a huge mistake by VAZ engineers. In Priora, you can only read indicators when you connect a computer to the EMU unit, but not everyone can do this. And the indicators may not be true if the on-board computer itself is damaged. That's why checking with a pressure gauge on the ramp is the best option for checking pressure.
Replacing the fuel pump on injection vehicles VAZ 2110/2112
- screwdriver with Phillips bit;
- thin slotted screwdriver;
- key to 17;
- key to 7;
- key to 5.
Procedure for replacing the fuel pump:
- Disconnect the negative terminal from the battery.
- Open the gas tank cap for a few seconds to reduce the pressure inside.
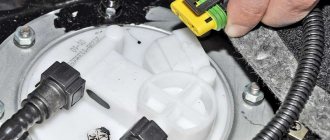
- Remove the rear seat, unscrew the screws, and open the hatch.
Unscrew the two screws securing the protective hatch
Disconnect the electrical connector
Using a 17 wrench, unscrew the nuts of the pump fittings
Using a 7 wrench, unscrew the 8 nuts securing the fuel module flange
Using a screwdriver, unscrew the 2 screws securing the fuel level sensor
Use a screwdriver to remove the clamps on the guides
Using a slotted screwdriver and a 5mm wrench, unscrew the bolts securing the fuel pump cover
We remove the fuel pump from the housing and install a new one in its place.
Having completed the assembly, we check the operation of the new fuel pump.
The process of replacing a VAZ 2110/2112 fuel pump, regardless of its design, does not require any special skills and can be done independently. However, if you are not particularly confident in your own abilities, it is better to contact the nearest car service center.