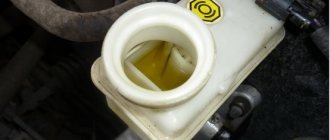
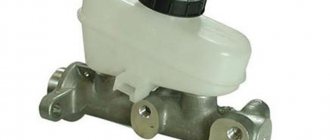
Hello again, my readers, today I decided to write about the brake fluid reservoir, an important part in the brake system. It stores a supply of fluid, which ensures that the brakes operate during braking without air getting into the system. Thanks to the lid, it also prevents moisture and debris from entering the liquid. If you do not make sure that there is enough fluid in it, then at the decisive moment you can be left without brakes. The level of brake fluid in the reservoir helps to identify a leak in the brake circuit; if it begins to drop sharply, you just need to monitor it periodically.
Where is he located
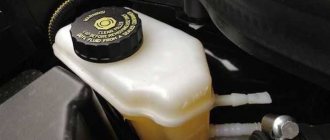
Where is this part located? It is located in the engine compartment under the hood; you just need to open it. Usually it is noticeable immediately, and it is not difficult to reach it with your hand. When operating vehicles, you need to monitor the level and add brake fluid to the reservoir. However, now there are cars where you cannot see the location of the tank. It is hidden deep in the compartment and covered with a decorative panel or parts.
Then, to find it, you need to consult the car manual or the Internet.
How to remove it
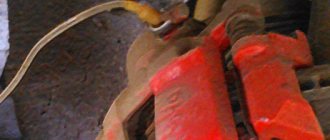
Remove the brake fluid reservoir to replace it or clean it from sediment and dirt. Sometimes this is done to change the rubber bushings that secure it. The sequence is:
- The tank lid is removed. Under it there is a float from a sensor that monitors the liquid level;
- It is better to carefully place the cork on a clean rag, because liquid drips from the float and you can get dirty;
- Taking a rubber bulb or a simple medical syringe with a larger volume and a jar where you will collect the liquid, pump out the liquid from the tank to the maximum;
- After this, press the tank latches on the sides, pry it up (with a screwdriver) and remove the tank from the cylinder;
- After such an operation, the rubber bushings of the tank must be replaced.
- Therefore, we pry up and remove the bushings from the holes of the cylinder.
- Now the tank is washed and, if necessary, replaced.
- Before installing the tank in its place, you need to insert new bushings: only after this can you insert the tank into the bushings all the way by hand.
- To make the job easier, wet the bushings with brake fluid before inserting the reservoir.
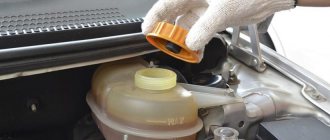
- After installing the reservoir in place, you need to fill it with liquid, and then bleed the entire brake system.
w[n] = w[n] ||
[]; w[n].push(function() { Ya.Context.AdvManager.render({ blockId: “RA-676344-20”, renderTo: “yandex_rtb_R-A-676344-20”, async: true }); }) ; t = d.getElementsByTagName("script")[0]; s = d.createElement("script"); s.type = "text/javascript"; s.src = "//an.yandex.ru/system/context.js"; s.async = true; t.parentNode.insertBefore(s, t); })(this, this.document, "yandexContextAsyncCallbacks"); Here's how to change this part, now let's look at cleaning options.
Cleaning the tank
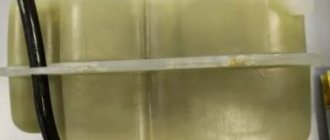
Inside the tank, over time, plaque and sediment inevitably appears on the walls due to the decomposition of the rubber elements of the system during operation, and the smallest chips arising from the friction of the working parts. This is why the brake fluid in the clutch reservoir darkens. Fresh fluid will become contaminated.
It is better to get rid of it in a timely manner so that the system does not clog.
Here are the cleaning methods:
- The most popular method has become to remove dirt in the tank using carburetor flushing fluid. It dissolves almost any contaminant and works great here. The disadvantages include the difficulty of accessing the internal walls and the fact that such a tool is not always available at hand.
- Another method is water pressure under high pressure. It also does a good job of sweeping away sediment and plaque that flows out of the tank, or rather flies out with the water. The disadvantage of this method is that strong pressure can damage the body if the Karcher is poorly adjusted.
- The third not bad way to clean the tank is to pour detergent or sand into it. The action of abrasive powder removes black dirt and plaque well. The disadvantage of this method is that it is not suitable for tanks in which the mesh is tightly installed.
- You can also wash it with gasoline, it dissolves deposits quite well. At the same time, it is at hand for motorists.
What kind of malfunctions are there?
First of all, this is a malfunction of the lid. Ideally, it should remove excess pressure when the engine temperature exceeds normal
. But if the lid is jammed, the coolant tank may even explode. What to do if such an unpleasant situation happened to you.
The most common breakdowns include rupture of the expansion tank or its leakage. The rupture could be caused by a sudden drop in coolant volume, which leads to engine overheating. This malfunction can be corrected by simply adding liquid to the tank. Remember that cold liquid cannot be added to the system!
Leakage is a defect in the housing or connecting hose. This can only be solved by replacing the defective part.
Since the cooling system includes not only a tank, but also a radiator with a fan, it is important to maintain all components in good working order. Inspect more often in the summer when temperatures are higher. Pay attention to the fluid level! If its quantity decreases in an unknown way, check the tightness of the cooling system. Remember that a timely inspection will allow you to avoid premature replacement of faulty elements.
Why change the fluid?
Why do you need to change the fluid at all? Remember that regardless of the duration of action, the liquid must be changed periodically. This must be indicated in the operational documents; each brand and model has individual characteristics. You'd better check the manual. As a rule, the brake fluid replacement period is 30-40 thousand times, or once every 2-3 years.
To dispel misconceptions about brake fluids, I will say that they are not designed to last the entire service life of the car, just like the oil in the box or engine. During operation, it gradually loses its properties, the additives in it are destroyed, it absorbs moisture from the air and becomes contaminated with rubber from abrasion of the cuffs and shavings from rubbing parts. The quality of the fluid decreases and as a result the brakes may fail.
Mixing liquids is not advisable, even if it is allowed by the manufacturers. Therefore, partial replacement of the brake fluid in the reservoir is acceptable for a short period and in extreme cases, it is generally better to replace the brake fluid in the system completely.
It is also a misconception that any DOT-4 standard liquid can be used in cars. You must adhere to the manufacturer's requirements, so use the liquid prescribed in the instructions. There is no point in discussing the advantages or disadvantages of different liquids when choosing the best one for yourself, just follow the requirements of the specialists who have already calculated and verified everything for you; for your safety, you just need to follow their instructions.
Recommendations
Some tips will be useful for both beginners and experienced drivers:
- Brake fluid must be changed in strict accordance with technical regulations in any condition.
- It is permissible to mix only those liquids that belong to the same class.
- If the car manufacturer has clearly indicated that it is necessary to use glycol liquid for the car, this means that pouring mineral water inside is unacceptable. And vice versa. The fluid must be replaced in full accordance with all the requirements of the car manufacturer.
- The presence of water in the composition is unacceptable. Otherwise, the liquid may boil at a temperature lower than that for which the product is designed. This sometimes causes the brake system to fail.
- The consequence of fluid contamination may be improper functioning of the brakes (with increased viscosity, this substance will not be able to quickly transfer forces to the mechanisms).
- After replacement, bleeding of the brake system is required. If you refuse this operation, there is a risk of air inside. This is unacceptable, as proper operation of the brakes will become impossible.
- To wipe the expansion tank, it is better to use a lint-free rag. It is not permissible to wash it with water.
Why is the level decreasing?
There are several reasons why brake fluid left the reservoir:
- He himself became thin and cracked;
- The bushings under the tank are leaky;
- One of the wheel cylinders, the line or the main cylinder is leaking;
- Natural evaporation and consumption during operation, only this happens slowly, topping up is usually at the next maintenance, and not more often. And if you don’t need to top it up between maintenance, then that’s normal;
- The brake fluid was squeezed out of the reservoir due to too much of it, or a poorly screwed cap. Externally, the tank will be dirty and dusty with streaks;
That's why the fluid leaves. It still takes a lot to pump the system, and the level may drop slightly after pumping on the first day, this is normal.
What to put in the washer reservoir
Question from a reader:
“Sergey, thank you for your site, there are a lot of useful tips for me as a beginner! I recently read an article about cleaning injectors, very useful information for me personally, the pressure was not even! But I have one more question that may seem a little stupid (for experienced ones) - but what do you put in the washer reservoir in the summer? In winter it is clear that it is not freezing. Any advice? Can I use regular water? On many forums they write that you need to pour distilled water? Thanks for the answer. Kate"
Your question is clear, read on...
To begin with, I will repeat once again about winter.
What to put in the washer reservoir in winter
In winter, it is clear that you need to fill the washer reservoir with non-freezing liquid (water simply freezes). However, you can make it yourself by mixing alcohol and water, read this article. It is also not necessary to always pour cone; in warm winters it can be diluted - this material will be useful.
What to put in the washer reservoir in summer
But what to pour in the summer? Just a few years ago, our fathers or grandfathers would not have asked such a question at all! Everyone poured regular tap water! The only thing is that it must be very clean, without small debris, so as not to clog the nozzles. To be honest, I also adhere to this rule. Why spend money and buy anti-freeze in the summer? Or should I buy distilled water?
How to check the fluid
To check the quality of TJ there are special testers, of which there are many on the market today. Before purchasing, you should study the instructions to understand what can be tested using this device. We need a boiling point, according to which a conclusion about its suitability will be drawn:
- If the temperature exceeds 175 degrees, the fluid is in good condition;
- If it is 165-175, provided that no more than two years have passed since the date of filling the liquid, it is suitable;
- When it boils at 165 degrees or lower, it needs to be replaced completely;
Video with a solution to this problem
VAZ - where is the reservoir for filling brake fluid located?
In the domestic VAZ car, the brake fluid reservoir is located in the engine compartment (on the left) and is secured with a clamp to the partition. A decrease in the volume of working fluid in the reservoir when the hydraulic brake drive system is sealed is a sign of worn out pads.
Knowing where the brake fluid reservoir is located, you can easily replace the brake fluid with fresh fluid. Remember to replace regularly. Thanks to this, you can maximize the operating life of your own machine.
Changing the fluid yourself
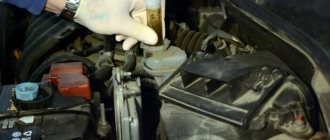
Before opening the tank itself, wipe the outside of the tank with a rag to prevent debris from getting inside. Make sure that the brake pedal is not depressed when you open the lid (liquid may splash out). It is recommended to work with rubber gloves, because the liquid is toxic. Hands should be washed with soap afterward.
When you add fuel fluid, make sure that its level is between the minimum and the upper mark. When performing a complete replacement, the fluid is drained from all circuits and then I pump the entire system again, starting with the most distant wheel (where the longest tube goes to the brake cylinder). If the contours are located diagonally, then the right rear wheel begins to pump. Then left in front. Then, accordingly, the left one is behind and finish on the right one in front.
If the contours are parallel, then pump the rear on the right, then on the left, then the front on the right and left. The video shows the process of replacing the tank itself. It is more convenient to perform pumping in a hole or by rolling the car onto an overpass. The tools and fluid here will depend on the make of your car.
Upon completion of pumping, you should slow down several times at low speed; if any wheel reacts weakly, which is felt by the car being pulled to the side, pump it again. After the first trip, you should check the brake fluid level again; most likely you will have to add more.
That's all, share the link with your friends, as usual, and subscribe to the site if you haven't already. I look forward to your feedback and comments, see you soon
Instructions for replacing and repairing the tank
Replacing the washer reservoir is usually done as a result of its failure, which cannot be repaired. In particular, if the CP is cracked and it is no longer possible to restore its integrity.
Using the example of a VAZ 2114 car, let’s look at how to remove the washer reservoir:
- First open the hood. Before removing the BO, it is necessary to drain all remaining liquid from the container. If the liquid level in the container is high, then unscrew the cap of the washer reservoir, this will reduce the pressure in the system.
- Then the BO is removed from the grooves; to do this, it can be pulled up, and placed in such a way that you can easily dismantle the electric motors.
- You need to disconnect the contacts from the motors, as well as the water supply pipes.
- Next, the electric motors are removed from the container body - for this you can use a regular screwdriver to pry them off (the author of the video is the menstimecom channel).
As you can see, there is nothing complicated in removing BO. It is much more difficult to repair the washer reservoir. If the container is cracked, it is not a fact that it can be repaired, since everything depends on the size of the crack and its location.
Read more: Obstacle on the right when the road narrows
If you don’t know how to seal the washer reservoir, then you have several options:
- For gluing, you can use special glue or cold welding. Before applying material to a crack, the BO must be thoroughly washed, and the area to be patched must also be degreased. Glue or cold welding is applied to the crack, while it is necessary to grab a few more millimeters from each edge of the crack. Depending on the type of glue and cold weld, the waiting time for the material to dry can range from 30 minutes to several hours.
- If the crack or hole is small, you can try to treat it with regular sealant. In this case, the repair procedure looks similar - the surface is first washed and then degreased. A certain amount of sealant is applied to the hole, which should completely fill the crack and the space around it.
- Another option that is best suited for larger cracks is the use of special plaster tape. It is also installed on a degreased surface, but before installation the tape should be coated with epoxy, and the material should be applied in several layers until all the cracks are closed.
- If all these options do not help you, then you can use a soldering iron or wood burning machine. With the help of these devices, the structure of the container is softened, which makes it possible to restore its integrity if the damage is minor. Additionally, after treatment with a soldering iron, the damaged area of the BO can be covered with cold welding.