Mounting features
The kit consists of the following components:
- body part;
- main (front) and rear cameras;
- fixing elements (wires, adhesive tapes, screws);
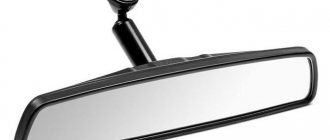
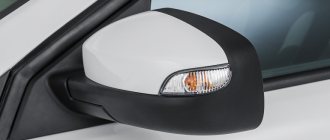
- rear view mirrors;
- recorder with display;
- battery;
- memory cards.
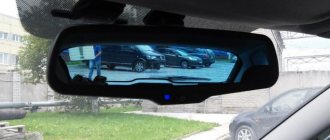
The case compactly contains electronic filling and a built-in front camera. On the front panel there is an information screen with control buttons at the bottom. The rest of the device is a standard car mirror.
A car video recorder in the form of a rear view mirror is connected to the on-board network, taking into account polar compatibility and shutter speed (no more than 5 V). Depending on the type of vehicle (vehicle), electrical devices are turned off when the ignition is deactivated, or are under stable voltage.
Any standard mount is equipped with rubber suction cups, which harden and fall off in the cold. Among other disadvantages:
- impossibility of fixing the device at the required height;
- marks and stains when installing the gadget without a bracket.
Menu items and settings of car recorders
Menu items and settings in most car recorders. The menu, depending on the installed software and its shell, can have different types and structures. Most often, the settings are divided into sections in different tabs (items with subitems). For example: in the Language/LANGUAGE item, you can select the language in which all menu items will be displayed.
(for convenience and comfort of setup, we have selected most of the possible designations of menu items; the names of the buttons are listed on the left, and the functions that each button performs on the right).
Language, LANGUAGE - menu item responsible for the menu language. The first thing you should install for further convenience of working with the DVR.
TIME and DATE, DATE and TIME, CLOCK - settings of date and time. Often divided into sub-clauses. Customization is required. There is also often an additional function to display the time during recording.
- Car mirror with rear view camera and recorder
DVR instructions
Formatting/Format - formatting the storage medium (memory card). During the formatting process, all data on it is deleted. Formatting is performed when the recorder is launched for the first time, when the storage medium is changed, and if necessary when errors occur.
FRAGMENT/RECORDING DURATION/RECORDING TIME/RECORDING CYCLE/RECORD/ - using this menu item, you can determine the size of the file on which information will be recorded continuously. Each manufacturer is free to set its own default recording size. The user can choose from the proposed sizes.
DVR instructions
Manufacturers and users recommend using the DVR in cyclic recording mode (RECYCLE-off/no). This setting will protect the user from running out of storage space at one point. With this function enabled, the recorder will record new video files after deleting the oldest ones. You should not save space on the memory card; even if the space is not used completely, the files that will be recorded will be smoother. After all, to start a new file recording, instead of the old one, it takes a few seconds, which can be very useful in case of controversial situations on the road.
CINEMA SIZE/SIZE/RESOLUTION - a setting that allows you to set the recording quality. For example, you can adjust the quality (if available - full hd 1080), (QVGA) -320x240, 640x480 (VGA), 848x480 (WVGA), 1280x720 (WXGA), 1280x960 (SXGA). Remember, the higher the quality of the recording, the faster the space on the storage medium is filled, but the savings are not justified; the larger the recording, the better.
SOUND RECORDING/AUDIO RECORD/SOUND RECORD, STAMP/DATE DISPLAY/DATE AND TIME - a menu item that allows you to configure sound recording. An excellent assistant in case of conflicts on the roads and when controversial issues arise with traffic police inspectors.
- Recorder mirror E-ACE + rear view camera (indiscriminate)
MOTION DETECT - the DVR starts recording when there is movement in its field of view. The function is useless when moving, but is indispensable as a security function. Very often she helped in solving crimes and offenses when the driver was absent. Most often, the settings contain an additional setting that allows you to turn off the recorder after there is no movement.
SHOOTING SPEED/FPS/FRAME RATE - a very useful setting that allows you to adjust the shooting quality to the speed of the car. At low shooting speeds, important information may be lost.
NETWORK FREQ/LIGHT FREQ - this function allows you to adjust color correction and make the DVR recording without “lights” and clearer. When set to 50Hz, the recording will be flicker-free.
Additional settings
All of the above settings are present in most DVRs; if the device has two cameras, the number of menu items may increase, but no difficulties should arise. Complete setup of the DVR will take no more than half an hour.
DVR instructions
On more expensive models there are significantly more additional functions, but as practice shows, the described functionality is quite sufficient. And having mastered basic knowledge, the user can easily understand the remaining functions.
Sucker
The DVR is most often attached with a suction cup to the windshield in the area of the rear mirror in the cabin.
- Thoroughly wipe the area where you are going to install the DVR.
- Peel off the protective film from the sticky surface of the suction cup.
- Loosen the mechanism that presses the suction cup.
- Install the suction cup and clamp the mechanism.
Take the device for a test drive and make sure it does not interfere with your view. Carefully measure out the required amount of power cord.
DVRs in the form of a rear view mirror.
- Loosen the DVR mounts
- Install the recorder on the mirror
- Secure the DVR.
We are on VK
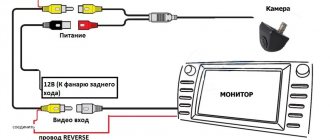
How to connect a DVR
There are several ways to install the DVR correctly.
- The length of the cable makes it possible to lay the element under the casing and trims with a lead to the cigarette lighter or socket with a socket. For long trips, it is recommended to use a tee with switches, which allows you to connect several devices to the unit at the same time.
If you use the specified connection diagram, the recording will turn on when the engine starts in automatic mode. After turning off the ignition, the device deactivates itself. If a built-in rechargeable battery is provided, shooting can be carried out even when the power unit is not working.
- The easiest and fastest way is to connect through a lampshade . You just need to remove the cover and find the “plus”. The main thing is not to confuse the branch with the running branch of the relay. Otherwise, recording will be made whenever the doors are opened. Since the interior lamp is predominantly energized, the DVR is also in an active state.
- Another option for setting up a mirror-video recorder yourself is connecting to the fuse box . It is located at the bottom of the front or side panel. An electrical diagram is printed on the unit cover. After selecting the desired element, pull it out, fix the red wire of the device, and insert the part back. The minus goes to the mounting bolt.
Such a scheme involves activating the recorder when voltage is applied to the selected electrical contact. If it is under constant voltage, you will have to turn off the device manually.
- The next method is a separate dedicated line to the battery. The wire is led out under the hood with the fuse box, the minus is fixed on the vehicle body. To optimize camera control, it is recommended to purchase a power controller.
Video quality
The DVR itself shoots 1080 P HD video. Which indicates good video quality
dvr e ace
In the video test, the front camera produces a slightly better image than the rear camera. It has a wider viewing angle and less pixelation. You can also adjust the viewing angle.
Mirror DVR
The built-in microphone records quite quietly, but let's assume that the main function of the device is still video recording. When the battery is fully charged it can record for over 30 minutes without being connected to a power source.
To extend battery life, use the shutdown function. You can use the option to turn off the camera if the video bothers you or distorts the image in the mirror.
How to set up - instructions
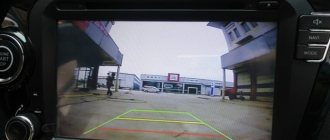
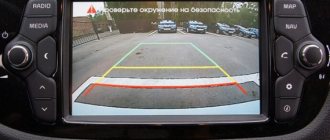
How to configure the mirror DVR after installation and connection? To do this, you need to enter the menu, select the appropriate sections, and make the necessary adjustments. After turning on the ignition, a short-term image appears on the monitor and the main camera is activated. When driving in reverse gear, the parking sensors are activated and the picture is displayed on the screen.
Control buttons
The recorder mirror can be configured manually using the corresponding keys located on the bottom of the device.
- "Nutrition". Used to enable, disable, or reboot the device.
- “*” - for photos, video viewing of footage and switching operating modes.
- "Right left". Designed to scroll through settings menu items.
- “OK (confirmation)” - to forcefully activate recording and take photos.
- "Menu". Select the desired parameters, including cycling, zeroing, image quality, switching between cameras.
Viewing Modes
The playback modes of the car video recorder are adjusted using the “right/left” key.
Viewing is possible in the following configurations:
- Front camera picture.
- Image from the rear view lens.
- Combination of both records.
- Picture-in-Picture (front view display with built-in rear focus).
How the DVR works.
In most cases, a car recorder starts working automatically after voltage is supplied to it. (power comes from the cigarette lighter using the adapter that comes with the kit). Accordingly, if there is no supply voltage, the DVR will stop working (this does not happen immediately, but after some time - protection against accidental shutdown). Also, using the off/on buttons, you can turn on the recorder from the internal battery.
Once turned on, the recorder immediately begins recording. To go into settings debugging mode, you need to stop recording; to do this, you need to stop by pressing the SNAP/REC button.
After this, you need to go to the settings menu (Menu button). The user is now in settings mode. Using the Up and Down buttons, you must select the required section or menu item in which you want to change the settings. Activation of changes and making new settings, as well as confirmation, occurs using the OK or SNAP/REC button
How to turn on the rear view camera
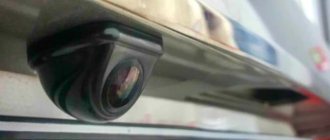
The universal instructions state that the car DVR is equipped with a connector for mounting a rear view camera. The accessory is equipped with a detachable cable that facilitates installation of the system. The kit includes Velcro and fastenings that make it possible to install the device on the windshield of the vehicle.
- Parking sensors are made of mortise or overhead type. In the first case, it is necessary to drill the bumper part of the car.
- Overhead modifications are fixed with adhesive tape. The disadvantage of mounting above the state license plate is the inability to inspect the road surface directly under the wheels. This option is useful when reversing off-road.
- The power is connected to the reverse light elements, the red wire is positive. When reverse speed is activated, the rear camera will automatically turn on. In this case, the video signal contact must be connected to the appropriate socket.
- In the interior part, the wire is pulled from the mirror to the luggage compartment under the trim or through the corrugation.
E-ACE DVR instructions
There are 6 control buttons on the front: power button, menu, mode switching, navigation button, ok confirmation button.
Mirror DVR with rear view camera
In this part of the mirror we can see the screen where the video is displayed. It appears when the device is turned on. Turning the mirror we can see a mini USB port for charging, a slot for a micro SD memory card, and a code for connecting a rear view camera.
auto recorder
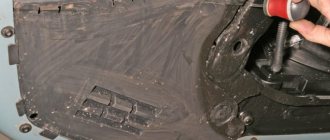
On the back of the mirror there is an emergency reset button, a built-in microphone and a front view camera.
To secure the mirror in your car you will need two mounts, which are included in the kit. You need to first fix them on the mirror itself on the upper or lower mounts on one side, either upper or lower, so that you can then put them on the standard mirror.
Then you tighten the fastener and lock them onto the opposite hinges. The main thing is not to confuse the orientation of the device. The camera should be on your right hand on the back side.
Front view camera
The following tips will help you position the front camera correctly:
- Before starting video recording, you must install a memory card.
- The camera has a cyclic shooting option. As the flash drive fills up, the previous recording will be erased. The rest of the materials are stored in an external storage device.
- For correct operation of the device, select the correct installation location and use a standard charger with a switch from 5 to 12 V (for cars and trucks).
- To connect the front video camera, stretch the wire above the doors, under the trims.
- The device is mounted together with steel protection against stones and insects.
Difficulties in operating the device
The Jansite mirror video recorder appeared on the market in 2021. Therefore, the product has not yet been studied enough. The equipment comes with instructions in English, which makes it very difficult to familiarize yourself with the rules for installing and operating the recorder. The manufacturers promised to translate the instructions, but have not yet done so. The available instructions contain only generalized, brief recommendations for installing and connecting the gadget.
The Jansite DVR has mixed reviews from users. Everyone, without exception, is pleased with the extremely affordable price. Among the shortcomings, there are isolated cases of failures in the program. Some users note that sometimes the cameras do not turn on automatically when the ignition is turned on and they must be turned on manually through the menu.
Some experts believe that for safe parking you need a rear view camera with a viewing angle of at least 180°. Therefore, the existing parking camera with a 140° lens is not enough. Connecting other recording devices yourself is very problematic because it is difficult to find a device with the same power requirements.
Chinese car video recorders have mediocre menu translation quality. It may be necessary to flash the device's firmware to install all full functions. To do this, you need to download the software of interest to your computer and scan it with an antivirus. If the program is compressed, you will need to unzip it.
The DVR must be dismantled, the battery and memory card removed. The latter must be connected to the PC and formatted. After cleaning the card, the necessary software is transferred to it and launched for testing. Upon completion of the procedure, the DVR is reassembled and rebooted.
Flashing the DVR firmware yourself causes some difficulties. If you format a memory card, a device without a native program may malfunction. You will have to connect the recorder itself directly to the PC. Here the following difficulty arises: sometimes the computer does not see the Chinese DVR. Therefore, it is better to do the firmware in a specialized salon.
Control buttons
To configure the mirror DVR, adjustment instructions are presented in the form of a table.
| № | Symbol | Decoding | Description |
| 1 | Vertical line in a circle | Power key | Used to turn on/off the screen or the device itself |
| 2 | quatrefoil | Working with the menu | Continuous pressing provides transitions between sections, short holding – brings up the settings menu on the screen |
| 3 | six pointed star | Actions with video modes and their emergency switches | The ability to change photos to videos, stop shooting if necessary, avoid overlapping images with each other |
| 4 | Left/Right Buttons | Turn pages up or down, adjust audio volume | In playback or video recording mode, adjust the movement of the image, as well as the volume level of the recorded sound files |
| 5 | OK | Confirming the selected action | Turn on/off the camera, agree to a certain option in standby mode |
| 6 | Display image | Screen Information | Indicate the brand, resolution, monitor diagonal |
Criterias of choice
As we have already reported, there are a lot of options for car dvr mirror devices with two cameras, but which gadget is better to buy? Sometimes this question can really confuse the car owner.
To make the right choice and understand which device with a radar is better, you need to familiarize yourself with the main selection criteria:
- First of all, you need to choose a gadget with the highest video resolution, so that the picture is really high quality, you need to choose recorders marked Full HD. In this case, the image recording resolution will be 1080p.
- Frame rate is an equally pressing issue. To choose the best device, the frame rate parameter must be at least 30 units per second. If the frequency is lower, the picture may be played back jerkily.
- You can choose the best recorder by paying attention to the device codec. Not so long ago, almost all mirror DVRs recorded video with the MPEG codec, but because of this, the video took up quite a lot of space, and the image itself was not of particularly high quality. Today, manufacturers use the H.264 codec, thanks to its use the video quality is much better, while the information takes up less space in memory.
- Does the device have internal memory? It is thanks to this parameter that it is determined how much information can be recorded on the device. Of course, the more free memory in the device, the better. In addition, the gadget must support the use of external memory cards, preferably with a capacity of at least 32 GB.
Parameter settings
| Characteristic | Values |
| Permission | HD, Full HD |
| Photo quality | M 12, 10, 1.3, 8, 5, 3 |
| Cyclicality | From 1 to 3 minutes, ability to block information on the memory card |
| Recording movements | On or off |
| White balance | Saturated, Fluorescent, Automatic, Dimming |
| Monitor protection | 10-30 S |
| date | Minutes-hour-day-month-year |
| Language | More than 10, including Russian |
| Version | Software version number |
| Restore factory settings and selected format | Confirm or cancel |
Reviews
I liked the DVRs made to fit the rearview mirror, and the mirror and monitor and DVR 3 in 1.
Vasiliyya
https://auto.meta.ua/forum/viewtopic.php?t=203905
The mirror looks good, but unfortunately the shooting quality is not very good.
Viki939548
https://otzovik.com/reviews/registrator_zerkalo_rear_view_mirror/
The recorder is attached to the original rearview mirror with two rubber clips! When driving, the camera does not jump and records both video and sound clearly! The mirror is now a little larger than the original one, which I consider a plus. The device also has a WDR function that evens out illuminated or darkened video! But that’s not all, I connected a rear view camera to the monitor and am enjoying the device to the fullest!
Vitaly
https://rozetka.com.ua/falcon_hd60_lcd/p8135319/comments/page=3/
A normal recorder for its price. Further along the mirror. It is painted over with some kind of blue paint (not a film - I tried to peel it off) which is darkish; in the evening, with the rear window tinted, you have to look closely at who is driving behind you.
elektronic71
https://otzovik.com/reviews/registrator_zerkalo_rear_view_mirror/
After my DVR broke down, out of good old habit, I turned to the same well-known Chinese online supermarket. I wanted to find something small and inexpensive that wouldn’t interfere with my view or irritate my inner toad. I looked at a lot of things until I decided that the mirror-recorder was the one. And the price is more than attractive - 1800 rubles. There were, of course, more, much more expensive options with radar detectors, navigators, touch screens and who knows what else.
Sergey428
https://otzovik.com/review_4580102.html
Modern gadgets can significantly improve the comfort and safety of traffic. Knowing all the advantages and disadvantages of a mirror-recorder, as well as assessing their financial capabilities, every car enthusiast decides whether he needs such a device or not.
Source
How to start video recording
Switching to video mode is automatic. To cancel an option, press and hold the key with the ▲ icon for several seconds. In standby mode, click on the ♦ symbol to enter the playback menu. If the procedure has been completed correctly, a ◘ will appear in the center of the display.
By pressing the right/left buttons you can select a file to view. Confirmation or exit from the mode is carried out by touching the OK button once or repeatedly.
Buttons for setting up the DVR
Power button (off/on) - allows you to turn the device off or on
Menu button - allows you to call the main settings mode
Down button - a control button that allows you to change the active menu line located below
Up button - similar to the Down button, allows you to change the active menu line located above
SNAP/REC button - start shooting/stop shooting. Opportunity to take a photo. Sometimes it has an additional function; when working in the menu, it confirms the selection of the required item in the menu. (If there is no OK button)
OK is a button for selecting or confirming certain settings or menu items.
- Car DVR built into the mirror. Like a mirror - just superb!
Reset - reset settings to factory settings (usually the smallest and tightest - protected from accidental pressing).
How to take a photo
If you hang and set up the DVR correctly, you can get high-quality photos. To do this, adhere to the following algorithm of actions:
- Select the ♦ icon and switch to photographing mode.
- Confirm the action by pressing the OK key, accompanied by a characteristic signal that the image is ready.
- Use the ◄/► buttons to select material to view.
- To play, press OK, scroll – “up/down”, exit the selected mode – ♦.
How to connect the recorder to a computer
The device is connected to a PC or laptop using a USB cable. As a result, the DVR displays two versions of the menu:
- USB storage model. There is access to videos and photos.
- PCCAM option. The equipment can work with chats and other materials in real time, including using a computer camera.
If the device malfunctions or malfunctions, it can be rebooted using a small needle. To do this, a sharp object is inserted into the RESET socket, after which the device should be restored.
Rules for choosing the best mirror DVR:
- Resolution quality. The best option would be devices whose resolution is HD or Full HD. Thanks to high performance, it is possible to achieve excellent shooting quality, obtain a clear, rich and contrasting image;
- Video recording format. It is recommended to choose the most well-known formats, including AVI or MPEG. They are present on all models of mirrors with a Xiaomi DVR and products from most manufacturers;
- Viewing angle. The minimum value is 70 degrees, but it is much better if it exceeds 120 degrees;
- Frame frequency. If its rate is lower than 25 fps, then the video file will be played fragmentarily;
- Shock sensor. Involves automatically turning on the camera to record even a weak blow;
- Parking markings. It is enough to turn on the reversing video camera, and the parking process will be greatly facilitated due to the appearance of parking markings on the monitor;
- Night photography. This is achieved thanks to the presence of an infrared sensor.
Please also note that it has its own battery. If it is present, the device will function even if the engine is turned off. Accordingly, battery life is directly affected by battery capacity.
Special abilities
Regardless of where you install the DVR, you can make the most of its capabilities. Special functions include the following:
- G-sensor. Its activation indicates a vehicle collision. In this case, photo recording is blocked to avoid overwriting by a third-party device. The file must be deleted manually from the memory card; the sensitivity of the sensor is adjusted in the setup menu.
- File blocker. Serves to protect materials from accidental deletion or overwriting, configured manually.
- Parking management. After activating this option, you can detect external vibration effects, after which the recorder will turn on for 15-20 seconds, followed by shutdown if no problems are detected. In this case, the video material is blocked automatically.
- Motion detection . This option is similar to the previous function; in stand-by mode, it allows you to identify the action directly from the setup menu. The XX symbol will appear in the central part of the screen, indicating the possible movement of a third-party object within a radius of three meters from the vehicle. In this case, the DVR starts automatically recording for 15-30 seconds.
The features of the device in question include the placement of a fixing device inside the rear view mirror. This solution makes it possible to place the device so that it does not interfere with the view, capturing the necessary moments.
Source
Other useful features
The recorder mirror is usually equipped with additional options that can be actively used during the operation of the device.
On delay
The function allows you to delay the start by 10–20 seconds. Useful for use when starting the engine. At this moment, the voltage may jump, and a delay in turning on will protect the device.
Motion Sensor
Parking mode is activated when excessive activity appears nearby. To make the camera work at the right time, leave the recorder turned on.
Shock sensor
The G-sensor will help protect the files you need by preventing other information from being written over them. It is triggered during sudden braking, unexpected acceleration, impact or driving off the road. Such records are transferred by the system to a special folder and are not automatically deleted. They should only be cleaned by hand.
Set the sensitivity parameters for the shock sensor within 3–4, otherwise the memory card will quickly become full when driving over uneven roads.
@Dvizhok.su