Cocktails are different and not all of them are intended to be taken “on the chest”. The paints and varnishes that we use to restore a car's paintwork are also cocktails - properly prepared mixtures of several ingredients. And since we strive to ensure that the restored car (fender, door) after repair sparkles brighter than a new one, and the paint lies evenly, then our “paint cocktail” must be prepared competently, carefully and carefully, and not concocted anyhow.
Ingredients
First of all, let’s decide on the type of our “paint cocktail”: will it be regular acrylic enamel (which is less likely), or metallic or pearlescent paint (most likely).
Regular acrylic enamel is two-component, with a hardener. The “ingredient kit” for such materials consists of three jars. For example, a liter of paint, half a liter of hardener and 100-150 ml of thinner. That is, when buying a liter of paint, you actually get about 1.6-1.7 liters of diluted paint.
This must be taken into account when selecting paint: some laboratories indicate prices for “thick” paint, and some for “thinned” paint. The difference, as you yourself understand, is huge.
In the case of “metallic”, the base paint is necessarily covered with a transparent varnish on top - without it, spectacular coatings look inconspicuous, and the weather resistance of two-layer coatings is much higher. Transparent varnish, like acrylic enamel, is two-component, with a hardener. But the “base” does not need a hardener - it is one-component.
Thus, the “set” for two-layer coatings already consists of five cans. For example, a liter of “base”, 500-700 ml of thinner for it, a liter of transparent topcoat varnish, half a liter of hardener and 100-150 ml of varnish thinner - a total of 3.3 liters! At the same time, the diluted paint itself was no longer there, the same 1.7 liters.
how to dilute car paint - How to dilute car paint? — 22 answers
In the Service, Maintenance, Tuning section, the question: How to dilute car paint? asked by the author Kirill Chirkov, the best answer is Solvent 646 (Synthesis). Suitable for diluting alkyd, 2K acrylic and metallics. Touch-correctors are designed for self-repair of chips, scratches and other minor damage to the protective paint coating of welded fences.
Hero of the day(195502)
glossy is the TEXTURE of paint.
Answer from European [guru] on the can is written Answer from Poll [guru] I know 3 types of paint - WHAT? exactly FOUR (I forgot water) Answer from the Black Hundreds [guru] xylene, toluene and even water Answer from Alik T [guru] acrylic with acrylic thinner, metallic thinner for metallics Answer from Vladimir Dmitriev [guru] Don’t paint it yourself. You'll disfigure it. It will look like a garbage dump. Trust the best professionals in a good car service center. Answer from Oriy Bulany [newbie] usually unfamiliar paints = poured into a bottle (a couple of grams), diluted, did not curdle = ok...
don’t dilute just 646,647 = the color fades (during the night it turned from blue to gray = Bordeaux faded)…. Try 650
Answer from Vladimir Sokolov [guru] we constantly use P12! Answer from MAFIA [guru] You can use acrylic paint, if you know how to use paints, then you need to be careful not to overdo it with the thickness, I think you understand everything, I wish you good luck.
Making a batch
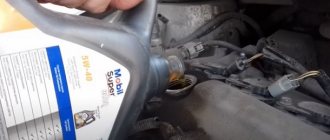
Before filling the gun, you should mix the components of the purchased paint.
For proper mixing of the components, which produces a painting material of the required viscosity, the following conditions must be met.
Dishes
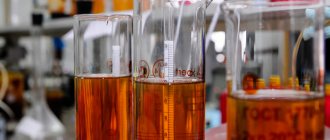
It is important that the container in which we mix is strictly cylindrical in shape (flat bottom and vertical walls). Only in such a container can you mix the components evenly and measure their quantities correctly.
It is better if it is a special measuring container in the form of a transparent plastic jar with a lid. Such cans are marked with markings that allow mixing materials in the required volume ratio (1:1, 2:1, 3:1, 4:1, 5:1, etc.).
Measuring container for preparing paints and varnishes
Also, for dispensing and mixing paints and varnishes, it is convenient to use a special ruler with marks that determine the volume fractions of the components.
Pour the base into a cylindrical container to a certain division, and then add the hardener (if added) to the required mark, then the solvent. Mix everything with the same ruler - and you're done. Often, a measuring ruler is sold along with a set of paint, and all branded cans indicate the proportions according to these rulers.
It is convenient to measure the required amount of components using a measuring ruler. Then I chatted with the same ruler - and that’s it.
Proportions
Given the abundance that has reigned on the paint and varnish market, it is, as they say, impossible to give one recipe for all occasions by definition. Yes, and you don’t need to do this. There is TDS - you know who the rest is from.
However, it would be useful to provide some general guidelines. In principle, we already talked about them a little higher: up to 50% hardener and 10-20% thinner are usually added to two-component products. The degree of dilution of base enamels usually ranges from 50-80%. Well, look at the exact proportions in the instructions for a specific product: all can varnishes and enamels have instructions in the form of pictograms that inform you in what proportion you need to dilute the paint with the hardener (if the material is two-component) and thinner.
Let me remind you: only thinner is added to one-component materials (alkyds, base enamels, 1K primers); in two-component ones (acrylic enamels and varnishes, 2K primers), a hardener is first added, then the mixture is brought to the desired viscosity with a thinner.
If you order paint for selection in a laboratory, then you will be given a set of components (usually ordered as a set), by mixing which you will get a ready-to-use material with a working viscosity - as they say, “for a spray.” Or they will give you paint that has already been diluted (of course, this only applies to the base, since the lifetime of two-component materials after mixing is strictly limited).
Supplements
A description of recipes for preparing paint cocktails would be incomplete without mentioning additives - materials used to change the individual characteristics of enamels, varnishes or primers.
For example, to create a rough surface - very often plastic bumpers of SUVs are painted this way - there are structural additives of varying degrees of granularity. In general, to prevent paint on plastic from cracking, 20-40% plasticizer must be added to it. There are matting elasticizers designed to reduce the shine and color of plastic parts such as side trims on Mercedes-Benz cars.
When painting with spectacular two-layer coatings, these additives must be mixed with the topcoat varnish (it is recommended to add a plasticizer to the filler primer as well). Read more about supplements and their uses here.
How to dilute car enamels of different composition?
Using thick paint when painting a car leads to an unaesthetic result - various defects, sagging and shagreen. Applying viscous auto enamel using a spray gun results in a lack of mirror shine and an attractive appearance of the body.
The paint must be diluted immediately before performing the procedure for painting the surface of the vehicle body. Compliance with the proportions of mixing the compositions and the correct choice of solvent will ensure high-quality, problem-free application of auto enamel and a quick drying process.
Thinning the paint allows you to achieve the ideal viscosity of the paint composition, sufficient to cover the entire area of the car body. The wrong choice of solvent can lead to problems during the painting process - poor adhesion to metal surfaces, delamination, the formation of thick lumps and “flakes”.
Note! Before choosing how to dilute the paint, you should carefully study the instructions on the car enamel packaging. Many paint and varnish manufacturers provide recommendations on the use of their products and the choice of solvent.
Different solvents are suitable for certain types of automotive paint:
- White Spirit. It is used mainly for degreasing and cleaning the body surface to be painted before applying enamel. Suitable for slate or rubber bitumen mastic, not recommended for diluting acrylic car enamel;
- №646. An aggressive solvent that not only reduces the viscosity of paintwork materials, but also leads to a change in its chemical composition. It should be used with caution in combination with acrylic paint and some types of primers;
- №647. The solvent is used with car varnishes and nitro paints and has an aggressive effect;
- Multicomponent composition R-4. Contains acetone or toluene, used to dilute alkyd enamels;
- Toluene and xylene are intended for diluting paint containing chlorinated polymer.
Note! When choosing a suitable solvent, it is worth considering the degree of polarity of the paint material.
If liquid hydrocarbons are used in the manufacture of enamel, kerosene or white spirit are suitable for diluting it, the presence of hydroxyl group molecules indicates the polarity of the auto enamel, for which alcohols and ketones are suitable for diluting.
Measuring viscosity
Any painter should be able to control such a vital indicator as viscosity. For what? So that it corresponds to the recommended size. Again, why? To evenly apply the material to the surface and obtain a coating of the required thickness with the required properties - beautiful and durable.
“Viscosity” (from Latin viscosus - sticky, sticky) is a value characterizing the fluidity of a liquid.
Why measure viscosity?
For more details, use the example of filler soil. The surface on which we apply it has various kinds of micro-irregularities left after preparation (grinding marks, pores, etc.). In other words, protrusions and recesses. From the deepest to the highest point - approximately 50 microns.
So, if we apply too liquid a filler to this surface, its thin film will not be able to cover these irregularities, and even with a margin for grinding (by analogy: if you put pebbles on the bottom of a jar and pour water without covering the stones “overall” ). As a result, the surface will remain uneven, and the soil, by and large, will be wasted. You have to do extra work - reapply the filler, spending twice as much time on repairs.
Let's take the opposite situation with applying too thick filler. It would seem that there certainly shouldn’t be any problems here. No matter how it is. A filler that is too thick and non-flowing, again, will not be able to properly fill all the micro-irregularities - its penetrating ability is too low and it is simply not able to flow into these small depressions (just as a soccer ball cannot fall into a golf hole).
The coating turns out to be loose, poorly adhered to the surface, and subsequently the filler begins to peel off. Not a very rosy prospect, but the troubles don’t end there. A filler that is too thick will not be able to spread over the surface in a smooth layer; increased shagreen is formed, which leads to torment and excessive consumption of materials during sanding.
And this is just a filler primer! What can we say about paints and varnishes? Gloss, shade, texture and adhesion again... All this directly depends on viscosity.
Someone will ask: “What if you dilute it thinner so that it flows everywhere, adheres well and spreads smoothly, and apply it thicker so that there is room for sanding?”
Not the best solution, to put it mildly. A thick layer of liquid material contains a large amount of solvent - the coating will remain soft for a very long time (until it dries completely, not hours or days, but weeks and months), and enamel applied over a wet primer can lead to wrinkling of the coating and poor adhesion between the paint and the primer . In addition, the likelihood of such unpleasant defects as “boiling” and many others increases.
So, it is imperative to be able to control viscosity. The question arises: how?
How to measure viscosity?
You can often see how viscosity is measured in the following way: a painter takes some long object (for example a screwdriver), dips it into a can of prepared paint and God knows, by the signs, determines whether the viscosity is optimal or whether it needs to be diluted more.
It is worth saying that if this method is good, it is only for professionals with very extensive work experience. Well, someone, and they, as they say, feel the paint and varnish material with their skin. But what should novice painters who don’t have much experience do?
From our school physics course, we know that viscosity is usually measured in pascal seconds (dynamic viscosity) or in square meters per second (kinematic viscosity). It is also known that methods for determining the true viscosity properties of liquids are quite complex, which means they are not suitable for use in repair shops. Therefore, such a concept as “conditional viscosity” was introduced into circulation.
Determining conditional viscosity comes down to measuring the time (in seconds) when a certain volume of liquid (100 ml) flows from a funnel through a hole of a certain diameter (usually 4 mm).
So don’t be surprised when you see the inscription on a can of paint: “working viscosity 22-24 s.” This only means that the material needs to be diluted to a conditional viscosity of 22-24 s, which is determined using a special device - a viscometer, which is a cylindrical measuring container with a volume of 100 cm³ with a conical lower part and a hole in it.
The most common viscometer for measuring the viscosity of paintwork materials is the DIN4 standard - with a hole diameter of 4 mm. In our standard it is called VZ-4. The VZ-246 funnel can also be used, only it has replaceable nozzles - with diameters of 2, 4 and 6 mm.
Viscometer DIN4. Our standard is VZ-4
Foreign paint manufacturers may recommend other devices to measure the viscosity of their materials, for example, a Ford #4 viscometer (nozzle diameter 1/6 inch or approximately 4.2 mm), some companies may also recommend their own viscometers.
In practice, any of them can be used with equal success: all of these devices are designed according to the same principle, and there are special nomograms and graphs for recalculating readings. This will not affect the measurement accuracy; the error is leveled by the permissible spread of the working viscosity.
How to use a viscometer? An approximate diagram is as follows. We fix the viscometer vertically, place a clean container with a volume of more than 100 ml under it, close the drain hole of the viscometer and pour paintwork into it flush with the edges. Let the material sit a little so that all air bubbles come out of it. The resulting foam can be removed with a knife or glass rod.
Then we open the drain hole and at the same time turn on the stopwatch. We complete the measurement when the liquid stops flowing in a continuous stream and begins to drip. The time recorded on the stopwatch in seconds is the conditional viscosity of the liquid. For example, the viscosity of water at 20 °C according to DIN4 is 13 seconds.
Viscosity is the most important indicator. It determines the material consumption, the optimal mode of its application, as well as the properties of the resulting coating.
I will add that measurements should be carried out at a temperature of 20±0.5°C. Deviations from this temperature are fraught with inaccurate measurements, since when the temperature rises, the viscosity of the material decreases, it becomes more fluid, and when it decreases, on the contrary, it increases.
The average working viscosity at 20 ºC according to DIN4 is:
- for acrylic enamels - 18-20 seconds;
- base enamels - 16-17 seconds;
- varnishes - 18-20 seconds;
- 2K soils - 20-22 seconds;
- liquid putties - up to 30 seconds.
For exact recommendations, see the instructions for this or that paintwork. Let's say the specified viscosity is 22 seconds. If the paint takes longer to flow out, then its viscosity is higher than normal and it needs to be diluted a little more.
By the way, the thinners themselves are “slow” and “fast” - depending on the evaporation rate and the temperature conditions under which they must be used. Thus, at low temperatures it is worth using “faster” thinners, and when working in hot weather, “slow” ones. In standard temperature conditions (18-25°C), respectively, standard. Read more about this here.
Viscometer
p, blockquote 12,0,0,0,0 —>
This is a device with which you can measure the viscosity of paints and varnishes. Using a viscometer, you can accurately bring paint or varnish to the desired fluidity. There are expensive viscometers designed for use in laboratories, and there are also cheaper options that can be used to determine the viscosity of car paint. It is quite possible to use inexpensive plastic viscometers.
p, blockquote 13,0,0,1,0 —>
Measuring viscosity is very simple. You need to mix the paint in the right proportions. If bubbles appear, you need to wait until they disappear. Next, the viscometer is immersed in paint and filled to the brim, then the device is raised up so that paint and varnish material flows from the hole below. At the same time, you need to start the stopwatch. As soon as the steady flow of paint stops and it begins to interrupt and drip, the stopwatch must be stopped. This will be the viscosity data you need. There are special tables in which you can find data on the viscosity that must be in order to use paint with a spray gun that has a nozzle of a certain size.
p, blockquote 14,0,0,0,0 —>
p, blockquote 15,0,0,0,0 —>
Temperature affects the viscosity of paints and varnishes. The lower the temperature, the more viscous the paint becomes, and vice versa, the higher the temperature, the thinner the paint. Before dilution and use, paint and varnish must be at normal temperature.
p, blockquote 16,0,0,0,0 —>
To dilute paints and varnishes, you can use special measuring containers. Such containers have a scale. Thus, you can breed not “by eye”, but quite accurately.
p, blockquote 17,0,0,0,0 —> p, blockquote 18,0,0,0,1 —>
More interesting articles:
Filtering
The prepared paint and varnish material must be filtered before filling into the tank of the spray gun, as it may contain foreign inclusions that got there during the preparation process, clots, etc. Otherwise, it is impossible to guarantee a high-quality coating, because all this debris may ultimately end up on the surface being painted.
For filtration, it is convenient to use disposable paper funnels with a nylon filter insert (mesh size, usually 190 microns). I inserted the funnel directly into the tank, strained it - ready, you can paint!
We fill the paint tank only using a filter funnel.