Causes of contamination of the car air conditioner radiator
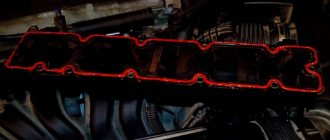
The correct name for an air conditioner radiator is a condenser. Most often it is located under the hood, behind the engine cooling radiator. This is necessary to ensure sufficient cooling by the oncoming air flow. In the same place there is an electric fan that turns on when overheated.
The climate system uses a special refrigerant – freon. While the engine is running, the driver turns on the car air conditioner from inside the car. An electric magnet is activated, which presses the compressor pulley and turns it into operation. The compressor creates pressure that pumps the refrigerant into the condenser. The oncoming air cools the freon and turns it into liquid.
After this, the freon passes through the receiver, evaporator, and the air in the cabin is cooled. Moisture condenses on the evaporator and flows under the car body. Over time, car owners notice that the interior smells unpleasant.
Causes of unpleasant odor:
- The condenser honeycombs become clogged with insects, dirt, and dust. The efficiency of the radiator decreases, since a dirty surface cools the freon worse.
- Moisture accumulates on the evaporator elements. It mixes with dirt and creates an optimal environment for the formation of mold, fungi, and the development of microorganisms.
As a result, along with the smell, dangerous microbes and fungi penetrate into the cabin, which are negative for human health. Therefore, the air conditioner radiator needs to be cleaned and thoroughly washed. You can do this work yourself or contact a car service.
How is a thermostat checked for suitability?
Checking the thermostatic valve on Lanos can be done in two ways. The first method does not require removing it from the car, but the accuracy of the readings will be low, except for those moments when the valve gets stuck open or closed.
The second method is more reliable and allows you to determine whether the part is 100% serviceable, but it will need to be removed. First, let's look at the first method of checking a device for suitability:
- Long time to reach the operating temperature of the internal combustion engine. In this case, the temperature needle on the tachometer does not rise to its usual position. This is a sign that the valve is stuck in the open position, and when the engine starts, the coolant moves in a large circle.
- Engine overheating, which occurs when the valve is stuck in the locked position. When the appropriate temperature is reached, the valve does not open, which promotes the constant movement of liquid in a small circle. Driving a car in this case is also dangerous, since excessive overheating of the engine occurs, which contributes to its accelerated wear. This breakdown is especially evident in the summer, when shortly after starting the engine, the temperature needle begins to reach the red zone.
- There is another way to verify the suitability of the thermostat without the need to dismantle it. To do this, you will need to wait until the internal combustion engine warms up to the operating temperature and touch the pipe that goes to the radiator. If it is cold, the valve is locked in the locked position. If the pipe becomes warm immediately after starting the internal combustion engine, this means that the valve is blocked in the open position.
A thermostat failure manifests itself not only in the form of a valve jamming in the open or closed position. More often, the device operates before the specified temperature, which also indicates its malfunction. However, this can only be checked after removing the thermostatic valve from the vehicle.
https://youtube.com/watch?v=XYUfcOwI2W0%3F
To accurately check the thermostat, it must be removed from the car. The dismantling process on Lanos 1.5 is labor-intensive, so its detailed description and photo report are presented in the material. To check the thermostat, you need to lower it into a container of water. The water is heated and the temperature is monitored using a thermometer. When the temperature reaches 87-92 degrees, the valve should open. If it does not work, then it must be replaced.
Replacing the radiator of the Deo Lanos cooling system
- Repair manuals
- Repair manual for Daewoo Lanos 1997+.
- Replacing the cooling system radiator
The radiator must be replaced if a coolant leak is detected from it.
In a workshop with special equipment, the radiator can be checked and repaired. It is more convenient to remove the radiator when assembled with electric fans.
| WARNING Remove the radiator only when the engine is cold. |
You will need: a 10" wrench, pliers with long thin jaws, a flat-blade screwdriver.
1. Drain the coolant (see “Replacing the coolant” ).
| 2. Disconnect the main fan wiring harness block by pressing the spring clip. | 3. Similarly, disconnect the wiring harness connector for the additional electric fan. |
| 4. Loosen the clamp securing the steam exhaust hose to the expansion tank, squeezing its bent ears with pliers, slide the clamp along the hose... | 5. ...and remove the hose from the radiator pipe. |
| 6. Loosen the clamp securing the supply hose... | 7. ...and disconnect the hose from the radiator pipe. |
8. Similarly, disconnect the outlet hose from the water distribution pipe.
| NOTE Replacing the radiator of the cooling system is shown using the example of a Chevrolet Lanos. |
| 9. Remove the bolt securing the upper radiator support bracket to the upper cross member of the radiator frame... | 10. ...and remove the bracket assembled with the upper support pad. |
11. Similarly, remove the second upper radiator support.
12. Remove the radiator assembly with electric fans from the engine compartment.
| NOTES The pins in the lower part of each radiator tank are fitted with rubber cushions for the lower supports, which are installed in holes in the lower cross member of the radiator frame. Remove them from the crossmember if they remain in the crossmember holes, or remove them from the pins and inspect them. Replace heavily compressed or hardened cushions. Similarly, remove the cushions from the upper support brackets, inspect them and replace them if necessary. |
| 13. If you removed the radiator for repair or replacement, loosen the clamp on the outlet hose... | 14. ...and remove the hose. |
| 15. Remove the three bolts securing the main electric fan casing to the radiator... | 16. ...and remove the electric fan assembly with the casing by removing the lower right support of the casing from the bracket on the radiator. |
| 17. Remove the two bolts securing the additional electric fan casing to the radiator... | 18. ...and remove the electric fan assembly with the casing, removing the lower casing supports from the brackets on the radiator. |
19. Rinse the outside of the radiator with a stream of water and dry. If there are cracks in the plastic radiator tanks, replace the radiator.
20. Check the tightness of the radiator by plugging the radiator pipes, supplying it with air under a pressure of 0.1 MPa (1 kgf/cm2) and lowering it into a container with water for at least 30 s. Radiator leaks are determined by escaping air bubbles. If the radiator does not fit completely into the container, check it sequentially from all sides.
21. Install the electric fans and outlet hose on the radiator in the reverse order of removal.
22. Install the radiator on the car in the reverse order of removal.
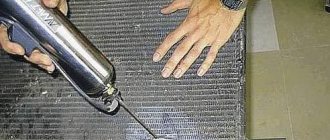
| HELPFUL ADVICE In order to eliminate the possibility of coolant leakage in the future, before installing the hoses, lubricate the radiator pipes with a thin layer of silicone sealant. |
23. Fill in the coolant and remove any air plugs from the cooling system (see “Replacing the coolant” ).
↓ Comments ↓
1. Car structure
1.0 Car structure 1.1 General information about the car 1.2 Passport data 1.3 Car keys 1.4. Controls 1.5 Heating (air conditioning) and interior ventilation 1.6. Doors 1.7 Seat belts 1.8. Seats 1.9 Rear view mirrors
2. Recommendations for use
2.0 Recommendations for use 2.1. Safety rules and recommendations 2.2. What you need to have in your car 2.3 Running in the car 2.4 Operating the car during the warranty period 2.5 Preparing the car for departure 2.6 Filling the car with gasoline 2.7 Using a jack 2.8 Towing the car 2.9 Adjusting the ignition timing depending on the quality of gasoline
3. Problems along the way
3.0 Malfunctions along the way 3.1. The engine does not start 3.2 Malfunctions of the fuel injection system 3.3 Idle speed has disappeared 3.6. The car moves jerkily 3.7 The car accelerates poorly 3.8 The engine stalled while driving 3.9. Oil pressure dropped 3.10. Engine overheating 3.11. The battery does not recharge 3.14. Extraneous knocking noises appeared 3.15. Problems with brakes 3.16. Wheel puncture
4. Maintenance
4.0 Maintenance 4.1. General provisions 4.2. Daily Maintenance (EO) 4.3. First maintenance (TO-1) 4.4. Second maintenance (TO-2)
5. Engine
5.0 Engine 5.1. Design features 5.2 Checking compression in the cylinders 5.3 Removing and installing engine mudguards 5.4 Replacing the power unit suspension mounts 5.5 Installing the piston of the first cylinder to the TDC position of the compression stroke 5.6 Removing, installing and troubleshooting the flywheel 5.7. Replacement of engine seal parts 5.8. Cylinder head 5.9 Removing and installing the engine 5.10. Engine repair 5.11. Lubrication system 5.12. Cooling system 5.13. Exhaust gas system 5.14. Engine power system 5.15. Fuel vapor recovery system 5.16. Exhaust gas recirculation system
6. Transmission
6.0 Transmission 6.1. Clutch 6.2. Gearbox 6.3. Front wheel drives
7. Chassis
7.0 Chassis 7.1. Front suspension 7.2. Rear suspension
8. Steering
8.0 Steering 8.1. Design features 8.2. Steering column 8.3. Steering rods 8.4. Steering gear
9. Brake system
9.0 Brake system 9.1 Design features 9.2 Possible malfunctions of the brake system, their causes and solutions 9.3 Bleeding the brake system hydraulic drive 9.4 Checking and adjusting the position of the brake pedal 9.5. Main brake cylinder 9.6. Vacuum brake booster 9.7. Replacing hoses and tubes of the hydraulic brake drive 9.8 Removing and installing the brake pedal 9.9. Brake mechanisms of the front wheels 9.10. Brake mechanisms of the rear wheels 9.11. Parking brake
10. Electrical equipment
10.0 Electrical equipment 10.1 Design features 10.2. Mounting blocks 10.3. Battery 10.4. Generator 10.5. Starter 10.6. Ignition switch (lock) 10.7. Engine management system 10.8. Lighting, light and sound alarms 10.9 Replacing the windshield wiper motor 10.15. Instrument cluster 10.16. Instrument panel switches 10.18. Car audio system 10.19. Replacing sensors and switches
11. Body
11.0 Body 11.1 Design features 11.2 Possible body malfunctions, their causes and solutions 11.3. Removing, disassembling and installing bumpers 11.4 Removing and installing radiator trim 11.5 Removing and installing wheel mudguards and wheel arch liners 11.6 Removing and installing the front wing 11.7 Removing and installing the air intake duct grille 11.8. Hood 11.9. Doors 11.10. Trunk lid 11.11. Fuel tank filler pipe hatch cover 11.12. Seats 11.14. Passive safety system (SRS) 11.15. Rear view mirrors 11.16. Instrument panel 11.17. Heater and air conditioner 11.18. Interior fittings 11.21. Windshield wiper 11.24. Body care
12. Wheels and tires
12.0 Wheels and tires 12.1 Technical specifications 12.2 Wheel rim markings 12.3 Tire markings 12.4 Wheel replacement 12.5 Tire break-in 12.6 Tire storage 12.7 Wheel balancing 12.8 Snow chains 12.9 Spare wheel
13. Purchase of spare parts
13.0 Purchasing spare parts 13.1 Engine oil 13.2 Greases 13.3 Coolants 13.4 Brake fluid 13.5 Fine fuel filter 13.6 Air filter 13.7 Engine lubrication system oil filter 13.8 Spark plugs
14. A trip to the service station
14.0 A trip to the service station
15. Winter operation of the car
15.0 Winter operation of a car 15.1 How to prepare a car for winter 15.2 Recommendations for starting the engine in severe frost 15.3 What is useful to buy for winter 15.4 Useful winter tips
16. Preparation for technical inspection
16.0 Preparation for technical inspection 16.1 Recommendations 16.2 List of malfunctions and conditions under which the operation of vehicles is prohibited 16.3 Changes to state standards regulating the maximum permissible content of harmful substances in the exhaust gases of vehicles
17. Tips for a novice auto mechanic
17.0 Tips for a novice auto mechanic 17.1. Safety precautions during repair work 17.2. Tools 17.3 Before you start 17.4. Restoration of threaded connections
18. Applications
18.0 Appendices 18.1 Appendix 1. Tightening torques of threaded connections, N m 18.2 Appendix 2. Lamps used on a car 18.3 Appendix 3. Spark plugs used on a car 18.4 Appendix 4. Recommended fuels and lubricants and operating fluids
19. Electrical diagrams
19.0 Electrical diagrams 19.1 Diagram 1. Connections of the generator set and engine starting system 19.2 Diagram 2a. Engine control system (start) 19.3 Scheme 2b. Engine control system (continued) 19.4 Scheme 2c. Engine control system (continued) 19.5 Scheme 2d. Engine control system (continued) 19.6 Scheme 2d. Engine control system (continued) 19.7 Diagram 2e. Engine control system (end) 19.8 Scheme 3a. Connections of lighting devices (beginning) 19.9 Scheme 3b. Lighting connections (continued)
We facilitate access to the heat exchanger
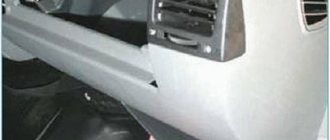
In order to remove the heater radiator on a Chevrolet Lanos, it is necessary to make access to it as easy as possible. Between the seats there is a decorative plastic tunnel that needs to be removed. To do this, you need to unscrew a couple of screws in the front on both sides and move the chairs forward. This will free up access to the two screws in the back. You can then lift up the back of the trim and remove it completely. The seats are then moved back as far as possible. The best solution would be to completely dismantle them, but this is not necessary. After this, you need to unscrew another screw and disconnect the front part of the tunnel, after first removing the cigarette lighter. The seats may interfere with this. But their cushions can be compressed during dismantling. The plastic itself is soft enough and can be bent without breaking. How can the heater radiator be changed on a Lanos car? After this, you need to remove the two side parts from below. One of the mounting screws secures the ground terminal. When reassembling it, it must be put in place. The next step is to unscrew four small bolts. Then the entire gear shift assembly along with the rod must be moved towards the passenger side and the structure can be completely removed from the passenger compartment. To make it easier to work, you can dismantle the glove box by removing a couple of screws from the bottom.
Replacing the heater radiator for a Chevrolet Lanos.
How to replace a heater core without removing the dashboard.
Many people are interested in the question: how to replace the heater radiator on a Chevrolet Lanos without removing the dashboard . I won’t say it’s as easy as shelling pears, but there aren’t any particular difficulties.
A lift or pit is required to perform this operation. But you can do without them.
You just need to remove the pipes from the heater radiator and disconnect the connection between the gearshift lever rod and the gearbox, and this is much more convenient to do from below the car.
Many people write that you need to remove one of the seats, or even both. Not at all necessary. Yes, if you remove them there will be more space, and it will be easier to remove the plastic tunnel in the center. But is it worth it?
So let's get started.
First, remove the pipes from the heater radiator and drain the coolant.
Don’t forget to provide some kind of container to collect the liquid, it will come in handy.
Unscrew the clamp securing the gear lever rod. Unscrew the bolt completely. Loosen the clamp and remove the gearbox linkage axle from the rod. It is advisable to mark the joint location so as not to suffer during assembly. We remove the clamp.
If the car does not have air conditioning, you can skip a few paragraphs.
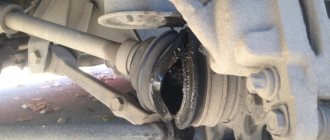
If there is an air conditioner, a fitting is provided in the heater housing to drain condensate from the air conditioner radiator. The fitting is located to the left of the heater radiator pipes. Usually it has an L-shaped rubber pipe directed downwards.
Let's jump ahead a little.
In order to remove the casing covering the radiator, the casing must be lowered downwards (it is connected to the heater body using a tongue-and-groove method). But the fitting does not allow this to be done. To pull the fitting out of the engine shield, you need to pull the casing towards you, but the “groove-tenon” connection does not allow this to be done.
We have to use force. Sometimes it is possible to accomplish this feat, but usually the casing breaks, sometimes even in several places. Of course, it can be glued together, but during installation it will break again.
But Russian “craftsmen” will find a way out of any situation. Using a hacksaw blade, or even a grinder, this fitting is cut off as much as possible. This is of course best done from below the car. Then, with the casing removed, cut off the remains almost flush.
As already mentioned, condensate drains through this fitting, i.e. there is no pressure. Then, after complete assembly, we select a tube of suitable diameter (fountain pen body, felt-tip pen), insert it into the hole, thereby diverting the drain from the engine shield. The connection can be sealed using any sealant.
Replace or repair the radiator
If your car has a copper or brass radiator that has leaked, then it not only can, but also needs to be repaired. After all, the cost of such a device is quite high, so buying a new copper radiator will cost a pretty penny. If you prefer to install a copper cooling radiator on Lanos, then you can make it to order. There is also an option to install a heat exchanger from VAZ cars.
Conventional aluminum radiators, which are installed on Lanos from the factory, cost 5 times less than copper ones, so if they are found to be faulty, it is better to replace them. To repair an aluminum heat exchanger, you will need special soldering equipment. In addition, even after carrying out these soldering works, such a device will not last more than 1-2 years. It is rational to repair the Lanos aluminum cooling radiator (link) yourself if a leak occurs at the junction of the tank with the honeycomb.
What is a thermostat on a car for?
The water cooling system of the Lanos engine (and all other models) is represented by two circuits - large and small. When the engine starts, the coolant circulates in a small circle, which is necessary for quickly warming up the internal combustion engine. The small circle of the cooling system consists of:
- engine cooling jackets;
- heater radiator in the car interior.
Access to the large circle is limited by a thermostatic valve - a thermostat. It opens when the appropriate coolant temperature is reached when the engine warms up. A large circuit connects the engine cooling radiator, where heat exchange occurs.
The thermostat plays a very important role in the design of the cooling system. If it were absent, then heating the engine would take 3-4 times longer. This would have a negative impact not only on the structural parts of the internal combustion engine, but would also lead to increased fuel consumption.
This is interesting!
If increased fuel consumption is detected on Lanos, then it would be a good idea to check the serviceability of the thermostat. If it is stuck in the open position, the engine will take a long time to reach operating temperature, due to which the consumption of the combustible mixture will increase (the mixture will be enriched).
Nuances of the work
The heating system can be restored by a car enthusiast by replacing the radiator. But here an additional problem arises - the designers did not take care to provide convenient access to the heat exchanger and facilitate maintenance of the heater.
The difficulty lies in the fact that the stove body with a radiator installed inside it is located under the front panel. Therefore, according to the official technical According to the manufacturer's documentation, it is possible to replace the radiator of the Lanos stove only by first dismantling the front panel, and for this you still need to disassemble almost half of the interior. Replacing a Lanos radiator is not a particularly complicated operation, but it is labor-intensive and time-consuming. But car enthusiasts have already developed a method for removing the heater on a Chevrolet Lanos without dismantling the front panel. This method reduces the time for replacing the heat exchanger, but it is not easy to implement (half the interior will still have to be disassembled), and you will have to work in a cramped space, and even with not very convenient visibility.
Functions, structure and principle of operation of the stove radiator
The radiator (convector, heat exchanger) of the stove is the most important component of the interior heating system of any car. The stove ensures the creation and maintenance of a comfortable temperature for the driver. This is especially true during the cold season. In addition, the heater prevents fogging of car windows.
The heating system consists of the following components and parts:
- frame;
- stove radiator;
- heat exchanger pipes;
- control valve;
- fan;
- electric fan motor;
- air ducts and distribution dampers.
The heating system heats the air entering the cabin
The role of coolant is played by antifreeze circulating through the cooling system. When the power unit is warmed up and the coolant temperature reaches 50 °C, it can be used to heat the passenger compartment. Depending on the position of the tap, a certain amount of hot antifreeze enters the radiator. The fan directs air flow from the engine compartment into the passenger compartment. This air passes through the radiator honeycombs, receiving heat from the heated antifreeze. The more antifreeze passes through the heat exchanger, the more heat is transferred to the air. The flow of heated coolant in the radiator can be adjusted using a tap.
The Chevrolet Lanos heater radiator has a fairly simple design
Depending on the car model, the air temperature in the cabin is regulated in various ways - by a control valve, fan rotation speed and the position of the air dampers. The heated air flow is regulated and distributed in different directions. By directing warm air onto the windshield and front side windows, you can prevent them from fogging up. Using the flaps, you can direct air to the area of the legs, face and certain places on the side windows. Blowing the windshield is also necessary to create slightly increased pressure so that dust and dirt from the street do not enter the cabin. This ensures the most comfortable microclimate for the driver and passengers.
The design features of the heater somewhat limit its operation. So, the stove cannot be turned on when the engine is cold. You need to wait until the coolant heats up to 50–60 °C. Otherwise, the engine will take much longer to warm up, especially in severe frost. In addition, due to the increased humidity in the cabin, the windows will begin to fog up. Therefore, water and air heaters are sometimes installed as additional ones. This depends on the design features of the heating system of a particular car model.
Replacing the stove radiator
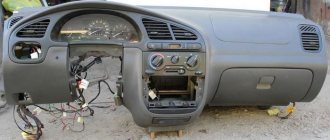
The heater radiator is the main problem of incorrect operation of the Chevrolet Lanos interior heating system. The easiest way to solve this problem is to replace the radiator. The work is quite complex, labor-intensive and expensive. When replacing a radiator, car service specialists completely disassemble the dashboard in the cabin.
However, the work can be done with your own hands without removing the dashboard. To do this, you will need an inspection hole or overpass and the following tools:
- a set of wrenches and sockets;
- Phillips and slotted screwdrivers;
- stationery knife;
- glue "Moment";
- platypuses.
To replace the radiator, you will need a standard set of plumbing tools.
The design and fastening of the heater body does not depend on the presence of air conditioning in the car. Therefore, for all Chevrolet Lanos models, the procedure for replacing the heater radiator is the same.
- The car is driven into a viewing hole (the best option).
- The front seats are removed. To do this, 4 bolts are unscrewed under each of them.
- The seat belt sensor is disconnected under the driver's seat.
- Three self-tapping screws are unscrewed and the plastic gearbox cover is removed.
- Two self-tapping screws are unscrewed and the handbrake housing is removed.
When replacing the heater radiator, the front seats, plastic covers of the manual transmission and hand brake are removed - The gearbox linkage mounting clamp is removed from the inspection hole.
To remove the gearbox control rod from the inspection hole, it is necessary to remove the clamp - The pipe through which the condensate from the air conditioner is drained is removed.
To remove the manual transmission control mechanism, remove the condensate drain pipe - The four fastening bolts are unscrewed, and the gearbox lever together with the rod is removed from the passenger compartment.
The gearbox control mechanism can only be removed from the passenger compartment - The fastening nuts and bolts are unscrewed, and the side panels connecting the center panel casing to the body are removed.
The sidewalls connecting the center panel casing to the body are removed, and the casing itself is released. - The lower part of the distributor, which directs air flow to the leg area, is removed. To do this, unscrew three screws - two at the top near the radio and one at the bottom. If the tourniquet gets in the way, use a screwdriver to tighten the tendrils of the clip, and the tourniquet is pulled out of the hole.
The lower part of the distributor, which directs air flow to the leg area, is secured with three self-tapping screws - The lower part of the heater housing is dismantled, which is secured with 10 screws. Only 8 are unscrewed, since 2 screws were already unscrewed when the distributor was removed. Since the design does not provide for such a dismantling option, you should remove the casing in a confined space extremely carefully and carefully so as not to damage it.
To remove the lower part of the stove housing covering the radiator, eight screws are unscrewed - Access to the radiator is provided. Before removing it, it is necessary to drain the coolant from the system and disconnect the pipes through which antifreeze enters the radiator.
- The radiator is released from the latch located outside. In addition, the bracket is removed from the back. After this, the radiator can be removed.
To remove the heater radiator, you need to disconnect the bracket and latch - Having gained access to the damper that regulates the temperature, its functionality is checked. It may not completely block the flow of cold air when the temperature control is set to the maximum position. In this case, you can stick a seal on it or adjust the control cable.
If the damper does not completely block the flow of cold air, a sealant is glued to it
Installing a new or flushed heater radiator is done in the reverse order.
The radiator can be replaced in another way. To do this, you will need to remove and remove the dashboard from the interior. This operation can be performed on your own in half an hour, without removing the front seats. The dashboard is removed from the passenger compartment along with the stove body, providing access to the elements of the passenger compartment heating system.
Video: replacing the heater radiator with dismantling the dashboard
Choosing a new heater radiator for Chevrolet Lanos
For Chevrolet Lanos, a heater radiator from the Chevrolet Sens model, which has the same dimensions, is suitable. Heat exchangers can be purchased with a strip or plate cooling fin system. In addition, on the market you can find prefabricated strip-plate and tubular-strip brazed aluminum radiators from such manufacturers as NISSENS, AVA, NRF, DAC, GROG, KMC with the number of main tubes from 16 to 22. The cost of products can vary greatly depending on design, workmanship and manufacturer.
Thus, it is quite simple to repair and replace the heater radiator of a Chevrolet Lanos car, consistently following the instructions of professionals. All you need is free time and a standard set of plumbing tools.
Source
Why are radiators of different sizes installed on Lanos cars?
Lanos cars are equipped with cooling radiators of different sizes. What is this connected with? Surely you have noticed that heat exchangers are installed under the hood of Lanos vehicles, which have distinctive design features. There are two types of radiators used on Lanos:
- Wide and short - installed on Lanos cars that do not have air conditioning
- Flat and long - used on Lanos with air conditioning, as well as on cars where it is possible to install an air conditioning system
On Lanos with flat heat exchangers, 2 cooling fans are used. One fan is used to cool the short heat exchanger.
Instructions for replacing the cooling radiator on Lanos
The design of Lanos cars uses a water cooling system, the integral element of which is a radiator. Another name for this device is a heat exchanger. It is designed for rapid cooling of the coolant circulating in a separate engine system. Sooner or later, this device fails and requires repair or replacement. Let’s look at how to replace the cooling radiator on a Chevrolet or Daewoo Lanos in detail so that this process does not cause difficulties for the owners.
How to change without removing the dashboard
The main difficulty encountered when repairing a stove is access to the lower casing. To classically dismantle this element, you will need to remove the entire torpedo, which will take quite a lot of time. You can pull out the radiator easier and faster if you work from the bottom side. First, let's do the preparatory work:
- For ease of work, remove both front seats.
- We remove the pipeline hoses and drain the working fluid into a previously prepared container.
Remove the pipe and drain the working fluid from the heating system - Loosen the clamp that holds the gearshift lever and completely unscrew the mounting bolt.
Unscrew the bolt and remove the clamp for subsequent dismantling of the lever - Pull the gear lever shaft out of the rod assembly.
This is interesting: We are replacing the heater radiator on a Daewoo Nexia car. Now we have free space to work. But in order to remove the radiator itself, you will need to dismantle the side metal elements that connect the floor and the console.
Remove the side fasteners that connect the console to the floor
Now you can remove the lower casing:
- Unscrew the 8 screws of the heater casing.
This is not easy to do; you will need a special wrench (a ratchet and an extended socket 7), since you will have to work from below. To remove the casing you will need to unscrew 8 bolts - We remove the casing and gain access to the radiator.
- Open the latches and remove the heater from the grooves.
Assembly proceeds in reverse order. It is worth noting that factory radiator mounts often break and it is better to modify these elements from scrap materials. You can use metal sheet products with a diameter of 2 mm.
The metal mount holds the radiator well and does not break.
Radiator replacement process
To replace a Chevrolet Lanos radiator, you need to understand how the coolant moves through the system, as well as have technical knowledge of the car’s design. So, let's immediately begin the replacement process:
- Allow the Chevrolet Lanos to cool.
- Remove the lower engine protection.
- Remove the power supply to the fan switch sensor.
You can remove the radiator as an assembly with the fan (fans - if there is an air conditioner) or by first dismantling the fan (fans). Drain the coolant. Disconnect the engine control system wiring harness connector from the main fan motor wiring harness connector. Disconnect the additional fan wire block.
Disconnect the steam hoses.
Using pliers, we compress the clamp securing the steam exhaust hose and slide it down the hose.
Remove the radiator inlet pipe.
Remove the steam exhaust hose from the radiator pipe.
We also remove the radiator outlet pipe ourselves.
Use a Phillips or slotted screwdriver to loosen the clamp securing the supply hose...
Unscrew the support brackets.
...and disconnect the hose from the radiator pipe.
Remove the radiator and fan assembly.
Disconnect the radiator outlet hose in the same way.
We put everything back together in reverse order.
Using a 10mm socket, unscrew the two bolts securing the brackets for the upper radiator supports to the upper cross member of the radiator frame.
Fill in 9.5-10 liters of coolant.
We remove the radiator assembly with fans from the engine compartment. We remove the fans.
- We seal the system.
- We start the car and let it run for 5 minutes.
- Add fluid and check for leaks.
Air conditioning system maintenance
At the beginning of each cold season of operation, as well as in the event of a change in system performance or the appearance of foreign odors, it is necessary to service the air conditioner. It includes:
- replacing the cabin filter;
- cleaning radiator fins and air intakes;
- cleaning the drainage system to remove condensate.
Timely implementation of routine maintenance increases the service life of the car air conditioner.
Precautions for system maintenance and operation
When performing repair and maintenance work on the air conditioning system, you should follow the safety rules and precautions:
Replacement of equipment and components should be done with the terminal of the car battery removed.
Safety glasses must be worn when working on a sealed system.
When the air conditioner is on, do not work in the area of the fans.
Radiator selection
Choosing a radiator has always been a difficult decision for the owner of a Chevrolet Lanos. Doubts eat up anyone who finds themselves in such a situation - original or analogue. Let's consider this issue in more detail.
The original is good, but it is not always affordable, and the average owner of a Chevrolet Lanos does not know which analogue is good and which one should not be taken. Usually, they are guided by the opinion of the seller, who just wants to fill his pocket and sell more and more expensively.
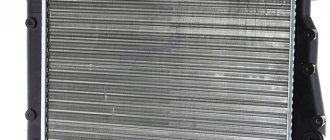
The radiator of the cooling system consists of two vertically located plastic tanks connected by aluminum tubes with cooling plates located in one row. The liquid enters the radiator through the pipe of the right tank, and is discharged through the pipe of the left tank.
So, which analogues are worth taking and which ones are not. The table below will show similar radiators that have been tested by time and quality. If you don’t come across an analogue that is offered to you, it means that it is either little-known or you shouldn’t take it.
| Name | Original catalog number | Analog part |
| Radiator General Motors | 96182261 | 5000 |
Installation of both the original and the analogue is carried out on the same seats.
Analogs
There are a number of analogues that can be used instead of the original:
| Name | Original catalog number | Analog part |
| Stellox | 10-25161-SX | 3000 |
| Fenox | RC00028 | 4000 |
| Luzar | LRc 0561 | 4000 |
| Nissens | 616551 | 4500 |
| Delphi | 52484500 | 4500 |
| Pmc | PXNDC-007 | 5000 |
| Valeo | 734248 | 7000 |
The nuances of buying a radiator
After the radiator has been ordered and the buyer has come to receive it, the following should be done:
- Unpack it in front of the seller and thoroughly inspect the radiator (at the same time, keep the packaging intact, otherwise it will be impossible to return the part).
- When inspecting, you need to look at the overall integrity, fastenings for cracks, and incoming holes.
- If everything is good, then we take it. If not, we return it and ask for a replacement or refund.
- Remember that you can return the item within 14 days from the date of purchase, provided it has no traces of installation and the packaging is intact.
By observing all of the above points, the radiator for the Chevrolet Lanos will last a long time and will not cause any trouble to the owner.
Reasons for radiator failure
There can be a lot of reasons why a radiator fails, but let’s look at the main ones:
- Physical wear and tear (senile).
- Clogging of ducts in radiator honeycombs.
- Physical damage (hit by a stone or other object, causing a break in the structure).
- Broken radiator mountings.
One of these reasons may damage the radiator and serve as a reason for replacement.
Reasons for replacing the radiator
The heat exchanger is the “weak point” of the entire heating system. The radiator of the Lanos stove is made of non-ferrous metals, so the part is not very durable and leaks (in places where components are soldered, due to defects in the metal structure, oxidation processes).
The second problem with the heat exchanger is the use of tubes with a small cross-section in the design. During operation, debris and dirt from the entire cooling system accumulate in the radiator, which leads to blockage of the tubes, causing the heater's efficiency to decrease. If this problem occurs, flush the radiator, but if it is severely clogged, such measures do not always bring a positive result. It is impractical to unsolder the radiator and clean it mechanically, since when reassembling the part it is rarely possible to restore the tightness. Therefore, if flushing does not increase the throughput of the heat exchanger, replace it.
Necessary tools and materials for replacing the radiator on Lanos
If you find a malfunction of the heat exchanger on a Chevrolet, Daewoo or ZAZ Lanos, then before replacing it, you should buy a new radiator. Today, these devices are produced by different manufacturers, and which brand is better to buy is discussed briefly. However, all car owners agree on the heat exchangers of the Danish company Nissens, which are distinguished by decent quality and cost.
In addition to the new heat exchanger, the following tools will be needed when replacing:
- Screwdrivers
- Key to "10"
- Pliers
Such a primitive set of tools suggests that the replacement process does not present any difficulties. In addition to tools, you will need a container, the volume of which must be at least 5 liters. Coolant from the system will be drained into this container. After replacing the radiator, it is recommended to fill the system with new antifreeze. A detailed description of how to replace antifreeze on Lanos with flushing the system is presented in this material.
To replace, you also need to select the appropriate antifreeze. The volume of the Lanos cooling system is 7 liters, but since it is impossible to completely empty it, 5 liters of antifreeze or antifreeze will be enough.
This is interesting!
If you are replacing the cooling radiator on a Lanos with an automatic transmission, then you will additionally need a “14” key, which is used to tighten the fittings protruding from the additional transmission oil cooling tank.
Radiator replacement process
1) The part is replaced only when the engine is cold. First of all, we drain the antifreeze; to do this, you can take a ten-liter canister, cut a hole in its side and place the resulting container under the radiator, open the valve.
2) To remove air from the system, remove the throttle body heating hose (photo 1).
3) Disconnect the wire blocks going to the fans (photo 2).
4) Unscrew the clamp of the gas outlet hose leading to the expansion tank (photo 3), repeat the operation with the supply hose (photo 4).
5) Unscrew the outlet hose from the water distribution pipe (photo 5).
6) Remove the upper radiator mounts along with the cushions on both sides (photo 6).
7) After completing the previous steps, you can remove the radiator. Next, remove the fans from the old radiator by unscrewing the mounting bolts (photo 7).
 We throw over the outlet hose and install a new radiator in place of the old one. We put on the upper fasteners and connect the fan cables. And we connect the disconnected hoses, everything except the throttle body heating tube.
9) We begin to pour antifreeze into the tank (photo 8), as soon as liquid flows from the throttle body hose, it can be connected in place.
This completes the procedure for replacing the radiator; you can let the car run for a while and, if necessary, add antifreeze.
Part number: Daewoo Lanos engine cooling radiator 96182261
How to change without removing the dashboard
The main difficulty encountered when repairing a stove is access to the lower casing. To classically dismantle this element, you will need to remove the entire torpedo, which will take quite a lot of time. You can pull out the radiator easier and faster if you work from the bottom side. First, let's do the preparatory work:
- For ease of work, remove both front seats.
- We remove the pipeline hoses and drain the working fluid into a previously prepared container.
Remove the pipe and drain the working fluid from the heating system - Loosen the clamp that holds the gearshift lever and completely unscrew the mounting bolt.
Unscrew the bolt and remove the clamp for subsequent dismantling of the lever - Pull the gear lever shaft out of the rod assembly.
This is interesting: Innovations first used on the GAZ-12 ZIM Now we have free space to work. But in order to remove the radiator itself, you will need to dismantle the side metal elements that connect the floor and the console.
Remove the side fasteners that connect the console to the floor
Now you can remove the lower casing:
- Unscrew the 8 screws of the heater casing.
This is not easy to do; you will need a special wrench (a ratchet and an extended socket 7), since you will have to work from below. To remove the casing you will need to unscrew 8 bolts - We remove the casing and gain access to the radiator.
- Open the latches and remove the heater from the grooves.
Assembly proceeds in reverse order. It is worth noting that factory radiator mounts often break and it is better to modify these elements from scrap materials. You can use metal sheet products with a diameter of 2 mm.
The metal mount holds the radiator well and does not break.
How to remove the heater radiator on a Chevrolet Lanos?
So, let's consider the order of removing the radiator of the Lanos stove:
- Replacing a stove radiator requires free space for disassembly. It is not necessary to remove the front seats, but this will provide adequate access to the necessary elements. Don't be lazy and remove the seats.
- Disassemble the plastic tunnel on the floor of the car. We unscrew the screws in the front and back on both sides. Lift the rear section to release the tunnel housing halves. Don't forget to disconnect the cigarette lighter connector.
- Remove the gearbox drive. Loosen the lever linkage ring to remove it from its connection to the rocker. Remove the fasteners and ring from the rod. Remove the 4 bolts that hold the lever. Pull out the mechanism along with the rod. Mark the connection location with a marker so that it can be installed correctly during assembly.
- Unscrew the steel strips that secure the console. Remove both halves. The bar houses the ground terminal, so put it in place when you assemble it.
- Remove the small glove box. Optional, just for convenience.
- Remove the hoses from the heater radiator. We pour the coolant into the container, because it will come in handy. We remove the rubber seal from the condensate drain pipe (located in the engine compartment).
- Unscrew the three screws and remove the air distributor that goes to the driver's feet. It’s not difficult to get there; the front part of the lower protection of the heater radiator housing is secured with screws.
- Start removing the bottom guard (casing). It is secured with ten screws, but only two of them secure the air distributor. We unscrew only eight.
Replacing a Chevrolet Lanos heater core requires patience and skill.
Use a small ratchet with a long head for 7. At points 9 and 10 there is a wire harness that makes it difficult to remove the cover (casing). There are mounting clips located on the dashboard side of the Chevrolet. To lower the cover completely, remove the clips. Next, insert the harness between the casing and the torpedo.
If the Daewoo does not have air conditioning, then remove the casing without effort. Otherwise, in the place of the fifth point there is a fitting, which is used to drain the remaining condensate. This placement makes it difficult to remove the casing. The fitting is located to the left of the heater pipes and goes into the engine compartment. To remove the cover, lower it down and pull it towards you. The fitting will prevent downward movement.
How to change the heater radiator on a Chevrolet Lanos? Removing the casing is complicated by the design of the elements. Here we choose from two options for solving the problem:
- Take a hacksaw blade for metal. Cut off the fitting.
- Apply the necessary force when you lower the casing down and immediately pull it towards you.
We choose the second option, in which the cover may be damaged or part of the plastic may break off. If this happens, then the fracture site is treated with a soldering iron.
Lanos heater radiator mount
How to remove the radiator? The heater is fixed in two places. At the bottom, a curly bracket secures the stove pipes (screwed with a self-tapping screw). Access the self-tapping screw. It holds the radiator mount, which is screwed to the upper box. Unscrew the self-tapping screw located between the radiator body and the pipe strip. You will find the screw by touch.
There is a steel clip on top, which is held on by a thin plastic insert. Remove carefully so as not to break the insert. The plastic may become deformed due to the weight of the device. The metal clip remains on the plastic.
Damper requires minor repairs
Press out the fixing elements. Remove the part that holds the damper axis. Unhook the cable and pull out the damper. Apply self-adhesive sealant to the damper using liquid nails. We clean the surfaces from dirt, take a new stove and assemble it in the reverse order.
From this moment the replacement of the heater radiator begins. Make sure that the elements fit tightly into their grooves, otherwise you will have to compact them. The Lanos heater radiator is copper or aluminum, depending on which one is installed by the manufacturer.
How to fix the radiator of the Lanos stove? We install a new radiator. For ease of assembly, pre-attach the brace. Then insert the heater pipes and snap the steel clip into place. Screw the screw onto the bracket.
Install the lower casing. It is important that he sits exactly in his place. During installation, the casing rests against the central insert at the location of the fourth screw. Insert a thin screwdriver into the gap between the boxes and press it into the edge of the bottom cover so that it goes behind the central insert. It clicks into place.
We connect the pipes and fill the system with coolant. We start the car and check that the heater is heating and the fans turn on on time. We assemble the console and tunnel. We mount the gearbox back and check that the gears are shifted correctly. We put the seats in place. This completes the work.