The Kalina car has a fairly simple design, thanks to which experienced car owners can carry out most routine repairs and restoration operations in a personal garage. With your own hands you can:
- replace the air pump and air filter;
- replace the ignition system module;
- change the diode bridge;
- remove air from the cooling system;
- dismantle the water pump and replace it with a new one;
- change the protective cover of the grenade, replace the worn, crisp CV joint with a new part.
Grenade
The Kalina CV joint or “grenade,” as car owners call this unit in driver’s slang, is a mechanism that transmits rotation to the wheels. Structurally, grenades are quite simple, while ensuring rotation of wheels that are not located parallel. The functional unit is securely covered under a ribbed cover containing lubricant inside. After several years of hard work, the rubber boot of the hinge exhausts its service life: its surface becomes covered with tears, allowing lubricant to seep out, and dust and water begin to actively penetrate into the unit from the external environment. If the defect that has arisen is not detected in a timely manner, the Lada Kalina grenade can very quickly fail, since the mechanism does not tolerate moisture, sand and dirt falling on the contacting surfaces. Prevention is always cheaper than treatment, so it will be much cheaper to change the boot than to wait for a breakdown and replace the entire device.
How the malfunction manifests itself
The Lada Kalina CV joint is a unit designed to work in extreme conditions. Accordingly, this device has a solid margin of safety and high-quality protection from adverse factors - a boot made of durable rubber, hermetically isolating the mechanism from the external environment. If the car undergoes maintenance on time and is carefully maintained by the owner, and is used on good highways, then both external and internal CV joints work flawlessly for a long time, without causing any complaints.
When the car is used to travel over rough terrain, where potholes are common, the hinges, which experience extreme loads, can be damaged. In addition, the breakdown of this functional unit may be due to other circumstances:
- production errors;
- use of material that does not meet technical requirements;
- use of low quality lubricant;
- clogging of the internal space.
If the owner of the car begins to hear a metallic grinding, clicking or crunching noise while driving along the highway, you should check the integrity of the boots and the functionality of the outer and inner CV joints at the first opportunity. If any of the components fails, it is completely replaced.
Which CV joint to choose for Kalina – Auto news and car repair tips
Replacing outer and inner CV joints on Lada Kalina
CV joint (constant velocity joint - approx.) or popularly just a “grenade”, is designed to transmit torque to the wheels of a car. CV joints can be internal or external, and the devices themselves are quite simple in technical terms and consist of a ball bearing that rotates transversely to its axis.
In the video, replacing CV joints on a Lada Kalina:
Failure of the CV joint on the Lada Kalina is a very common occurrence, and the main reason for its failure is torn anthers. Because, together with dust and water falling under them, the lubricant turns into thick mud, and it is no longer able to fully perform its functions.
Replacing the outer CV joint
In the process of replacing the outer CV joint
The work of replacing an outer or inner CV joint is not very difficult and can be done by any motorist who has at least once repaired a car with his own hands. And in order for the repair to be easier and faster, you need to prepare the following tools:
- Socket heads for “17” and “30”.
- Driver or ratchet.
- Extension for the wrench.
- Jack.
- Wheel chocks.
- Hammer.
- Vise.
Step-by-step disassembly procedure
After you are convinced of the malfunction of one or another CV joint, you can begin to work.
- First of all, we tear off the mounting bolts from the wheel and the hub nut, then we set the wheel chocks under the rear wheels. (To make it easier to tear off the nuts, it is better to use an extension for the wrench - approx.).
- We put the car on a jack and hang the wheel.
- We remove the wheel and, for greater reliability, place it under the car next to the jack.
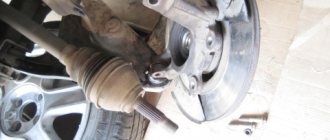
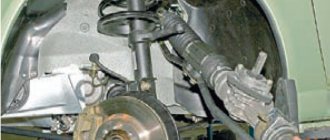
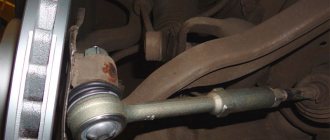
- Now that this picture appears before you, all that remains is to unscrew the 2 bolts that secure the ball joint to the steering knuckle.
Unscrew the bolts marked with a red marker on both sides.
They counterfeit everything related to the AvtoVAZ assembly line. Any part purchased at a car store can be a counterfeit...
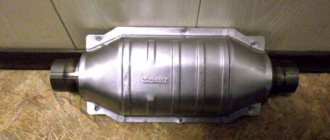
CV Joint Review
(grenades) for VAZ 2108-2115.
Without causing strong blows, the CV joint will move out of place
If the internal CV joint is supposed to be replaced, then work 1 to 6 should be performed as well, after which, using a pry bar, we remove it from the gearbox and take out the entire assembly.
We take the inner CV joint assembled with the axle shaft to a vice where we clamp it and dismantle it.
- After the “bare” axle shaft appeared before us, the work on removing the CV joint can be considered completed.
Step-by-step assembly procedure
Work on assembling all parts should be carried out in the same order as removal, however, there are some nuances in these works.
- First of all, we put the new boot on the axle shaft; this may cause some difficulties. To make the task easier, the axle shaft can be coated with lubricant.
- Then add lubricant to the CV joint.
New lubricant added to CV joint
All work on changing the CV joint, if the work is carried out correctly, will not take more than 1.5-2 hours. You can check the quality of the work performed immediately after the repair. If you start driving with the wheels turned to the side and there is no crackling, squeaking or noise, it means that the repair was carried out correctly and the car can be safely operated further.
Signs of CV joint failure
The first signs of a faulty grenade are crunching sounds in the area of the front wheel on turned out wheels when starting to move. When the fault is severe, noise appears at less significant loads.
The anther begins to crawl
In order to prevent such damage in advance, you should periodically inspect the anthers from the outside for cracks and integrity in general.
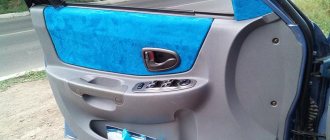
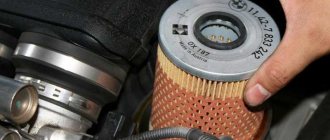
Selection of CV joints
CV joint in original packaging. Usually inside the package is a pomegranate produced by VIS
There is no consensus among car owners regarding the choice of one or another brand of constant velocity joint, but clear leaders stand out:
On a note!
Constant velocity joints, which are sold in the store in sets, include grease, a boot and all the necessary clamps in their sets. Pay special attention to this fact so as not to overpay for additional spare parts and accessories.
I had to change more than one CV joint. Of course, I had to tinker with the first one for a couple of hours, since I didn’t really know all the subtleties, but I changed the subsequent ones almost with my eyes closed.
I bought a grenade for viburnum. The assembly includes the grenade itself, a finger guard and clamps. You can change it in an hour without rushing, it can be done faster. But why rush in such a matter?
Source: https://5net.ru/kakoj-shrus-vybrat-na-kalinu/
How to identify a malfunction?
CV joint is a design that is a complicated version of the cardan and gear drive. Just like the cardan, the grenade ensures the transmission of torque when the direction of the axes changes. And just like a gear drive, a CV joint engages between the driving and driven elements, only the role of the teeth in this case is played by balls moving in the longitudinal recesses.
Since the balls constantly move along the grooves, metal is produced there over time, which leads to the appearance of extraneous noise. If you ignore the first symptoms of a serious defect and postpone inspection of the grenades until later, one of the units may collapse during the trip.
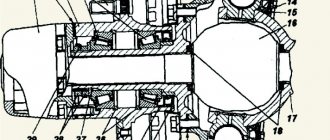
Device
In terms of their design, the inner and outer CV joints are very similar.
- Half shaft.
- Clamp and boot.
- Clip.
- Hinge housing.
- Separator.
- Ball.
- Retaining and cone ring.
- Spring washer.
Thanks to this device, the elements are capable of transmitting torque to the wheels at an angle of up to 45 degrees (not only in the horizontal, but also in the vertical plane).
Disassembly algorithm
When a decision is made to dismantle the outer CV joint for replacement, proceed according to the following scheme:
- Using a gate extension, the wheel bolts are torn off and the hub nut is unscrewed.
- The car is lifted off the floor with a jack.
- The wheel is dismantled.
- The fastener of the ball joint is unscrewed.
- Having turned the steering wheel as much as possible, you need to press the steering knuckle and remove the hub with the hinge. In this case, you can help yourself a little with a hammer.
- The damaged protective cover and clamps are removed from the grenade.
- To dismantle the CV joint, special equipment is used. If it is missing, the hinge can be knocked down with gentle blows of a hammer.
Assembly
When the old element is disassembled, it's time to prepare the new one for installation. Please note that when installing the CV joint, the boot of the Kalina “grenade” is also replaced. It is strictly forbidden to use the old one, even if it is intact. The element has already undergone wear and tear, and the clamps will not provide the same tightening.
Installation of spare parts
Replacing the CV joint on a Kalina car is done as follows:
- A protective cover is put on the axle. To make work easier, the axle can be treated with lubricant.
- Lubricant is placed in the hinge.
- Lubricant is added inside the protective cover.
- With gentle blows using a wooden block, the grenade is mounted on the axle shaft.
- When the installation of the CV joint is completed, air is removed from the protective cover and fastening is carried out using clamps.
- The steering knuckle is mounted, the hub nut is fixed, and the wheel is mounted in place.
- All fasteners are securely tightened and the car is removed from the jack.
External drive joint - removal, replacement of protective cover and installation
To complete the work you will need:
- special flares for installing clamps for fastening CV joint covers or sliding pliers;
— puller of outer retaining rings;
— lubricant for CV joints — 40 cm;
— new protective cover of the hinge with new clamps;
new thrust and retaining rings of the hinge.
Removal
1. Remove the drive assembly,
2. The ends of all four clamps of the inner and outer joints on both shafts are directed in the direction opposite to the rotation of the drives when moving forward. To ensure correct assembly, if the clamps are to be reused, we use a marker to mark them with marks indicating the direction of rotation.
3. Using large sliding pliers or special pliers, squeeze the large clamp and use a slotted screwdriver to disconnect the clamp lock.
4. In the same way, remove the small clamp of the protective cover of the outer hinge.
5. Use a slotted screwdriver to pry up and remove the protective cover from the outer hinge body.
The damaged cover can be removed by cutting it with a knife.
When performing the following operation, if the hinge is to be reused, do not strike the cage or the hinge body.
6. Secure the drive shaft in a vice. By striking the inner race of the hinge through a soft metal drift, we press the outer hinge from the drive shaft.
7. Using a slotted screwdriver, pry up and remove the retaining ring from the splines of the drive shaft.
8. Using an external retaining ring puller, remove the thrust ring.
9. Remove the protective cover from the drive shaft.
10. Wash the hinge in kerosene, wipe with a clean cloth and let dry.
Installation
1. To avoid damaging the new cover during installation, wrap the shaft splines with tape or insulating tape.
2. We put a new protective cover on the shaft, move it to the center of the shaft and remove the tape.
Advice
Do not use a socket to install the thrust ring. The internal chamfer found on almost all sockets will compress the ring, preventing it from being installed on the shaft.
3. We fix the drive shaft in a vice vertically. Using a 24 mm open-end wrench as a mandrel, install a thrust ring on the splined end of the shaft.
4. Install the retaining ring in the same way.
5. Lubricate the shaft splines with CV joint lubricant.
6. Install the hinge on the joint end of the shaft. We press the hinge onto the shaft through a wooden block until it is secured with a locking ring.
The outer joint requires 40 cm^ of lubricant.
7. Fill the joint with lubricant for constant velocity joints. We put the remaining part (from 40 cm) of lubricant into a protective cover.
8. We move the protective cover towards the hinge so that the large sealing belt of the protective cover is completely put on the hinge body, and the small sealing belt fits into the groove of the shaft.
9. Lifting the small-diameter sealing belt with a slotted screwdriver, release air from the internal cavity of the cover.
10. Using large sliding pliers or special pliers for installing clamps and a slotted screwdriver, install the large and small clamps of the protective cover. We install the clamps taking into account the direction of rotation of the drive. The outer end of the clamps should be directed in the direction opposite to the rotation of the drive when moving forward.
Advice
Before installing the assembled drive on the vehicle, be sure to install a new snap ring on the splined shank of the inner joint.
11. Install the drive assembly on the car.
Preventing grenade malfunction
Under normal conditions, these joints travel over 300 thousand km. Having a reliable design, the CV joint is able to withstand serious loads, but not in the presence of sand and dust. It is enough to burst the rubber of the protective cover, and the lubricant, mixed with dirt, will turn into a thick abrasive paste, which will inevitably undermine the health of the mechanism. Thus, it is necessary to periodically carry out external inspection of grenades in order to promptly detect damage to the anthers. At the first hint of a leak in the seal, repair and replacement should be carried out.
With torn rubber, a grenade can certainly drive for some time, but the longer repairs are delayed, the more expensive it will have to pay. Even if you change the grenade yourself, the cost of repairs will reach 3 thousand rubles, and there are several such units on the car.
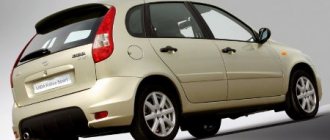
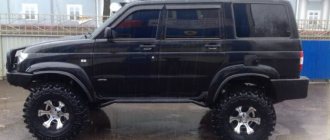
Basic information about LADA Kalina
LADA Kalina has been produced since 2004; production of the popular second-generation car began in 2013. Kalina-1 is available in three body types: hatchback (model 1119), sedan (model 1118), station wagon (model 1117). There are cars available with petrol engines of three modifications: a 1.4-liter 16-valve engine with a power of 89 hp. s., 1.6-liter 8-valve engine producing 81 hp. s., 1.6-liter 16-valve engine producing 98 hp. With. The LADA Kalina-1 has only a manual transmission with five gears. The front axle has a classic MacPherson suspension, the rear axle has a beam with stabilizer, springs, and shock absorbers.
Typical faults of LADA Kalina-1
Significant malfunctions with Kalina rarely occur, but there are a lot of various undesirable trifles. The car’s clutch is not very reliable and has an impressive service life, regardless of the type of engine, so it can malfunction after 40-50 thousand kilometers. The main source of malfunction is a broken clutch disc.
You need to constantly monitor the oil level in the engine - sometimes it leaks through the gaskets or burns through the piston rings. On the instrument panel there is only an oil pressure warning light, but there is no dial indicator. If the indicator lights up all the time, there is a possibility that the crankshaft is knocking.
A common malfunction of VAZ gearboxes is increased noise. It is difficult to get rid of the humming of the gearbox; sometimes neither replacing the bearings nor refilling with first-class transmission oil comes to the rescue. The transmission is noisy even in new cars, because of this the Volzhsky Automobile Plant has repeatedly completed the transmission.
A problematic element since the days of the VAZ 2108 and VAZ 2109 has been the thermostat in the engine, moreover, the valve in the thermostat was capable of jamming in any position. It's annoying when the engine doesn't heat up to the required operating temperature, but if the engine overheats, it's more problematic.
Electrical problems on LADA Kalina appear mainly of three types:
- the ignition module is often damaged;
- very soon the bearings and diode bridge “die”;
- The window lift cable on the driver's door breaks.
When the ignition coil sparks, the first and fourth cylinders or the second and third cylinders stop functioning. The ESP cable breaks when it falls off the guides.
The main source of cracking noise in outer CV joints is insufficient lubrication; At the factory, in order to save money, they put it in sparingly. The consequence of this is severe wear of the hinges, and as a result, the “grenade” needs to be replaced.
A broken timing belt is a very annoying problem. And if on the 8-valve engine 21114 it is possible to change the belt drive and move on, then on engines 11194 or 21126 the valves bend from the oncoming push from the pistons, repairs will be quite expensive. In addition, a break can occur through a jammed water pump, because of this, if the pump begins to make noise, it must be replaced immediately.
Driving type
It has been noticed that aggressive driving can finish off grenades much earlier than the allotted time. If careful drivers sometimes have grenade boots that last for 15 years, then a reckless driver will have to repair the unit after only 3 years. The service life of hinges and anthers can only be extended by periodic visual monitoring of the condition of the protective covers, as well as a quiet ride.
We recommend reading:
- Improving the hood of the Lada Kalina car
- We screw the fog lights on the Lada Kalina
- Selection of covers for Kalina
- Optimal tire pressure for Lada Kalina
- Spare parts and accessories for Kalina
- Guide to replacing Kalina brake pads
Selection of CV joints
CV joint in original packaging. Usually inside the package is a pomegranate produced by VIS
There is no consensus among car owners regarding the choice of one or another brand of constant velocity joint, but clear leaders stand out:
- VIS.
- GNK.
Original packaging of GNK CV joint
Inside the GNK CV joint package - boot, CV joint, clamps
GNK outer CV joint installed
- GLO.