The bestseller of this brand is the budget model Kalina, which is in strong demand in the post-Soviet space. It is equipped with a minimal amount of additional equipment, but, fortunately, it does not lack the most important thing - front optics, without which driving a car at night is unthinkable.
After all, with the help of a headlight, the driver not only sees all road elements and is able to navigate in space, but can also identify his vehicle to other road users.
The correct operation of this structural element is controlled by special devices during regular state technical inspection. However, it is necessary to periodically adjust the headlights on the Lada Kalina.
This procedure can be easily completed on your own. To implement it, certain conditions must be met that do not require any financial costs.
Self-installation of fog lights on a Lada Kalina car
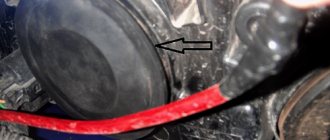
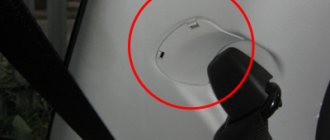
On the Lada Kalina, there are protective plugs in the places where the foglights are installed, so you don’t have to make holes in the bumper; just remove them.
- First you need to remove the bumper, for which you should unscrew the bolts and screws from the bottom of the bumper and under the grilles, you should also unscrew the screws in the wheel arches, with which the edges of the bumper are secured. Then you should remove the sides of the bumper from under the wheel arches and completely remove it.
- Then you should remove the plugs (you can use a flat screwdriver to bend the latches) and screw the PTF onto the self-tapping screws (three for each headlight).
- Inside the car, above the clutch pedal, you need to find the place where the bundle of wires goes, push out the seal, and then, using steel wire, pull the wires from the foglights next to the main wires.
- Afterwards, you need to connect the fog light wires to the main wires and tighten the entire bundle with ties (plastic clamps).
- Opposite the fog lights, you should leave wires of sufficient length with connectors, screw the negative terminals to the screws on the car body, and secure the wires with zip ties.
- Since the total power consumed by the PTF is 110 W, they must be connected via a relay, which is controlled by a button. The button is installed inside the car, on the dashboard. Power for the headlights can be obtained by connecting to the pink wire in the fuse box (it goes to relay K7, which turns on the high beams). You can also power the PTF from the blue-black wire that comes from the ignition switch.
- The PTF must be connected through a 15 A fuse. To do this, you need to connect the power contacts of relays 87 and 30 to the wires to the fog lights and the fuse, respectively.
- After all the connections have been made, you need to check again that the connection is correct and then connect the battery terminal, and then make sure that the fog lights turn on when you press the button.
- Then reassemble the bumper in reverse order. Of course, after assembly there should be no extra screws left.
PTF adjustment
After installing fog lights on a Lada Kalina car, it is necessary to adjust the direction of their luminous flux, for which you should place the car on a flat surface at a distance of five meters from the wall. Then you should cover one headlight (for example, with cardboard), and then, by rotating the adjusting screw, set the light flow limit 0.5 m below the level of the headlights.
You can more accurately adjust the fog lights at a service station using a regloscope. After carrying out all the above procedures, the PTFs are completely ready for use on the road.
Fuse blown
To fix the problem, you need to replace the part. It is necessary to open the block in which all Kalina's electrical fuses are concentrated and find the blown one. It is worth using a location diagram if a person does not know where the right one is located. Finding and changing the fuse is a matter of two minutes.
Are fuses blowing at an unenviable rate? It makes sense to test the car's wiring yourself or seek help from a professional electrician. If the fog light has disappeared, the solution to the problem is similar.
Fuse block diagram for Lada Kalina
How to adjust the headlights on a Lada Kalina with your own hands
How to adjust valves on fret Kalina 8 valve
10/05/2018 From time to time, drivers are faced with an unpleasant and dangerous moment - a light curtain. A wide, high beam from the vehicle's lighting illuminates the space in front of the car.
This situation causes 30% of road accidents.
This is easy to avoid: it is important to systematically check and adjust the position of the lighting equipment on the car. This is not the most difficult task; it can be done independently without the involvement of specialists.
The algorithm is universal for all machines. As an example, let's look at how the Kalina Lada headlights are adjusted.
Headlight range control: device and malfunctions
A device that monitors and regulates the position of a car's lighting devices is called a headlight range control. It is possible to adjust the headlights on Kalina using:
- Kalina manual headlight leveler;
- electric headlight corrector.
The principle of operation in both cases is similar, the difference is one. The first option involves making the correction using a regulator installed inside the car. The driver himself changes the tilt of the car lighting. The electric corrector works automatically: depending on the location of the machine, the device changes the angle of inclination of the optics. Possible problems:
Sensor inaccuracy. Failure of the bracket leads to a failure of the tracking element synchronizer performance. Souring of contacts. Due to the reduced conductivity of the electrical wire, the device begins to malfunction. Factory defect. The regulating element falls out of the electric corrector.
How to adjust headlights
Adjusting the headlights on the Lada Kalina does not require complex manipulations or special knowledge. The car enthusiast is able to make the adjustment with his own hands. First of all, you need to remember that the adjustment of the optics is related to the elements of the Kalina chassis, the pressure inside the tires and the condition of the light bulbs. It is necessary to replace darkened lamps and adjust the pressure (it should be the same for each side of the car). Tools for checking and adjusting light lights on the Lada Kalina:
- tape measure, 5 meters is enough;
- large sheet of cardboard or plywood;
- five-millimeter 6-sided key;
- load not less than 75 kg;
- pen-pencil);
- opaque textile (piece of black fabric).
Stages of adjusting Lada Kalina lighting fixtures:
Drive the car up to a smooth wall, strictly perpendicular, and stop at a distance of 5 meters. Place a load on the driver's seat. Place a plywood screen with a diagram for adjusting the headlights against the wall. Apply three vertical stripes on the diagram: an axial one and two lines corresponding to the centers of the low beam bulbs, symmetrical to the axial one. Two horizontal stripes: the first corresponds to the middle of the headlights (counting from the bottom), the second should be drawn 75 mm lower - this is the central position of the light beam. Set the Kalina headlight corrector to zero and turn on the low beam. The lighting devices on Kalina will be adjusted when the upper line of the light strip is located on the lower (second) horizontal line. The edges of the light beam boundaries should be located along the outermost vertical stripes. If the actual position of the light spot does not correspond to the adjustment parameters, open the hood, find the adjustment screws and make the correction (by tightening or loosening the fasteners). There are two screws for each headlight. One is responsible for the horizontal plane. Using the second, you can raise or lower the light beam. The correct location of the light window is adjusted separately for each headlight, while the second one is covered with thick textiles.
The PTF on the Lada Kalina is adjusted in a similar way.
The border of the light flow should be located half a meter below the level of the headlights. It is important to pay attention to the correct location of the headlights on Kalina, including PTF. With the correct placement of the optics, the driver automatically avoids emergency situations that arise in cases of poor road illumination at night, during fog, rain and snowfall, or due to the glare of oncoming traffic. The adjustment process on Kalina itself is not too long and does not require special skills; most motorists can cope with it on their own him. If you do not dare to carry out the procedure yourself, you can go to any service station, where specialists will be happy to help. How to adjust the headlights on a Lada Kalina with your own hands Link to main publication
If you do not dare to carry out the procedure yourself, you can go to any service station, where specialists will be happy to help. How to adjust the headlights on a Lada Kalina with your own hands Link to main publication
Adjustment features
Since Lada Kalina is a representative of the budget segment, it is equipped with a minimum of required lighting devices. Here we focus on head optical devices. Headlights allow the driver to have sufficient visibility when driving, and also serve to identify a specific car on the roadway.
Adjustment of the Lada Kalina headlight beam is carried out using a specialized device during a technical inspection. Mechanics advise owners to periodically check the correct beam and adjust the headlights (if necessary) and if necessary, know how to adjust the headlights yourself. The indicated procedure can be carried out independently.
The settings of the Lada Kalina lighting devices are interconnected with the condition of the load-bearing elements of the chassis, lamps and tire pressure. Before adjusting the lighting devices, it is recommended to check the points indicated here to ensure they are in good condition and that the indicator (pressure) is correct. If there are deviations from standard values, then the identified deficiencies should be eliminated immediately. For example, the pressure parameter should be the same on both sides of the car. Darkened lamps will also need to be replaced with new analogues.
To adjust the optics in the Lada Kalina, the owner will need the following tools:
- cardboard sheet;
- five-meter tape measure;
- "hexagon" (6 mm).
Adjustments should be made in a dark box or at the appropriate time of day. Also one of the main conditions is the presence of a vertical wall. We install the car on a level area five meters from the designated structure. We adjust the corrector to the zero position.
A cardboard sheet is required to periodically block the beam of headlights. The adjustment process itself is carried out using a hex key with a dimension of 6 mm. The light beam of each headlight is individually compared with a special circuit. Here it is necessary to achieve the correct direction of the beam, which will allow the driver not to dazzle oncoming traffic participants in the dark.
Adjusting the optics of Kalina in the hatchback body version
Fog lights for Gazelle: overview, types, connection diagram and reviews. headlights and lighting of a gazelle: main aspects of choosing and installing PTF connection of PTF gazelle
For this type of LADA Kalina body, the head lighting equipment has a similar design as that of the sedan. These devices are distinguished by the fact that adjusting the headlights is simple and accessible. The adjustment procedure is carried out to achieve optimal illumination of the section of road ahead, and the risk of dazzling drivers of oncoming cars must be completely eliminated.
To conveniently carry out the adjustment process, the owner will need a chalk and a tape measure. You should first ensure that at the time of adjustment there is 50% fuel volume in the tank. Mechanics advise hiring an assistant who will be present in the driver’s seat during the procedure. How to adjust headlights step by step:
- The car is placed on a similar flat area close to the wall, on which the center of the car and the centers of the headlights are marked with chalk.
- Next, using a tape measure, we measure a distance of 7.5 meters, where we place a mark.
- We drive the LADA Kalina car exactly to this mark.
- We connect the marked centers of the optical devices with a straight line drawn with chalk. We also draw vertical lines through these centers.
- Next, we retreat 75 mm from the horizontally drawn line and draw a straight line parallel to it. To be more correct, we first measure this distance in several places.
- We adjust the headlights while they are on and one at a time. At the moment the process is performed on the first optical device, we cover the second with the indicated cardboard sheet.
- We achieve the correct position of the reflector by rotating the screws. Here it is necessary to achieve such a position of the light beam at which the top of the corner of the light spot on the wall intersects the vertical straight line previously drawn through the central point of the headlight.
We combine the section of the upper border of the beam with the lower line.
We carry out similar manipulations for the second headlight.
Notes:
How can you remove the headlight on a Lada Kalina?
Adjusting the position of the headlights must be done every 20 thousand km or as needed. On the Lada Kalina, this adjustment operation is not carried out often, since deviations from the norm rarely occur (in most cases, due to road accidents).
Checking and adjusting the headlights of the Lada Kalina VAZ 1118 is carried out with a fully filled fuel tank, a set of tools and a spare wheel.
1. First check the air pressure on all tires of the car with a pressure gauge. If necessary, bring it to normal.
2. Place the Lada Kalina car perpendicular to a smooth wall (for example, a garage) at a distance of 5 m. Place an additional weight weighing 75 kg on the driver’s seat.
3. Mark the screen on the wall as shown in the headlight adjustment diagram.
4. Draw a vertical center line O on the screen, lying in the plane of symmetry of the car (the distance from it to the center of the left and right headlights should be equal). To the left and right of it, draw two more symmetrical lines A and B, which should coincide with the centers of the left and right headlights.
5. At a height h corresponding to the distance of the centers of the headlights from the ground, draw a horizontal line 1, and 75 mm below it - line 2.
6. Turn on the low beam headlights on the Lada Kalina car by turning the headlight range control of the Lada Kalina 1118 to position “0” (this position corresponds to the load of the Lada Kalina car with one driver).
7. Closing each headlight in turn, check that the light limit corresponds to the adjustment diagram previously marked on the screen. The boundary must follow line 2. The inclined segments must begin at the intersection points.
8. Insert the “6” hexagon into the regulator socket through the hole in the upper cross member of the radiator frame.
9. By turning adjuster 1, located closer to the wing, with a hexagon, adjust the position of the headlight beam in the horizontal plane.
10. By turning regulator 2, located closer to the radiator, adjust the position of the light beam in the vertical plane. Make sure that the upper boundary of the light beam coincides with the lower horizontal line, and the break point of the beam (the point of intersection of the horizontal and inclined sections of the light flux) with the vertical line corresponding to the center of the headlight.
11. Similarly, adjust the direction of the light beam of the other headlight.
Note:
Adjust the direction of the light spot for each headlight separately. During adjustment, cover the second headlight with opaque material or disconnect the connector with wires from it.
Scheme for adjusting headlights on a Lada Kalina VAZ 1118 car:
- 1 — horizontal line corresponding to the centers of the headlights;
- 2 - line passing through the centers of light spots;
- A, B - vertical lines corresponding to the centers of the headlights;
- O - center line;
- h is the distance from the centers of the headlights to the floor;
- d is the distance between the centers of the headlight lamps.
Indispensable attribute
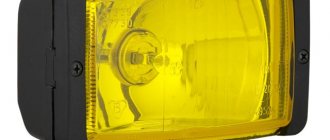
Fog lights are designed for bad weather conditions when it is difficult to drive due to reduced visibility. They increase the safety of both the passengers of the vehicle and other road users.
In bad weather, conventional headlights are of little use, since the light beam is reflected from water droplets, and creates the feeling that the car is in a spot of light, which prevents the driver from seeing where he is pointing the car. Anti-fog models - scatter light directly in front of the car, which spreads along the roadway. This happens because the beam comes out dense, wide and flat.
Typically, these headlights emit white or yellow light and are installed both at the front and rear of the car. Adjusting the fog lights depending on environmental conditions does not require special skills and can be done independently.
What is a hydraulic corrector and how does it work?
The hydraulic headlight corrector is installed on the Grant from the factory. This device adjusts the headlights higher or lower depending on the vehicle's load.
You need to adjust it yourself - there is no automatic setting.
The corrector control is located under the light switch handle. Position 0 corresponds to a car with one person - the driver.
The more the machine is loaded, the higher the hydraulic corrector value should be.
Principle of operation:
- the handle controls the hydraulic corrector cylinder;
- the cylinder regulates the pressure in the flexible tubes that go to the pushers;
- pushers are installed in the headlights - the higher the pressure in the tubes, the stronger the liquid inside the pusher presses on the rod;
- the position of the rod deeper/further is responsible for adjusting the headlight higher/lower.
What to do if the hydraulic corrector is broken
Have both or one headlight stopped responding to the hydraulic corrector? Most likely your pusher is broken.
According to the regulations, the entire hydraulic corrector mechanism is replaced as an assembly and cannot be repaired. Price from 400 to 1000 rubles. Order number: 21903718010.
If you want to fix the pushrod, there are two ways.
Table 1. Options for repairing the headlight range control pusher.
| Option 1 is barbaric. No further adjustment. |
|
| Option 2 is humane. We return the corrector to full working condition. |
|
A corrector kit costs about 700 rubles - it may be easier to replace it
How to replace a hydraulic corrector with an electromechanical one
Do you want to replace the hydro with an electric corrector (EMKF)? The process is simple, as there are ready-made solutions from the factory.
Article: EMKF-41. Price 2000-3000 rubles.
To replace, you only need straight hands - depending on the manufacturer of the EMKF:
- dismantle the old hydraulic corrector;
- We install a new corrector control unit in place of the cylinder - we run the wiring according to the instructions;
- we pull the wires through the elastic band along which the hydro pipes went;
- We put the regulators in their standard places in the headlights.
How does the Lada Kalina headlight work and what functions does it perform?
What the Kalina headlight is, what its functions are, how replacement and repair are carried out - such questions arouse the interest of motorists. A machine is a well-coordinated mechanism with thousands of parts.
And it’s difficult to name the main one or the secondary one. In particular, the headlight unit provides directional light and illuminates the route and the surrounding area at night, which is very important for traffic safety
Design and functions of headlights
The Lada Kalina car has its own headlights. 2 headlights with three sections are installed here, and each performs certain functions:
- for low beam;
- for distant and side lighting;
- to indicate turns.
When the headlights of the Lada Kalina are not adjusted, many inconvenient moments arise while driving both for the driver and for those who may be nearby at that time. After all Kalina's optics are adjusted, it will be able to illuminate the roadside well and will not blind drivers in the oncoming lane.
The design of Kalina's headlights is such that when using low beam, only the corresponding lamps will be turned on. When high beam is needed, both the low and high beam bulbs light up. The sections of the front direction indicators have transparent lenses, and the turn signal bulbs themselves are bright orange. The headlight unit for the Lada Kalina has an electromechanical drive and is easily adjusted thanks to the corrector. The regulator is located on the instrument panel, connecting to the electric drive, which is installed in the headlights, using wiring .
There should be an icon on it. The “AL” symbol indicates that the manufacturer is Bosch (Russia). This means that polycarbonate was used in the production of products. This model of headlights is produced without a cap on the low beam bulbs, while products from Avtosvet are also made of polycarbonate, but have a cap on the low beam bulbs. You can disassemble the Lada Kalina headlight unit and find that it contains:
- numerous wiring;
- reflectors and glass;
- plugs and inserts, so-called headlight masks;
- lamps.
How to replace headlight bulbs
The bulbs in Kalina's car headlights cannot work forever, and when they burn out, they are replaced, often without even removing the headlights. You can select new lamps by studying the catalog in the VAZ dealer showroom. Low beam bulbs are replaced as follows:
The protective cover, which is made of rubber, is removed from the entire car headlight; you just need to pull one of the 3 tabs. Disconnect the wiring from the light bulb. Remove the spring clip, disengage it from the 2 hooks, and also separate it from the body. The new light bulb is installed by performing all the steps in reverse order.
If the light bulb is halogen, there is a risk of damaging the glass bulbs if you touch them with your hands. When heated, the headlight glass begins to darken, but a clean rag made of natural material, which must be moistened with alcohol, will help get rid of the marks. How to replace Kalina marker lamps:
- remove the protective cover from the headlights;
- disconnect the light bulb socket;
- remove the lamp from the socket and then install a new one.
How to replace turn signal lamps:
- turn the turn signal socket to the left by 45°, and then remove it from the headlight housing;
- press on the car headlight glass and then scroll all the way to the left. Then replace the light bulb with a new one.
How to replace bulbs in rear headlights:
- the cartridge is removed to the left;
- You need to press the light bulb and scroll to the left, then it will come out freely. Insert a new one, performing all the steps exactly the opposite.
What can you buy?
Despite the wide variety of fog lights in auto parts stores, many owners do not understand what to choose and which fog lights are best for Kalina.
Many are also confused by the different terminal blocks, which forces them to look for adapters to integrate the PTF with the standard electrical wiring system (see also the article Wiring diagram VAZ 21074 - injector: we understand the intricacies).
The classic ones have lamps with an HB4 base, and the lensed ones have H11.
If you approach the choice from a practical point of view, then for the Lada Kalina, without additional alterations and changes to the standard electrical circuit, the following are suitable:
- Fog lights Kirzhach on Kalina (lensed);
- Classic PTF made by Bosch (headlight with reflector);
Advice: we can also recommend Luch foglights, since they are a copy of the German ones. But their main advantage is the price, while the quality is much worse.
Among the advantages of these models is the fact that the adjustment of Kalina’s fog lights will be simpler and more understandable due to their installation in the standard mounting locations of the front bumper.
Here's how to adjust fog lights on Kalina if the recommended models are installed
Dismantling and repair of optics
One of the most common malfunctions in the operation of optics, if you do not take into account the failure of lighting sources, is damage to the headlight glass. If the lamp itself is damaged, it will have to be removed and disassembled to change the glass.
How to disassemble the headlight and how to replace the brake light bulb:
First you need to open the trunk and move the brake light source to the left. The Kalina brake light lamp must be pressed and turned to the left, so that the device can be removed from the installation location. The installation procedure is performed in reverse order. If you need to replace the glass, you will have to remove the bumper to do this. To do this, you need to unscrew the corresponding fasteners. After dismantling the bumper, it is necessary to disconnect all the wiring connectors that are connected to the optics. After completing these steps, you can unscrew the lower fasteners of the flashlight; to do this, use a wrench. After this, similar actions are performed with the upper bolts securing the optics. When all the screws are removed, the optics themselves can be removed. The next stage will be the glass repair itself.
You need to pull the headlight towards you and carefully remove the rubberized seal. It is usually attached to the lantern quite tightly, so most likely you will have to use a utility knife to cut the elastic. After the headlight housing and glass are separated from each other, all remaining adhesive and sealant should be removed from the perimeter of the housing.
To do this, you will also need to use a utility knife, and if the residues are small, then use sandpaper. Make sure that the surface on the housing is clean and free of sealants and dirt. Before installing new glass, the housing around the perimeter of the installation will need to be treated with a solvent. This will allow the surface to be degreased, so that the fit of the new glass will be maximum. Next, apply glue to the new seal and connect the glass itself to the body. The tightness of the structure must be optimal, otherwise the problem of fogging of the optical glasses from the inside may arise. Press the headlight on both sides so that the lens is connected to the housing as firmly as possible. At this stage, the repair can be considered complete; assembly is carried out in the reverse order. When installing the lights, they will need to be readjusted.
Photo gallery “Replacing glass with your own hands”
1. Unscrew the lower bolts securing the optics.
2. After this, unscrew the top screws.
3. Disconnect the housing from the glass and replace the latter.
Scheme for adjusting headlights on Kalina
If the headlights on Kalina do not shine well, you can act according to different schemes. First, you need to drive up to the wall and stop, maintaining an interval of 2 m. Then mark the center of the car on the wall, place the axial parts of the lamps according to the optimal markings, and mark the distances from the road surface to the necessary lighting fixtures. From the center of the light flux, mark the distance to the center of the car; the line should be made a few centimeters below the first one.
Drive the car away from the wall to 7 m. Connect the points that correspond to the central areas of the headlights using straight lines. Supplement it with several vertical segments. Once the marking work is completed, begin adjustments.
It is best to carry out work against the wall - it will be easier and more accurate.
How to adjust headlights on Kalina in height
To improve the height of the light, you need to measure the distance from the floor to the central areas of the headlights. Then, taking into account the data obtained, a line is drawn on the screen with an indentation of 60 mm, and a second one is made. Additionally, vertically placed line segments are drawn along the centers of the spotlights, and another line is drawn at an equal distance from both of them.
Cover the lamp with a cardboard sheet and turn on the low beam. Start adjusting the directions of the light beams from the open headlights, alternately changing positions (it is convenient to use a Phillips-type screwdriver).
Good high beam is determined by height adjustments
How to adjust the headlights on Kalina horizontally
Deviations of light beams from headlights that occur in horizontal planes are adjusted using crossbar holes located in the longitudinal direction of the car axis. By rotating the screw on the housing, the height of the light beam is adjusted.
The upper area of the spot must clearly coincide with the second line of the screen, the break zone of the light beam must coincide with the centered line of the headlight in the vertical direction. The positions of the spots of the other headlight are set in the same way. Turn on the low beam again and check that the actions are performed correctly.
Adjusting the headlight beam
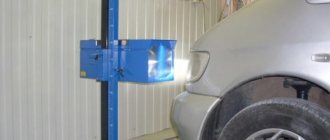
Correctly adjusting headlights can only be done in a service station. However, let's look at how this operation is performed by experienced craftsmen.
There are two adjustment screws on the back wall of the unit called the headlight unit. The first of them, located closer to the radiator, allows you to deflect the light beam “up and down”, and the “horizontal” direction is adjusted with the second screw. Ideally, this should happen: when the car is 5 meters from the screen, the border of the light spot touches line “2” (see figure). Line “1” is spaced from the ground at a distance equal to the height of the centers of the headlights. The second line is drawn 65 mm lower.
Here are a couple more tips that will be useful:
- The centers of the beams should be on lines AE, BE;
- Line “0” has the following meaning: it intersects with line “1” at one point, so the border of the spot should pass exactly through this point;
- The caps of the plastic adjustment screws are compatible with a hex screwdriver. However, a Phillips screwdriver will also work.
So, we have fully examined how to adjust the headlights on Kalina-2. Of course, replacing lamps with subsequent adjustment is a less labor-intensive operation than connecting a radio. However, accuracy is important here. And the special equipment used to perform the settings is only available at service stations.
Tuning options
You can increase the attractiveness of your car for yourself and others by tuning the lighting system. Main options:
- tinting;
- installation of bilens;
- installation of LEDs in dimensions;
- creating angel eyes.
Many car enthusiasts choose tuning of headlights on Kalina, such as tinting - applying a special film over the entire surface of the glass of the device to give the car an original design. Another popular option is installing xenon. Almost all workshops offer this service, but only experienced craftsmen can carry out the installation efficiently.
How to remove the headlight on Kalina 2: adjusting, tuning and replacing the low beam lamp
Checking and adjusting the headlights, replacing the low beam lamp on the Lada Kalina-2
In head optics, low beam lamps most often have to be replaced. For a Lada Kalina car, the low beam lamp is a halogen lamp with an “H7” socket, the power of which is 55 watts (no more). Osram bulbs may come from the factory, but others will do. After replacement, the filament will occupy a new position, and the headlight adjustment may be lost. So, checking the settings, and, if necessary, adjusting the headlights is carried out immediately after replacing the lamps, which on the Lada Kalina is done without dismantling the headlight unit.
Step-by-step replacement instructions
Each H7 standard bulb has an iron base, which is pressed to the headlamp with a wire clamp. To bend this bracket, just get close to the plane of the headlight from behind. Let's open the hood and see what exactly will bother us.
Behind the headlight on the right is a washer reservoir. It is dismantled like this: disconnect the electric motor terminals, tighten the plug harder, find one nut and one fastening bolt. The fastening elements are unscrewed with a 10mm wrench, then the tank is placed on the engine. Next we could look at how to remove the headlight on Kalina-2, but in this case this is not required.
Before performing any manipulations with electrical equipment, always disconnect the negative terminal of the battery. It is better to connect this terminal last (before closing the hood). Be careful.
Replacement sequence:
- Remove the rubber cover covering the low beam lamp compartment;
- Disconnect both terminals from the lamp contacts;
- The fastening bracket is removed from the grooves by first pressing on it, then the bracket is moved to the side;
- They take out the lamp, install a new one in its place, and return the bracket to its place.
Next, perform steps “2” and “1” in reverse order. The connection diagram is not important - there are only two contacts, and both go to the filament. Now, if we connected LEDs. then everything would look more complicated.
When installing a halogen light source, you must remember: the surface of the lamp glass must be perfectly clean. Do not allow grease marks to remain on the flask. Installation is carried out using only cotton gloves. The glass of the flask is cleaned with industrial alcohol or Secunda.
Adjusting the headlight beam
Correctly adjusting headlights can only be done in a service station. However, let's look at how this operation is performed by experienced craftsmen.
There are two adjustment screws on the back wall of the unit called the headlight unit. The first of them, located closer to the radiator, allows you to deflect the light beam “up and down”, and the “horizontal” direction is adjusted with the second screw. Ideally, this should happen: when the car is 5 meters from the screen, the border of the light spot touches line “2” (see figure). Line “1” is spaced from the ground at a distance equal to the height of the centers of the headlights. The second line is drawn 65 mm lower.
When making adjustments, the corrector switch is moved to position “0”. Of course, you only need to turn on the low beam. We also note that the headlights are adjusted one by one (the “excess” light source is covered with a cloth).
Here are a couple more tips that will be useful:
- The centers of the beams should be on lines AE, BE;
- Line “0” has the following meaning: it intersects with line “1” at one point, so the border of the spot should pass exactly through this point;
- The caps of the plastic adjustment screws are compatible with a hex screwdriver. However, a Phillips screwdriver will also work.
So, we have fully examined how to adjust the headlights on Kalina-2. Of course, replacing lamps with subsequent adjustment is a less labor-intensive operation than connecting a radio. However, accuracy is important here. And the special equipment used to perform the settings is only available at service stations.
Question and answer: what should not be allowed under any circumstances
Q: What happens if you buy lamps with a base other than “H7”?
A: It will not be possible to install lamps in a standard headlight.
Q: If I use more than 55 watts of power, will this cause overheating?
A: Excessive power leads to the fact that the fuse in the low beam lamp circuit burns out. A separate fuse is used for each of the lamps, so it will not be possible to “deceive” the automation.
Q: Are halogens afraid of power surges?
A: For incandescent lamps, excess voltage is a harmful factor. In the case of using halogen lamps, there will be two harmful factors: overheating, underheating. Actually, this is why MTBF can be considered a relative rather than an absolute value. This value depends, and depends strongly, on the stability of the voltage.
Adjusting Grant's fog lights
Any more or less experienced driver understands the need to use additional lighting devices, such as fog lights. Standard high-beam (low-beam) headlights, designed to provide a sufficient level of illumination of the roadway, do not always cope with their functional task, and in conditions of drizzling rain, sleet and, especially, fog, they can significantly complicate the reality of the driver’s perception of the road situation. The relatively high beam of light they create, refracting in the humid air, creates a rather dense light curtain that limits the view of the road.
The solution to this problem was the use of special external lighting devices on the vehicle, called fog lights. The practice of using these headlights has shown a direct dependence of the degree of efficiency of their functioning on the correct location of the device relative to the surface of the earth.
How to use fog lights
The design of fog lights must meet the requirements of the existing regulatory framework, including the Road Traffic Rules (hereinafter referred to as the Traffic Regulations), GOST 8769-75 (hereinafter referred to as the GOST) and the UNECE Rules (Uniform Regulations). The list of basic requirements of these regulations is as follows:
- The light beam produced by the fog lamp must meet several conditions:
– the light distribution of the beam is directed downwards, and its upper boundary should be clearly defined;
– the horizontal scattering angle does not exceed 70 0 .
- The installation height is at least 250 millimeters from the road surface.
- The maximum distance between the fog lamp and the external dimensions of the vehicle is no more than 400 millimeters.
In addition, the traffic rules define the mode of use of fog lights - conditions of insufficient (rain, snow, fog) or limited (mountain roads, sharp turns) visibility.
How to adjust fog lights
The main task of the fog lamp adjustment process is to give them a certain position in space, characterized by the formation of a light beam directed into an area free of condensation and evaporation, located at a distance of 0.3-0.7 meters from the surface of the road surface. Expanding these boundaries in one direction or another significantly affects the functionality of fog lights.
https://www.youtube.com/watch?v=xBSZwfcRn4A
The technological operation for performing adjustment work comes down to setting certain values for the vertical and horizontal angles of the device.
Preparatory activities
Adjusting the fog lights is preceded by the following measures:
- selection of a flat horizontal platform;
- measuring the pressure in the car tires and bringing it to the value specified in the car’s operating instructions (the value of this parameter affects the height of the fog lights relative to the road surface);
- refilling the fuel tank (until full);
- loading the vehicle to a weight equal to the load weight of the main period of operation;
- at a distance of 10 meters (some experts reduce it to 5 meters) from the vehicle we place (perpendicular to the surface) a special screen (you can use a wall, garage door, etc. as the latter);
- preparation of tools: screwdrivers, measuring instruments (ruler, tape measure).
How to adjust headlights on a viburnum - Car repair and maintenance
25 Apr
How to set up the headlights on a Russian state-owned Lada Kalina with your own hands
Lada Kalina The head light of a car is a fundamental element when driving in the dark. Currently, there are no vehicles left that are devoid of lighting technology. This fully applies to the Russian automaker AvtoVAZ.
The blockbuster of this brand is the economical Kalina model, which is in strong demand in the post-Soviet area. It is armed with the least amount of additional equipment, but, fortunately, it is not without the most important equipment - front optics, without which driving a car at night is unthinkable.
After all, with the help of the headlight, the driver not only sees all the road elements and is able to navigate in space, but can also indicate his vehicle to other road users.
The correct operation of this structural element is controlled by special devices during constant municipal technical inspection. But it is necessary to carry out repeated adjustment of the headlights on the Lada Kalina.
This function can be easily accomplished on your own. To implement it, certain criteria must be met that do not require any monetary costs.
ADJUSTING HEADLIGHTS
CAR UNIVERSAL FOR ALL MODELS.
WE ADJUST THE HEADLIGHTS
OURSELVES.
How to independently adjust the headlights on a Lada Kalina
The car owner will need to make a minimum of effort; for convenience, below is a complete list of necessary components
- An additional pair of hands in the person of an assistant.
- Five meter tape measure.
- The nearest flat vertical surface, be it the wall of a house or a fence.
- Cardboard sheet. It is necessary to cover the adjustable headlight.
Scheme for adjusting the head light Armed with everything you need and waiting until it gets dark, you can begin the adjustment process. It is worth remembering that the car must have the correct tire pressure, without excess load, and the corrector must be set to the zero position.
On the selected surface it is necessary to draw a screen according to the diagram shown.
Having measured five meters from a vertical obstacle, you need to install the car perpendicular to it and alternately cover the headlights with a cardboard sheet and adjust them with a six-millimeter hex key.
In this case, it is necessary to compare the light from each headlight with the circuit used. For both headlights, set the upper limit of the low beam to line 2, and bring the bends of the beam boundaries to points A (for the left) and B (for the right).
Successful result of the work performed
Having carried out all the procedures, in the end we get the correct adjustment of Kalina’s headlights, the light of which will not cause discomfort to other road users, and also correctly illuminate the road surface.
It is doubly pleasant to realize that, firstly, the setup process was completed independently, and the principle “if you want to do it well, do it yourself” is still relevant, and, secondly, a small, but far from unnecessary amount of money was saved.
Headlight device
Traditionally, the lighting system of the car model in question is represented by blocks distributed into three sections, due to which the low, high and side beams are activated, and also indicate a turn. Activating the low beam requires the use of bulbs designed specifically for this purpose.
Turning on the main beam ensures the simultaneous operation of the blocks that are responsible for low and high beam lighting, and the power of each is equal to 55 W. Special transparent diffusers are mounted on the front of each of the mentioned sections.
Using a special corrector allows you to adjust the headlights. The operation of the electric corrector is based on an electromechanical drive. Traditionally, the adjustment system has a device mounted on the instrument panel, as well as a special drive, due to which the electrical wires in the headlights are connected.
Setting up such an electrical corrector requires complete disassembly of the headlights. There are other reasons for dismantling the lighting system. This could be the installation of new lighting elements or tuning.
Connecting the headlights
There are two main connection paths, which will also determine how to properly adjust the fog lights in the future.
The first, and most basic, is the usual connection of the entire wiring system. This installation often takes about 15-20 minutes. Everything is simple, because in order to connect the headlight you need to insert all the necessary wires into the correct connectors. The factory diagram already contains the most important parts. It is important to realize that you need to select headlights exclusively for your car. The kit should include a button and the equipment itself. Do not forget that each wire must be carefully insulated.
Installation begins with removing the central panel, under which the necessary wires are hidden. It is at this moment that it is worth checking the presence of all elements, for example, relays, buttons, and so on. Sometimes a complete replacement of all parts, including wires, is required.
The wire we need is located near the light bulbs leading to the stove, at the end of which you will see a relay contact, to which we will connect the headlights. To do this, connect one wire to the button, and the second to the found relay contact. It is important to make sure that the chain is closed.
Video on how to connect fog lights:
It is more difficult when the car does not have wiring and you need to lay the wires yourself. In this case, in addition to the headlights themselves, you need to purchase a switch, relay and fuse. Copper wires in insulation should be carefully laid so that eventually the wire from the button goes under the pedal to the battery, and from there, as in the situation with built-in wiring, to the headlights.
Connecting the fog lights is not difficult, if the car already has wiring to power them, you need to make sure that the sizes of the headlights and plugs are suitable. If you need to lay the electrical circuit yourself, then stock up on insulated copper wire, a relay, a switch and a fuse. Choose the latter depending on the power of the headlights. You can connect these devices from the battery via a switch. The lamp contacts are connected in pairs into one circuit and one is connected to the “-” terminal, and the other to the “+”.