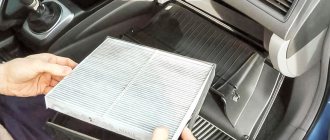
A jamming or poorly functioning hood lock, unfortunately, is never one of those breakdowns that drivers repair right away. Although adjusting this small mechanism twice a year would save many Zhiguli owners from the need to replace the hood lock on a VAZ 2114 at the most inconvenient time and urgently.
The locking mechanism fails gradually, only in 2% of cases, it breaks suddenly, the spring cracks or the safety hook flies out. In other cases, the lock gradually loosens, and the driver has to slam the lid harder and harder. How to replace and adjust the mechanism yourself, using a minimum of tools and without sufficient experience.
- latch pin,
- springs - lock latches, hooks,
- lock-nut,
- lock washer,
- hook - hook axis, handle,
- cups - upper, lower,
- traction mechanism - holders, bushing, seal, shell,
- lever.
The lock on the entire line of Zhiguli cars works extremely simply: by slamming the hood, the pin falls into a standard hole on the frame and is held in place by a spring. By pressing the traction handle in the passenger compartment, the latch is released, opening a small gap. By pressing the safety hook handle, the lid opens completely.
Instructions for replacing, adjusting and installing the hood lock on a VAZ
A jamming or poorly functioning hood lock, unfortunately, is never one of those breakdowns that drivers repair right away.
Although adjusting this small mechanism twice a year would save many Zhiguli owners from the need to replace the hood lock on a VAZ 2114 at the most inconvenient time and urgently. The locking mechanism fails gradually, only in 2% of cases, it breaks suddenly, the spring cracks or the safety hook flies out. In other cases, the lock gradually loosens, and the driver has to slam the lid harder and harder. How to replace and adjust the mechanism yourself, using a minimum of tools and without sufficient experience.
Removal and installation
Removing and installing the hood of a VAZ 2114 is quite easy without the help of others, without resorting to the help of a car service. How to do this will be discussed further. The hood is held in place by hinges located along the rear edge of the front part of the body. A hood lock with a hook is installed in front, which protects it from opening while the car is moving. In the open position, the hood rests on an iron stop. The lock has a cable drive with a handle, which is located inside the cabin under the instrument panel on the left side.
In order to remove the hood, you need to open it and put it on the stop. Then you need to disconnect the windshield washer tube from the tee, and also disconnect the electrical wires from the engine compartment lamp. Now you can unscrew the four bolts securing the hinges to the hood. It is better to have an assistant nearby at this time to hold the hood suspended. By unscrewing these bolts, you can remove the hood of the VAZ 2114 from the body. The withdrawal operation is completed. Installation is done in reverse order. But at the very end, before tightening the fastening bolts, you will need to adjust the gaps between the hood and the body wings.
Hood lock device
The entire VAZ line has a mechanical lock device, with similar main parts. VAZ 2114, 2115 have additional plastic protection installed under the bumper. This is important to remember when the cover jams after the cable breaks. Otherwise, the locking mechanism has the following parts. Using the example of the hood lock of the VAZ 2110.
- latch pin;
- springs - lock latches, hook;
- lock-nut;
- lock washer;
- hook - hook axis, handle;
- cups - upper, lower;
- traction mechanism - holders, bushing, seal, shell;
- lever.
The lock on the entire line of Zhiguli cars works extremely simply: by slamming the hood, the pin falls into a standard hole on the frame and is held in place by a spring. By pressing the traction handle in the passenger compartment, the latch is released, opening a small gap. By pressing the safety hook handle, the lid opens completely.
Hood lock functions
The purpose of any locking mechanism, be it the hood lock of a VAZ 2109 or a BMW, is to tightly hold the engine compartment lid, preventing street dirt and water from entering the engine compartment. The engine compartment is provided with optimal ventilation, but air penetration should not occur through the cover.
The “disease” of 90% of VAZ cars is that six months after use, the hood lock begins to deteriorate: the cylinder wears out, the springs lose their rigidity, the cable (traction mechanism) frays, and cracks can form on it. Therefore, the lock should be adjusted twice a year, replacing, if necessary, faulty parts. Otherwise, a sudden opening of the hood on the highway is guaranteed.
How to open a car hood if the cable is damaged
You can often come across the following request from owners of “fourteeners”: the hood cable of the VAZ 2114 has broken - what to do? Access to the engine compartment of the Samara is possible if the car enthusiast knows a few tricks. The main difficulty is determining the location of the traction break. Often the “thread” breaks directly at the point of attachment to the hood release handle. In this case, you can manually search the indicated area and try to hook the tip of the cable with pliers. If this is successful, then you just need to pull the torn end towards you to open the hood.
Primary problems with the hood latch
The first malfunctions in the locking mechanism are noticeable immediately. If you pay due attention to them, a simple adjustment will help you repair the lock. The hood lock cylinder on the VAZ 2109, for example, is made of industrial steel and for it to break completely, you need to ignore the first malfunction signals for more than one month.
- Each time you close the hood, you need to slam the lid harder and even put pressure on the frame.
- The lid clangs and rattles on rough roads. Moreover, this can be clearly heard in the cabin.
- The lock does not close the first time.
- When the cable is loosened, you need to pull the handle several times for the lock to open.
- After pressing the hood handle in the cabin, the lid does not lift, forming a gap, but remains in place. The gap between the frame and the cover can only be seen if you lift the cover yourself.
If these signs have just appeared in the car, you can adjust the lock, this will prevent the need to completely replace it.
The cable is broken - what to do?
Not everyone knows that a cable is responsible for opening the hood, which is connected to the hood and a button for opening it. If the cable is broken, the hood will not open.
In order to open the hood, you must first remove the protection. If the car is equipped with serious impact protection, then it must be removed, 2 front fastenings are responsible for this, they are tightened with both front crab bolts. If the machine has simple protection, then it can be removed by unscrewing the screws on the “TV.” If the protection is medium, it includes 2 parts, and also uses other screws that finally secure it, and all of them are unscrewed with a simple 8 key.
The next step is to control the cable fastening, after which the hood opens. To do this, you need to reach with your hand to that very “TV” and pull the eyelet of this cable in the direction where the cable usually pulls it to the left.
Under no circumstances should you force yourself to unlock the lock. If you pulled the VAZ hood cable, but the hood still does not open, you do not need to pull it harder, just resort to alternative help. To do this, you need to continue to pull the eye to the left side, and at the same time prop the VAZ hood up with the same hand. Most likely, it will not be possible to reach the hood with your other hand, so if you cannot perform both operations at the same time with one hand, you need to resort to the help of another person who will support the hood from the outside. Only after all operations will the driver be able to open the hood of the VAZ.
If the driver wants to change the cable and not have to deal with this problem in the future, it is necessary to remove the old cable and install a new one. Be sure to stretch the cable to the front eye and put it in place so that the cable does not fly off again. After all this, you need to remember where the neck of the cable was previously located, and it was in the second eye, so by pulling it in the opposite direction, the cable will be in its place.
How to adjust the hood latch
The first faults that the driver notices can be eliminated by a simple inspection and tightening or replacing some parts. Adjustment of the hood latch on all VAZ cars is carried out in two main stages: horizontal and vertical.
Vertical adjustment
Vertical adjustment is a check of the optimal length of the lock latch. This must be done if the hood cannot be securely locked in the closed position. When driving, a rattling noise is heard, even with the engine turned on, when the car is standing still, there is a slight bouncing of the cover.
To adjust, use a 19 mm spanner and a flat head screwdriver. Stages of vertical adjustment.
- Loosen the locknut on the latch. To prevent the latch itself from turning, hold it with a screwdriver.
- If the hood lid does not close well or does not close at all, it is necessary to adjust the length of the latch. You just need to unscrew it (enlarge it) with a screwdriver.
- If the cover rattles and vibrates when driving, shorten the length of the latch by screwing the latch several turns.
- Verifying the correct latch length setting can only be done through experimentation.
- There are no dimensions, calculations or measurements with a centimeter tape, even in production.
- After the mechanism is adjusted, the locknut should be tightened with a wrench while holding the lock latch.
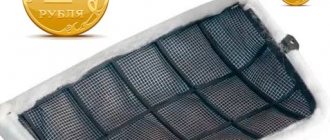
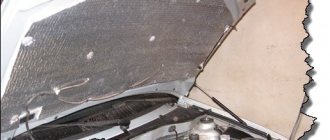
Sound insulation of the hood
Many owners of the VAZ 2114 would like to feel less noise while driving the car. It must be admitted that the engine in this car is far from quiet. The noise from its operation is clearly transmitted into the cabin. Soundproofing the hood can help overcome this problem. But you shouldn’t limit yourself to just that. For a more tangible effect, you need to soundproof the front fenders and the wall of the engine compartment.
The hood is a rigid frame, which consists of a welded steel profile, as well as a steel sheet, which is, in fact, the hood cover. Only the inside of the hood cover needs to be glued with soundproofing material.
Repair
To repair the lock and replace parts, you will need the following tools:
- open-end wrench for 17 and 19;
- liquid oil for lubrication;
- Screwdriver Set;
- pliers or pliers.
Repairing a lock yourself requires some skill and slowness, so you need to count on at least 2 hours. First you need to determine which mechanism in the lock has failed; most often it requires repair:
- springs (zam, hook, latch);
- replacement of traction.
It is unlikely that it will be possible to repair the hood lock in a few minutes for the first time.
Replacing the lock spring
The lock spring is located on the car frame. Wear of the metal part, deformation and cracks cause the hood to not close tightly. Using the VAZ 2114 as an example, you can install the lock spring in several stages:
- Disconnection from the spring of the traction mechanism. A screwdriver is used.
- Removing the spring.
- Installing a new lock spring.
Replacing the latch spring
If you need to change the latch lock spring, for example, on a VAZ 2114, you will need a flat-head screwdriver and a 19mm wrench. You can change the spring in three stages:
- Kickback (loosening) of the locknut.
- Unscrewing the pin.
- When the locking mechanism is removed, the spring is replaced with a new one and a similar assembly is performed in the reverse order.
After repairs, it is recommended to always check how the hood latches after replacing the part.
Replacing the hook spring
Unlike the previous two spring replacements, replacing the lock spring will require either pliers or fine tweezers. Repair is more painstaking and requires a certain skill. The work is carried out according to the following principle:
- Use a screwdriver to pry off the lock washer that holds the hook axis.
- The washer is removed from the grooves with tweezers (or pliers).
- The hook axis is removed.
- The spring is removed.
After replacing the spring, reassemble the mechanism in the reverse order.
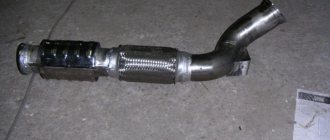
Replacing traction
It is necessary to change the lock drive when the locks are in working condition, and when the hood is opened using the handle from the passenger compartment, the lid does not open. Replacement of traction is carried out according to the following principle:
- The cable is released from the hook (the hook itself does not need to be removed).
- A 13 key is used to secure the handle axis.
- The handle is removable.
- Use pliers to straighten the bent part of the cable.
- The locking sleeve extends and the end of the cable is released.
- The loop is removed from the draft lever.
- The rod is pulled out from the motor side.
- The shell is released from the holders and the part is replaced.
Assembling the new rod is carried out in the reverse order. After replacing any part, additional adjustment of the mechanism is required.
Installation of sports locks
Sports hood locks can be installed instead of standard parts or as additional insurance. It is recommended not to abandon the original locking mechanism; this is an additional guarantee that the hood will not be opened by intruders; the latches on VAZ cars are quite strong and can withstand significant mechanical forces if they are opened.
Installing sports locks on the hood of a VAZ will require additional tools and some skills; the whole process takes several hours.
Tools and materials
Preparing for installation
Before installing the sports lock, it is necessary to accurately measure the places where the rods are attached on the bar.
- Holes are drilled in the frame above the headlights and rods are installed.
- the tops of the rods are smeared with grease, and the hood lid is covered so that fingerprints remain on the lid.
- On the hood, on the printed marks from the rods, the necessary holes should be drilled.
- The hood cover is drilled from the inside out.
- Take the smallest drill and drill a hole on a solid wheel.
- The hole is expanded with a large drill.
- Checking holes for additional boring.
- The hole should be 1-2 mm away from the rod.
The preparatory procedure before installing the sports lock is completed.
Installation
Installing the lock also requires using a drill to secure it to the hood. Stages of work:
- For example, the protective coating is removed from the plate on the hood lock of a VAZ 2106, the plate is applied to the hood and the four mounting holes for the plate are measured.
- Use a thin drill to drill the cover for the screws.
- The plate is screwed on with self-tapping screws.
- The rods are tightened to the optimal position.
- Studs are inserted into the holes of the rods.
- Installation of safety cables.
- Installation completed.
How to replace and adjust the hood lock on a VAZ 2113, 2114, 2115
Author: remontnik · Published 04/03/2015 · Updated 11/06/2019
Photo and video instructions for those who want to independently replace and adjust the hood latch on cars of the LADA Samara family.
1. Before starting work, you need to mark the position of the latch on the hood with a marker.
2. Using a screwdriver and a 17mm wrench, loosen the locknut.
3. Unscrew the locking nut and washer.
4. Using a screwdriver, remove the lock washer of the safety hook axis.
5. Then we take out the axle and remove the lever from the 2 plastic holders.
6. Remove the safety hook assembly with the drive lever.
7. Remove the upper end of the lock spring from the panel hole.
8. Disconnect the drive rod from the spring and remove it from the body panel.
9. Installation is carried out in reverse order.
Replacing the hood cable of a VAZ 2114
Buying a new cable is not a complicated matter - any car store within walking distance is unlikely to ask for more than 150 rubles. On the shelves you can find imported Czech-made rods, which, according to the assurances of “experienced” ones, are of course many times stronger than our “snot”. But, in fact, the difference between the options available on the market is minimal: the strength characteristics are almost identical.
Replacing the hood cable of a VAZ 2114 will not cause any difficulties if you follow the algorithm outlined below. To carry out repairs, the car owner will need: a set of screwdrivers, pliers.
Algorithm (also relevant for models “2113”, “2115”):
- We bend the bent end of the cable at the place where the rod is attached to the hood opening handle;
- Move the locking ring of the handle to the upper position;
- Remove the hood release handle (optional);
- We climb under the hood and remove the O-ring;
- Disconnect the rod clamps in the area of the sealing ring;
- We remove the rubber seals around the perimeter of the engine compartment;
- We drag the rod through the partition of the engine compartment;
- We take out the rod holders that secure the shell with the drive to the body;
- Remove the other end of the cable from the hood lid spring;
- We pull out the drive shells from the clamp;
- Remove the hood cable;
- We perform the steps described above in reverse order with the new cable.
When reinstalling, try not to damage the hood lock spring - if this happens, the hood may begin to open spontaneously while moving. When purchasing a new cable, pay attention to the number of traction strands - monofilament cables are much less durable and are prone to breaking and chafing. If you have any questions, watch this useful thematic video
Adjusting the hood lock on 2114, 2113, 2115.
The adjustment is made by changing the position of the lock latch.
1. Loosen the locknut and position the latch so that when closing the hood it fits exactly into the hole on the front panel.
2. In order to adjust the protrusion of the lock retainer, unscrew the lock nut and use a screwdriver to adjust the protrusion. After that, fix it with a lock nut.
3. Check the lock and, if necessary, repeat the adjustment operation until the lock operates smoothly.
Adjusting the gaps between the hood and wings of the VAZ 2114
Open and place the hood on the stop. Loosen the bolts securing it to the hinges. There are two of them on each side. After this, we cover the hood and install it so that the gaps between the wings and the hood are equal on both the right and left sides. Now carefully lift the hood and thoroughly tighten the fastening bolts.
You can adjust the height of the hood by changing the height of the adjusting buffers. There are two of them. These buffers must be installed so that the surfaces of the wings and hood coincide.
The height of the buffers can be adjusted by turning them in or out. Having completed all these operations, you need to make sure that the hood now opens easily and closes securely with the lock. If the closure does not close securely or there are other problems with closing, the hood latch must be adjusted.
What are sports locks?
What are their functions?
Many people who saw strange, symmetrically located devices on the hood of a car for the first time had a similar thought: “What can people come up with to stand out from the crowd!”
Yes, these accessories really give the car a new, sporty, aggressive look. That's all? Is it worth it to poke holes in the hood for the sake of a dubious change in appearance? In fact, sports hood locks, in addition to decorative functions, perform another important role.
Driving safety
It is not uncommon for a car to open its hood while driving. And this happens not only with “old” vehicles. It’s good if everything gets done by replacing the hood, windshield, straightening the roof, followed by paint work. All this costs a lot of money and, most importantly, nerves. How to insure yourself against similar and more serious troubles?
Additional hood locks of this type are designed precisely to prevent such situations. These were developed for racing cars, and now no sports car will be allowed to participate in a rally without them. An open hood, and even on a race track... This is where they got their name, and are now known as “sporty”.
So, we figured out the main purpose of the additional sports hood locks. What about the appearance of the car after such an improvement?
Choosing a hood lock
Recently, hood locks have been produced by many manufacturers in different versions.
Locks of the most common shape and design are mainly available in three colors.
Classic round shape and cables for securing the fasteners.
Such locks will give an original look to the hood of any car.
All these hood lock models differ in appearance, but, as you noticed, they consist of almost the same parts. It follows that it is not so important what shape the lock is chosen, the main thing is its reliability, quality of materials and workmanship.
Some people may not like the fact that these models are too noticeable, as they protrude quite well above the surface of the hood. Yes, everything unusual immediately catches your eye. For those who prefer less drastic changes to the appearance of the car, there is also a suitable solution.
This hood lock model practically merges with the surface of the hood. In the closed position it has no protruding elements. Suitable for any car design and have good aerodynamics.
DIY installation of sports hood locks
Let's choose today the last version of the lock (as the most universal one), and start installing it. We will install it using the example of a VAZ-2109 (2108).
Tools and materials
During the installation process we will need:
- Marking pencil
- Roulette
- A grinder with a small disk, or a jigsaw with a metal file
- Electric drill
- Drills 4, 8, 12 mm
- Round and flat files
- Spanners
- Flat head screwdriver
- Masking tape, preferably wide
- Solid oil or other thick lubricant
- Set of sports locks.
Preparing for installation
Installing sports locks is a responsible undertaking. The reliability of the locks, and therefore safety, depends on a serious approach to this process. In addition, quite a lot of holes are drilled and cut out in the hood. The incorrect location of the holes, their size and shape, cannot be corrected by anything, except perhaps by replacing the hood. Be careful, don't rush!
Before starting installation, it is recommended to remove the spring latch and safety hook from the hood. During the work, we will have to close and open the hood lid more than once; the standard device will make these actions difficult. You will need a 19 mm wrench and a flat head screwdriver.
Drilling holes
Then we select suitable places on the frame for attaching the pins. We mark and drill. Drilling is easier in three steps. First with a 4 mm drill, then 8 mm and finally 12 mm.
We install the pins in place and tighten the nuts. They should be slightly higher in height than required. We will still be adjusting them, so there is no need to fully tighten the nuts.
Next, apply a little grease to the ends of the pins and place the hood on them. We try to do this carefully so that there are clear traces of lubricant on the inside of the cover. First we drill with a four-piece drill from the inside. Using 8 mm and 12 mm drills, you can already drill from the outside, covering the hood (wooden blocks should be placed between it and the frame). Perfect accuracy is not required at this stage.
We have now crossed the “point of no return.” We'll have to see this through to the end!
We lower the hood. When done correctly, the holes line up with the pins. If we miss a little, we finish it with a file.
Hole for cover
Then we cover the front side of the hood around the hole with masking tape in several layers. This is necessary to avoid damage to the paintwork when cutting a hole for the lock.
We put a lock on the pin and determine its position (twist it as we like). Trace the outline of the castle with a pencil. You can use the box from the kit as a stencil. We do this: we place the box with the lock in place on the hood so that the pin fits into the lock. Hold the box and remove the lock. All that remains is to circle it according to the pattern.
The marking is ready, you can continue. The next stage requires attentiveness and a steady hand. Using a grinder (jigsaw), we cut out the holes along the drawn contour. There is no need to rush, the main thing here is accuracy and precision.
Use a file to smooth out the edges and try on the lock. The hole should not be very large, otherwise there will be a problem with attaching the lock.
It is important that not only the lock fits into place, but also that the pin fits well into the “socket” of the lock.
Installation of overlays
When everything fits and matches, insert the lock, mark and drill holes for fastening. All that remains is to secure the lock and adjust the length of the pins.
You can fasten the locks using the fasteners included in the kit, or you can also use rivets.
Let's step back a little and inspect our work. That's it, the sports hood locks are installed by yourself. And no worse than in the service center!
How to ensure ease of opening and reliable fixation?
For these purposes, a special part is sold that can be installed on the car yourself. This part is called a gas stop. They replace the standard rack and, as a result, the consumer properties of the car increase sharply. The opening of the hood begins as follows. You only need to lift the hood a little with one hand. Next, the gas stop gets to work. He himself will raise the hood to the required height and securely fix it there. The standard stop will no longer be used. During operation, this stop does not require any maintenance.
Many owners of VAZ 2114 cars prefer to install a gas strut on their car, especially since the installation process does not require much effort. To perform this operation you will need:
- The stops themselves;
- Two keys for 13;
- Four nuts with washers for 13mm;
- Drill;
- Eight-millimeter drill;
- A little enamel and bitumen.
First of all, we lift the hood and install it on the still old stop. After this, you need to mark the places where there will be holes that you will need to drill yourself. On both sides of the hood you need to measure 530 millimeters.
In this case, the internal distance between the two holes will be 310 millimeters. The holes will be drilled into the thickening of the hood, inside of which there is a void. Nevertheless, the procedure should be approached with all responsibility, because if you overdo it, you can drill a hole in the hood itself. After making sure that everything is marked correctly, we proceed directly to drilling. Using a drill you need to make four holes. Two in the hood thickening and two under the hood, one on each side of the body cross member. To prevent the possibility of corrosion, it is advisable to treat the resulting holes with an anti-corrosion compound and paint. After this, you can proceed directly to the installation. We take the gas stop and install it in the drilled holes on one side. We do the same with the second emphasis. They will need to be screwed. For those who work without an assistant, it is better to first screw the stops onto the hood, and only then onto the body. If there is someone nearby who can support the hood, then the sequence of actions does not really matter. When everything is done, it will be possible to test the set stops in action. You will need to try opening and closing the hood several times. It should open easily and smoothly, and closing should not be accompanied by significant effort.