§64. Cardan transmission repair
During operation, the following defects appear in the cardan transmission:
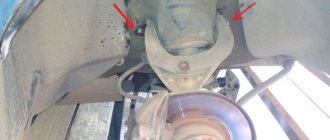
- wear of the necks of the cross; - wear of bearings and seals of the crosspiece; -development of fork holes; -wear of splines on shafts and forks; - deflection or twisting of shafts; - wear of the intermediate shaft support bearing. Signs of these defects are beating of the shafts, increased clearance in the joints, knocking noises when moving and jerking when starting off.
To troubleshoot a cardan drive, it is disassembled in the following order:
Unscrew the flange bolts connecting the cardan joints to the drive gear of the main gear and to the driven shaft of the gearbox, and remove the cardan drive. With the driveline closed, first disconnect the driveline tube, roll back the rear axle, and then disconnect the shafts. If there is an intermediate shaft (GAZ-51 car), first unscrew the flange from the drive gear of the main gear and remove the main shaft, then unscrew the cushion with the intermediate shaft support and the intermediate shaft flange from the driven shaft of the gearbox from the frame.
Before disassembling, it is recommended to mark the parts with marks to preserve their original position during assembly. The main defects of cardan transmission parts are: wear of the journals, bearings, crosspiece seals, holes in the rollers, splines on the shafts and forks, deflection or twisting of the shafts, wear of the support bearing of the intermediate shaft.
Worn crosspiece necks are restored by chrome plating followed by processing to the nominal size. Oil seals and worn bearings are replaced with new ones. Needle bearings that are missing at least one roller cannot be used. If there are dents from the rollers on the necks of the crosspiece, then the crosspiece assembly with bearings should be replaced.
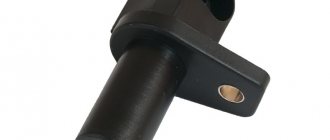
Sliding universal joint forks with worn splines are usually replaced with new ones. A fork with worn splines in outer diameter and thickness can be restored by surfacing using direct current of reverse polarity. After surfacing, normalization is carried out at a heating temperature of 860°C, mechanical processing (grinding and cutting splines), hardening, tempering and grinding along the outer diameter. The sliding forks must move freely, without jamming, along the splined part of the propeller shaft. There should be no noticeable radial play.
When assembling the cardan transmission, you must:
press the holders of the needle bearing seals onto the necks of the cross with an interference fit of 0.02-0.03 mm, screw in the valve and oiler; saturate the plug seals with cylinder oil and install them in the holders; insert the crosspiece into the fork (when assembling the sliding fork, before installing the crosspiece, insert the plug for the spline connection of the fork), put support washers, cups with needle bearings, bearing caps on the necks and screw the locking plates with screws; connect the crosspiece with the second fork in the same sequence;
if the cardan joint has steel bushings, install them on the necks of the cross with a gap of 0.07-0.15 mm, and in the fork socket with an interference fit of 0.04-0.08 mm; screw the grease nipple and safety valve into the crosspiece; place the oil seal cover and its support washer, as well as the oil seal, pre-impregnated with oil, on the splined end of the propeller shaft; insert the splined end of the shaft into the fork and tighten the oil seal cover by hand when installing the sliding fork, make sure that the axes of both crosses lie in the same plane (the GAZ-51 car has indicator arrows on the fork and shaft, which must be located on the same straight line during assembly) ; Install a grease nipple into the spline fork.
Checking cardan shafts for runout is done with an indicator when installing them on prisms. Runout at any point along the length of the pipe should not exceed the values established by the technical specifications. Shafts with twisting, wear, and crushed splines are replaced with new ones. When assembling the cardan drive, the universal joint forks must be located in the same plane. The rear axle driveshaft and intermediate shaft must be dynamically balanced on a bench. The imbalance should not exceed the values specified in the technical specifications.
Source
Cardan diagnostics and repair
To understand what exactly the problem with the cardan is and to eliminate it, you must first carry out diagnostic measures. Once the cause of the malfunction is determined, it is eliminated through appropriate repairs. If it is determined that the problem lies in the crosspiece, then it should be replaced with a new one. To do this, you must first remove the driveshaft itself from the car. Next, the crosspiece is removed from it, and you definitely can’t do this with anything. Special pullers must be used. Next, a new cross is installed, and the cardan is assembled, and there is one important nuance here. It is imperative to observe the position of the sliding forks. Otherwise, an imbalance will arise and the cardan will vibrate even more abruptly than before. To avoid such trouble, marks should be applied to the shaft halves.
If the outboard bearing is determined to be faulty, it must also be replaced. There is no particular point in repairing it; it is better to install a new one. In this case, you can replace the bearing itself or the intermediate support assembly. In any case, you should first remove the cardan, remove the cross and the sliding fork. Quite often it is not possible to put the cross back together, so it is worth replacing it together with the outboard bearing. If vibration is observed after repair, the bearing needs to be aligned. It must be done, otherwise the vibrating problem will continue to haunt the driver.
To center it, you need to put the car on a lift. The fasteners should be loosened so that the spare part can move freely. One person is behind the wheel and accelerates the car to 100 km/h. Next, he releases the gas and depresses the clutch pedal. After the wheels stop completely, the engine turns off. After this, the bearing fasteners are tightened.
The spline connection problem is often encountered. To understand how to proceed further, it is necessary to evaluate the level of play. If it is too large, then the entire cardan will have to be replaced. If the situation is not so critical, then you should work with the splines. The cardan must be removed from the machine, and then the splined connections must be disconnected. They must be cleaned of dust, dirt, and rust. The boot should also be replaced. After assembling the cardan, lubricant is pumped through a special fitting.
Cardan transmission assembly
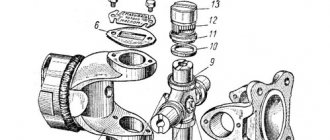
When assembling the cardan transmission, you must:
- press 2 oil seal holders 9 needle bearings onto the necks of the cross with an interference of 0.02-0.03 mm, screw in the valve and oiler;
- saturate plug seals 4 with cylinder oil and install them in the holders;
- insert the crosspiece into the fork 1 (when assembling the sliding fork, before installing the crosspiece, insert the plug 10 of the spline connection of the fork), put support washers 6, cups 8 with needle bearings 7, bearing caps 12 on the necks and screw locking plates 11 with screws; connect the crosspiece with the second fork in the same sequence; if the cardan joint has steel bushings, install them on the necks of the cross with a gap of 0.07-0.15 mm, and in the fork socket with an interference fit of 0.04-0.08 mm;
- screw oiler 13 and safety valve 3 into the crosspiece;
- place the oil seal cover 18 and its support washer 17, as well as the oil seal 16, pre-impregnated with oil, onto the splined end 15 of the propeller shaft;
- insert the splined end of the shaft into the fork and tighten the oil seal cover 18 by hand when installing the sliding fork, make sure that the axes of both crosses lie in the same plane (the GAZ-51 car has indicator arrows on the fork and shaft, which during assembly should be located on the same straight line );
- install oiler 13 into the splined fork.
Source