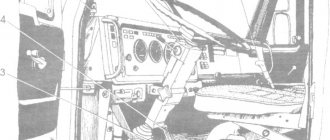
Controls and instruments
Figure 1.4:
Controls
The location of the vehicle controls is shown in Figure 1.4.
Note
: On some vehicles, instead of two levers (items 21 and 23) for controlling the transfer case, one lever is installed.
1. Handwheel of the headlight range control unit, depending on the vehicle load (Figure 2.2).
Figure 1.5:
Headlights corrector
1 - block handwheel
With the vehicle fully loaded, the following must be aligned with the mark on the control unit housing:
- number 1 on the block handwheel (for buses);
- number 2 on the block handwheel (for vans);
2, 3, 11 and 13. Plugs.
4. Side ventilation grilles.
5. Lever for switching direction indicators, headlights and horn.
Note
: On some vehicles, the sound signal is turned on by the windshield wiper and washer switch (see Fig. 1.10).
The lever has six fixed positions - I, II, III, IV, V and VI and four non-fixed positions “A” (Figure 2.3 and 2.4). If the switch lever is in position I, and the handle 28 of the central light switch is in position II, then the low beam headlights are on. When the lever is moved to position II, the high beam headlights come on and the blue indicator light comes on. When you repeatedly move the switch lever from position I toward you along the steering column (non-locking position), the high beam headlights signal. When you press the lever button (from any position) along the axis, a sound signal is activated (without fixing) - see Figure 1.6.
Changing gears on a manual transmission when the car starts moving
So, before you start driving, you need to depress the clutch and set the gear lever to neutral.
Then, while holding the brake pedal, you can start the engine, after which, releasing the brake pedal, you will need to depress the clutch pedal and, without releasing it, engage first gear.
After engaging first gear, smoothly releasing the clutch, you can start driving. If necessary, parallel to the smooth release of the clutch, the gas pedal is also lightly pressed.
If you need to apply emergency braking, you should simultaneously depress the brake and clutch pedals, while the gear shift lever can be moved to neutral later.
Gear shifting in a manual transmission occurs in the following ranges: first gear 0-20 kilometers per hour, second gear 20-40 kilometers per hour , third gear 40-60 kilometers per hour, fourth gear 60-90 kilometers per hour, fifth gear 90-110 kilometers per hour.
Sixth gear is engaged when the vehicle is moving at a speed of over 110 kilometers per hour. Also, reverse gear is engaged only after the car has come to a complete stop.
In other words, proper manual transmission gear shifting will preserve the life of the clutch and protect the element from wear out too quickly.
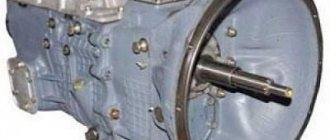
GAZ 2705 | Manual Transmission
| Rice. 1.127. Manual transmission lever shift diagram |
Gears shift poorly on a manual transmission: the main reasons
When changing gear, press the clutch pedal all the way down, then slowly release it. When driving, do not keep your foot on the clutch pedal, as this may cause the clutch to break. Do not use the clutch to hold the car when stopping on an incline - use the parking brake for this.
Upshifting too quickly or downshifting too slowly will overload the engine and cause detonation. Constantly increasing engine speed to maximum speed in each gear leads to increased engine wear and increased fuel consumption.
Maximum permissible speeds
Entering an expressway or passing slow-moving traffic may require maximum acceleration. Be sure to observe the following maximum speed limits for each gear:
gear - speed, km/h
1………………………52
2………………………89
3………………………137
4………………………178
CAUTION Do not downshift if the vehicle speed exceeds the maximum permissible speed in the next downshift.
If you have difficulty shifting into reverse, shift to neutral, immediately release the clutch pedal, then try shifting again.
When towing a trailer, to maintain engine braking efficiency, do not engage fifth gear.
Switching gears while moving
In the recommendations for operating cars, there is the following clause: “Switching the manual transmission must be done at certain speeds and tachometer readings.” This increases the service life of the gearbox and engine, improves driving efficiency and protects the environment.
It is advised to change gears at 2-3 thousand revolutions according to the tachometer. If it is not there, then we focus on speed. Experienced drivers say that it is better to shift at the beginning of the climb and stay in a lower gear until the hill ends. If you switch while driving up a hill, you can lose the dynamics of the movement, the engine speed will drop and it will be more difficult for the engine to overcome the obstacle. This leads to increased wear of internal combustion engine parts and increased fuel consumption.
Consider the stages of switching in motion
- Let's eat. Release the gas pedal and simultaneously press the clutch. The pressure should be smooth, but not slow
- We shift the gearbox to neutral and then to the desired gear. Switching on mechanics occurs only through the neutral position. Experts recommend taking a short pause when changing from one gear to another. This will save the box. They advise you to count to two. That is, the lever is in one position - we count “One” and move it to neutral. We count “Two” - turn on the desired gear
- Smoothly release the clutch pedal, without sudden movements of the foot. Having brought the clutch to the point of setting, squeeze approximately halfway. If you release the clutch pedal sharply, the car may jerk or it will “peck” its nose, and your face will hit the steering wheel. Lightly press the gas.
- Keep the gas pedal slightly pressed so that the engine does not howl, because the clutch is in the middle position
- Smoothly release the clutch completely.
- We take our foot off the pedal. It's better to move her to the side so she can rest
If you do not adhere to this rule, you can quickly destroy the gearbox release bearing. Even when the pedal is slightly pressed, the bearing begins to work. During long trips, its resource is sharply reduced, because it is constantly pressed against the plates of the gearbox basket, and it needs to rest. It is activated only when changing gears; the rest of the time it should be inactive.
Common Mistakes
Let's consider the erroneous actions of beginners or those who switched from automatic to manual. They can lead to premature transmission failure.
- Not changing gears in a timely manner. They do not pay attention to the speed of the car and engine speed
- Slowly move the manual transmission lever. As mentioned above, you need to switch clearly and relatively quickly, on the count “2”. If this is done smoothly, the car will begin to brake with the engine. While you switch, you will need to accelerate again to keep up with city traffic.
- Smoothly pressing the clutch pedal leads to a decrease in driving speed. At the moment of changing gear, you release the gas and begin to press the clutch. At this moment, the box is in rigid coupling with the motor. Since the accelerator pedal is not pressed, fuel is not supplied, the engine begins to slow down the car. Therefore, we press quickly until we lose speed, switch gears and smoothly release the pedal.
- They release the clutch pedal sharply. This will cause the machine to jerk and jerk. As a result, you can bump your nose into the steering wheel and damage the gearbox elements.
Principle of operation
The clutch pedal has failed: how to get to 100 on your own?
The working diagram of the gearbox is as follows. The drive shaft receives rotation from the driven clutch disc and transmits it to the intermediate one. If the gearbox is set to neutral speed, there is no engagement of the intermediate shaft gears with the driven one, the car is immobilized, since rotation is not transmitted.
When a gear is engaged, the driver engages the driven element gear with a specific intermediate gear. And rotation begins to be transmitted from the driven shaft to the wheels. The car starts to move.
The necessary gears are engaged by a control unit consisting of three sliders and forks. Each of the forks is equipped with a special groove of the element. That is, the driver, using the gearshift lever and a special rocker, acts on a certain slider, moving it to one side. In this case, the fork on the slide pushes the gear, and it engages. The change in gear shift speed is influenced by engaging gears of different sizes and numbers of teeth.
To prevent the slider with the fork from returning to its original position, the box control unit is equipped with latches. The latter are spring-loaded balls that fit into grooves on the sliders. That is, the slide has grooves in certain places.
When moved to the desired position, the ball retainer jumps into the groove, eliminating the return of the slider. When changing speed, the driver must apply pressure on the slider that exceeds the force of the detent spring so that the ball pops out.
This is a simplified description of the design and operating principle of a manual transmission.
Typically, the VAZ gearbox of classic models operates according to this scheme. On some cars the scheme may be slightly different, but the essence of the work is the same - the slider with the fork acts on the gear.
In some cars, the slider in the gearbox, which is responsible for engaging the first gear, also ensures that the reverse gear is engaged. It happens to them that first and reverse gears are difficult to engage
Of course, this breakdown cannot be ignored
On other gearboxes, first and reverse speeds are separated and different sliders are responsible for turning them on. In such cars, problems with engaging first gear may not be reflected in engaging reverse gear.
There are several options why first gear does not engage well. It also all depends on how the cause manifests itself - it is impossible to turn it on, and everything is accompanied by a metallic grinding sound from the side of the box, or the speed turns on, but immediately turns off on its own.
Do-it-yourself overhaul of the Gazelle gearbox
Any difficulties with shifting gears, noise, or spontaneous activation of speed require urgent repair of the gearbox. Long-term operation of the Gazelle sooner or later leads to one or more characteristic malfunctions:
- destruction of bearings;
- loosening the fixing bolts;
- wear of synchronizer rings;
- gear damage;
- formation of burrs and other malfunctions.
Repairing the Gazelle gearbox involves dismantling and disassembling. First you need to prepare a number of necessary tools. In addition to standard tools, you need a beard, pullers, a needle file, and fine-grained sandpaper. After the car is driven onto the overpass, the crankcase is freed of oil. Then the cardan is removed and the lever with the cap is taken out. The wiring for the reverse light and the speedometer cable are disconnected from the box. The gearbox is dismantled by unscrewing the exhaust pipes and bracket. The box is also fixed with the clutch housing - there are 4 nuts. When removing it, you need to be very careful not to damage the cylinder head - the Gazelle gearbox weighs 32 kg. For this reason, the cylinder head should be covered with a wooden block in advance.
Disassembling the gearbox
Step-by-step disassembly of the unit will prevent you from making mistakes, and the procedure will be much simpler. It is better to place the removed box on a flat table in the garage to make it more convenient to work. Further reassembly steps are given with simultaneous troubleshooting. Before this, it is advisable to study the Gazelle checkpoint diagram .
- Pull out the lever with the bracket, if it was not removed at the dismantling stage. Check the spring-loaded cups that are responsible for stabilizing the switch. There should be no significant play in the lower part of the rod, both springs should be in place and in good condition. Check that both fixing pins are firmly seated on the sides of the upper part of the housing, where the speed selector directly fits. Test the lower part of the handle and its seat in the gearbox for wear - the metal should not be severely corroded.
- Check the condition of the end of the input shaft onto which the flywheel support bearing fits. Grooves, steps, and other signs of wear on the metal surface will indicate a specific problem. This will be the cause of strong play, causing tremors, noise and other problems of the box. Remove the flange covering the inside of the box on the input shaft side. Pull out both retaining rings - a bit, a flathead screwdriver and a hammer to help. Check the drive shaft bearing for play. During assembly, replace the worn-out part with a new one.
- Halve the box. The Gazelle-Business model has an additional locking bracket, which also needs to be unscrewed. Both parts of the old-style gearbox are simply bolted together. Unscrew the speedometer drive gear and the reverse drive gear of the intermediate shaft.
- Remove the front housing cover and pay attention to the condition of the drain plug with the magnet. As a rule, a lot of dust, shavings and other wear elements collect in this place. Test the outer race of the roller bearing - it should fit tightly, not play, and also the track - ideal without cavities or bulges. Clean and sand all uneven surfaces with fine sandpaper.
- Check the condition of the input shaft bearing - note that there is not only axial, but also radial displacement. Replace if during operation it moves to the 4th gear gear - this is easily determined by the damaged parts of the gear.
- Check synchronizers of all gears. There should be no close contact with the gear rings, no gap, in other words, there should not be much thinning. Otherwise, the problematic synchronizer must be replaced. Experts also recommend replacing elements whose teeth have ground cones. The synchronizers have a special boss that serves as a limiter. If it is also worn out (the factory thickness of the ebb is at least 6 mm), the speed on the box may turn on spontaneously or difficulties with turning on will be observed.
- Check the gears for shells and signs of wear.
- Check the condition of the forks and synchronizer clutch rings. The thickness of the seat for the fork with replaceable crackers in normal condition should be about 9 mm. If it is more, then this already indicates wear and play. The problem is solved by replacing elements - crackers, rings.
- Check the condition of the vent. It should not cling to the main gear synchronizer rings, otherwise this will indicate its displacement. Traces of contact are clearly visible on the surfaces of the teeth. The problem can be solved by proper shaft adjustment.
- Remove the input shaft. Measure the diameters of the end of the secondary shaft and the hole of the main shaft. Subtract the smaller number from the larger number and divide the resulting amount by two. Measure the circumference of one of the rollers located at the junction of the shafts. Compare the indicators - if they are very different, you can judge there is a large backlash.
- Loosen and pull out the rear part of the box housing - the secondary shaft is located in it. Do it carefully, remove the rods carefully!
- Carefully inspect the inside of the rear housing. Clean off dirt, check the bearing seats and bearings. In the extended area of the casing or shank, it is recommended to check the bushing - it must be installed normally, do not cover the drain hole, otherwise the box parts will not be well lubricated.
- Check the secondary shaft parts. Replace those that have strong production. The 5th gear gear especially suffers. This happens to drivers who constantly overload their Gazelle.
Attention! If the secondary shaft bearing is destroyed, this is always fraught with serious consequences. The back of the box may fail completely. In case of damage to the input shaft bearing, the situation is not so critical.
Washer shaft or intermediate shaft
It remains to check the condition of the washshaft. There is nothing complicated here - visually inspect the helical gears in the light. There should be no traces of wear on them. To remove the bearings from this shaft, you need to arm yourself with two large screwdrivers or short pry bars. The tools are placed on both sides of the bearing, the shaft is placed vertically. Then gently press on both screwdrivers. The clip will easily pop up with effort.
Assembly and connection of the gearbox
It is easier to assemble the box when the rear part of the gearbox housing is screwed with self-tapping screws to a heavy wooden block. It doesn’t fall anywhere, remains motionless, and the shafts are quickly inserted.
It is also recommended to press the bearing onto the secondary shaft on a base with a stop. It is necessary to drill a hole in a wooden block with an 18 mm drill bit into which to insert the shaft. Now putting the bearing on is much easier. It is advisable to install and fit new elements using a soft drift of the required size.
Using another 16 mm drill in a similar block, make a new hole for the input shaft. In this position, it is easier to assemble parts on it, as well as connect it to the secondary shaft. The rest is assembled in the same way as it was removed, only in reverse order.
A few final useful tips:
- The reverse sensor is screwed in after installing the box on the car;
- after threading the lever into the gear shift mechanism, an important diagnostic is carried out - while turning the input shaft, it is necessary to control the speed and direction of rotation of the secondary shaft;
- On the input shaft, be sure to lubricate the seat for the crankshaft bearing;
- Oil is poured in an amount of 1.2 liters through the hole for the gear shift lever (it is better to check through the standard filler hole).
Final test to check the operation of the gearbox:
- hang out the rear wheels of the Gazelle;
- start the engine;
- alternately switch speeds, creating an imitation of movement;
- test each transmission for at least 1 minute.
Why should this test be carried out without a load, that is, with the wheels hanging? The fact is that the initial operation of the box will be dry, even if the oil is filled in advance. It simply will not have time to get into all the gaps, and only the intermediate shaft will be in an oil bath.
Switching rules under different conditions
Stiff clutch pedal
Gear changes depend on the various conditions in which the vehicle is moving. These rules should be followed so that during the use of the gearbox it does not fail.
Climb
During an ascent, you must switch the gearbox to mode H, as a result of which the transmission will begin to operate at increased voltage.
The following rules must be followed:
- When switching from 1st to 2nd gear when ascending a KamAZ truck, you must use the method of depressing the clutch pedal twice.
- In order for the crankshaft to work correctly when changing gears, you need to use the fuel pedal; it also needs to be pressed periodically. At the same time, you can overcome any steepest climb.
- The shaft speed when lifting must be more than 2000 rpm. Otherwise, the engine may shut down, which may cause an accident while driving on the road.
- During the climb, switch to the desired mode, this will facilitate the operation of the engine and all components of the machine.
Descent
Some drivers turn off the engine when descending a mountain to save gas. This should not be allowed at KamAZ.
KamAZ braking occurs not only as a result of stopping the engine, but also by activating the auxiliary braking system. When a heavy vehicle is going downhill and the driver applies the auxiliary brakes, the clutch should not be depressed and the driver should not shift from one gear to another.
Icy areas
You need to drive a truck on icy areas with maximum speed and range. When braking, you must use the engine stop assist system. If emergency braking is required, the operator must stop the trailer wheels. If you do not take this rule into account, you may end up in a skid.
It is possible to slow down the internal combustion engine only as an exception, as this can lead to its wear. When braking, the wheels should not slip. To avoid this, you need to turn off the reduced speed, which will help reduce the rotation of the crankshaft.
Skid
When skidding, do not disengage the clutch. When the truck skids, you need to turn the steering wheel in the direction of the skid. If the KamAZ skids, you need to take your foot off the gas pedal and press the differential. This must be done using the regulator located on the panel. As a result, the indicator on the panel will turn on. You need to start the move from the second high gear. After overcoming the skid, the differential should be unlocked.
Switching gears while moving
In the recommendations for operating cars, there is the following clause: “Switching the manual transmission must be done at certain speeds and tachometer readings.” This increases the service life of the gearbox and engine, improves driving efficiency and protects the environment.
It is advised to change gears at 2-3 thousand revolutions according to the tachometer. If it is not there, then we focus on speed. Experienced drivers say that it is better to shift at the beginning of the climb and stay in a lower gear until the hill ends. If you switch while driving up a hill, you can lose the dynamics of the movement, the engine speed will drop and it will be more difficult for the engine to overcome the obstacle. This leads to increased wear of internal combustion engine parts and increased fuel consumption.
Consider the stages of switching in motion
- Let's eat. Release the gas pedal and simultaneously press the clutch. The pressure should be smooth, but not slow
- We shift the gearbox to neutral and then to the desired gear. Switching on mechanics occurs only through the neutral position. Experts recommend taking a short pause when changing from one gear to another. This will save the box. They advise you to count to two. That is, the lever is in one position - we count “One” and move it to neutral. We count “Two” - we turn on the desired gear
- Smoothly release the clutch pedal, without sudden movements of the foot. Having brought the clutch to the point of setting, squeeze approximately halfway. If you release the clutch pedal sharply, the car may jerk or it will “peck” its nose, and your face will hit the steering wheel. Lightly press the gas.
- Keep the gas pedal slightly pressed so that the engine does not howl, because the clutch is in the middle position
- Smoothly release the clutch completely.
- We take our foot off the pedal. It's better to move her to the side so she can rest
If you do not adhere to this rule, you can quickly destroy the gearbox release bearing. Even when the pedal is slightly pressed, the bearing begins to work. During long trips, its resource is sharply reduced, because it is constantly pressed against the plates of the gearbox basket, and it needs to rest. It is activated only when changing gears; the rest of the time it should be inactive.
Common Mistakes
Let's consider the erroneous actions of beginners or those who switched from automatic to manual. They can lead to premature transmission failure.
- Not changing gears in a timely manner. They do not pay attention to the speed of the car and engine speed
- Slowly move the manual transmission lever. As mentioned above, you need to switch clearly and relatively quickly, on the count “2”. If this is done smoothly, the car will begin to brake with the engine. While you switch, you will need to accelerate again to keep up with city traffic.
- Smoothly pressing the clutch pedal leads to a decrease in driving speed. At the moment of changing gear, you release the gas and begin to press the clutch. At this moment, the box is in rigid coupling with the motor. Since the accelerator pedal is not pressed, fuel is not supplied, the engine begins to slow down the car. Therefore, we press quickly until we lose speed, switch gears and smoothly release the pedal.
- They release the clutch pedal sharply. This will cause the machine to jerk and jerk. As a result, you can bump your nose into the steering wheel and damage the gearbox elements.
Breaking
If the manual transmission is noisy, there are reasons for this:
- the bearings performed their functions to the end;
- lack of oil.
The second problem is much easier to solve than the first. Check the amount of oil and “add” it.
We advise you to watch: how to repair a manual transmission on Gezali.
The first option requires replacement of spare parts. This is done either in a service center by specialists (if the car is under warranty, this is a big plus for the owner), or manually (but not by yourself). Only a person who knows the business can disassemble and assemble the checkpoint. This procedure requires knowledge, patience and perseverance.
So, the first thing to do is drain the oil. After this, remove the cardan. Mark the hinge points and the box extension, remove the clamp. Unscrew the cardan mount and remove the shank (move it back and pull it out). The result will be a niche. Next, remove all the necessary parts in the cabin, turn off the speedometer and light elements. After these steps, the box is removed and disconnected.
Gearbox design for Gazelle Next
In order to begin disassembling the gearbox, it needs to be made clean (washed thoroughly). Disassembly is carried out step by step only by a knowledgeable person. At the slightest mistake, the gearbox may not work correctly on the Gazelle Next or, in general, show no signs of life. After disassembling the box into parts, they should also be washed from traces of oil.
The cause of the strange sound is being found. It could be:
- wear of the secondary shaft bearing.
- Bearing play.
- Bearing idling.
Watch the video: how to replace the rear axle gearbox.
Other problems with component parts may also occur. Worn and broken components are replaced with new ones.
Automatic transmission for GAZelle Next
Recently, many GAZelle Next car holders are installing imported parts on their car, as they show their best side, functionality and performance are much better than factory parts. With the installation of the Toyota power unit, an automatic gearbox is also installed. A lot of drivers, complaining about traffic jams in the city, dream of such an opportunity. Automatic transmission offers many advantages.
Interior view of Gazelle Next automatic transmission
- Safe management.
- There is no need to work with your right hand (shifting gears) and left foot (clutch) every time.
- Traffic safety.
- Smooth and soft control.
- Reduced engine wear.
- Good cross-country ability of the car on dirt roads, as well as on snowy or muddy roads.
Despite such bright positive aspects of automatic transmission, there are disadvantages:
- Fuel consumption increases.
- The maximum speed will be reduced.
- In case of emergency driving (skidding in winter), the automatic transmission will not help.
- The oil needs to be changed more often than with a manual transmission.
- Expensive repairs.
- Low load capacity.
And one more drawback. According to car enthusiasts, if a loaded Gazelle Next travels long distances, the service of the automatic transmission will be limited to a year of operation.
The most common symptoms and troubleshooting methods
Volkswagen Passat Das graue Auto Logbook Replacing the gear shift cable
Despite the structural simplicity of the unit, repairing a Gazelle gearbox with your own hands involves serious work. Without the proper knowledge and skills, it is better not to touch the unit, so as not to make it worse. To replace damaged parts, the box must be dismantled and disassembled.
There is a noise in the box
Most often, a sign of a mechanical malfunction is a dull hum or crunch, indicating weak fixation or destruction of the bearings. An unpleasant cracking sound is also possible, indicating damage to the synchronizer rings. Often the box howls, and in completely different ways. The strength of the sound and its character depend on the speed of movement, the specific gear, and the duration of driving.
It is noteworthy that the characteristic noise does not always indicate a gearbox malfunction. Especially if the elements of the box have recently been replaced. In this case, the howling will only be a sign that the parts have not yet gotten used to it. Often, the crunching of the gearbox is confused with malfunctions of the clutch or other related units. And any experienced Gazelle driver will confirm that until you disassemble the box, the specific cause of the noise can only be determined with a 50 percent probability. But a competent bulkhead will help you immediately find the problem area. Before this, of course, you need to check the oil level. If it's ok, you need to disassemble the gearbox. Anything can turn up during the troubleshooting process. For example, there may be a mismatch in bearing markings, missing washers, or incorrect sizes.
Difficulty shifting gears
If it becomes difficult to change gears, this indicates one of the problems:
- synchronizers or gears of a certain gear are worn out;
- the lever or other switching mechanisms are damaged - most often the fork;
- problem with the clutch - it does not engage completely, the pedal drive cable is loose, the driven disc is damaged.
It also happens that it is difficult to change gears on a warm engine, but when it is cold everything goes like clockwork. The point here is that initially there is a thick layer of lubricant between the synchronizer thrust ring and the gear. After the temperature rises, the oil liquefies, the ring and gear are rubbed almost dry, and the coupling rests against the teeth of the ring. Either a high-quality grip, such as HOLA, or another MTF compound will help.
Speeds do not turn on
In this case, you need to urgently check the fluid level in the clutch reservoir. It is possible that a leak has occurred through a damaged main circulation center or control center. It is possible that air has entered the system, then you can get by with a little blood by expelling it through the fitting.
If the fluid is ok, then the problem is with the gearbox, or more precisely, with the switching mechanism. More often the fork breaks down - it bends or is pierced by the rod, and then it becomes impossible to engage a certain gear. It is not uncommon for the tide-limiter on the synchronizer to grind off.
What are the faults of the Gazelle gearbox?
Gazelle gearboxes are rightfully considered one of the most reliable and durable, but even they can become unusable due to high loads. In order for the replacement of the Gazelle gearbox to go without a hitch, you must know the hardware of the car, study the diagrams, be careful and patient, and also follow the safety rules and understand the principle of operation of the Gazelle 4x4 gearbox.
Checkpoint diagram
Gazelle repair may be required in some cases:
difficulty changing gears. This snag occurs due to the lack of fluid in the cylinder or due to the presence of air in the hydraulic drive. In addition, you can check the locking bolts, which often need additional tightening, as well as the transmission intermediate shaft. You can observe how the device jerks in neutral, and the transmission howls. Another sign is that in 4th gear, fifth or second, the device makes a howl, a lot of noise;
The gearbox engages with noise and crackling noise when starting. In this case, the synchronizer blocking ring on the transfer case could be worn out or deformed. Also check the power take-off. It is advisable to replace the blocking ring or power take-off box, and to ensure that the new element fits in without problems, use lapping paste. In addition, check the condition of the input shaft, how the mortar works, whether the car is noisy in neutral;
random shutdown of manual transmission
If you notice such a problem, first of all check the fastening nuts to the clutch housing, as well as the condition of the gazelle gearbox linkage. In addition, the couplings could wear out (worn out teeth), as well as the locking springs (they can either wear out or weaken)
You may also need to adjust the intermediate shaft and input shaft;
the appearance of extraneous noise. In order to get rid of them, it is necessary to replace bearings or damaged gears, add oil to the crankcase or check its alignment with the crankshaft.
Principle of operation
KamAZ vehicles are usually equipped with manual transmissions. The mechanism is controlled in the classic way, by pressing the clutch pedal and moving the rocker to the required position. A special feature of the transmission is low (H) and high (B) operating modes. This ability minimizes the load on the power unit. It is typical that for this purpose a divider is used, which acts as a gearbox that increases transmission ratios. On some cars, when changing from a higher gear to a lower gear, they do not use the rocker. For these purposes, a special switch and clutch pedal are used. The gear switches automatically, the upper position of the lever is typical for a loaded vehicle, the lower position is used when moving an empty vehicle. The features of driving a car are indicated in the instructions for the gearbox that comes with the product. You can also read about How to adjust the clutch on a KamAZ.
Types, differences and applicability of GAZ gearboxes
How to adjust the clutch pedal
The GAZelle, Volga and Sobol vehicles use a unified model range of gearboxes, which are built on a common component base and therefore have the following common features:
- Common crankcase for all boxes;
- Identical shafts and most gears (as well as all other parts, including bearings, synchronizers, seals and others);
- Uniform mounting dimensions (except for gearbox models for diesel engines).
The differences between the boxes are minor; they are aimed at harmonizing different types of power units and transmissions. The boxes differ in the following details:
- Length of primary shafts;
- The height of the housing for the gear shift lever output;
- The number of teeth of the input shaft gear;
- The number of teeth of the intermediate shaft drive gear (gear block);
- The number of first gear teeth on the secondary shaft;
- The number of teeth of the speedometer drive gear.
Thus, using only a small number of different parts, you can get a larger number of gearbox models to solve a wide range of problems:
- Model 3302-1700010 is a large range of gearbox modifications for all GAZelle vehicles (including those for UMZ, ZMZ and Chrysler engines), it uses a 25-tooth input shaft gear, a 36-tooth intermediate shaft gear and a 45-tooth 1st gear tooth gear, the speedometer drive is built on a 7-teeth drive gear and a 17-teeth driven gear. The housing for the lever handle output is increased in height;
- Model 3302-1700010 for 4x4 vehicles - is distinguished by the presence in the crankcase of a window for the power take-off shaft, and also on its crankcase there are bosses for mounting a bracket holding the transfer case levers;
- Model 330242-1700010 is a gearbox for trucks with diesel power units, there are modifications for GAZ-5602 engines (Steyr engine license) and Cummins ISF. Its main difference is the input shaft increased in length by 48 mm and, accordingly, its bearing cover;
- Model 31029-1700010 - for Volga passenger cars, it uses a 26-tooth input shaft gear, a 35-tooth intermediate shaft gear and a 43-tooth first-speed gear, the speedometer drive includes a 6-tooth drive and 19-tooth driven gears. Gear shift lever housing - low;
- Model 3110-1700010 is a variant of the previous box for Volga cars equipped with an electronic instrument panel. The main difference is the installation of a speedometer sensor in the gearbox (on previous models, the speedometer drive is cable), while the speedometer drive gear is 10-tooth, the driven gear is 20-tooth;
- Model 31104-1700010 is a gearbox option for Volga cars with a diesel power unit, the main difference is in the speedometer drive, it uses a 6-tooth drive and 18-tooth driven gears;
- Model 2217-1700010 - gearbox for Sobol cars, differs from gearboxes for GAZelles only in the speedometer drive; it is built on a 7-tooth drive and 15-tooth driven gears.
All replacement parts are specially marked:
| Primary shaft | Intermediate shaft gear | 1st gear | Speedometer drive pair | |
| GAZelle gearbox, petrol | Annular projection 5 mm wide and 2 mm high on the neck | Circular groove along the radius on the outer cone | 4 holes with a diameter of 6 mm along a radius of 40 mm | Marking 3302 |
| Gearbox "GAZelle", diesel | Extended by 48 mm | |||
| Checkpoint "Volga", petrol | Smooth neck | There is no groove | 2 holes with a diameter of 6 mm along a radius of 40 mm | Marking 24 |
| Volga checkpoint, electronic panel | Marking 3110 | |||
| Gearbox "Volga", diesel | Marking 31104 | |||
| Checkpoint "Sobol" | Marking 4.55 |
It should also be noted that early Volg models were equipped with 4-speed gearboxes (and some models existed in versions with old 4-speed gearboxes and with new 5-speed gearboxes), but we will not consider them here.
How to engage reverse gear on a gazelle video
How to change gears on a Gazelle car, don’t repeat it, it’s dangerous, huh) Reasons why reverse gear is difficult to engage Reasons why reverse gear is sometimes not engaged the first time. The consequence of turning on the rear when...How to Shift Manual Transmission Gears Correctly. Driving video lesson No. 6 This lesson shows how to correctly change gears in a car with a manual transmission. ——————…GAZELLE/VOLGA — Repair of the gearbox — Part 1 — DisassemblyRepair of the Gazelle gearbox. Sequence of disassembling the box. Defects of parts ——- Group “Autozn...DRIVING WITHOUT A CLUTCHAutosphere Omsk. Vasily Zaloznov tells how to change gears, errors when shifting. The main points when changing gears, what are the main errors when switching a manual gearbox... GAZ 3302 gearbox How to adjust the clutch in a car The GAZelle reverse lights do not light up. We are looking for the reason. The GAZelle reversing lights do not light up. We are looking for the reason. Group in VK https://vk.com/budhigazelista Donat https://www.donationalerts.ru/r/budhi_gaze...What happens in the gearbox due to failure to engage the reverse gearWhat happens in the gearbox due to failure to engage the reverse gear. Gears do not engage (with the engine running ). No clutch. Just about the complicated stuff. What to do if the gears on a manual transmission don’t engage, there’s no clutch. The main ones... Differential locking (limited friction) with your own hands Guys, don't be stupid!!! This is an Experiment! Read the story of this diff! Previously, such a system was installed on a car...
when Volkswagen Passat B3 B4 engages first instead of reverse, when reverse or fifth gear does not engage well and adjusting the rocker on the gear selection machine does not... How to engage reverse gear without grinding or crunching We engage “reverse” without harming the gearbox. those. without the sound of rubbing gears. The gazelle gearbox lever is loose. Business Next cummins cummins. The gazelle gearbox lever is loose. Business cummins cummins =================== To support the channel! — https://www.donationalerts.ru/r/gazelist ———…
Table: malfunctions of the Gazelle box according to the nature of the noise
| Position | Character of noise | Malfunction |
| Neutral speed, clutch depressed or when the clutch is released after changing any gear other than reverse or fifth | Howl | The cause of this in most cases is a worn input shaft bearing or drive gear bearing. |
| On the move when changing gears | Crunch | Most likely, wear of the clutch release bearing, but the reason may be hidden in the synchronizers - wear or destruction of the blocking rings on the shaft |
| When moving, the gear is knocked out | Knock, push | Problems with the gearbox fork |
| Cold engine, difficult to engage fifth gear | A hum that goes away after warming up | Too thick oil or poor quality lubricant |
| Speeds change while driving | Knocks | Oil starvation, insufficient MTF levels |
| Only when different gears are engaged | Howl | Problems with individual gears |
| In fourth or fifth gear | Crackling | The sump is shaking, needs adjustment |
| During acceleration and deceleration | Rattling | The synchronizer ring is displaced relative to the intermediate shaft |
Now you know how to remove and rebuild the Gazelle gearbox yourself.
Share your opinions in the comments.
If you have any questions, leave them in the comments below the article. We or our visitors will be happy to answer them
Gearbox disassembly
1. Remove dirt and wash the outside of the gearbox. 2. Unscrew the oil filler and oil drain plugs and drain the oil from the gearbox, if this has not been done previously.
3. Remove the clutch release bearing and foam ring 1 from the guide sleeve.
4. Unscrew the bolts and remove the rear engine mount with bracket, if this was not done when removing the gearbox from the vehicle.
5. Unscrew the reverse light switch with the gasket.
6. Unscrew bolt 1 securing the speedometer drive stopper, remove stopper 2 and speedometer drive 3.
7. Unscrew the breather.
8. Unscrew the four bolts 1 and remove the gear shift lever housing 2 with the gasket.
9. Unscrew the three bolts 1 and remove the input shaft bearing cover with the guide sleeve 2 of the clutch release bearing with the gasket.
10. Unscrew the bolt securing the reverse idler gear axle on the front gearbox housing.
11. Remove the retaining ring of the input shaft bearing if it is necessary to replace it.
Be sure to remove the large retaining ring, otherwise you will not disconnect the box.
12. Remove ten bolts securing the front gearbox housing to the rear housing.
13. Separate the front and rear gearbox housings.
To do this, you can clamp the extension in a vice with soft jaws and hit the bosses with the holes for attaching the front housing to the clutch housing with a copper hammer.
At the same time, try not to tear the gasket.
14. Remove the adjusting rings from the seat under the front bearing of the intermediate shaft on the front gearbox housing, if they were installed.
15. Unscrew the two bolts 1 of the fastening and remove the plate 2 of the rod clamps with the gasket.
16. Remove the three retainer springs.
17. Set the 5th gear and reverse shift rod to the reverse position.
18. Unscrew the locking bolts securing the shift forks to the rods.
19. Mark the gear shift forks (their belonging to the rods and orientation). Knock out the rods with a hammer made of soft material and remove them.
The first to remove the rod 3 for engaging the 5th gear and reverse gear, the second is the rod 1 for engaging the 1st and 2nd gears, and the last is the rod 2 for engaging the 3rd and 4th gears.
When removing the 3rd and 4th gear selector rod, make sure that
so as not to lose the locking pin installed in the rod hole.
Remove the 1st and 2nd and 3rd and 4th gear shift forks from the synchronizer sliding clutches.
20. Remove the retainer balls by placing your hand and pushing them with a screwdriver through the holes inside the crankcase.
21. Remove the two locking plungers using a special tool or a hooked wire.
22. If it is necessary to disassemble the 5th gear and reverse gear rod, you must first unscrew the locking bolt 1, and then remove the head 2, locking sleeve 3 and spring 4 from the rod.
23. Unscrew the bolt securing the reverse intermediate gear axis on the rear gearbox housing.
24. Unclench the retaining ring of the rear bearing of the secondary shaft with pliers and, hitting the end with a drift of soft material, press out the secondary shaft.
25. At the same time remove the secondary shaft assembled with the primary shaft, the intermediate shaft and the axis of the reverse intermediate gear from the rear gearbox housing.
26. Check that the 3rd and 4th gear synchronizer is set to neutral.
27
Separate the primary and secondary shafts, paying attention to the fact that the bulk rollers (14 pcs.) of the front bearing of the secondary shaft may fall out of the input shaft housing
28. If during operation it is discovered that oil is leaking from the gearbox through the seals, the defective seals must be pressed out.
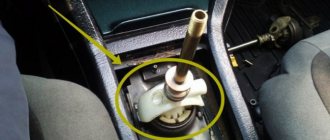
Shifting Gear Gazelle
2.32 Gear shift
Gear shift and lever position
Manual transmission
The gear shift positions are shown on the handle. Before engaging reverse gear, you must lift the ring under the lever handle.
When changing gears, fully depress the clutch pedal and then release it smoothly. It is not recommended to drive the car with one hand on the gearshift lever, as this increases wear on the gearbox.
When shifting from fifth to fourth gear, do not push the lever laterally to avoid accidentally engaging second gear, which could cause the engine to overspeed and cause engine damage.
Before engaging reverse gear, make sure that the car is at rest and your foot is not on the accelerator pedal. Move the lever from neutral to the right all the way, and then engage reverse.
The table below shows the driving speeds at which you should engage the next gear for maximum fuel economy.
Do-it-yourself gearbox repair on a Gazelle
As you know, Gazelle repairs can be carried out either by the driver himself or by entrusting it to car service specialists. At the same time, complex diagnostic operations, of course, should be left to specialists. This includes manipulations with the engine, electronics, and so on. At the same time, repairing a gearbox yourself is sometimes simply a necessity, because this unit can fail while the car is moving.
At the same time, the existing repair instructions cannot always provide complete answers to questions of interest. Whereas the key to successful repair is, first of all, correct diagnosis. It is clear that if the driver carries out repairs on his own, he will need to know the basics - at least what a gearbox is.
Possible gearbox malfunctions
Cases in which repair of the Gazelle gearbox is necessary may be as follows:
- Changing gears is difficult. In this case, the repair will include the following operations:
- The cause of this malfunction may be: air in the clutch hydraulic drive, lack of fluid in the master cylinder. To solve the problem, you will need to add fluid to the master cylinder reservoir until it reaches the required level, after which you need to bleed the hydraulic drive system,
- the locking bolts may have become loose - they need to be tightened,
- Burrs formed on the gear clutch teeth on the inside can also interfere with the normal operation of the unit - accordingly, they need to be cleaned,
- If the holes for the pins are broken in the shift lever housing, the lever must be replaced or the stepped pins must be pressed in.
- In addition, repair of the gearbox on the Gazelle is also necessary in the case when the gearbox is engaged with a bang, that is, there is a violation in the synchronization of gear engagement. The following points can contribute to this:
- wear of the synchronizer blocking ring (or rather, its thread). The problem is solved by replacing the spare part with a new one and grinding the new ring into the corresponding gear. Lapping must be carried out in such a way that the contact surface is eighty percent of the total area,
- deformation of the same ring also indicates the need to replace it. For lapping in this case, you can use a special lapping paste.
- Also, box repair is necessary if the gears turn off spontaneously. This malfunction requires the following corrective actions:
- in case of loosening of the nuts securing the box to the clutch housing, it is necessary to restore their tightening,
- it is necessary to replace worn parts, including couplings, if their teeth are worn out,
- It may also be necessary to replace the retainer springs if they have become loose.
- We can completely eliminate the noise in the Gazelle gearbox with our own hands. To do this you need:
- replace worn bearings,
- replace damaged gears in case of breakage of their teeth or wear of their working surface,
- add oil in the crankcase to the normal level,
- restore the alignment of the clutch housing and crankshaft.
- When carrying out such operations, you will definitely need knowledge of such an issue as the design of a gearbox. Otherwise, it is not possible to determine the cause of the malfunction (meaning, on your own).
- Among other things, manual transmission repair will also be required if an oil leak is detected. The reason for this may be worn oil seals or steel-babbit bushings, or damage to the breather or gaskets, as well as a violation of the tightness of plugs and plugs. In this case, you will also most likely need to change the oil in the gearbox or at least top it up. In any case, repair work must be started by first stocking up with the required amount of liquid.
When carrying out all repair operations, special control is required for the assembly of the gearbox. This problem “disappears” by itself if you contact a car service. By the way, replacing the pins on a Gazelle can be done there.
Do-it-yourself repairs: gazelle gearbox, fault diagnosis
Gazelle gearbox repair
The gearbox is precisely that component of the car that has every right to be called the main one. Agree, it’s hard to imagine a modern car without a gearbox. But like any other part, this component can fail. For the vast majority of motorists, transmission repair sounds like a death sentence. In fact, box repair work, especially when it comes to cars like the Gazelle, is very complex and in most cases is carried out only by specialists. It is best if this is a person who has more than one year of experience in this area. But before you go to a repair shop or repair the gazelle gearbox and similar cars with your own hands, you need to pay attention to how the car behaves and whether the gearbox really requires surgical intervention.
Digressing from the topic, I would also like to note the fact that a breakdown of this component can occur at any time, for example, if you are driving along an intercity highway and the nearest service station is a couple of hundred kilometers away. In this case, you must diagnose and repair the gearbox yourself, at least in order to be able to get to the nearest service center. In order to carry out the work yourself, you need to use the instructions, which, as a rule, come with the car’s passport. But before opening the box, as we noted above, it is necessary to make a correct diagnosis. So, what are the signs that the Gazelle gearbox requires repair:
- Difficulty switching from one gear to another, regardless of the sequence. The simplest solution in this case may be to tighten the locking bolts. In this case, it will be enough to simply tighten them and there is no need to start more complex work.; Difficulties in shifting gears can also be caused by burrs, which can form on the clutch teeth during operation. The way out of this situation is to clear the burrs; It may also be necessary to replace the gear shift lever, which happens if the holes for the pins are broken.
- Loss of synchronization when switching on the gear. This problem is most common in the case of Gazelle. In this situation, gear shifting occurs with a crash that is heard not only by you, but also by everyone around you. Most often this problem is associated with wear on the timing ring. Accordingly, in this case it is necessary to replace the ring.
- The most terrible problem, which can lead not only to a decrease in comfort while driving, but also to a traffic accident, is spontaneous gear shifting, which threatens to cause a wedge. If this happens at high speed, the consequences can be dire. If such a problem occurs, it must be resolved immediately. First of all, you should try to loosen the fastening of the box with the clutch housing.; You can also try to replace parts that have already outlived their service life, if any are found.; There may also be a problem with the retainer spring, which may weaken during operation or if you decide to save money when purchasing it, causing damage to quality. In this case, it must be replaced accordingly.
- If you notice a non-standard and strange noise in the box, similar to a crunching noise, most likely you need to replace the bearings.
Gazelle gearbox malfunctions
All of the above signs indicate that your gearbox is in urgent need of repair. When it comes to bearings or loosening the shift retainer ring, you can get by with minimal cost and measures. Accordingly, it is necessary to replace only those spare parts that have succumbed to wear. But, before starting repairs, you definitely need to familiarize yourself with the design of the gearbox. Otherwise, you are unlikely to be able to put it back together, and in some situations, when beginners take on the “business,” even experienced craftsmen are unlikely to be able to correct the mistakes. Therefore, if you are unsure of your own abilities, we strongly recommend that you do not start repairs yourself.
Also, paying attention to the above listed signs will help to significantly reduce expenses, speaking of the financial component. In addition to the fact that the gearbox in a car like the Gazelle, just like any other, is one of the components of the main purpose, its cost is no less low. Initiation of a breakdown in the checkpoint will necessarily lead to further waste. But this is not even the main problem. Much more important is the stable and proper operation of the car, because if the gearbox fails at full speed, the consequences can be the most sad and tragic.
Gearbox (Gearbox)
Description:An article about checkpoints on the driving school website: https://www.svetlanin-dom.ru/index.php…
gazel-time.ru
Problems when paying with bank cards
Sometimes difficulties may arise when paying with Visa/MasterCard bank cards. The most common of them:
- There is a restriction on the card for paying for online purchases
- A plastic card is not intended for making payments online.
- The plastic card is not activated for making payments online.
- There are not enough funds on the plastic card.
In order to solve these problems, you need to call or write to the technical support of the bank where you are served. Bank specialists will help you resolve them and make payments.
That's basically it. The entire process of paying for a book in PDF format on car repair on our website takes 1-2 minutes.
If you still have any questions, you can ask them using the feedback form, or write us an email at [email protected]
How to change gears on a manual transmission?
Due to the widespread use of automatic transmissions, more and more novice motorists prefer to learn on such cars.
At the same time, a professional motorist must have the ability to drive a car with any gearbox; for this reason, it is best to learn driving in a car with a manual transmission.
In particular, “mechanics” has certain advantages, for example, it provides greater control over the car, consumes less fuel, and due to its simple design, it is cheap, both to purchase and to repair.
The only drawback of the “mechanics” can be considered the difficulty of changing gears for beginners, which improves with experience.
Before you start practicing, you need to have some knowledge about manual transmission. Most mechanical transmissions have 4 or 5 gears, one reverse and neutral speed, when switching to which the transmission of torque to the wheels stops.
From neutral speed it is possible to switch to any gear, in particular reverse. It is imperative to learn the location of the speeds so as not to be distracted by the gearshift lever while driving.
1st gear is mainly used to start or park the car. You need to be careful with reverse gear, since it has a larger speed range than first, and prolonged use can cause damage to the gearbox.
How to get moving. So, to start moving, you need to press the clutch and switch to 1st gear, then slowly release the clutch pedal, and also gradually press the gas. At a certain moment, you will feel the car begin to move; at this time, hold the clutch in place a little, then gradually release it.
Having accelerated the car to 20 - 25 km/h, you need to switch to 2nd speed. To do this, you need to release the gas, press the clutch, engage 2nd and remove your foot from the clutch.
You need to switch to other speeds in exactly the same way. But there is no need to jump gears, because if the speed is not enough, the engine may not be able to handle it - it may stall or simply begin to slow down.
It is recommended to change to the next gear every 25 km/h, but you need to take into account that the transition ranges for different cars may be different - this factor depends on the engine performance and gearbox ratios. After gaining some experience, you will even be able to change gears based on the sound of the engine.
To switch to a lower gear, you need to release the gas and press the brake, and wait until the car slows down to the required speed, then press the clutch and go to the required gear, remove your foot from the clutch and press the gas.
Also, remember, when you downshift, be sure to reduce the speed of the car, because if you switch to a lower gear at high speed, the car will brake sharply and possibly skid. In addition, when switching gears, you must fully press the clutch, otherwise the box will make a characteristic grinding noise, and over time it may even deteriorate.
Bottom line. Knowing the principle of manual gear shifting, you can start practicing. You need to realize that at first you may not be able to do a lot of things, for example, slowly releasing the clutch and switching to the right gear at the right moment. The most difficult thing at first will be a smooth start, for this reason you should train a lot on some free area.
See all photo news >>
Types of boxes
What to do if reverse gear is difficult to engage? The answer to this question is not difficult to find; you need to look at the structure of the checkpoint. First of all, you need to study the features of gear shifting. This usually causes a problem with the reverse gear. Modern manual transmissions use 2 types of switching:
- The lever goes into the box and acts on the switch fork through a ball joint;
- Switching occurs using the scenes.
Direct switching
. Various limiters are usually installed here to avoid engaging another gear instead of reverse. On a VAZ classic, for example, the hinge needs to be pushed down so that you can engage the gear. It is with this limiter that problems usually arise. Its increased wear prevents it from engaging reverse gear in a timely manner. To fix the problem you will have to disassemble the box. Usually this mechanism is changed along with the fork and support.
Rocker switch
. There may be several reasons for this. First, let's look at the structure of this system. The lever here does not go into the box. A pair of scenes (sometimes cables) go from it to the gearbox. One of the scenes is responsible for changing gears, and the other for selecting them. Shifting problems occur when the lever that engages reverse gear is unscrewed. To fix the problem, just drive into the inspection hole and screw the bolt into place.
Experienced craftsmen recommend installing a new bolt. This malfunction is typical for the “tenth” VAZ family. If there is a problem when turning on with all gears. At the same time, you have to “catch” the transmission with a lever, then the problem is most likely in the wings. During use they lengthen. If you notice such a problem, then measure the length of the drawstring. It will be longer than recommended by the manufacturer. The malfunction is eliminated by installing a new part.
The main causes of gearbox failure
Disassembling the box (Gazelle/406 engine), as with other power units, may be required immediately. The most common causes of malfunction are the following:
- deformation and destruction of worn parts or loosening of fasteners (causes a humming noise during system operation);
- destruction of bearings (a characteristic crunching sound is heard in the gearbox);
- wear of the synchronizer rings (crackling noise appears when changing gears);
- the presence of burrs, wear of gears, jamming in the drive causes difficulties in engaging the gear;
- the speeds themselves can be turned on or off when gear teeth are misaligned, fasteners or the driven shaft are loosened;
- Due to oil loss due to holes in the crankcase or loosening of bolts, interruptions occur not only in the gearbox, but also in the aggregating units.
Recommendations for extending the service life of the unit
Without proper care, the Gazelle gearbox quickly breaks down. Some explain this by the mismatch of the unit for a truck. As you know, the box used here, albeit modified, is from a passenger car. Therefore, the slightest overload or prolonged operation has an extremely negative effect on the resource. Already by the 80,000th mileage, gears begin to fly out, crackling and noise appear.
Other recommendations:
- do not load the car above the norm of 1.5 tons;
- drive on good roads, avoiding gravel and complete off-road conditions;
- monitor the clutch, refill technical fluids on time.
Repairing and disassembling the Gazelle gearbox is not an easy task, but following the instructions, you can handle the operation yourself. If something doesn’t work out, you can always take the box to a service center or call a specialist to your home.
The box turns off and the gear falls out
How to replace the release bearing on a VAZ-2114
If the speeds are off, the culprit may be the fork, clutch, or worn transmission gears. It happens that the spring that presses the fixation ball bursts. It is also possible that the input shaft splines may dry out. The reason may be the bronze crackers on the third and fourth gear forks - they break in half. It is also possible that burrs may form on the locking device. Many defective parts are installed on the Gazelle gearbox right from the factory. For example, blocking rings, which must have a gap of at least 0.3 mm. In fact, there are many such elements with a gap of 0.1-2.5 mm.
How the box works
GAZelles are equipped with 4- or 5-speed manual transmissions. Components of the device:
- 2 aluminum crankcases connected by 100 bolts;
- speedometer drive gear;
- primary and secondary shafts connected to the cardan and crankshaft;
- an intermediate shaft on which the cut reverse and 1st stage teeth are located;
- pressed gear block;
- inertial synchronizers;
- reverse gear is provided by a gear block;
- clutch for engaging 3rd and 4th gears;
- system for blocking simultaneous launch of several speeds;
- spring-loaded balls for fastening different levels of the box;
- mechanism of the damper device of the lever and control elements.
The design of the unit allows for timely diagnosis of the first signs of malfunction to prevent more dangerous failures.
Specifications
Key characteristics of the gearbox of GAZelle cars:
- 4- or 5-speed transmission;
- 5 speeds - 1 reverse and 4 forward.
For the transmission, the following parameters can be noted:
- three-way lever located in the assembly;
- the mass of the part is 56 kg;
- oil tank capacity - 3 l;
- gear ratios for five stages - 6.55; 3.09; 1.71; 1; 7.77.
- The fourth stage in the gearbox is direct.
Basic models of the device assume the presence of synchronizers in the mechanism to ensure reliable operation.
Gear shift diagram
The gear scheme on the GAZelle is distinguished by the presence of a synchronizer. Moving the lever from the neutral position to the left side causes its lower part to move the shift rod and fork. This causes the first stage gear to move backward and come into contact with the first gear element located on the intermediate shaft. When the clutch is running, torque is transmitted through gears and intermediate elements to the secondary shaft.
The inclusion of the third speed is due to the movement of the lever from the neutral position, first to the right side, and then forward. Under the influence of the fork, the clutch begins to move backwards and the structure impacts the synchronizer. The torque follows in the direction of: the input shaft, the permanently meshed gears, the intermediate and secondary shaft of the gearbox.
To start the fourth speed, you will need to move the selector to the right and back relative to neutral. The forward movement of the clutch helps to engage the synchronizer locking ring with the input shaft. After balancing the speeds, gears are engaged. Reverse speed is started by moving the lever to the right after overcoming the resistance of the safety system.
The synchronizer is a mechanism in the form of a hub mounted on the secondary shaft of the box. The coupling moves along the splines located outside under the influence of the fork. Other key elements of the synchronizer:
- retaining springs;
- "blocking" parts;
- side bronze rings for locking the mechanism;
The work of the synchronizer is involved in engaging 3rd and 4th gears and is expressed in ensuring a smooth transition from one level to another.
How much oil to fill
Before changing the oil in the 5th mortar, it is necessary to check the current level. It is recommended to carry out such an action every 20,000 km. If there is enough oil in the gearbox, fluid is added to the crankcase.
The technical documentation does not contain data on the required amount of oil in the GAZelle box. The figure varies depending on the modification of the equipment, ranging from 1.2-1.6 liters. During work, the mixture is poured into the hole with a syringe until oil flows out of it.
GAZelle Next, GAZelle Business and other modifications of the car cannot be started with a low level of oil fluid. Small volume is the cause of air pockets, which have a negative impact on bearings and other elements of the gearbox.
Design and principle of operation
How to repair a gearbox
As with any car, the Gazelle’s gearbox performs the most important functions of the transmission. It converts and transmits torque to the wheels from the engine. Therefore, a lot depends on the quality of operation of this unit. For example, the comfort and safety of people, because any malfunction of the gearbox carries the risk of accidents.
The small Russian car is equipped with a manual 5-speed gearbox. Despite the manufacturer's assurances that it is durable and unpretentious, most owners claim the opposite. The reliability of the unit is poor primarily due to constant excessive loads, since commercial vehicles can be operated for 24 hours straight.
The main elements of the checkpoint are:
- double crankcase;
- gears;
- main shafts and intermediate;
- synchronizers, balls, springs;
- gear shift mechanism.
The crankcase is made of aluminum alloy for lightweight purposes. It consists of two parts: front and rear with extension. They are securely connected with 10 bolts through a 0.33 mm paronite gasket. To ensure alignment of the shaft ends and rod holes of the switching mechanisms, they are centered with special bushings pressed into the crankcase.
The shafts are equipped with other unique parts. For example, the secondary shaft is limited from axial movements by retaining rings and special thrust half-rings. A collar is also provided. The input shaft is equipped with a drive gear for the speedometer drive. All shafts, including the intermediate one, have gears, and at the ends there are roller or ball bearings and retaining rings/half rings. A special place is occupied by bushings, fixing pins, spring washers and 0.2 mm shims. The drive and driven shafts are connected at their ends to the engine crankshaft and crankcase. The intermediate shaft is located inside the box body.
The gear shift mechanism, in addition to the lever, is equipped with springs, a seat, seals, a thrust cone, and bushings. There are a lot of washers, plugs, and dowel pins. Speeds are switched using forks - there is a separate one for fifth gear and reverse gear. The locking device or fuse consists of two plungers and a locking pin. To prevent accidental engagement of reverse gear, a separate bushing with a spring is provided.