When to change pads
The frequency of replacing rear pads is 2 times less than the front ones. Since they have less load when braking.
On average, the mileage they can cover without replacement is 60-90 thousand km. Of course, these figures are approximate, since the operating conditions and driving style of each driver are individual. There are cases where the pads can be worn out by 30,000 km.
It is necessary to change the pads if:
- The thickness of the lining is less than 1.5mm. With such a thickness, the block no longer performs its functions and is simply not able to effectively brake the car.
- The overlay begins to peel off from the base. Using a pad with such problems is unacceptable. The pad can come off and get caught in the rotating parts, causing the wheel to wedge.
Lining Thickness
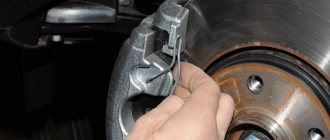
There is no need to remove the drum to check the thickness of the lining. You just need to remove the special rubber plug behind the drum and assess its condition.
Plug for checking the condition of the rear pads
Signs of brake pad wear:
- increasing the braking distance of the car;
- incorrect behavior of the brake system when braking;
- the appearance of metal shavings on brake discs and pads;
- knocking noise when braking hard;
- squeaking noise when braking.
If at least one of these signs appears, you must immediately inspect the brakes and, if necessary, replace worn parts.
Visually you can detect the following damage to discs and pads :
- the thickness of the pad lining is below the required technical specifications;
- cracks or delamination of the brake pad;
- chips and scratches on the block or lining;
- reducing the thickness of the brake disc below the required technical specifications;
- uneven pad wear;
- the appearance of a protruding edge along the edge of the disk.
After the pads are replaced, they take time to get used to. Therefore, braking may not be as effective . If, after time, braking has not improved, or there are any knocks or vibrations, then the replacement was made incorrectly and the procedure must be repeated.
Differences
Priora pads have different designs and it is very important to know which ones are installed on your car. If the car is equipped with an ABS system, then the pads must be purchased specifically for cars with ABS; they will not work for Priora modifications without an anti-lock brake system (ABS).
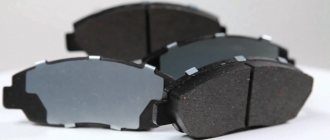
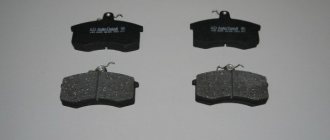
The pads have a specific design for cars with and without ABS. The difference is that the pad with the anti-lock braking system has a special hole for the ABS sensor, while the regular one does not.
You can see the differences between the pads in this photo.
Elements of the rear brake mechanism: 1 - front block of a car without ABS; 2 — front block of a car with ABS; 3 — pad spacer; 4 — upper tension spring of the pads; 5 — handbrake drive finger; 6 — pin washer; 7 — pin pin; 8 — rear block of a car with ABS; 9 — rear block of a car without ABS; 10 — hand brake drive; 11 — lower tension spring of the pads;
Replacing brake pads (disc system)
- Having chosen the pads recommended by the manufacturer, take a set of tools, unscrew the wheel nuts, jack up the car and remove the wheel.
You need to start replacing the pads on a cooled down car (so that the parts of the brake mechanism have cooled down), on a flat area without a slope and with a stop (except for the jack itself) placed under the bottom. Use wheel chocks under the wheels. - Unscrew the cap of the brake fluid reservoir (to make it easier to press in the brake piston).
- Unscrew the caliper guides, and if there are fixing brackets, remove them with a screwdriver. If your car is equipped with a pad wear sensor, disconnect the connector.
- Use a screwdriver to move the pads away (insert a powerful flat-head screwdriver between the pads) in order to press the brake piston. Remove the old pads. Clean the installation site from dirt.
- Install new pads. It is recommended to lubricate the caliper guides , but very carefully so that the grease does not get on the contact surfaces of the pads, otherwise the brakes will not work.
- Reassemble the brake system in the reverse order, install the wheel, and remove the car from the jack.
- Bleed the brakes and let the new brake pads break in.
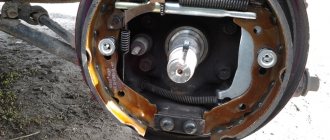
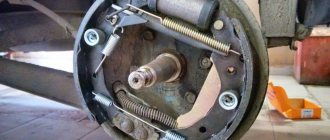
Arrangement of elements of the rear brake mechanism
This picture shows a detailed arrangement of the elements of the rear brake mechanism with a description of each element. This will be necessary to understand the principle of operation of the mechanism.
Elements of the rear brake mechanism with ABS: 1 — brake mechanism protection; 2 — ABS system sensor; 3 — front block; 4 — pad spacer; 5 — rear wheel brake cylinder; 6 — hand brake drive; 7 — rear block; 8 — ABS sensor disc; 9 — rear brake drum;
Preparing for replacement
Before changing the pads, it is necessary to prepare the car.
Preparation
- It is necessary to pump out some of the brake fluid from the reservoir using a syringe or bulb. This is necessary to prevent excess fluid from leaking out of the top when the brake cylinder is compressed.
- Next, we loosen the handbrake cable; if it is too tight, it will be impossible to compress the brake cylinder, which will complicate the work process.
Read how to adjust the handbrake here.
- Then we prepare the necessary tools
Required tools:
- Head on "7"
- Torx head "E8"
- Open-end wrench "10"
- Ratchet
- Large flathead screwdriver
- Two mounts
Step-by-step instruction
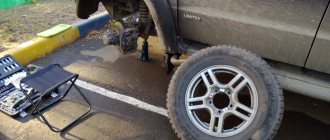
- Jack up the wheel and remove it (remember to put chocks under the wheels of the car).
- If the car is equipped with an ABS system, then it is necessary to remove the ABS sensor so as not to break it when removing and installing the pads.
- To do this, you need to unscrew the sensor with the “E8” head and pull it out of the drum.
- Using a ratchet with a head set to “7”, unscrew the guide wheels (in some models of vases the guides are made for an open-end wrench set to “10”).
- Next, you need to dismantle the drum. To do this, you can use a wooden block or mallet and strike the end of the drum until it comes off.
Attention:
After the drum is removed, do not press the brake pedal under any circumstances, as the piston of the brake cylinder may fall out of the cylinder.
Make sure that the car is released from the handbrake. Otherwise the drum will not be removed.
- We remove the drum; if the car is equipped with ABS, we remove the ABS sensor master disk.
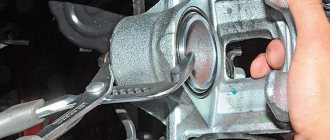
- The next step is to compress the brake cylinder. We take two pry bars and squeeze the pads so that the cylinder is compressed, as shown in the picture.
- Next we proceed to disassembling the rear brake mechanism.
- Remove the upper tension spring with a screwdriver and take it out.
- We take out the spacer bar by spreading the pads.
- Use a screwdriver to remove the front pad pressure spring.
- Remove the front block.
- Remove the rear pad pressure spring and release the pad down.
- We remove the handbrake drive lever from the handbrake cable engagement and remove the shoe.
- Unbend the cotter pin and pull it out of the pin hole.
- Remove the washer and handbrake drive, and then the finger from the block.
The next step in replacing the rear pads is to reassemble them in reverse order.
To make tensioning the compression spring more convenient and easier, you can use a piece of wire or rope to engage the spring with the block.
After the pads have been replaced on both sides of the vehicle, the handbrake needs to be adjusted. You can read how to properly adjust the handbrake here.
The brake pad replacement process is complete.
The causes of brake pad wear will be:
- the quality of the roads on which the car is operated;
- driving style;
- temperature conditions throughout the year;
- If the brake pads have already been replaced, then the quality of such work affects the service life of the parts.
The brake system should be checked every 10 thousand kilometers
.
In this case, the emphasis is on the behavior of the pads during braking, how smoothly the braking occurs, and whether there are any squeaks or other extraneous noises. The replacement for cars with an automatic transmission and a manual one is slightly different in terms of mileage. On a manual, it is worth replacing the pads every 30-50 thousand kilometers
; on an automatic, the wear is more noticeable and replacement is done
every 25-30 thousand kilometers
. The mileage of pads for SUVs that are used off-road is radically different. Difficult road conditions (sand, mud, water) cause the pads to become unusable much earlier than the required mileage.
Front pads wear out faster because most of the inertial force that the brakes dampen falls on the front of the car. So the front pads should be changed two to three times more often than the rear ones.
The pads need to be changed in pairs - immediately changed either on the front wheels or on the rear. The pads on a pair of wheels should not be allowed to have different degrees of wear. It is also necessary to change the pads on time; worn pads severely damage the brake discs and, most likely, the cost of repairs can then increase several times.
When replacing brake pads, you need to pay attention to the degree of wear of various elements of the brake system. First of all, you need to examine the degree of wear of the brake discs; you also need to check the rubber covers and guide boots for integrity. When replacing pads, the brake hoses are also checked. All this is done so that if there is a leak, its cause can be eliminated before something irreparable happens on the road.
It is quite difficult to describe the entire process of replacing brake pads in detail, since the procedure for replacing rear brake pads and replacing front pads is slightly different, especially if there is a disc and drum system, and in addition, each car model has its own nuances. However, there are still some general points:
- the hood opens and the brake reservoir cap is unscrewed;
- the wheel is removed;
- the brake mechanism is cleaned of dirt;
- the bolts (caliper guides or brake drum bolts) are unscrewed in order to get to the pads;
- use a screwdriver to remove the pads (brake mechanism);
- pads are changed in pairs;
- The brake system is being pumped.
Now let's try to analyze the general procedure for replacing the rear and front pads separately.