The Kia Rio maintenance regulations do not limit the service life of the front wheel brake pads, however, in addition to their maximum permissible wear, the pads must be replaced in the following cases: when replacing the brake disc, the linings are oily or there are deep grooves, cracks and chips on them , as well as in the event of detachment of the linings from the base of the pads.
The internal pads of the Kia Rio are equipped with acoustic wear indicators, which begin to make a grinding noise during braking when the pad wear approaches the maximum permissible level. If you hear a grinding noise when braking your car, it’s time to change the pads.
Attention! The brake pads of the front wheels must be replaced only as a set - all four brake pads.
Replacing the pads of only one brake mechanism can lead to the car pulling to the side when braking.
If the fluid level in the brake and clutch hydraulic reservoir is at about 0, then before installing new pads, use a syringe or a rubber bulb to pump out some of the liquid from the reservoir so that when the piston is recessed into the working cylinder of the brake mechanism, the liquid does not leak out from under the reservoir cap.
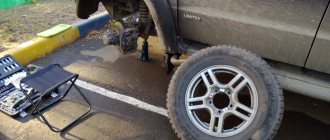
We install the car on a factory-made stand.
We remove the front wheel of the Kia Rio.
2272-6-12-03-11
To do this, use sliding pliers to press the piston into the cylinder, being careful not to damage the boot.
Before installation, we clean the brake mechanism parts from dirt and corrosion, especially the brake pad seats in the caliper guide plates and the pad guide.
It is prohibited to use gasoline and diesel fuel to clean brake mechanisms.
If the protective covers of the guide pins are torn, replace them with new ones.
We assemble the brake mechanism in reverse order.
After replacing the pads on both front wheels, press the brake pedal several times to set the gaps between the pads and discs.
[We save up to 5,000 rubles on Kia Rio maintenance] [Kia Rio maintenance for 15 thousand km] [Kia Rio maintenance for 45 thousand km] [Kia Rio maintenance for 60 thousand km] [Do it yourself Maintenance - general recommendations] [Safety rules for carrying out vehicle maintenance yourself] [ Tools required for carrying out maintenance of the Kia Rio]
Replacing brake pads for the front wheels of Kia Rio
When to change front brake pads in Kia Rio
Kia Rio operating experience has shown that high-quality front pads last a long time and must be replaced approximately every 40-50 thousand kilometers.
The interval largely depends on driving style, road pollution and proper operation of the brake system. You can monitor the status of settings in two ways - audibly and visually.
It's easiest by ear. Modern brake pads are equipped with acoustic wear indicators, which, when the linings are in critical condition, begin to emit a characteristic sound of metal friction - a whistle or grinding sound.
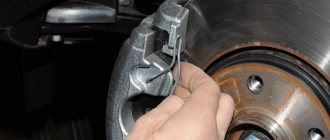
To reassure yourself, you can periodically conduct visual inspections. To do this, you need to turn the steering wheel to the right, remove the right wheel and look through the caliper at the inner pad. Critical wear is a thickness of 2 - 3 mm, in which case immediate replacement is required. With a thickness of 5 mm, you need to prepare new pads in advance and replace them at a convenient time.
There are other cases when it is necessary to replace the pads. This includes damage or oiling of the linings and replacement of brake discs.
What tools are needed to replace pads?
The minimum set of necessary tools includes:
- Jack and shoes (wheel chocks);
- Wheelbrace for removing wheels;
- Pear or enema;
- Carob, or better yet, cap on 14, 17, 19 or 21;
- A slotted screwdriver, you may also need an awl;
- Round nose pliers;
- Wire brush;
- Fabric gloves and a piece of thick fabric.
Instead of keys, it is convenient to use the appropriate sockets and ratchet. To tighten (press in) the brake cylinders, sometimes round nose pliers are useless and a special wrench is required to press in the brake calipers.
How to change the rear brake pads on a Kia Rio 3 with your own hands
Timely replacement of the rear brake pads of the Kia Rio 3 allows you to save money, and most importantly, protect the lives of passengers from an accident.
Parts life
“Boots,” at their core, are consumables for the vehicle’s braking system. They quickly wear out from friction during braking, as well as from external negative factors. It is a big mistake to assume that they are replaced only after a certain number of km or at strict intervals over time.
According to Kia, with an average load, the pads can withstand up to 30-40 thousand km. But it is better to carry out an inspection every 15 thousand km.
Parts wear out differently: the front ones wear out faster than the rear ones. This is because when braking, the front brakes are applied first, and only then the rear brakes are applied.
Causes of pad wear
Several things affect the lifespan of a part. Among them:
- Environmental conditions - climate, road quality. Any abrasive materials damage the pads. Both large ones, for example, crushed stones, stones, glass, and small ones - sand, dust or dirt.
- Part material.
- Driving style. They deteriorate faster for drivers who like to brake or accelerate sharply.
- Breakdown of the brake system. The replacement of the “shoes” is brought about by deformed brake discs, permanent wedge of guides or brake pistons, blockages in the pipes, low-quality brake fluid or air bubbles in it, etc.
Therefore, it is recommended to constantly inspect the brakes of your car.
When should you change the pads?
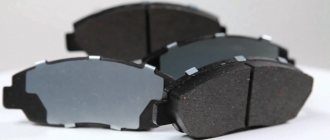
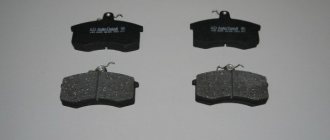
The part consists of 2 parts: a metal base and a friction lining. The latter is always made of materials with a high coefficient of friction.
You can figure out whether the rear brake pads of the Kia Rio 3 need replacing. They have built-in wear sensors - small metal plates. They are located deep in the friction lining. When the part is almost worn out, the plate comes into contact with the brake disc while driving. This is accompanied by a characteristic squeak.
Also, the wear of any pads can not only be heard, but also seen. The overlay should be at least 1-1.2 mm thick.
If the friction layer is worn unevenly, then it will have to be repaired along with the pad or even a new caliper installed.
Car brake system
The machine is equipped with 2 independent brake systems: service and parking. The first stops the car while driving. To start the process, it has a hydraulic drive. The second prevents the car from rolling away from the parking lot.
The working system consists of 2 circuits. The brake mechanisms of the machine wheels are connected to each other diagonally. In the first circuit, the “stoppers” of the left front and right rear wheels work, and in the second circuit, on the contrary, the right front and left rear.
Even if one of the circuits breaks down, the remaining second circuit will be able to ensure a safe stop for the car.
The second, the parking system, consists of a cable drive connected to the rear brakes.
Pad selection
To change the rear pads of a Kia Rio 3, it is best to purchase original components. They can be found both from official suppliers and on the regular car market. To select the correct part you need to know its part number. If the car is equipped with rear disc brakes, then pads No. 583021RA30 are needed, drum pads - No. 583050UA00.
Cheaper, but no less high-quality parts are offered by Sangsin, AMD and TRW.
How to change the rear pads on a Kia Rio with your own hands
Knowing how to correctly change the rear pads on a Kia Rio, the driver can avoid overpaying money at the service station.
What tools will you need?
- jack, “shoes”;
- a set of ring or open-end wrenches (instead, special heads and a ratchet are sometimes used);
- round-nose pliers (in especially difficult cases they turn out to be useless, and in order to sink the calipers, you have to take a special wrench);
- enema or pear;
- soft cloth, newspaper or paper;
- metal brush;
- slotted screwdriver (in some cases an awl may be needed).
It is recommended to carry out work wearing mittens or gloves.
Replacement on disc brakes
Lucky are those drivers who have all 4 disc brakes: the job is easier. Replacing rear brake pads on Kia Rio 3 disc brakes in stages:
- Drive onto the site (any flat surface), shift the engine to 1st gear. Be sure to install wedges under the front wheels. Don't take the handbrake off!
- Pump out excess brake fluid from the reservoir.
- Loosen the wheel nuts, but do not remove them completely.
- Raise the car with a jack and remove the wheel.
- Use a brush and cloth to remove all dirt from the caliper. This must be done carefully so as not to damage the soft rubber seals.
- Remove the caliper. First, unscrew the 2 bolts that hold it in place. Remove the nut with a wrench and remove the caliper itself.
- Change the brake shoes.
- Remove the caliper guides, clean, lubricate, and put back.
- Be sure to inspect the gaskets on the guides, as well as the brake cylinder. Change if necessary.
- Press the piston into the cylinder. This is done with pliers or a grinder key (or a bicycle key). The cylinder must not be hit; it may break.
- Screw the caliper and wheel into place.
Lower the car. Check that the wheel bolts are well tightened.
Replacement on drum brakes
The process of replacing rear brake pads on a Korean Kia Rio looks a little more complicated if the rear has drum brakes.
You need to add hub nuts to the list of tools. This is a consumable, they are replaced after any unscrewing. You also need a hammer, a cube of wood measuring 2x2 cm. No keys needed.
Stages of replacing the rear brake pads of the Kia Rio 3:
- Drive onto level ground, turn off the engine, and then shift into 1st gear. Be sure to put chocks under the front wheels. Don't take the handbrake off!
- Remove the wheel.
- Remove dirt from the drum and protective shield.
- Remove the protective cap from the axle. To do this you will need a screwdriver and a piece of clean paper or cloth. First, use a screwdriver to pry the cap several times around the perimeter, after which it easily slides off the axis. Because It is completely filled with lubricant and must be placed on a clean surface. A piece of paper is useful for this.
- Using the same screwdriver or awl, you need to unlock the collar of the nut, and then use a 21 wrench to remove it.
- Place the cube on the drum and knock. Knock so the whole drum.
- Remove the drum, supporting the outer washer with a wrench.
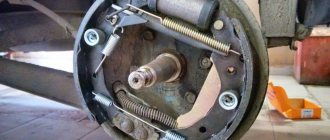
- The rear pads of the Kia Rio 3 are attached to the shield using 2 types of fastenings - brackets and pins. The first ones need to be rotated 90º, and then unfastened from the pin. Then remove the pins from the side of the protective shield.
- Remove the pads, as well as the bar and springs. Before disassembling, just in case, take a photograph of the position of the parts.
- Unhook the handbrake cable.
- Attach the rear “shoe” to the cable lever and put it in place. And then secure it to the pin using a bracket.
- Insert strip.
- Install the front shoe.
- Connect everything with springs.
- Place the drum.
- Tighten the hub nut. After a correctly performed operation, the drum rotates easily and does not play. This is done in 2 stages. First, tighten the nut completely, so that the drum slows down a little. Then the nut needs to be loosened by 15º.
- Lock the nut. To do this, just place a screwdriver against the collar and tap it a little with a hammer.
- Return the wheel to its place.
- Lower the car. Tighten the wheel bolts.
Which pads to choose
On KIA Rio 3 of all years of production, including restyling models, original pads are installed according to code 581014LA00. They are quite expensive, so in order to save money, you can choose an analogue from other manufacturers. It can be:
| Trademark | Catalog number |
| Sangsin 3.9 | SP1399 |
| TRW 3.4 | GDB3548 |
| AMD 3.7 | AMDBF358 |
Suitable for KIA Rio 2:
| Trademark | Catalog number |
| Kia | 581011GE00 |
| Sangsin 3.9 | SP1186 |
| TRW 3.4 | GDB3420 |
| Hankook Frixa 4 | FPK01N |
With the KIA Rio 1 it’s a little more complicated. Initially, “native” ones were installed using the code K0BA23328Z and third-party ones with the following dimensions: length - 91.5 mm, width - 64.0 mm, thickness - 14.5 mm.
| Trademark | Catalog number |
| Kashiyama 3.4 | D3062M |
| 4TRW 3.4 | GDB3206 |
| HSB 4 | HP1002 |
Since 07/08/2002 the pads have increased in size: length - 129.0 mm, width - 51.4 mm, thickness - 16.5 mm. The catalog numbers have changed accordingly:
| Trademark | Catalog number |
| Kia | 58115FDC00 |
| TSN 2.3 | 2121 |
| Kashiyama 3.4 | D11126M |
| Sangsin 3.9 | SP1113 |
There are many companies producing front pads for KIA Rio and most make high-quality products. Don't just buy pads that are too cheap.
Replacing rear brake pads for KIA Rio
- 33 1 30k
- 180 21 210k
Photo report with a detailed description of how to replace the rear drum brake pads of a Kia Rio .
To replace, in addition to the pads themselves, you will need hub nuts, which are best taken care of in advance, especially since they are inexpensive.
The design of the rear brakes and hubs is inconvenient. The brake drum itself is a hub, and sits on an axle on two bearings. The inner one is pressed into the hub drum and fits quite freely on the thickened part of the axle, while the outer one is conical. All this is tightened with a nut with a crushable collar, which is secured against unscrewing by crushing. The nut is protected from unscrewing by a shaped washer, which clings with its protrusion to a groove in the axle. Thus, the wheel and the drum are held on by one 21 nut, which is not yet tightened all the way, but regulates the pressure of the tapered bearing. In general, the structure feels somewhat flimsy.
Which rear brake pads should I install on the Kia Rio and when should I change them?
Original number 58315FDA01, average price about 1663 rubles.
- SANGSIN SA134 — 793 rub.
- KASHIYAMA K11177 — 840 rub.
- Ween 1522461 — 720 rub.
Inspection frequency - according to the maintenance regulations, it is necessary to carry out an inspection every 15 thousand km.
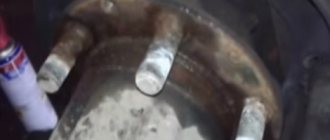
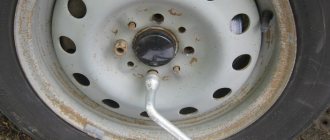
We remove the wheel, then the hub cap - first tap it on the side, then press it out with a flat screwdriver. The cap is filled with bearing grease, carefully set aside. Unlock and unscrew the hub nut. In this case, the tightening is quite weak, the jammed collar does not hold the load - it is unscrewed with a short knob without much effort. But you will still have to loosen the nut so as not to spoil the groove on the axle.
We pick up the washer and, holding the tapered bearing from falling out, carefully remove the drum. Although you can remove the bearing separately.
Rocking it lightly, remove the drum. You may need to tap the shield to get the pads to settle.
On the right side it looks like this.
For inspection purposes, the tapered bearing was removed. There is some chipping on the rollers, no scuffing - still good. But we will replace the lubricant with MS-1000.
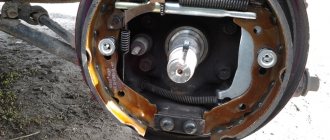
Regardless of the order of removal, we disassemble the pads. The main thing is that the springs that hold the adjustment bar do not jump out. The pads are fixed on the shield with pins on spring brackets - we hold the pin with pliers, press the tip of a flat-head screwdriver onto the bracket and turn it (or the pin) 90 degrees. After removing the rear block from the shield, we remove the lever connected to it from engagement with the handbrake cable. We clean the shield from deposits, thoroughly clean and lubricate the contact points of the pads so that they do not jam. We clean and lubricate the adjusting mechanism, transfer the lever from the old pad to the new one, and install everything in place with the new pads.
First, the pads are usually assembled with springs and bars, and then installed on the shield, but in this case it will be more convenient to act sequentially. First, we put the rear block in place, hooking it to the handbrake cable, and fixing it with a pin. Then we insert the gap adjustment mechanism and the front pad, then the springs of the pads and the adjuster. New pads left and right.
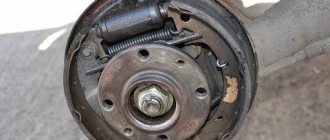
Now all that remains is to install the drum and adjust the tapered bearing. Along the way, you can replace the bearing grease. The main difficulty in this operation is to properly tighten the hub nut. The essence of correct tension is to choose the backlash without interfering with rotation. There are several simple tightening methods. 1) Smoothly tighten the nut, turning and rocking the hub until the play disappears, then tighten slightly (30 degrees). 2) Similar to the previous one, but tighten the nut all the way (without fanaticism, of course), then release it 90 degrees and tighten it a little. After this, we hammer the collar into the groove of the axle, fill the cap with grease and put it in place.
Tools and accessories for work
For work we will need:
- Wheel key
- Socket wrenches, ratchet wrench or socket set
- Flat head screwdriver
- A special tool for driving the brake cylinder (although you can do without it if you have some car repair skills)
- High temperature brake lubricant
- Wheel chocks
- Jack
If you are a supporter of original spare parts, you should use them: the original Kia Rio front brake pads have part code 58101-1GE00, the rear ones - 58302-1RA30.
Their price ranges from 2000 to 5000 thousand rubles per set. If you wish, you can save money and install a TRW kit code - GDB 3420 front, GDB 3494 rear. There are also cheaper substitutes, for example ROAD HOUSE 21208.02 and 21362.42, about 1000 rubles per set. You can also use spare parts from other manufacturers. It should be noted here that some substitutes are not inferior in quality to original products, although they have a significantly lower price. Main Kia brake pad manufacturers and prices
| Manufacturer | Front (part code) | Rear (part code) | A country | Prices, rub. |
| Hyundai/Kia (original) | 58101-1JA10 | 58302-1RA30 | Korea | 2000 — 4800 |
| Vite | VBS3420PS | VBS3494PS | China | 400 — 600 |
| UBS | B1103019 | Russia | 700 | |
| Ashika | 50-0K-K12 | 51-0K-K06 | Italy | 850 — 900 |
When choosing Kia Rio brake pads, be careful, use the VIN of your car to buy exactly the ones that are suitable for your modification of the car. If you doubt the right choice, seek help from professionals
Causes of pad wear
Since the Rio is produced exclusively in front-wheel drive configuration, the manufacturer installs front disc brakes by default. Regardless of the frequency and type of driving, they are subjected to serious stress. The main cause of wear is production. Moreover, it is not always possible to diagnose the condition without a visual examination. If you study the appearance of the Kia Rio pads, which have exhausted their service life, you will find the following:
- work surfaces are seriously oiled;
- on the active side there are chips, grooves with a depth of 1 mm;
- the connection between the pads and the base is very loose;
- friction linings are worn out.
You can make sure that the front brake pads of the Kia Rio 3 need to be replaced by moving at your usual pace on an asphalt road. The car will react to braking with an unpleasant metallic grinding sound; one of the front wheels may react more sharply to the pedal.
A serious degree of wear will be indicated by noticeable shocks during braking and ABS errors on the on-board computer.