Additional recommendations
If you cannot depress the brake cylinders, open the cap of the brake fluid reservoir to reduce the pressure.
If the pads wear unevenly, pay attention to the caliper. Most likely it will need repairs. When replacing the rear pads, change all the springs. They are inexpensive, but they will protect you from possible failures until the next replacement. The front caliper guides can be lubricated with graphite grease for smoother operation.
Replacing the pads on the front axle will not cause problems even for “dummies” of automotive repair. But from the back it’s not so simple. Assess your strengths and capabilities in advance: can you reach the handbrake cable and cope with a stuck brake drum? If yes, then everything will definitely work out.
Didn't find the information you are looking for? on our forum.
We recommend reading:
How to remove the fuel rail on a VAZ 2112 16 valves
Wiring diagram VAZ 2110 injector 8 valves and with a carburetor engine
How to start a VAZ from a pusher
No spark VAZ 2104 carburetor reasons
How to adjust the rocker on a VAZ 2114, varieties, repairs
Wiring diagram for VAZ Priora injector 16 valves
How to change pads on a VAZ 2112
Changing the oil in a VAZ 2114 engine, 8 valves, 16 valves
Changing engine oil 21074
Replacement of rear brake pads of VAZ-2109
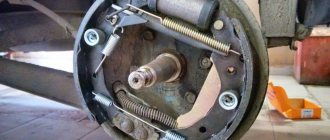
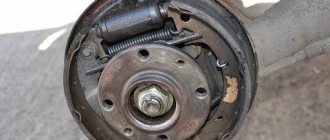
The nines have drum brakes at the rear, which is another hemorrhoid. Firstly, you will never know how worn the pads are without removing the drum, and secondly, removing the drum is the biggest problem on all cars. We unscrew the bolts that secure the drum and then the fun begins.
The drum won’t just come off, the pads make indentations in it, which it then clings to when you pull it off. This is true on all cars, not only on Zhiguli. To remove it, knock it down, take a heavier hammer and knock on the drum from the back side through the spacer so that the edge of the drum does not break off. Yes, this is a problem with all drums, the longer you don't change the pads, the more pieces of the edge are missing.
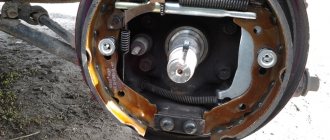
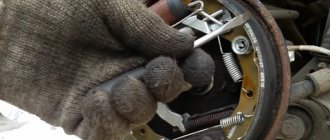
If you are lucky and the drum comes off, then your view will be of the pads, tightened by some kind of springs. We remove the springs and the pads will come out without any problems.
There is an expansion plate installed between the pads at the top, which may fall out if the pads are suddenly removed.
Removing and replacing front brake pads VAZ 2108, 2109, 21099
And the handbrake cable is attached to one of the blocks, but the block can be easily pulled out of the groove and it will come out easily.
Now we install new pads in the same way. It is best to tighten the springs with a screwdriver; they glide over it perfectly and easily fit into the mounting holes.
Lada 2109 Poltorashechka › Logbook › Replacing rear pads
I won't go into detail about why I replaced the new pads with new pads. I just changed it and it’s ok) Here’s the details, with photos) 1. Remove the wheel. I hope everyone knows how to remove a wheel) for those who don’t know: we tear off the bolts, jack up the car, unscrew the bolts completely, remove the wheel.
2. We knock down the brake drum.
We put a block on the back side and hit the drum through the block with a hammer. I just pressed the drum with the key. You just have to be careful, because you can break the drum. It won’t get any worse, it just won’t look nice, like it’s been bitten)
3. Remove the “old” pads. (You have old ones, I have new ones). Use a screwdriver to pry up the guide springs and unhook them.
Then use a screwdriver to pry off the top spring.
and remove the front pad.
Removing the upper arm
and rear pad. I don't think there will be any problems.
4.reassemble everything in reverse order)) We attach new guide springs, if you purchased them)
So, there is a lever on the rear block, I didn’t take a photo of its assembly, there’s nothing wrong with it. We insert the pin from the inside of the block (the inside is where you want it)) because all the pads are the same), put on the washer, put on the lever with the hook, insert the cotter pin into the hole of the pin and bend the ends of the cotter pin). We hook the lever to the handbrake cable, and use a screwdriver to hook the guide spring onto the block. Let's let her go, she won't run away anywhere.
We hang it on the second block, stick the top bar, hook the top spring,
we catch the lower spring.
Center the pads on the brake cylinder,
we put on the drum, I positioned it with bolts and tapped it well with the key,
Lada 2109 2003, petrol engine 1.5 l., 80 l. p., front wheel drive, manual transmission - do it yourself
Cars for sale
Lada 2109, 2002
Lada 2109, 1998
Lada 2109, 1997
Lada 2109, 1989
Comments 9
And when I change wheels seasonally, I always remove the drums, clean them of crap, coat the flange with graphite (I just don’t know what to call it) and everything comes off easily)))
It's not a matter of changing wheels, it's a long story. It all started when my handbrake pin broke and a few days later I noticed a hellish grinding noise from the rear. I changed the pin. I couldn't tighten the handbrake myself. I thought the springs had come loose and, just in case, I took new sets of lever springs and pads. I took the wheel apart and everything is fine. I twisted the hub, decided that it was a wheel bearing, bought a new one, came to the service center, pressed in a new bearing, installed the hub - it still sheared, but they found the cause. On the handbrake cables, there is a spring in the wheel as protection, and when the cable pin broke, they weakened and this spring rested against the hub and grinded... S.ka. tightened the handbrake and everything fell into place.
Fix, we'll take off the replacement of new ones with new ones, and what kind of pads are installed, what kind of extra ear is there?
The cheapest there were. This is such an extra ear, I don’t know why it’s there
VAZ 21099 | Replacing front brake pads
Be sure to replace all pads on one axle of your vehicle, even if only one pad is worn. If the brake pads will be reinstalled, mark them before removing them.
When brake pads work, brake dust is generated, which contains asbestos, which is harmful to health, so when cleaning brake pads, do not use compressed air or inhale the dust.
To clean brake mechanisms, use only special brake cleaner.
Remove the cap of the brake system compensation tank.
Apply the parking brake and block the rear wheels with chocks.
Replacing the front brake pads of a VAZ 2110 yourself
Loosen the front wheel nuts. Raise the front of the car and place it on stands. Remove the front wheel.
Check the brake rotor for cracks, especially around the wheel bolt holes, and for excessive wear or mechanical damage. If it is necessary to replace at least one of the disks, replace both disks on the axle.
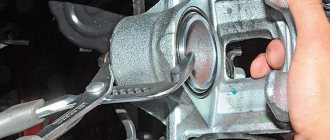
Rice. 11.13. Using a clamp to press the piston into the caliper
Using a clamp, press the piston into the caliper (Fig. 11.13). When the piston is retracted, brake fluid is forced out of the brake cylinder into the compensation tank, so constantly monitor the fluid level in the tank, and if necessary, pump out excess fluid from the tank.
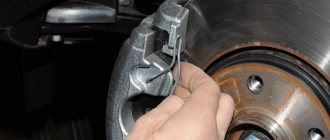
Rice. 11.14. Unscrewing the lower bolt of the front brake caliper: A – lower bolt; B – top bolt; C – hollow bolt for fastening the brake hose
Unscrew the lower caliper mounting bolt, while holding the guide pin from turning with the second key, and lift the caliper up, turning it around the upper guide pin. Use soft wire to tie the caliper to the front strut (Fig. 11.14). Do not remove the upper caliper bolt and the hollow brake hose bolt.
Remove the outer noise pad, retaining spacer, and outer brake pad from the caliper bracket.
Rice. 11.15. Removing the inner brake pad
Remove the internal noise-absorbing pad, retaining pad and internal brake pad from the caliper bracket (Fig. 11.15).
Retaining spacers can be reused if they are sufficiently resilient, not deformed, and are free of cracks, wear, or corrosion.
If the pads are suitable for further use, clean them with a wire brush and a rag.
Rice. 11.16. Removing the brake shoe guide
Remove the four brake pad guides, check their condition and install them in place (Fig. 11.16).
Rice. 11.17. Installing a brake pad wear indicator
If available, remove the wear indicator from the old brake pad and install it on a new one (Fig. 11.17). If the indicator is worn or bent, replace it.
Do not press the brake pedal with the brake pads removed.
Apply special disc brake lubricant to both sides of the inner noise-absorbing pad. Install the inner brake pad with wear indicator, retaining spacer and inner noise-absorbing spacer.
Install the outer brake pad, retaining spacer and outer sound absorbing spacer.
Remove the lower guide pin from the caliper bracket and check its condition. To remove the upper guide pin from the caliper, move the caliper away from the bracket. Apply a thin coat of high temperature grease to the guide pins and install them into the caliper bracket.
Rice. 11.18. Using a clamp to press the piston into the caliper before installing the brake pads
Reinstall the caliper and screw in the lower caliper mounting bolt. If the caliper is not installed on new pads, use a clamp to press the piston into the caliper (Fig. 11.18).
Replace the brake pads on the second front wheel in a similar manner.
Install the wheels and lower the car to the ground.
Press the brake pedal several times until the brake pads are in their working position.
Replacing rear brake pads on VAZ 2108, 2109, 21099 and VAZ 2113, 2114, 2115
Replacing rear brake pads begins with removing the wheel. Please note that when replacing rear brake pads, the handbrake must be released, the car must be in first gear, and thrust blocks must be installed under the front wheels.
First (before jacking up the car), loosen all four wheel bolts. Next, we hang the rear of the car on a jack.
and unscrew the four cone bolts securing the wheel, and then remove it.
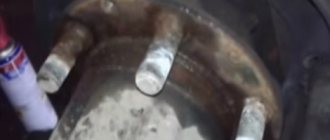
Removing the brake drum is carried out as follows. We unscrew the two guide pins with a socket or a 12-mm open-end wrench.
These pins are screwed into the hub and attract the brake drum to it. After unscrewing them, remove the drum. If it cannot be removed, then you need to screw the pins into the holes corresponding to their diameter (M8). Only now the thread should be on the brake drum.
We screw in both guide pins until they stop or until the drum begins to move. Now, one by one, we screw them in further, thereby pressing the drum off the brake pads.
Now you need to release the parking brake cables. To quickly loosen, you need to use an extended 13mm socket, two extensions and a ratchet wrench. This will allow you to relax the parking brake cables within a minute, without resorting to removing the muffler and other labor-intensive procedures. Using two 13mm open-end wrenches, loosen the locking nut and twist it:
Now we install the prepared extension cord, as shown in the figure, and twist the nut almost to the end.
Now we proceed directly to removing the brake pads. We take out the plinth from the pin holding the parking brake lever and push this pin deep into:
Using pliers, remove the lower tension spring.
Using pliers, release the spring at the front brake pad, which keeps the pad from moving horizontally.
We release the pads from the upper tension spring using pliers or a screwdriver.
Remove the front pad.
Remove the spacer plate.
Remove the drive lever by removing it from the cable end.
Using pliers, release the spring at the rear brake pad, which keeps the pad from moving horizontally.
And remove the brake pad.
We install everything in the following order. First, we connect the new pads together using the upper compression spring, and then insert the spacer plate into the groove.
Now, slightly expanding the upper compression spring, insert the spacer plate into the opposite groove. It is necessary to insert the securing pin of the parking brake drive lever into the connected pads.
We install the assembled pads, passing the compression spring and plate between the hub and the brake cylinder. Please note that there is a concavity on the plate; when installing, it should be directed towards the hub.
Having inserted the pads into the grooves of the brake cylinders, we also install them in the lower grooves:
Install the lower compression spring.
We use pliers to install springs that prevent the brake pads from moving horizontally.
We press the finger inside, holding it so that it does not fall out. We insert the drive lever into the eye of the cable, insert it into the slot in the plate and bring it to the pin.
From the reverse side we squeeze the finger out, it should go through the hole in the lever. We put the washer on top and install the pin.
Design and characteristics of brake pads
Rear brake pads of the VAZ 2109 consist of:
- Base made of metal.
- Friction lining glued to it.
- The rear brakes are equipped with four pads. The body and base are made from sheet steel by stamping, then they are subject to welding.
- The elements are protected from corrosion by galvanic coating.
- A friction lining is glued to the base at a temperature of about 100 degrees with special glue.
- The required surface roughness, which speeds up the grinding in of the pads, is obtained by additional processing.
- 320 Nm is the efficiency during control braking - when the car is moving at a speed of 80 km/h and 40 bar is the pressure in the brake system. In this case, the pads are in a cold state. The force with which the linings can be moved relative to the block does not exceed 210 n/cm2.
- All materials from which products are made comply with quality certificates and the international standard ISO 9001. They are carried out in compliance with UNECE Rules.
- The special material used in the manufacture of brake pads creates a minimal noise level during braking, which improves the comfort of the driver and passengers when moving in the car.
- Increased wear resistance of elements reduces maintenance costs.
- The instructions indicate that replacing the rear brake pads of the VAZ 2109 should be carried out after the car has driven 70,000 - 90,000 kilometers.
- The service life of the products depends on the care taken when driving the car and the condition of the road surface where the vehicle most often travels.
Dismantling and installation of rear brake pads of a VAZ 2109 car
So:
- On a VAZ 2109 car, replacing the rear brake pads is carried out when the hand brake is lowered all the way down.
- First gear is engaged.
- Stands are placed under the front wheels to secure the car.
- The rear of the machine rises and rests on supports.
- The wheel is removed. All elements of the braking device are washed with detergents and then thoroughly dried.
- If the brake fluid level in the master cylinder reservoir is at or close to about 0, you need to pump out the fluid from the reservoir so that it does not splash out when replacing the brake pads.
- The two guide pins are unscrewed.
- The brake drum is removed.
Replacing rear pads on a VAZ 2109
- The guide spring on the front block is pulled out.
- The front block is removed.
- The expansion bar is removed.
- The guide spring on the rear block is removed.
- The drive lever is disconnected from the end of the handbrake cable.
- The cotter pin is pulled out and the support washer is removed from the pin on the drive lever of the rear brake shoe.
- The rear brake pad is removed.
- The support washer is removed.
- By pressing on the finger shown in the photo, the drive lever is removed from the block.
Replacing the rear brake pads of a VAZ 09
The place where the finger presses on the drive lever
- The finger is pulled out of the device.
- The thickness and condition of the removed friction linings are checked and it is determined whether the pads on the VAZ 2109 need to be replaced.
- The car enthusiast can install new pads himself. The process is performed in the reverse order of removing them.
- When installing, you need to insert the upper toes of the pads into the grooves of the piston.
- When installing the drum, the brake pads are brought together using two pry bars to move the brake cylinder and its piston to the center.
- The brake drum is put in place.
- To move the brake pads to the brake drum, press the brake pedal up to three times.
- The wheels are installed in place.
- Their ease of rotation is checked.
- The car falls to the ground.
- After the rear pads have been replaced on the VAZ 2109, press the brake pedal so that the cylinder pistons can take their working position.
- Check the brake fluid level in the brake fluid reservoir and add fluid if necessary.
- The handbrake is adjustable.
How the rear brake pads are replaced on a VAZ 2109 car can be clearly seen in the video. With timely replacement of worn-out elements of the brake system, the safe movement of the car is ensured, and the cost of this repair will be significantly lower than that which may arise after an accident when driving a car with faulty brakes.
What are rear brake pads and where are they located?
Rear brake pads are an extremely important element of the car that directly affects the vehicle's handling; in addition, the safety of the driver and passengers largely depends on their condition. Therefore, the car owner should promptly replace the brake pads if they fail.
Most often, the worn condition of the pads is indicated by a characteristic squeak that appears when the car is braking. However, it is better for the driver not to bring the brake system to this state.
As the name suggests, rear pads are designed to work with the rear pair of wheels. They can be seen by looking under the brake drum. The block consists of the following elements:
- friction lining (it interacts with the wheel disk and therefore gradually wears off);
- caliper or pad base (the pad is actually attached to it).
Replacing front brake pads
The minimum permissible thickness of the friction linings of brake pads is 1.5 mm.
Replace the pads in the following cases:
- the thickness of the friction linings is less than permissible;
- the surface of the linings is oily;
- the friction lining is not firmly connected to the base;
- The linings have deep grooves and chips.
Warnings! Do not use gasoline, diesel fuel or any other mineral solvents to clean brakes.
Replace the brake pads on both front wheels at the same time.
It is unacceptable to replace the inner and outer pads between each other, as well as between the left and right wheels - this can lead to uneven braking.
1. Disconnect the wire from the “–” terminal of the battery.
2. Brake the vehicle with the parking brake and install support blocks under the rear wheels.
3. Remove the front wheel and clean the brake mechanism from dirt.
4. If the brake fluid level in the master cylinder reservoir is at or near it, pump out some of the fluid from the reservoir. Otherwise, when installing new pads, it will overflow.
5. Remove the rubber seal along with the hose from the bracket.
6. Using a screwdriver, bend the tendril of the lock washer of the upper guide pin fastening bolt.
7. Unscrew the upper bolt securing the guide pin, holding the pin by the hexagon wrench.
8. Rotate the shackle body downwards around the axis of the lower pin.
9. Mark the brake pads if you intend to install them again.
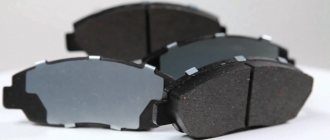
10. Remove the brake pads.
Warning! The surface of the friction linings should not be oily, with deep marks or chips. The pad must be firmly connected to the base of the block.
11. Check the thickness and condition of the friction linings of the brake pads.
Helpful advice. If during the next check the thickness of the linings approaches the minimum permissible, then such pads are still functional, but their service life will soon expire. Choose for yourself: either immediately replace the pads, or constantly monitor their thickness.
12. Clean the brake parts, especially the brake pad seats, from dirt and rust.
13. When installing new pads, press the piston into the cylinder. To do this, install the worn brake pads in place (it is advisable to install only the base instead of the inner ones) and lift the caliper body. Using a screwdriver or pry bar, apply pressure to the inner pad and lean on the brake disc to gently press the piston into the cylinder.
14. Install new brake pads. Make sure the pressure springs are parallel to the top edge of the brake pads. Old pads must be installed in accordance with the previously made markings.
15. Turn the bracket body and screw in the upper guide pin mounting bolt with a torque of 31–38 N·m (3.1–3.8 kgf·m), holding the pin by the hexagon with a wrench.
16. Bend the lock washer tab with a screwdriver. Install the wheel and lower the car to the ground. Then press the brake pedal several times to set the piston to the working position. Check the brake fluid level in the reservoir and, if necessary, bring it up to normal.
Replacing brake pads
High-quality and fully functional brake pads are the key to safety on any trip in your own car. But how can you determine whether it’s time to change these parts? To do this, just listen to our recommendations. You just need to replace the pads
- You found metal shavings mixed with dust on the brake discs. This means that the friction pads are completely worn out and the pad is rubbing against the metal of the disc;
- the gasket has peeled off from the brake pad;
- traces of lubricating fluid are found on the surface of the part;
- the braking distance of the car increases;
- the car pulls to the side during braking, regardless of the driver’s actions;
- The pads have microcracks, scratches and other mechanical damage.
When and why to change pads
Why, of course, is a rhetorical question. No motorist wants to be left without brakes.
Possible complications will only lead to higher repair costs:
- one of the wheels will jam while driving;
- due to extreme wear, brake fluid will leak;
- the caliper will break.
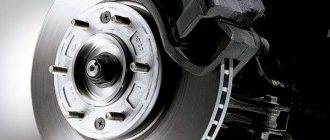
1. Brake pads; 2. Pad preload spring; 3. Bolts securing the cylinder to the guide pins; 4. Bolts connecting the cylinder to the caliper; 5. Cylinder; 6. Piston: 7. O-ring; 8. Guide finger; 9. Protective cover for finger; 10. Pad cover; 11. Pad guide; 12. Protective cover; 13. Brake disc; 14. Caliper; 15. Front wheel hub; 16. Brake cylinder hose: 17. Guide pins; 18. Piston protective cover; 19. Bolts securing the brake mechanism to the steering knuckle; 20. Fitting for bleeding the brake drive; 21. Brake block; 22. Pad guide spring; 23. Expansion bar; 24. Upper tension spring of pads; 25. Wheel cylinder protective cap; 26. Thrust screw; 27. Fitting for bleeding the brake mechanism; 28. Brake shield; 29. Crackers; 30. Thrust ring: 31. Spring; 32. Fluid supply tube fitting; 33. Support cup; 34. Seal; 35. Wheel cylinder piston; 36. Pad stop; 37. Finger of the lever for manual drive of the pads; 38. Lever for manual drive of brake pads; 39. Parking brake cable; 40. Cable spring; 41. Cable end; 42. Lower tension spring of pads; 43. Pad support plate; 44. Pad guide plate; 45. Rivets for fastening plates.
Front wheel brake mechanism: 1 – brake disc; 2 – pad guide; 3 – caliper; 4 – brake pads; 5 – cylinder; 6 – piston; 7 – sealing ring; 8 – protective cover of the guide pin; 9 – guide pin; 10 – protective casing
How does driving style and pad quality affect? There are average indicators: for the front axle - 15-20 thousand km, for the rear axle (drum) - up to 100 thousand km. But this does not exempt you from regular checks.
How to change the front ones yourself
Compared to the previous procedure, replacing the front pads will seem very easy. The wheel, of course, will also have to be removed. After which you can verify the need for repairs through a special “window”. The thickness of the friction material should not be less than 2 mm, otherwise you risk being left without brakes at any time.
Measure the thickness with a ruler; it’s better not to do such calculations by eye.
There is a single bolt at the top of the caliper, held in place by a lock washer. It is necessary to straighten it using a flat screwdriver. Use a long, thin, flat-blade screwdriver. If there is resistance, use a hammer. The bolt should be unscrewed while holding the guide with another wrench. Secure the mechanism with the second anti-rotation key
The brake hose must be released from its mounting. Remove the Brake Hose You can now “open” the caliper by moving it to the side. Remove the old pads. Remove worn pads
To ensure that the new linings fit neatly into place, it is better to thoroughly clean all points of contact. This is where a metal brush comes in handy.
Naturally, the new clutches are thicker than the old ones and it will not be possible to put the caliper back. Therefore, it is necessary to depress the brake cylinder. To do this you will need a large screwdriver. Close the brake mechanism without pads and press the screwdriver against the cylinder like a lever.
It will take some effort, so be careful not to let the screwdriver come off. Then install new linings, close the caliper and tighten the mounting bolt.
Required Tools
You will need radically different tool sets for the front and rear axles. Let's start with something simple. To replace the front disc brake pads you will need:
- flat screwdriver;
- open-end wrenches for 13 and 17;
- metal brush.
If you don't have WD-40, you can use kerosene.
Spray it from a disposable spray bottle The following list for replacing the rear linings of a VAZ 2109 (21099) may not be all you need, but you need to be prepared for difficulties. Full recommended list:
- hammer (preferably a larger one);
- pliers;
- flat screwdriver and metal brush;
- WD-40 lubricant;
- wooden block or board;
- two open-end wrenches for 13;
- 13mm head with extensions.
We put on gloves and get to work.
Replacing the rear brake pads of a VAZ 2109 – Lada Master
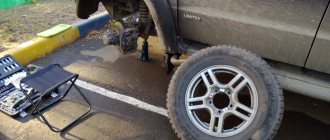
There can be many reasons for replacing brake pads on the rear wheels of a VAZ 2109, but most often this is caused by wear of the friction linings. The work process is not complicated, but requires care, since the car will be hung on a jack if you do not have the opportunity to lift it on a lift.
When to change brake pads on the rear wheels
There are no clear regulations for replacing brake pads on the rear wheels of a VAZ 2109, because the frequency of their replacement depends on many factors:
- quality of friction linings;
- driving style;
- operating conditions;
- the material from which the pads are made.
First of all, brake pad wear appears during active braking, when the car stops maintaining its trajectory. This indicates rather a problem in the brake system, but the possibility of uneven wear of the pads on the right and left wheels cannot be ruled out.
Also, creaking and noise during braking and insufficient tightening of the handbrake, provided that all elements of the handbrake drive are in good working order, indicate wear of the pads. In rare cases, the friction lining may crumble due to overheating during prolonged braking and during operation in difficult conditions.
Preparatory work
Replacing the rear brake pads of a VAZ 2109 begins with placing the car on a level surface. Since you will have to jack up the car, you should carefully secure the car.
The situation is further complicated by the fact that you will have to release the handbrake. Therefore, it is necessary to place wheel chocks, or simply wooden blocks, under the front wheels and put the car in first gear.
You need to take this seriously, because many operations will have to be performed under the machine.
VAZ 2109, 2115, 2108, 2114: detailed video on replacing rear pads
For the work, we will prepare the necessary tool, which should be at hand during the process:
- wheel wrench;
- pliers;
- standard set of keys;
- wooden block;
- set of heads with extensions.
Removing the rear pads
The operation of replacing the pads begins with removing the wheel, so before putting the car on a jack, you need to remove the wheel bolts with a wheel wrench. Only after this can you put the car on a jack and remove the wheel.
- Using a socket or a 12-mm open-end wrench, remove the two guide pins from the hub.
- The brake drum should come off easily, but there are times when it sticks to the hub, in which case it should be helped with a wooden block. To avoid damaging the brake drum, it is not recommended to use a hammer. The drum may crack or become deformed. If this does not help, then take the guide pins and screw them into the other two threaded holes. Thus, the pin will rest against the hub and press out the drum. The pins must be tightened evenly to avoid distortion.
- After this operation, you can gain direct access to the brake pads.
- Loosen the handbrake cable. We can only gain access to the compensator by removing the resonator. In order not to disassemble the muffler, you need to assemble an extension from a set of heads of sufficient length so that you can unscrew it with a 13mm head and a wrench. It is better to use a wrench with a ratcheting mechanism, this will simplify work in tight spaces.
- We unscrew the locknut with a 13mm wrench, and then with the assembled extension we release the handbrake tension cable as much as possible.
- To remove the pads, you must disconnect the handbrake drive. We remove the cotter pin from the fixing pin and press the pin so that it does not interfere with the removal of the mechanism.
- Carefully remove the spring from below using pliers, then remove the limit spring from the front block.
- Remove the upper spring with pliers and remove the front pad.
- Remove the spacer bar.
- We take out the lever that sets the pads in motion, freeing it from the cable.
- Remove the rear block, freeing it from the lateral movement limiter.
Installing new pads
To install new brake pads, you need to connect them with the upper tension spring and install a spacer bar. Install the pads on the caliper, and then reassemble in reverse order.
After assembling the unit and installing the wheel, do not forget to tighten the handbrake cable. In the normal position of the body, when it is not loaded, the handbrake should lock the rear wheels in 3-4 clicks.
After completing this simple operation, we will put the rear brake circuit in order and at the same time adjust the parking brake. Watch your brakes and good luck on the road!
Features of replacing rear brake pads on VAZ 2108, 2109, 21099 cars
The service life of rear brake pads on VAZ 2108, 2109, 21099 vehicles and their modifications is 60-70 thousand km. Necessary tools, accessories and spare parts
- Set of rear brake pads for VAZ 2108, 2109, 21099 cars and their modifications
— Medium slotted screwdriver
— Pliers with thin jaws
Preparatory work
— Remove the rear wheel
— Clean the rear brake mechanism from dirt
The procedure for replacing brake pads on VAZ 2108, 2109, 21099 cars
First remove the front brake pad, then the rear. Before removal, we bring the pads together as much as possible, pushing the pistons of the brake cylinder inward. This can be done using two mounting blades if their ends are placed behind the shoulder of the supporting brake shield and compress the pads with them.
— Disconnect the upper tension spring of the brake pads
We lean the slotted screwdriver on the brake cylinder and using it as a lever, use its blade to pry up the edge of the upper tension spring and disengage it from the front block. We take out the spring.
— Disconnect the front pad guide spring
Use a screwdriver or pliers to pry up its edge and remove it from engagement with the block.
- Remove the front brake pad
We lower it down along with the lower tension spring. Disconnect the spring and remove it by hand.
— Remove the expansion bar
It is not secured by anything and is simply removed.
— Disconnect the guide spring from the rear brake pad
We pry it off with a screwdriver or pliers.
- Remove the rear brake pad
In this case, it is necessary to remove the tip of the parking brake cable from engagement with the manual drive lever (the lever is secured to the rear block).
— Separate the manual drive lever from the rear block
To do this, you need to unsplit the lever axis using pliers and remove the lever from it.
That's it, the brake pads are removed.
Features of installing new brake pads in the rear wheel brakes
— First install the rear brake pad, then the front in the reverse order of removal
— Attach the manual drive lever to the rear brake pad
At the same time, we put the lever on the axle, install the spacer washer, install the lever, and secure it with a cotter pin.
— Tension the tension springs using pliers or a screwdriver
— After installing the brake pads and drum, press the brake pedal several times to self-adjust the gap between the pads and the drum
We carry out a similar procedure for removing the old brake pads and installing new ones for the other rear wheel.
Notes and additions
— When replacing rear brake pads, it is necessary to evaluate the condition of the brake drums, since the efficiency of the rear brake mechanisms of the braking system of VAZ 2108, 2109, 21099 cars is based on the interaction: pads - drum. And if the drum is worn out and the pads are new, normal braking will not be achieved.
— Also, if necessary, replace the guide springs of both pads.
— You should pay attention to the brake cylinders of the rear brake mechanisms. Leakage of brake fluid through their seals is unacceptable. It is also unacceptable to operate cylinders with damaged anthers.
More articles on the braking system of VAZ 2108, 2109, 21099 cars
Rear TC
The algorithm for replacing rear TCs on a VAZ 2109 is as follows.
- Place the car on a flat surface and loosen the tension on the wheel bolts.
- Unlock the pads by fully lowering the parking brake handle.
- Raise the rear of the car with a jack and remove the wheels.
- Place wheel chocks under the front wheels to prevent the vehicle from moving.
- Unscrew the brake drum studs from the rear wheel.
- Using a wooden block and a hammer, knock the drum off the TK.
- Clean the surfaces using the dry method and compressed air.
- We begin full dismantling work.
- Remove the upper garter spring. For this you will need pliers.
- The lower spring is removed in the same way.
- Remove the front TC guide spring.
- Remove the expansion bar.
- Next, the guide spring of the rear TC is dismantled and moved to the side.
- Remove the end of the parking brake cable from the lever.
- Remove the hand brake drive. To do this, you will need to remove the cotter pin from the finger, and then remove the finger itself.
- The dismantling work has been completed, so now everything should be reassembled in the reverse order, only with a new rear TC.
- Before installing the drum, be sure to compress the cylinder pistons so that the outer diameter of the shoes is smaller than the inner diameter of the drum.
- Assemble the unit, steps in reverse order.
- Lower the car to the ground, press the brake pedal several times, which will allow the pads to fully take their place.
Perform the procedure on both wheels. The principle of replacing rear TCs is the same. Just don’t forget to bleed the brake system after completing the work.
Article on the topic: Removing the VAZ 2110 torpedo and installing the trim: detailed instructions with photos
How to install new pads?
Before replacing the rear brake pads on a VAZ-2109, you need to make sure this is necessary. Visually inspect the condition of the element, use a ruler to measure the thickness of the clutch. The brake pads are installed in reverse order. It is recommended to press the piston cylinders using a hand vice. It is also necessary to sharpen the drums and center them. If the thickness of the drum is small, then you need to install new ones.
When removing and replacing rear brake pads on a VAZ-2109, there is no need to bleed the system. This will have to be done if you are replacing a cylinder or line tubes.
Replacing the front brake pads of a VAZ-2109
To unscrew the caliper, you need to flare the lock washer that secures the bolt. Using a regular flat screwdriver, bend it in the desired direction, and you can tap it with a hammer.
Then unscrew the top bolt. We only need to completely unscrew it, since we will not completely remove the caliper, but only fold it back.
And just loosen the bottom bolt a couple of turns and that’s it, the caliper will open. Do not use open-end wrenches.
Now, in order to fold back the caliper, you need to release the brake hose by sticking it out of its seat.
That's it, now the caliper will open up freely and we will have free access to the pads. You can take a closer look at everything.
We take out the pads. The photo shows that they were still fine, almost unused, but they made an outrageous noise, they had to be replaced, most likely they got some kind of fake.
Before installing new pads, clean the guide along which the pad will run; you can use a metal brush, sandpaper, or a regular screwdriver to remove dirt and oxides. Then you can lubricate it with grease to prevent it from oxidizing, or you don’t have to lubricate it.
Now we install new pads. It’s better to take something normal, an original or a trusted manufacturer like Ferodo. Chinese crafts tend to creak and are not as effective.
Now you need to press the caliper cylinder, otherwise the caliper will not fit onto the pads, since the thickness of the new pads is greater than the old ones.
When he presses in, he dresses normally.
Now we screw everything back, lock the bolts and fix the brake hose in its place.
Replacing brake pads VAZ-2109 video instructions
Replacement of front pads VAZ 2110-…
What rear pads are installed on the VAZ 2109
The most common rear pads that car owners install are original VAZINTERSERVICE (VIS-Auto) brake pads. Article - 21080-3502090-55. The average price is 730 rubles. Such pads are good because they ideally match the model in size, composition and service life.
Among analogues, the most reliable manufacturers are:
- ATE - Germany (03013702312);
- TRW - USA (GS8210);
- FERODO - UK (FSB240);
- STS - Russia (11524-STS);
- EzATI - Russia (2108-3502090).
Brands ATE, TRW and FERODO offer a reliable composition of materials that does not damage the inner surface of the drum. The cost of such pads ranges from 800-1500 rubles. per set. Domestic manufacturers STS and EzATI produce overheat-resistant pads. They are worse in composition, but the price is more affordable - about 600 rubles. per set.
Replacing front pads
The minimum permissible thickness of the overlays is 1.5 mm. If you have any doubts that the thickness of the friction lining is within acceptable limits or its surface is oily, or there is a suspicion that the friction lining is not firmly connected to the base, be sure to remove, check and, if necessary, replace the pads. The linings should not have deep grooves or chips.
When installing old pads, replacing the inner and outer pads with each other, as well as between the left and right wheels, is unacceptable.
This may result in uneven braking. The surface of the friction linings should not be oily, have deep marks or chips.
The pad must be firmly connected to the base of the block. If, during the next check, the thickness of the linings approaches the minimum permissible, then such pads are still functional, but their service life will soon expire.
Choose for yourself to either immediately replace the pads or constantly monitor their thickness.
Brake pad sets must be replaced on both sides of the vehicle at the same time.
The piston must be pressed into the cylinder carefully so that it does not warp.
To do this, install both worn brake pads (it is better if only one base remains from the inner one) and the caliper housing in place.
Using a large screwdriver or pry bar, carefully move the piston, pushing down on the inner pad and resting on the brake disc.
If the brake fluid level in the reservoir is at or close to about 0, then pump out some of the fluid from the reservoir. Otherwise, it will overflow when installing new pads.
Front pad replacement process:
1. Brake the car with the parking brake and install thrust blocks under the rear wheels. Raise and support the front of the vehicle. Remove the wheel.
2. Wash the brake mechanism with warm water and detergent and dry it.
Visually check the condition of the pads through the hole in the brake caliper housing.
Remove the rubber seal along with the hose from the bracket.
Use a screwdriver to bend the lock washer of the upper guide pin mounting bolt.
Unscrew the upper bolt securing the guide pin, while holding it by the hexagon wrench
Rotate the shackle body downwards around the axis of the lower pin
Mark your brake pads if you plan to reinstall them.
Remove the brake pads.
Check the thickness and condition of the brake pad friction linings.
Clean the brake parts from dirt and rust, especially the brake pad seats.
If you are installing new brake pads, press the piston into the cylinder.
Install new brake pads.
Make sure the pressure springs are parallel to the top edge of the brake pads.
Old pads must be installed in accordance with the previously made markings.
Turn the bracket body and tighten the upper guide pin mounting bolt with a torque of 31–38 Nm (3.1–3.8 kgf·m), while holding it by the hexagon wrench.
Bend the lock washer with a screwdriver
Install the wheel and lower the car to the ground
Then press the brake pedal several times to set the piston to the working position.
Check the brake fluid level in the reservoir and top up if necessary.
How to replace the rear brake pads on a VAZ 2109 yourself
Before starting to replace the brake pads on the VAZ 2109, we install support bars under the front wheels. Remove the rear wheel. The parking brake lever must be pushed down all the way. We clean the brake mechanism from dirt.
The minimum permissible thickness of the friction linings of the pads is 1.5 mm. It is prohibited to use gasoline, diesel fuel or any other mineral solvents to clean brakes. The pads are replaced on both sides of the car. It is not permissible to replace the front and rear pads between each other, as well as between the left and right wheels.
Unscrew the two guide pins.
Remove the brake drum. If there are difficulties with removal, screw two M8 bolts into the threaded holes of the drum and compress it, screwing the bolts in evenly.
Remove the upper tension spring using pliers.
We also remove the lower tension spring.
Remove the front pad guide spring.
Remove the front pad.
Pull out the expansion bar.
Remove the rear shoe guide spring.
Remove the rear shoe by disconnecting the drive lever from the end of the parking brake cable.
We also remove the rear shoe cotter pin.
and a support washer.
By pressing on your finger, remove the drive lever from the block. Remove the finger from the block.
We check the condition of the friction linings of the brake pads.
We replace them in the following cases:
- lining thickness less than 1.5 mm;
- the surface of the linings is oily;
- the friction lining is not firmly connected to the base.
The linings should not have deep grooves or chips.
We install new pads in the reverse order of removal. When installing, insert the upper toes of the pads into the grooves of the piston.
Before installing the drum, we bring the brake pads together with two pry bars in order to move the pistons to the center of the cylinder.
Problems when paying with bank cards
Sometimes difficulties may arise when paying with Visa/MasterCard bank cards. The most common of them:
- There is a restriction on the card for paying for online purchases
- A plastic card is not intended for making payments online.
- The plastic card is not activated for making payments online.
- There are not enough funds on the plastic card.
In order to solve these problems, you need to call or write to the technical support of the bank where you are served. Bank specialists will help you resolve them and make payments.
That's basically it. The entire process of paying for a book in PDF format on car repair on our website takes 1-2 minutes.
If you still have any questions, you can ask them using the feedback form, or write us an email at [email protected]
Methods for selecting new parts
Partial replacement will lead to uneven braking of the front part of the car, which will cause the car to drift away from a straight path on a dry road, and will lead to a skid on a wet road.
Below is a list of recommendations on which brake linings should be chosen in a store during a visual inspection of the products:
- With a flat plane adjacent to the working part of the disk. Small indentations and chips at the ends are allowed, the size of which does not exceed 1% of the area of the entire working surface.
- Products with a uniform surface, without obvious foreign impurities.
- No friction material cracks.
- The material should not peel off from the base.
- Products in high-quality packaging, accompanied by instructions for use.
It is quite difficult to figure out which pads are better by manufacturer due to the large number of the latter.
But there are brands whose products have been tested by VAZ-2109 users and can be recommended for use: