How drum brakes work
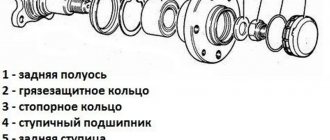
In addition to the pads and drum, the components of the devices in question include:
- working and main cylinders, inside of which the pistons are located;
- compression and return springs;
- spacers;
- racks for supporting brake pads;
- parking brake mechanism.
Lanos is equipped with rear drum brakes with two cylinders, the efficiency of which is higher than that of single-cylinder ones. Below is the appearance of a working brake cylinder with two pistons with its component elements, from which it is not difficult to understand how the mechanism works.
One of the main roles in the design of the working cylinder of drum brakes is played by sealing cuffs.
On what principle does a drum-type brake mechanism work?
The operating principle of drum brakes is simple, and it will not be difficult even for a beginner to understand the features of their functioning. In order to brake the rear wheels with drum pads, the following actions are performed:
- When the driver presses the brake pedal, the fluid pressure created in the master brake cylinder increases in the line.
- The liquid acts on the pistons of the working cylinders, which leads to their movement.
- The pistons press on the brake pads, which are in frictional contact with the inside of the brake drum.
- In this case, the speed of the vehicle decreases.
- When the brake pedal is released, the fluid pressure in the system decreases and the brake devices return to their original position due to their compression by springs.
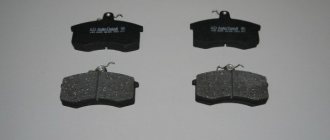
When inspecting the rear drum brake pads, you can find a picture where the friction layer on the front element (in the direction of travel of the car) has a greater level of wear than on the rear. This is due to the fact that the front devices are pressed against the drum more strongly than the rear ones. And therefore, very often, when replacing pads, owners do not replace them as a set, that is, 4 pieces, but one on each side.
The Chevrolet Lanos is equipped with two independent braking systems: service and parking.
The first, equipped with a hydraulic drive, provides braking when the car is moving, the second brakes the car when it is parked.
The working system is dual-circuit with a diagonal connection of the brake mechanisms of the front and rear wheels.
One circuit ensures the operation of the right front and left rear brake mechanisms, the other - the left front and right rear.
If one of the circuits of the service brake system fails, another circuit is used to stop the vehicle with sufficient efficiency.
The hydraulic drive includes a vacuum booster and pressure regulators in the hydraulic drives of the rear brakes.
The parking brake system has a cable drive to the brake mechanisms of the rear wheels.
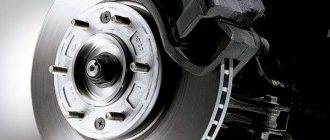
The front wheel brake mechanism is disc, with automatic adjustment of the gap between the pads 1 (Fig. 9.1)
Rice. 9.1- Front wheel brake:
1 — brake pads; 2 — brake caliper; 3 — pad guide: 4 — brake disc: 5 — caliper guide; 6 — air release valve; 7 - brake hose
and disk 4, with a floating bracket. The movable bracket is formed by a caliper 2 with a single-piston working cylinder. The 3 shoe guide is bolted to the steering knuckle. The movable bracket is bolted to guide pins 5 installed in the holes of the shoe guide. The guide pins are lubricated with grease and protected by rubber covers. A piston with an o-ring is installed in the cavity of the wheel cylinder. Due to the elasticity of this ring, an optimal gap is maintained between the pads and the ventilated disc, the surface of which is protected by the brake shield. When braking, the piston, under the influence of fluid pressure, presses the inner pad against the disc; as a result of the reaction force, the caliper moves on the fingers and the outer pad is also pressed against the disc, and the pressing force of the pads is the same. When the brake is released, the piston is moved away from the pad due to the elasticity of the sealing ring, and a small gap is formed between the pads and the disc.
Main brake cylinder 1 (Fig. 9.2)
Rice. 9.2. Main brake cylinder with pressure regulators in the hydraulic drives of the rear wheel brakes and a reservoir:
I - main brake cylinder; 2 — reservoir of the main brake cylinder; 3 — tank plug with brake fluid level sensor; 4 — connecting sleeves; 5 — pressure regulators in hydraulic drives
The tandem type hydraulic brake drive consists of two separate chambers connected to independent hydraulic circuits.
The first chamber is connected to the right front and left rear brake mechanisms, the second - to the left front and right rear.
A tank 2 is installed on the main cylinder through rubber connecting bushings 4, the internal cavity of which is divided by partitions into three compartments. Each compartment supplies one of the brake master cylinder chambers and the clutch release master cylinder.
When you press the brake pedal, the pistons of the master brake cylinder begin to move, the working edges of the cuffs cover the compensation holes, the chambers and the reservoir are separated and the displacement of brake fluid begins.
A brake fluid level sensor is installed in plug 3 of the reservoir. When the fluid level drops below the permissible level in the instrument cluster, the brake system malfunction warning lamp lights up.
Vacuum booster (Fig.9.3),
Rice. 9.3. Vacuum booster
installed between the pedal mechanism and the main brake cylinder, during braking, due to the vacuum in the engine intake pipe through the rod and piston of the first chamber of the master cylinder, it creates additional force proportional to the force from the pedal.
A check valve is installed in the hose connecting the vacuum booster to the inlet pipe. It maintains vacuum in the booster as it falls in the intake pipe and prevents the air-fuel mixture from entering the vacuum booster.
Pressure regulators 5 (Fig. 9.2) installed on the main brake cylinder adjust the brake fluid pressure in the rear brake mechanisms during braking, eliminating the possibility of advanced locking of the rear wheels. This is achieved by proportionally reducing the pressure in the hydraulic drive of the front wheel brakes.
The ratio of pressure values in the front and rear working cylinders at different values of pedal force is given in table. 9.1
Table 9.1 Ratio of pressure values in brake hydraulic circuits supported by pressure regulators
| Pressure in the working cylinder in front of it, MPa | Pressure in the rear working cylinder, MPa |
| 0,5 6,0 10,0 | 0,5 3,7 – 4,1 4,8 – 5,4 |
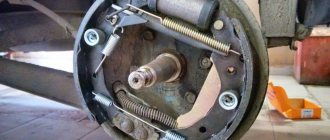
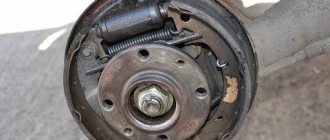
The brake mechanism of the rear wheels is drum, with automatic adjustment of the gap between the shoes and the drum. Brake pads 1 and 11 (Fig.9.4)
Rice. 9.4 Rear wheel brake:
1 - front brake pad. 2 — brake mechanism shield; 3- spring of the clearance adjuster lever; 4 — support posts; 5 — clearance adjuster lever; 6 — gap adjuster; 7 — upper tension spring; 8 - working cylinder; 9 — spacer bar; 10 — release lever for parking brake drive; 11 — rear brake pad; 12 — parking brake cable; 13 - lower tension spring.
are driven by one hydraulic working cylinder 8 with two pistons. The optimal gap between the drum and the pads is maintained by a mechanical adjuster 6 mounted on the spacer bar 9.
The parking brake, actuated mechanically, consists of a lever installed on the base of the body between the front seats, a front cable with an adjusting device to which two rear cables are attached, as well as release levers 10 (see Fig. 9.4) installed in the brake mechanisms of the rear wheels If a break in the sheaths or wires of the cables is detected, they must be replaced with new ones. The hydraulic brake system is integrated into a single whole by metal tubes and hoses. The system is filled with a special brake fluid of at least DOT-4 class, which must be replaced periodically. The procedure for replacing brake fluid is described in section. 4 “Maintenance” (see “Replacing brake fluid in the hydraulic drives of brakes and clutch release”, p. 66) Checking the brake system is described in section. 4 “Maintenance” (see First maintenance (TO-1), p. 47)
Useful tips
The working stroke of the brake pedal with the engine running should be approximately 60 mm. Too small a stroke indicates incorrect installation of the brake pedal, improper adjustment of the vacuum brake booster or jamming of the working cylinder, causing increased fuel consumption and accelerated wear of the brake pads. Too much stroke is a sign of excessive clearances in the pedal mechanism or a leak in the hydraulic brake system. If the stroke decreases when the pedal is pressed repeatedly, i.e. it becomes “harder”, there is air in the system. If the pedal's full travel begins to increase, the system is leaking.
If the brake pedal always vibrates when braking, the brake discs are most likely warped. Unfortunately: in such a situation they only need to be changed, and both at once.
If the car starts to pull to the side when braking, check the working cylinders: they may need to be replaced. If there is a knocking noise in the front suspension that goes away when braking, tighten the caliper mounting bolts.
After replacing the brake pads, be sure to press the brake pedal several times before driving to ensure that the pistons in the working cylinders are in place.
Brake system
…
Bleeding the hydraulic brake system
The hydraulic brake drive is pumped to remove air that got in when it was filled with fluid after replacing it or after repairing hydraulic drive units associated with its depressurization. Signs on...
Other on the site:
Starting from an external battery (“lighting up”) If the battery is low, you can use the battery of another car to start the engine.
Any wrong action will result in battery explosion, injury and failure. Moreover, elect... Replacing muffler assemblies (resonator or muffler) Marks on the muffler pipe 1 – muffler pipe; 2 – resonator; 3 – connecting sleeve; A, B, C – marks on the pipe The muffler assembly is a non-separable unit, but if necessary it can be ...
Removing the drive shafts PERFORMANCE ORDER During assembly, you will need a new hub nut, as well as a replacement nut for the ball joint pinch bolt of the lower suspension arm. 1. Remove the decorative wheel hub/wheel cap, with...
What are the advantages and disadvantages of drum brakes?
A very interesting question that many car owners ask. First, let's list all the advantages of drum brakes:
- simplicity of design;
- low cost of maintenance and repair;
- high operational efficiency, which is associated with a large contact area.
However, the mechanisms also have some disadvantages, due to which they are becoming less and less popular. Disadvantages of drum brakes include:
- Poor cooling performance, which affects the wear rate of not only the friction linings, but also the drum.
- Unstable braking, which manifests itself when water or various contaminants get inside.
- There is a high probability of the pads sticking to the drum when the parking brake is applied during frosts.
Disadvantages also include the complexity of the pad replacement process. To do this, you need to disassemble the structure, which consists of a spacer, as well as tension and extension springs. With disc brakes, the replacement process is much easier and faster.
Which rear brake drum to choose for Daewoo Lanos?
| Manufacturer | vendor code | price, rub. |
| Original | ||
| GENERAL MOTORS | 96193771 | 3200 |
| Analogs | ||
| Blue Print | ADG04702 | 2300 |
| Japan Parts | TA-W01 | 2500 |
We install the part analogue from the manufacturer JapanParts (Italy) with article number TA-W01. Spare parts from this manufacturer have good quality characteristics. If it is not possible to supply an original part, then it is better to choose Japan Parts .
To lubricate the bearing and fill the wheel hub, we use universal lubricant for components and mechanisms.
Tools for work
- Jack or car lift;
- 27mm spanner wrench ;
- 19 mm hex head ;
- Press;
- Pneumatic impact wrench;
- Cotton rag ;
- Pliers.
How to Determine the Need to Replace Drum Pads
Drum-type pads have a fairly high service life, which depends on various factors. The main one is the quality of the products. Low quality products can become unusable after just a couple of thousand km. High-quality devices usually require 2-3 replacement periods for front disc pads. This is why owners of cars with drum brakes are less likely to wonder how to replace rear brake pads.
80% of unevenly worn devices must be replaced
To determine the degree of wear and the need to replace the rear pads on the Lanos, you will need to carry out a visual inspection of them. This can be done through the inspection hole on the support disk. However, you should not rely on it, since it will not be possible to measure wear through it. That is why the second option is used. To do this, you should dismantle the drum and, armed with a caliper, measure the friction layer. The manufacturer recommends replacing drum pads on Lanos if the outer layer is already less than 0.5 mm.
This is interesting! It is strictly contraindicated to allow complete wear of the friction layer, as this will lead to accelerated wear of the drum, as well as its deformation and overheating.
Signs of wear on the rear brake pads on Lanos, Sense and Chance include the following factors:
- A squeaking sound in the rear when braking, which does not guarantee that the cause is wear on the friction layer. However, it is imperative to disassemble the mechanism and find the cause of the creaking.
- The handbrake does not hold - if over time the parking brake force disappears, and attempts to tension the cable do not help, then this indicates a high probability of wear on the pads.
- When braking, the rear end pulls to the side, and skidding occurs on slippery roads.
- Contact with the friction layer of various aggressive substances, which not only affect the degree of braking, but also contribute to accelerated wear of the devices. These substances include not only oils, but also brake fluid. It can get on the friction layer due to a violation of the integrity of the rubber cuffs. As a result, the working cylinders leak, which not only reduces braking efficiency, but also contributes to accelerated wear of the friction linings.
- Increased braking distance, as well as uneven and jerky deceleration of the vehicle.
The average service life of drum brakes is 70 thousand km. There is no need to talk about exact numbers, because conditions such as the nature of driving, operating conditions, and the absence of exposure to negative influences must be taken into account.
This is interesting! Having decided after diagnostics that the rear pads on a Lanos car need to be replaced, you should resort to implementing this process. However, first we will consider the issue of choosing quality products for Lanos, Sens and Chance.
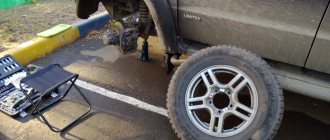
Replacing brake pads on the rear wheels of a Chevrolet Lanos
We replace the pads in case of maximum permissible wear of their linings or the rear wheel brake drum. The pads also need to be replaced if the linings are oily, have deep grooves and chips on them, or if the linings are detached from the base of the pads. The minimum permissible thickness of the overlays is 0.5 mm. The maximum permissible inner diameter of the drum is 201 mm. The brake pads of the rear wheels must be replaced only as a set - all four pads. Replacing the pads of only one brake mechanism can lead to the car pulling to the side when braking. We show replacing the pads on the left rear wheel. The brake pads of the right rear wheel are replaced in the same way. We remove the wheel.
Choosing the best options for rear drum pads for Lanos, Sens and Chance
Lanos offers many options for rear pads from different manufacturers. However, such products differ not only in cost, but also in quality. Let's consider the options for rear pads for Lanos, which should be preferred:
- Hi-Q - many people choose products from this particular brand, as they are quite reliable and have a long service life. Catalog number SA055.
- ATE are expensive German options that have article number 03013702672. They are rarely chosen, because their cost is quite high.
- Metelli is a product of an Italian brand. For Lanos, products are selected that have the number 53-0309. They are distinguished by high quality and reliability.
- NK (Brake Shoes) - have number 2736540.
It is necessary to choose high-quality and, most importantly, not cheap pads, because your safety depends on them, and you cannot save on this.
Conclusion
Replacing the rear brake pads of a Chevrolet Lanos is a little more difficult than replacing the front ones. But at the same time, it is more than possible to change the elements yourself. Particular attention should be paid to the choice of pads, because braking efficiency depends on them.
Quite a lot has been written about the Lanos braking system. The main way to radically improve the brakes of this car is to install rear disc brakes from Vectra, replace calipers and front discs with 256 mm (from Lanos 1.6) and install a GTZ with a diameter of 22 mm (also from Lanos 1.6). The method is good, correct but expensive.
An easier option is to replace the brake force adjusters with 3/40 units. Cheaper, but also less effective.
A free way to modernize the brake system is to remove fungi from the regulators, i.e. in this mode, the pressure in the front and rear brakes is the same, because The regulator doesn't regulate anything anymore. I think this modernization is wrong and I will never do it myself, but this is only IMHO.
However, let's get back to the topic. It all started when I bought myself 3/40 adjusters, a set of new brake hoses and decided to paint the brake drums. Read more about all this here.
Having thrown off the drums, I discovered this sad picture - the adjuster bracket for the distributing block flew out of its place, and on different sides the regulators were in different positions. Actually, hence the difference in braking along the axle and the handbrake, which held only one wheel and then very weakly.
You put the bracket back, put the drum on, press the brake several times (about 20), but it still comes off. The reason is a stiff spring.
How to adjust the tension of the handbrake cable on Lanos, Sens and Chance
After carrying out the procedure for replacing the rear brake pads on a Lanos, you will need to adjust or tighten the handbrake.
Let's move on to directly adjusting the cable tension. It is important to know that this must be done only after the rear pads on both sides have been replaced.
- The handbrake cable is tensioned from inside the cabin. To do this, use a key set to “10” to tighten the adjusting nut in the passenger compartment. The tension is checked by rotating the rear wheel, which should not wipe. As soon as you feel that the wheel is rubbing against the pads, you need to loosen the nut 1-2 turns.
- Next, check the number of clicks of the handbrake. The handbrake is considered to be correctly adjusted when, at the first click, there is slight friction between the pads and the drum. At the second click, the wheels are locked and you can turn them, but with great effort. On the third click the wheels cannot be turned.
- The handbrake tension should be checked regularly, because on Lanos the pads are involved in the braking process of the car, so they wear out quickly. And accordingly, if now the adjusted handbrake functions well, then after 5-10 thousand it may not “hold” the car at all.
Lanos, Sens and Chance cars use drum-type rear brakes. They are less efficient than disk ones, but their serviceability affects the safety of the vehicle. At the first sign of a malfunction of the rear brake mechanism, in particular when the pads are worn, they should be replaced immediately.
Replacement process
To replace the rear brake pads of a Chevrolet Lanos, you need to prepare tools. For work you will need: a jack, a wheel wrench, pliers and a flat-head screwdriver. When everything is prepared, you can proceed directly to the process:
- Engage 1st or 3rd gear at the gearbox.
- Place wheel chocks under the front wheels.
- Raise the rear of the car, where the pad will be changed, using a jack.
- We dismantle the wheel.
We remove the wheel. Using a chisel and hammer...
Remove the cap from the brake reservoir.
...press out the protective cap of the wheel bearing.
We dismantle the top cover of the brake drum.
Use a screwdriver to straighten the cotter pin...
We move the working piston inward and fix it in this position.
...and use pliers to remove it from the trunnion hole.
We squeeze the sliding parking brake levers inward.
Using a 24mm socket, unscrew the castle nut of the hub bearing.
Compress the spring and unhook the handbrake cable.
Remove the lock washer. Before removing the brake drum, lower the parking brake lever all the way - the car must be released.
Turn the pressure spring a quarter. In this case, it is worth holding the support stand.
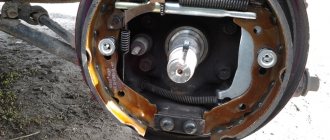
Remove the brake drum assembly with bearing. Do not press the brake pedal after removing the brake drum, as the pistons may come completely out of the wheel cylinder. We clean the brake mechanism parts from dirt. Do not use gasoline or diesel fuel to clean brake parts.
Now, you can remove the cup, spring and support post.
Remove the brake drum assembly with bearing. Do not press the brake pedal after removing the brake drum, as the pistons may come completely out of the wheel cylinder. We clean the brake mechanism parts from dirt. Do not use gasoline or diesel fuel to clean brake parts.
All operations described below must be done with the second block in the same drum.
Using a screwdriver, disconnect the front end of the upper tension spring from the lash adjuster lever earring and remove the spring. We move the upper stops of the brake pads away from the pistons of the wheel cylinder.
By stretching the upper spring, we remove the pads from the slots.
Remove the shackle of the clearance adjuster lever.
Now, stretch the lower spring and remove the pads from the restrictor plate.
Remove the slack adjuster lever along with the spring.
Next, we dismantle the pads along with the springs.
Remove the spacer bar assembly.
We unhook the springs from the pads, first the upper one, and then the lower one.
Please note that the ratchet nut of the spacer bar, the shackle and the adjuster lever of the right brake mechanism are silver, and the left mechanism is black. The threaded tip of the spacer bar is marked: RH - for the right mechanism; LH - for the left mechanism. Before installing new pads, it is necessary to reduce the length of the spacer bar by screwing the ratchet nut all the way onto the threaded end. After installing the brake drum, tighten the rear wheel bearing nut and adjust the bearings. Adjust the position of the brake pads. To do this, press the brake pedal 10–15 times.
- If necessary, add fluid to the brake reservoir.
- Wear of the friction part. It can only be seen if you take the drum apart. According to the manufacturer's recommendations, the friction part should not be less than 2 mm.
- If brake fluid gets on the linings, it also leads to replacing the pads.
- The friction part is cracked, chipped or chipped. This indicates that the pad needs to be replaced.
Before using the handbrake, right in the garage, it must be gently pulled and released several times. This will help the new pads adjust.
Causes of malfunction
The causes of rear brake pad failure are no different from the front ones. But it’s worth dwelling on them to know them: