The automobile generator is equipped with a rotor with a commutator unit, which allows the excitation voltage to be supplied using carbon moving contacts. When parts burn or wear out, the functionality of the power source is impaired. Checking and replacing generator brushes does not require the use of special tools and is carried out by the owner independently.
Who can help with problems with the starter?
Of course, if you are a jack of all trades, then you can diagnose the starter yourself and replace the brushes. What to do if you find yourself far from home, for example, on a section of the road from Zhukovsky to Moscow, you stop on the road in the Lyubertsy region, and your car does not want to start normally. There are no brushes or necessary tools at hand. If you don’t want to create problems for yourself in bustling Moscow, stop by the Start-Motors auto repair shop on the way, located at 29 Yubileinaya Street and see what’s wrong with the starter.
A quick and accurate diagnosis of the starter will be carried out by professional technicians in a car repair shop. They will not rush and remove the starter from the car. By disconnecting the wires from the terminal, it can be directly connected to the “plus” of the battery. The engine started working - the problem is in the start relay . The engine is silent - the whole problem is in the brushes.
Dismantling the starter
The procedure for removing the starter on most modern cars is as follows:
- The battery is dismantled (you don’t have to remove it, but this will make it possible to work more freely with the starting device);
- Remove the air filter, also due to freedom of access;
- Now the through bolts securing the starter are easily accessible.
The starter is secured mainly with three bolts. One retainer is located at the very bottom of the starter, it is more difficult to reach, and the bolt differs in size from the other two (usually 13M).
It is much easier to unscrew the upper starter clamps. You can use a ratchet wrench.
- The engine protection is removed;
- The spacer between the air manifold and the cylinder block is unscrewed, otherwise it will interfere with dismantling the starter;
- Then the bottom bolt is pulled out;
- The starter can now be removed from its seat.
After dismantling, it would be advisable to recheck the starting device directly through the battery. To do this, it is connected with its terminals to the positive and negative outputs of the battery. If the starter does not respond, then you should turn the device, thereby the brushes that have come out of their seats will fall into place and the starter will most likely start.
However, this is not an axiom. Starters with completely worn brushes, as a rule, do not react in any way to a current pulse, no matter how you turn them.
How to determine brush wear?
The experience of a technician is the best assistant in determining a starter malfunction in an auto repair company. Wear can only be determined by turning the starter motor. In one certain position the starter works normally, in another it is silent and contact is lost. This is explained by the presence of a gap between the worn brush and the commutator. In a worn state, the brush is pressed against the collector slip rings only under its own weight; as soon as it moves away a little, the contact disappears.
Sometimes the starter does not work correctly when brushes of normal length are skewed or stuck; in this case, it is enough to correct them. The malfunction may be a loose harness from one of the brushes. As a consequence: due to the increased load current, the second brush may burn out.
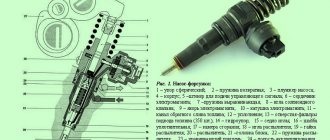
Rice. No. 1. Malfunction in the form of a copper strand unsoldered from the brush
How to replace generator brushes
A car generator is designed to convert the mechanical energy of rotation of the engine crankshaft into electrical energy.
It performs two main functions: recharging the battery and powering the vehicle's power supply systems with generated electricity.
Along with the rotor and stator, the housing of the alternator also contains a brush assembly, a voltage regulator and a rectifier unit.
Brushes are the most vulnerable element of the generator. At the moment of their contact with the slip rings, the rotation speed of the generator shaft reaches 12-14 thousand rpm, which causes accelerated wear of the contacting surfaces. Timely replacement of generator brushes helps prevent damage to the brush assembly and ensure uninterrupted power supply to the vehicle while driving.
Generator brushes: what function do they perform?
When in contact with the slip rings located on the rotating rotor shaft, the generator brushes transmit current from the battery to the rotor field windings. This is how an electromagnetic field is created.
Under the influence of the alternating magnetic field of the rotating rotor, an electromotive force is induced in the coils of the stator windings and an alternating electric current is created. The current passing through the diode bridge (rectifier block of the generator) is converted into direct current. This is exactly what is needed to recharge the battery and ensure the functionality of the car’s electrical equipment.
When to change brushes: main signs
It is recommended to replace them as they wear out, but at least once every 4 years (or upon reaching a mileage of 50 thousand km).
However, under difficult operating conditions, critical wear of brush rods made of graphite or its compounds with copper (bronze, aluminum) may occur earlier than the specified period.
The brushes should protrude by at least 5 mm (the norm is 8-10 mm). This indicator is the most important - by measuring the length, you can understand whether there is a problem.
Several symptoms may indicate that your brushes need replacing, including:
- lack of starter response when turning the ignition key to the ON position - this can happen if the rods are skewed and there is no sufficient contact with the surface of the slip rings;
- slow rotation of the engine flywheel by the starter;
- reduced power of interior lighting, weak or flashing headlights, side lights;
- sudden shutdown of electrical appliances;
- rapid discharge of the battery, after which it becomes almost impossible to charge it.
We recommend: Mini air conditioner in a 12 volt car - true or a scam?
To determine the cause of disturbances in the operation of the generator, it is necessary to accurately diagnose the malfunctions of the generator and, in particular, the brush assembly.
How to check generator brushes?
The brush assembly is usually combined with a voltage regulator. Contact with the rotor slip rings is carried out due to the force of the springs.
A malfunction of the generator brushes can be easily determined by visual inspection (sign: the length of the protruding ends is less than 5 mm). You also need to check the diameter of the slip rings (the norm is 14.2-14.4 mm, the minimum is 12.8 mm).
The presence of workings on contact surfaces is not allowed. Worn slip rings need to be replaced.
Advice
Problems with the generator can also arise due to increased brush resistance, which should be no more than 0.5 ohms. You will have to replace the brushes if, when checking, the multimeter shows increased resistance.
However, given that in most modern cars the brush assembly is combined with a voltage regulator, generator problems can be associated with a malfunction of the relay regulator, designed for a voltage of 15 V and a current of up to 5 A. For diagnostics, measurements with a multimeter are used.
When the engine is running, the voltage at the battery terminals or at the generator outputs should be in the range of 14-14.2 V. A voltage change of no more than 0.5 V is allowed.
If the fluctuations are more significant, this is a sign that the relay regulator is faulty and must be replaced.
It is also useful to check the voltage regulator.
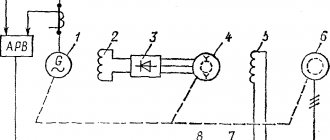
To do this, assemble a circuit that combines, using wires, an adjustable power supply, a light bulb, a voltage regulator with a brush assembly, and a multimeter (voltmeter).
The power supply and multimeter are connected with correct polarity to the contacts of the voltage regulator. The light bulb wires are attached to the brushes. By turning on the power supply, voltage is applied (from 3 V), the light comes on.
With a gradual increase in voltage and upon reaching 14 V, the light should go out - this indicates normal operation of the regulator.
How to change brushes on a generator?
You can replace it without removing the generator - just remove the voltage regulator along with the brush assembly. Before this, you should disconnect the generator from the power supply (disconnect the negative terminal from the battery).
After this, unscrew the clamping nut and remove the voltage regulator with the brush holder. If the wear is critical (the offset is less than 5 mm), the brushes (graphite rods) will need to be replaced.
Here's how they do it:
- disconnect the contacts (unsolder the wires) and remove the old brushes, clean the soldering area, check the elasticity of the springs;
- install a new set into the brush holder, solder the contacts;
- check the free movement of the brushes in the brush holder;
- install the brush assembly in place and secure it with a nut.
Sometimes the solution may be simpler: perhaps the contact between the brushes and the rotor rings was broken due to the former sticking. The reason may be mud or graphite deposits, which can be easily removed by blowing contaminated areas with compressed air.
Diagnostics of the starter and replacement of brushes
Even the most experienced auto mechanic can disassemble the starter and replace the brushes. In a car repair shop, they usually do not limit themselves to the usual replacement of brushes; at the client’s request, they perform starter diagnostics .
Starter diagnostics are performed as quickly and accurately as possible.
The Start-Motors auto repair shop guarantees its work; its craftsmen carry out any repairs with full responsibility and are attentive to maintaining their reputation.
Along with replacing the brushes, the starter armature is checked; this is done due to the fact that if there is poor contact between the brushes and the lamellas, carbon deposits appear. 1. The presence of conductivity between the collector lamellas of the armature is checked. 2. The armature is checked for a short circuit of the winding to the housing. Using an ohmmeter, check the presence of conductivity between the collector lamellas and the armature core. 3. Soot that appears from poor contact of the brushes with the surface of the commutator is cleaned off with sandpaper, usually No. 400; sometimes it may be necessary to grind the commutator on a lathe.
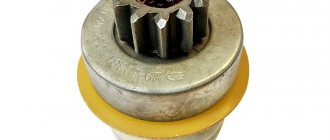
Rice. No. 2. A commutator with carbon deposits and a “burr”, which hastened the failure of the brushes
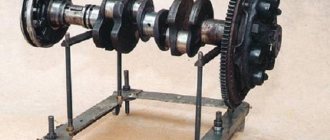
4. After cleaning the commutator, the armature is installed on the prisms and the runout of the commutator is checked. (The permissible radial runout of the commutator is 0.05 mm. If the commutator runout is large, you need to turn it on a lathe). 5. After this, the technician will check the diameter of the collector. 6. There should be no contamination in the form of graphite from old brushes in the grooves between the commutator lamellas. 7. Using an ohmmeter or tester, you need to verify the continuity of the circuit between the wire terminal and the brush wire. Otherwise, you will have to change the starter housing assembled with the stator winding. 8. There should be no conductivity between the stator winding and the housing. Otherwise, the starter housing assembly with the stator winding is replaced. 9. The brush holder is installed on the anchor in a certain position. 10. Using a screwdriver, the brush spring is pressed out, the brush is connected to the brush holder. A total of 4 brushes need to be changed.
Rice. No. 3. Block with brush holders
Important: The (+) wire of the brush must not touch the ground.
How to check visually, using a light bulb or multimeter
The simplest and most effective way to check generator brushes is visual.
To do this, dismantle the brush system. In this case, it is not necessary to completely dismantle the generator from the car. In many cases, the brushes can be removed without removing the alternator from the vehicle. To do this, it is enough to free access to the rear panel of the generator, then dismantle the brush system or the electronic voltage regulator, if it is structurally combined with the brushes.
We recommend: Black carbon deposits on spark plugs, causes
Next, measure the remaining length of the brushes (size A in the example) extending beyond the fastening area. It should be at least 5 - 7 millimeters.
In the case of a combined design with a small residual length of the brushes, it is necessary to determine the nature of the repair:
- You can replace the brushes separately from the relay regulator. To do this, it is necessary to disassemble the structure. Sometimes this is technically impossible. In any case, the repair will cost about 600 rubles, plus about 400 rubles for the cost of two brushes. Brushes should be replaced in pairs;
- The cost of a voltage regulator starts from 1,200 rubles, so in most cases it is more profitable to change the entire design. This will leave a spare regulator, which may be useful later. It can be repaired slowly, independently.
You can check the generator relay with brushes using a load light.
You can use any salon light bulb as a lamp.
Separately, the generator brush can be checked using a multimeter by measuring the resistance between the copper terminal and the working surface of the brush. The resistance should be less than 1 ohm, and should not change when the copper lead moves.
Checking brush springs
The main thing when checking springs is tension. The check is performed using a steelyard. The tension of the springs is measured at the moment they are lifted from the brush.
- Nominal spring force of type 1 brushes - 14 - 18 N
- The minimum tension of brush springs of type 2 is 9 N.
After all checks and assembly, the starter is ready for use. The auto repair shop will carry out any most complex repairs, because in the auto repair shop’s warehouse there are brushes for any foreign car. Algorithm of action of specialists:
Starter diagnostics Determination of malfunction Replacement of faulty structural elements provides a guarantee for the supplied starter. - 6 months
will carry out any, even the most complex repairs of the car starter and generator .
So does the starter need to be lubricated?
On numerous forums on the Internet, there are different opinions on whether certain parts of the starter need to be lubricated. It’s worth saying right away that the planetary gearbox can be generously lubricated. By doing this you will only contribute to its normal operation. For this purpose, it is better to use: from expensive lubricants LIQUI MOLY Thermoflex or RAVENOL Arctic Green Grease AGG2, from cheap ones - “Litol 24”, graphite lubricant, CV joint lubricants. Also, the choice should be based not only on price, but also on operating temperature.
As for the gearbox shaft, it is better to use the above-listed Molykote 3400A Leedfree, Molykote BR 2 Plus, graphite lubricant, Castrol LMX, Ciatim 201. The choice again depends on price and temperature conditions.
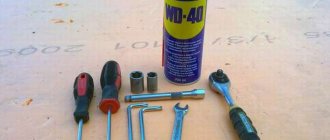
Some car enthusiasts use WD-40 as a lubricant. However, we do NOT recommend that you do this, since this product is not inherently a lubricant and can damage the starter elements.
There is an opinion that it is necessary to lubricate the copper-graphite bushings on the armature axis. Actually this is not true! Their normal sliding is facilitated by graphite, which is powder applied to their working surface. As you know, graphite is excellent for gliding. At the same time, dirt does not accumulate on it.
Regarding the question of how to lubricate the starter solenoid relay and its armature, there is a recommendation not to lubricate it at all. The fact is that the lubricant in this place collects various dirt on itself, forming a dense mud layer, which undoubtedly harms the normal operation of the Bendix. And if this same lubricant thickens in the cold, then this will be all the more harmful for the mentioned elements of the starter and threatens emergency operation until it completely fails.
What's the result?
Thus, the selection of lubricant for the starter largely depends on the operating conditions of the machine. In particular, it depends on the frost in which she drives. The main thing is that the lubricant is always of normal consistency. Also, do not forget to do a preventive inspection of the starter every 40...50 thousand kilometers or every 2 years and lubricate its shaft and planetary gearbox. But lubricating the shaft where the bendix moves or the solenoid relay not only makes no sense, but is also harmful. Copper bushings are also included in the list of non-lubricated parts, but are only subject to wear control.
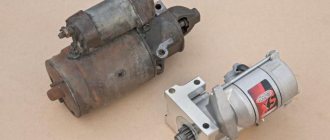
How does the VAZ Ten starter work?
Domestic “tens” are equipped with a starter unit with number 5702.3708, which is essentially a DC electric motor. One of the main components of such a device is a traction relay, as well as a planetary gearbox. The motor is excited by the action of permanent magnets installed inside the unit structure. The body of the mechanism itself is made of steel; it is connected using two pins to the covers of the device.
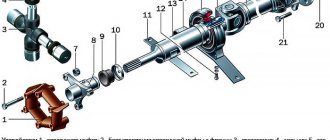
Designation of the component elements of the device
Also, the design of the starter unit implies the presence of an armature and a stator. The armature is designed to carry out rotation in metal-ceramic liners, as a result of which the rotation is transmitted through a gearbox to the device drive. When the driver turns the key in the ignition, voltage from the car's battery is transferred to the relay windings. As a result of the influence of the magnetic field, the armature is first retracted, causing the gearbox gear to mesh with the flywheel. Accordingly, this leads to the closure of the contact bolts inside the structure.
Then the armature itself remains in the same state, it is fixed in this way with the help of a holding winding. When you turn the key in the ignition switch, this winding is de-energized. Ultimately, this contributes to the fact that the armature returns to its original position (the author of the video is Avtoelectrica HF).
Features of the node device
Now we suggest finding out what parts of the starter the design includes. The design of a car starter is useful for any motorist to know, especially if you independently repair your car.
So, what elements does the design include:
- Frame. As a rule, it is made from a cylinder. The housing includes a core with field windings.
- An anchor made in the form of a shaft with seating surfaces for bearing parts. Typically these elements are made of steel alloy. In the center of this element there is a core with collector plates.
- Front starter cover covering the structure.
- Starter fork.
- Solenoid relay designed to transmit voltage to the winding of the unit and ensure the ejection of the overrunning clutch. The relay is also equipped with a jumper and contacts.
- Bendix or overrunning clutch. This part is necessary to transmit torque to the flywheel and disengage the gears after starting the engine.
- Starter brush holder. The starter brushes perform the function of supplying voltage to the armature plates. This unit allows you to increase the power of the electric motor as a whole, especially when performing the main task.
- Starter rotor. Its axis rotates on special bushings, that is, plain bearings. As you know, starter bushings are not permanent parts, so the bushings need to be changed from time to time. As a result of wear on the bushings, the current that passes through the windings cannot be converted into mechanical energy. In addition, wear of the bushings can provoke the appearance of extraneous sounds that are not characteristic of the normal operation of the mechanism. Before installation, new bushings must be treated with lithol.
- Starter button. If your car is equipped with a button, you can start the engine without using a key.
Disassembly
You can clean the brush properly only by disassembling it into parts. All you need to do for this:
- remove the nozzle from the telescopic pipe;
- Unscrew the fasteners located on the inside;
- Divide the nozzle into two halves.
Some models of Samsung vacuum cleaners are equipped with collapsible brushes.
They can be divided into two parts by pressing a special latch located on the nozzle body. You will have to tinker a little with the turbo brush (a distinctive feature is a rotating shaft with bristles covering the dust collection area).
In order to disassemble the turbo brush of a Samsung vacuum cleaner, you need to carry out a number of sequential actions:
Using a flathead screwdriver, carefully pull out the rubber wheels.- Unscrew all the fasteners connecting the two parts of the nozzle (two outer bolts, two central bolts and two bolts located in the opened niche of the dismantled small wheels).
- Carefully open the housing halves and remove the caps covering the moving roller bearings.
- Remove the cleaning roller from the housing.
In order for the reassembly process to proceed without hitches and errors, the brush must be photographed before disassembly.
Diagnostics
How to find out that the prerequisite for the problem was specifically worn starter brushes of the 2109, 2110 VAZ model? First, you need to make sure that there is no break in the electronic circuit of the device. Check whether the connection of the wires to ground is secure. If everything is fine with them, take an insulated wire and connect the positive terminal of the starter to the positive terminal of the battery. Don't forget to turn the ignition into neutral before doing this. If there is a problem in the wiring, the starter will work and start the engine.
If this does not work out, the starter will have to be dismantled for the upcoming diagnostics.
Soldering Brushes with Silver at Home. Welding Toyota Starter Brushes Using Homemade Spot Welding
Watch to the end, soldering in 2 stages! It is possible to replace the starter brushes yourself, even at home. To do this, you need to have: new brushes, a silver product (I used a ring flattened with a hammer), a spot welder or a welding machine, or even a 12-volt battery with wires and terminals will do.
Watch to the end, soldering in 2 stages! How does a starter fail? The car will not start in cold weather. Doesn't start the first time. Starts in one go. If it doesn’t want to, it won’t start at all. One fine day you leave the house, insert the key into the ignition, the starter turns and that’s it. There was a smell of burnt wiring. It is useless to heat and light a cigarette.
This means that the starter winding has burned out, in addition to the worn brushes. Here you either rewind the winding or buy another stator. I decided to buy it because it would take a lot of time to find the wire. They sell quickly and without problems only in coils. And this is not expediently expensive. You can solder the brushes with a watch spring, but silver, in my opinion, is better.
Since it fills the stranded wire and the solder area completely! I hope my video helped you. After all, I had to suffer to come up with a simple and quick way out of the situation. Everything was done for the first time and experimentally, however, a month and a half passed and the flight was normal. 1- The car started always the first time, including from the key fob.
Source: https://thewikihow.com/video_0PGzxT_VJpo