How to replace starter brushes on a VAZ 2107
The brushes on the starter can also wear out and cause unit failure. In this case, they need to be replaced. On cars of the “classic” family, starters are slightly different from each other. But there won't be much difference in replacing the brushes. It will be necessary to either remove the back cover under which they are located, after unscrewing a couple of bolts. Or unscrew just one bolt, which tightens the protective bracket, under which the brushes are located:
And this is what it looks like after:
There are a total of 4 brushes here, each of which can be removed through a separate window. You just need to unscrew one bolt securing it:
And then, squeezing the spring clip, pry it off with a screwdriver, and it can be easily removed:
All the others are removed in exactly the same way, and they all need to be changed at once. Installation is carried out in reverse order.
American connecting chips
Many American standards differ from European ones, and trailer hitch socket pinouts are no exception. Here are two types for your reference: 7 and 4 pin connectors.
The 7-pin socket, used in the HOPKINS model range, as well as in other cars (Fig. 8), differs from the European standard practically only in design, which allows, if necessary, replacement with a European analogue.
American 7-pin towbar socket
Designations:
- Connecting side lights.
- +12 V.
- Starboard turning lights.
- Brake light control.
- Weight.
- Turning lights on the left side.
- Reverse signal.
Now let's consider a more complex option - a 4-pin connector (see Fig. 9). If you try to replace it with a European 7-pin socket, problems will arise.
4 pin connector
Designations:
- Weight.
- Control of side lights.
- Left side turn signal and brake light control.
- Starboard turn signal and brake light control.
As you can see, the difficulty is due to the fact that the turn signals and brake lights are controlled along the same line. There are two ways to solve the problem:
- Not entirely correct, but the easiest way: connect directly to the stops and turn signals. Note that in some cars the wiring may not withstand the additional load, so it is better to solve the problem in another way.
- This option is somewhat more complicated, but more correct: you need to completely extend the wiring under the European connector. For example, in a Chevrolet Tahoe, to do this you need to remove the instrument panel, find wires with separate signals for the turn signals and brake lights, connect to them by stretching the electrical wires from the towbar socket through the entire interior of the car. You can make the task a little easier if you take the signal for the brake lights from the rear fender; it is displayed there on almost all cars. In this case, you only need to pull two wires.
The main problem that car owners face when connecting a trailer is malfunctioning lighting equipment. Even if the socket and plug connectors are completely identical, the side lights, turn signals, or brake lights may not light or work correctly. This is due to differences in the standards used by manufacturers for electrical wiring.
There are several basic schemes for connecting a trailer to a towbar, depending on the number of socket contacts and country standards. In Russia, the most common are 7-pin (European and American) and 13-pin connectors. If the vehicle is not equipped with an electronic control unit, the socket contacts can be directly connected to the installed wiring.
| Towbar socket | Trailer fork |
For pinout, it is recommended to use stranded copper wire in double insulation with conductors with a cross-section of at least 1.5 sq. mm, for grounding - 2.5 sq. mm.
| Contact no. | Code | Wire color according to GOST 9200-76 | Color of some trailers (Ukraine) | Purpose |
| 1 | L | Yellow | Green | Left turn signal |
| 2 | 54G | Blue | Red-white | Fog lights |
| 3 | 31 | White | Black | Negative (grounding) |
| 4 | R | Green | Yellow | Right turn signal |
| 5 | 58R | Brown | Rose red | Right clearance |
| 6 | 54 | Red | White-blue | Brake lights |
| 7 | 58L | Black | Black and blue | Left clearance |
Features in the connection diagram of the MZSA trailer plug: power is not supplied to pin No. 5, and both side lights and license plate lights are shorted to connector 7. If the right marker does not work, you need to move the black wire from socket 7 to 5 in the towbar socket or perform the reverse procedure in the plug. You can also close connectors 5 and 7 with a jumper.
13 pin trailer connector wiring diagram
| Towbar socket | Trailer fork |
Use double-insulated stranded wire with a cross-section of 1.5 sq. mm for the main signals, and 2.5 sq. mm for grounding and power pinouts.
| Contact no. | Wire color | Purpose |
| 1 | Yellow | Left turn signal and emergency lights |
| 2 | Blue | Fog lights |
| 3 | White | Ground (minus) for terminals 1-8 |
| 4 | Green | Right turn signal |
| 5 | Brown | Right clearance |
| 6 | Red | Stop signal |
| 7 | Black | Left clearance |
| 8 | Pink | Reverse |
| 9 | Orange | Power supply 12 V (35 A) directly from the battery |
| 10 | Grey | Power supply 12V (35A) with ignition on |
| 11 | Black and white | Grounding for No. 10 |
| 12 | White-blue | Spare socket (reserve) |
| 13 | Red-white | Grounding for No. 9 |
In some car models, even if the trailer connector connection diagram is strictly followed, the on-board computer may generate an error (due to increased load on the network). In this case, it is necessary to additionally install a smart connection (coordination unit).
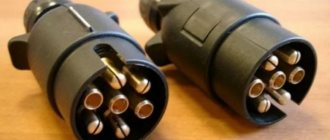
Pinout of 7 pin towbar socket
The pinout of a trailer socket (from the English pin - “pin, leg”) is a wiring diagram of electrical connectors necessary for independently connecting a trailer to a car. The connection is required to ensure the safe operation of non-self-propelled trailers. The connection is made using a socket (located at the towbar) and a corresponding plug connected to the trailer wiring. Using connecting connectors, it is possible to combine the electrical circuits of technical equipment: the electric current supplied from the vehicle will operate the turn signals, side lights and license plate lights of the trailer. You may also need a smart connector that coordinates the vehicle's wiring with the trailer (on some modern vehicles with electronic control circuits).
7 to 7 socket connection diagram
The most common connection scheme at the moment is with a 7-pin “plug” (“European” connector). It is used when connecting most trailers for passenger cars. The connection diagram is shown below:
Please note: the receiving and responding parts of the device have both types of sockets (“male” and “female”). This solution is a guarantee of safety when connecting a round connector in poor visibility conditions: the relative position of the sockets eliminates the possibility of their incorrect connection or short circuits
Connectors are sold in any car dealership, and for their connection they use multi-core copper cables with different wire colors. For safe and long-term operation, it is recommended to coat the contacts with grease or lithol, and treat the place where the cable enters the socket with sealant.
Pinout of 7-pin towbar socket in passenger car trailers
To synchronize the light signals, it is necessary to pin out the 7-pin trailer socket and connect it to the vehicle's electrical wiring. The optimal locations for the socket location are technological openings for changing lamps (they have access to the sockets). If the towbar is equipped with a socket box to which all signals are output, it is enough to buy a 7-pin “plug”, connecting it in accordance with the connector diagram indicated in the instruction manual. This method is called standard. Otherwise, use a universal connection method: the wiring is connected directly to the signal circuits if there is no on-board computer in the car. The wires coming from the connector are connected to the electrical circuits of the rear lights.
Universal trailer connector connection method and pinout
To connect in a universal way, using the towbar connector, alternately connect the wire of the left turn signal of the car with the left turn signal of the trailer, the rear fog light of the car and the fog light of the trailer, etc.
Carefully study the machine's wiring diagram to accurately find the necessary circuits (use a tester to check). When connecting the wires through the towbar connector, use crimp clips or solder the wires after stripping the insulation. To connect to a car with an on-board computer, you need not only a 7 pin trailer plug, but also a matching unit - a device that is connected to the on-board circuit and is not perceived by the computer. Even with increased current consumption due to the operation of the trailer's lighting equipment, the on-board computer will not indicate malfunctions.
7-pin trailer socket pinout: important features
A simplified diagram for connecting a 7 to 7 socket involves independently determining the routing of the wires, and the greatest difficulty is determining where the corresponding conductors are connected. It is strongly recommended not to do this at random, connecting the connector contacts of the caravan in series with the indicator lamp - in the presence of digital circuits for controlling lighting devices, this method is unsafe.
Before connecting, check the electronic circuits in the trailer connector for rotted wiring in the area of soldering and contacts, and for short circuits in areas of rubbing elements. After this, draw up a routing diagram indicating the colors, methods and locations of wire connections. If electrical connections are located outside the cabin, they should be covered with heat-shrinkable cambric (special insulator), and upon completion of work, check the electrical connections with a multimeter, making sure there are no short circuits.
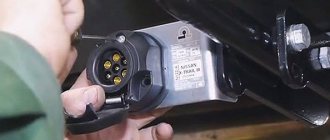
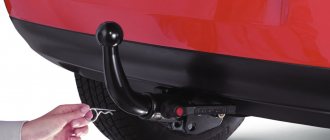
What is a towbar socket
The towbar socket is a connector with electrical contacts that is used to connect the trailer to the vehicle. It is located near the towbar, and the corresponding plug is connected to it. Using a socket, you can safely and correctly connect the electrical circuits of your car and trailer.
Towbar socket
When connecting an outlet, the term “pinout” is used (from the English pin - leg, output). This is the pin layout for proper connection.
Materials for connecting the tow bar
We go to a car store or car market and buy the materials necessary for installation and connection:
socket housing for towbar with cover and rubber sealing ring
We pay attention to the normal fit of all parts of the housing, the absence of play or the pressed brass contacts dangling in the sockets, we check the threads and the condition of the fastening screws on the terminals. polypropylene or metal corrugated hose for insulating wiring harnesses - 2-3 meters, and a couple of dozen plastic mounting clamps for fixing wiring harnesses. silicone gasket, choose color and manufacturer to suit your taste.
Direct connection diagrams
This type of connection is used when there is no standard terminal block in the car. In this case, the wires are connected directly to the rear light harness. To facilitate installation, you can use connectors equipped with plug connectors for mating with optics. On the other side of the device there are wires for connecting to the mating part of the device.
Before connecting the towbar socket, you need to determine the location of the connectors. They are connected to the lighting equipment through technological cutouts intended for replacing lamps, and the harness is brought out through a drain in the bottom of the trunk. In some cases, the connection diagram for a socket on a towbar involves soldering wires. Such connections are more durable.
If you plan to combine two contacts, for example, the dimensions of the right and left sides, then the common output wire must have a cross-section of more than 2 mm², because the load on it will increase. You can purchase the necessary components in a store or at a car market. You should not buy home-made connectors and connectors, because... this is fraught with the occurrence of a short circuit with further fire of all wiring.
The procedure for carrying out electrical installation work when connecting the towbar socket
1. First stage of work: determining the connection diagram, the need to use a matching unit, choosing the type of connector
.
If at the time of installing the trailer connector, the latter is not yet available, or you do not plan to buy it at all, and you intend to use only rental equipment, it is recommended to immediately install a 13-pin universal connector.
Video - why a 13-pin socket for a towbar is preferable in some cases:
In this case, using a 13/7 pin adapter, you can connect a regular cargo trailer without any problems.
There is, of course, the opposite option - a 7/13 adapter, but some of the user connections, including for charging the battery, will have to be made outside the connector, which is very inconvenient.
If you have a car built before 2000, you may not need to install a matching unit. In this case, the rating of the fuses serving the turn signals and rear lights should be increased by 25%.
2. Next, it is imperative to check all electrical circuits in the trailer connector
(if available).
This can only be avoided if you are using a rental trailer; the lessor checks them and is responsible for their functionality and safety.
The most typical malfunctions of trailer electrical equipment:
- “rotting” of electrical wiring, especially in the area of connections, contacts, soldering;
- short circuits in the area of rubbing parts;
- failure of light lamps;
- large leakage currents associated with salt coating of roads and driving into bodies of water (boat trailers, especially on the sea coast).
3. At the third stage, a routing scheme is developed
(what wire, what color, what section, where it goes, how it goes, where it connects, what it connects to, and, finally, how it connects).
In order. If the purchased trailer connector is equipped with conductors, there is no point in replacing them. Otherwise, you should select conductors in exact accordance with the colors and sections shown in the figures above.
The most difficult thing is to determine the path of the wires from the connector into the luggage compartment so that it is invisible, the conductors cannot be damaged during operation and cause a short circuit, and the seal of the cabin is not compromised. In most cases, manufacturers provide a standard hole.
Connections can be (and are better) made using the standard method: stripping + twisting + soldering + heat shrink. All connections must be made at least with the ignition off. There is a connection option using special clips.
Such connections do not provide high currents and are not as durable, but in some cases they can be used when using cargo trailers.
For further actions you need a minimum set of tools and components:
- a set of plumbing tools for dismantling and installing interior elements during cable laying;
- a set of electrical installation tools, if necessary, a soldering iron, solder, flux;
- wires, electrical clips, self-tapping screws, casings, heat shrink, electrical tape, clamps;
- multimeter;
- control lamp;
- mirror (when installed alone).
4. Connection
. At this stage, you need to be as careful as possible; it is better to sign each connection first, and only then carry out the electrical installation.
Electrical connections outside the car must be “dressed” with heat shrink (a cambric that shrinks in size when heated with an industrial hair dryer can be used with a lighter).
5. Check. At this stage, using a multimeter, the absence of short circuits is determined and electrical connections are made. Only after this can you turn on the ignition and test all functions.
If the on-board computer provides information about errors in the operation of electrical equipment, most likely, the use of a coordination unit when connecting a trailer for your car is mandatory.
Connecting the towbar socket to the car
Before connecting the towbar socket to the car, you need to make sure that its body, cover and plug are sealed. To do this, pour water over this part and see if there are any leaks. If the structure is not airtight, then the weak points will need to be treated with silicone after the final stage of installing the tow bar.
The outlet itself is connected in two ways:
- Standard. In this case, no changes are expected to the vehicle's electrical system. If the trailer and trailer hitch have the appropriate connectors, then a circuit for such a connection is not required - you just need to insert the socket into the socket.
- Universal. In the case when we are not talking about standard equipment, but about an additionally purchased towbar or trailer, a more complex connection is most often required.
If everything is clear with the standard version, then there are two options for connecting the tow bar to the car wiring using a universal method.
Option 1
This method is suitable for situations where the car does not have a modern control unit, which makes it possible to connect the wires directly to the electrical circuit. This means that the wiring coming from the connector is connected to the wires of the rear light elements.
To do this, you first need to refer to the trailer socket connection diagram, which can be found in the accompanying documents and instructions. Next, the socket itself is connected in the area where the car’s rear light harness block is located. Most often, in this place you can find a special technological window provided by manufacturers in order to simplify the procedure for replacing damaged light bulbs.
Healthy! In this case, you must have an extra wire for the second turn signal.
To connect the outlet this way, you can use crimp clips or simply strip the insulation from the wires, connect them and secure them by soldering. It is also worth considering that in order to connect everything correctly, it is better to arm yourself with a wiring diagram of the machine.
Option 2
If you are the owner of a modern foreign car, then most likely it has complex electronic components installed that will not allow you to connect the trailer using the first method. The fact is that the installed control unit constantly monitors the optics located in the rear of the car. As soon as more current consumption begins in this area, this will be perceived by the system as an error.
To avoid this problem, an additional element is used, which is called a matching block. This device is connected to the car’s standard electrical system, and it becomes a kind of intermediary, allowing the signal to be seamlessly transmitted to the light elements of the trailer.
Healthy! The control unit simply will not “see” the additional element, and accordingly the driver will not receive any error messages.
If you do not want to buy a matching unit, then you can use a little trick - use a relay. By and large, it will serve as a control element that supplies voltage to the side lights of the trailer. The relay can also be installed for brake lights and fog lights (if installed).
We recommend: Automatic headlights
Once you have connected the trailer and checked that all systems are working properly and the lights are on, be sure to protect the internal components from moisture. Silicone is used for “gaps”, and to protect the contacts from oxidation it is recommended to treat them with graphite lubricant.
Schemes of various types of sockets
On domestically produced cars, 7-pin electrical connectors are most often installed. They ensure the transmission of all signals from the vehicle to the BTS. If you need to connect a trailer instead of a cargo trailer, then use a 13-pin socket. For electrical wiring (pinout), double-insulated stranded wires with a core cross-section of at least 1.5 mm² are used. To protect the tourniquet from damage, it is placed in a corrugated sleeve.
7-pin socket pinout
If the car does not have a standard connector for connecting a trailer, then install a socket purchased in a store on a special plate near the towbar. In this case, pinout is done in a universal way. To do this, the wires are directly connected by soldering to the corresponding terminals of the contact blocks of the rear lights.
The pinout of the 7-pin socket is as follows:
- 1 — left turn;
- 2 — fog lamp;
- 3 - “mass”;
- 4 — right turn signal;
- 5 — reversing lamp;
- 6 - brake light;
- 7 - side lights and room lighting
On some European vehicles, the rear fog lamp contact may not be activated.
Control signals from the direction indicators are removed from both sides and connected to the socket using different wires. The indication of the rest of the lighting equipment can be taken from one block of rear lights.
13-pin socket pinout
Most imported cars are equipped with standard 13-pin connectors. If the car does not have a towbar, then in most cases a 7-pin socket is installed. When one of the vehicles has a 13-pin socket and the other has a 7-pin plug, the connection is made using an adapter.
Unlike the 7-pin socket, the 13-pin socket additionally has 3 ground pins, and 2 supply power and 12 V from the battery. 1 pin remains unused. Lamps of dimensions are powered through different conductors: each on its own side.
To install a towbar on a Chevrolet Niva, a standard set of wires with end connectors are used, which are connected directly to the contact chips of the rear light optics.
15-pin connector pinout
This type of coupling device is used to connect towed vehicles to the towing vehicle in most countries around the world. Through the connector, not only a signal is received from the turn signal and brake light, but also feedback is transmitted to the truck driver about the state of the brake systems and some BTS mechanisms are controlled. Otherwise, the pinout is similar to the 13-pin socket. These electrical connectors are only used on heavy truck tractors.
Types of connection diagrams
There should not be any difficulties in connecting a Kurgan trailer or the same MZSA with a VAZ 2110. Everything is our own, original, and therefore simple, provided by the manufacturer.
But situations are different. Some require a special adapter adapter, others need to adjust the wiring itself and determine which wiring goes where. Supposedly incompatible trailer hitches and machines can in fact be connected. But this is quite difficult to do.
There are several important points to consider:
- If the machine is used to connect to different caravans from different manufacturers, it would be logical to install a pair of 7-pin sockets;
- For Russia it is not very convenient and easy to select a “company” for 13-pin sockets;
- Depending on the model, series and year of manufacture of the car, they may have differences in terms of pinout. It happens that side lights are output to pin 5, although on another version they go to pin 7;
- Previous owners of used cars could well have done something weird and used their own special circuit to connect the trailer;
- You should always check the car's electrical circuit and consult official documents.
Not everyone has preserved their native documents. And then people turn to various forums for help, looking for answers on the World Wide Web.
I'm not at all opposed to you reading my materials. But some issues require individual consideration. That’s why I invite you to ask them in the comments, and I try to answer everyone.
For trailers connected to vehicle towbars, I have special recommendations.
How to avoid falling asleep while driving at night: 15 useful tips
Category: Instructions
Contact the manufacturer. Or go to a good, trusted electrician. Moreover, it is not necessary to go to the office of the company that produces the car or trailer. Everything can be found on official resources. Such information is completely true, and therefore you will not find errors common in the recommendations of supposedly skilled people. Electrics are a very important component of a car. Any mistake made when connecting incorrectly can even result in a short circuit and damage all electrical equipment.
I very much doubt that anyone wants to face this. Follow this simple advice.
Pinout options
At first I thought that I would describe to you in detail where each contact is on the socket, where it goes and what it is intended for.
But now they understand that the idea is pointless. It will only confuse you even more and drive you into a dead end. We need to do it much simpler. Visual examples are the best option. I will prepare for you several images showing the essence of typical pinouts on sockets of towing coupling devices. They should not act as the basis for your own connection. Remember, only official documents and manufacturer's instructions. Each machine may have its own characteristics.
Well, let's start with the good old domestic cars. This is where we most often see trailers.
In the case of domestically produced machines, the standard pinout looks something like this.
Nothing complicated. But the situation with European cars. The differences are minor, but they are there. Therefore, consider what kind of car you have at your disposal.
There is already a 13-pin monster here. In fact, there is nothing particularly difficult in connecting, but still the difference of 6 contacts makes itself felt.
As you can see, each standard scheme has its own characteristics. Connecting a trailer to a car is more than just connecting two plugs. Sometimes you have to rack your brains here. And in order not to break it, you can turn to good specialists. For example, to us.
Connector Types
The most widespread for passenger car trailers both in Russia and abroad - primarily in Europe - are 7-pin (7-pin) and 13-pin (13-pin) connection schemes.
On domestically produced trailers, as a rule, a 7-pin connector
, therefore, along with the towbar, it is reasonable to purchase a corresponding socket with seven contacts.
13-pin connector
traditionally used in caravan trailers (campers), which require additional power for lighting and other consumers. In addition, original factory towbars of foreign cars are usually equipped with a 13-pin socket.
However, if you happen to have a foreign car with an original towbar with a 13-pin socket, and the trailer purchased from our company has a 7-pin connector, then this is not a problem - there are adapters
, both for connecting a 7-pin trailer plug to a 13-pin socket, and vice versa.
The USA, Japan and Australia have their own standards and, for example, the American one, in addition to the physical difference in the connectors, of which there are several standard sizes, there is an important nuance - in some cases, power for the turn signals and brake lights is supplied through the same wires. Therefore, if you have an “American” one with an original connector, it makes sense to completely switch to a European connector, adding the necessary relays or matching unit.
What connector do you have? Here's a flat one
Here's a round one
The difficulty is that the turn signals and stop signals go through the same wires. To install a “European” connector, there are two options: 1) The simplest, but somehow illegal option is to use the wires of the “American” connector. (In Tahoe, they are usually attached to the left inside the rear bumper) This is an option for those who do not use trailer You can choose: place the stops and flashing lights on the trailer stops (red lights will flash) or on the turn signals (orange stop) or duplicate both.
2) Complex, but correct option: Completely extend the wiring under “Europe”. Using the Tahoe as an example: you need to find “clean” turn signals and brake lights by removing the instrument panel and using three relays (since these wires are not power) pull them through the entire interior to the tow bar.
Stop, in principle, can be taken from an additional brake light
On Americans, the ground wire is usually white, unlike Europeans.
Well, heaps of European (standard)
socket
fork
No. Code Signal Wire 1 L left turn 1.5 mm2 2 54G 12V ((+) option) 1.5 mm2 3 31 Ground (-) 2.5 mm2 4 R right turn 1.5 mm2 5 58R right marker and number plate illumination 1.5 mm2 6 54 stops 1.5 mm2 7 58L left dimension 1.5 mm2
The transportation boom that swept the country in the 90s led to an increase in the production of trailers. Traveling with motorhomes is popular, as are water modes of transport. This led to the creation of new prototypes of towing devices, which, like the trailer socket on the car, did not change their purpose.
Recently, the connection diagram for a passenger car trailer plug, due to its simplicity and implementation, did not raise any questions among car enthusiasts. In those days, testers with a load light helped to decide the pinout of single-color conductors. Although the current manufacturer uses color-coded conductors and drivers are armed with inexpensive Chinese multimeters, the diagram for connecting a trailer to a passenger car continues to gather opinions and facts.
The electrical wiring, hidden under the trim and the bottom of the trailer, is openly shown in a place called the towbar. Towards the tow, starting from the socket, it goes under the bumper and stretches to the battery, dashboard, light and signaling devices. In the direction of the towed device, starting from the fork, the wiring is secured with plastic or metal clamps on the drawbar and goes down to the trailer light panel.
It is impossible to say exactly where to start when assembling a road train. Switching nodes without permits is not a good idea, and undergoing maintenance without working lighting is also not a good idea. A missing light element may cause claims from the traffic police, and an incorrectly routed turn signal contact may lead to an accident. Initially, you need to delve into the connector standards and features, decide on your option, and then connect it correctly.
Tips and tricks
A simple 7 pin socket wiring diagram suggests that you need to determine the wire routing. The most difficult point is the need to determine where the conductors are connected. However, it is not recommended to search at random.
It turns out that it is better not to try to connect the trailer contacts in series with the indicator lamp. The fact is that if there are digital lighting control circuits, this method can lead to breakdowns and malfunctions.
It is also recommended that before making the connection itself, check the electrical circuits in the trailer connector (especially in the area of contacts and soldering). It is important that the contacts are not oxidized or rotted. The contacts are also checked for short circuits, especially in moving places.
At the end of the checks, you need to draw up a routing diagram, distributing the wires by color. You also need to decide on the method of connecting the wires, their connection points, etc. In cases where the connections are located outside the vehicle interior, heat shrink is used to protect and seal the connections. Once the wiring connection is complete, a final check is made with a multimeter to check for possible shorts or poor connections.
Chevrolet Captiva › Logbook › Connecting the towbar electrical... 7 or 13 contacts
When the need arises to transport a trailer, we are faced with the issue of installing a towbar and connecting an socket to connect the towbar’s electrics. If everything is more or less clear with the hardware, then questions arise with the electrical connection.
How to connect the towbar socket to the car's electrical system?
The socket can be connected in two ways:
standard; universal.
Application of the STANDARD method
This is only possible if the car has a socket for connecting the towbar electrics. In such cases, you won’t need a trailer connection diagram at all, you just need to purchase an original set of wires (we plug one end into the socket intended for it, and the other end ends with a towbar socket, install the socket and that’s it) Very often, the pinout of the towbar socket (provided that standard equipment is used) is present in the machine's operating instructions. This is an ideal option as it does not require any changes to the vehicle's electrical system.
But this is a rather rare option.
As a rule, a UNIVERSAL connection method is used.
UNIVERSAL method 1: The car is not equipped with a modern electronic control unit.
Thanks to this, electrical wires can be directly connected to existing electrical circuits. That is, the wires that come from the connector are connected to those connected to the rear lighting equipment.
UNIVERSAL method 2: The vehicle is equipped with a multiplex bus.
The control unit tests the rear optics. When it determines that it is drawing more current (as a result of the connection to the trailer optics), the driver will receive an error message. In such cases, a “matching block” should be used. The matching unit is connected to the standard electrical system of the vehicle, after which the unit itself transmits the corresponding signals to the trailer’s lighting equipment. The car's control unit does not “see” this device, so problems with connecting the towbar no longer arise.
Read also: What are screw compressors for?
When connecting the towbar electrics, we learn that there are various socket options for connecting the towbar electrics.
The most common types of sockets have 7 and 13 contacts. On passenger trailers for transporting various cargoes and equipment, 7-pin devices are usually used, but on house trailers 13-pin sockets are used. Essentially, the difference lies in the use of additional contacts necessary to activate the reversing lights and other electrical components of trailer houses (refrigerator, charging an additional battery, etc.)
7 pin socket pinout - Europe (DIN/ISO 1724)
1 Left turn signal 2 +12V (optional) or Rear fog light 3 Ground 4 Right turn signal 5 Right marker and license plate light 6 Brake lights 7 Left marker
13-pin socket pinout - Europe (DIN / ISO 11446)
1. Left turn (Yellow) 2. Rear fog light (Blue) 3. Ground for pins 1 to 8 (White) 4. Right turn (Green) 5. Left side marker and license plate light (Brown) 6. Brake lights (Red) 7. Right side of the dimensions and license plate lights (Black) 8. Reverse (Pink) 9. +12V from the battery (Orange) 10. +12V with ignition (Gray) 11. Ground for pin 10 (White-black ) 12. Signal wire (usually spare) (White-blue) 13. Ground for pin 9
Connection features
Now let's move on to how to connect the trailer using the towbar socket. Typically, when you purchase a towbar for your vehicle, it comes with a connection kit.
But it happens that you have to buy materials and tools separately. They are used to secure and connect the plug to the socket. Buying a set is not difficult, and the price is quite reasonable. I looked through various online stores in Togliatti, St. Petersburg, Moscow, and other large and small cities. I will say that the pricing policy is approximately the same level everywhere. I was guided by sockets from Bosal, because I consider the manufacturer to be optimal in terms of price and quality. If you decide to connect everything yourself, you can’t do without:
- mounting plate;
- fasteners;
- wiring kit;
- sockets;
- set of wrenches;
- drills and drill bits (if the car does not have a regular place for a towbar and socket);
- connection terminals;
- heat shrink;
- screwdriver;
- soldering iron;
- electrical tape.
Prepare approximately such a set so that in the middle of the work process you don’t have to run for missing elements.
In the absence of a special kit, try to choose a high-quality bracket, durable fasteners and a multi-core wire with a minimum cross-section of 1.5 mm2. Take strictly copper wires.
But there are two installation methods:
- standard;
- universal.
I’ll tell you about them separately. Photo and video materials will help you.
Standard
It is important to use it if the corresponding connectors are already provided on the towbar and trailer. They are connected as needed. Here it is important to understand what kind of wiring or pinout is used. Simply consult your vehicle's official owner's manual for assistance. This is described both on the Chevrolet Niva and on the more expensive and interesting Subaru Forester SH, for example.
Everything looks something like this:
- study the socket diagram, installation features and pinout of the trailer plug;
- find the block with the wiring harness in the rear light (the socket will be connected to it through the corresponding connectors);
- through a special outlet window, if provided by the car manufacturer, we pull the wires through;
- when connected, one wire remains, necessary for the second turn signal of the car;
- The wires are connected using clips or soldering.
See also
Tire markings: decoding of symbols
Follow the manufacturer's instructions strictly. Otherwise, the entire wiring of the car will be destroyed. I am not kidding. This is a responsible job.
Universal
This method is suitable for modern cars with an ECU. There is no standard way to do this.
The ECU is responsible for controlling the rear lighting. If you tamper with the wiring, the on-board computer will simply start giving errors or turn off all the car's lighting. It's sad when the lights don't work. And dangerous.
Therefore, buy yourself an additional coordination unit. A special device that is connected to the machine's electrical network. It sends the necessary signals to the rear optics, since the ECU is not capable of recognizing the trailer’s lighting equipment.
Then we follow the instructions of the standard method, connecting the wires of the trailer plug and the towbar socket to each other. Don't forget to carefully insulate the wires.
As you can see, the most difficult thing about connecting yourself is knowing the trailer connection diagram and the socket pinout. Make sure the trailer plug and socket are aligned. Or buy adapters.
Thank you all for your attention! I hope you'll subscribe, tell your friends about us, and leave some interesting comments!
Very useful tips
The headline may be loud, but in fact it is true.
All the diagrams presented above are intended for cars that do not have complex electronics.
But don’t forget that modern cars have come a long way. Modern cars have in their design such a device as an electronic control unit. When you turn on the ignition, the ECU goes into testing mode for all circuits in the car. When connecting a trailer, the load on certain lines increases. Your on-board computer, that is, the control unit or ECU, will perceive this as a breakdown. And as a result, you will constantly see an error. In such conditions, you should not count on normal operation of the trailer.
To correct this situation, you need a special adapter or module, whatever you call it. It is mounted as if in the gap between the elements in order to level out the parameters of the electrical circuit. It is called a matching block or, more modernly, Smart Connect.
As a result, we get something similar, as shown in the image below.
Finding a suitable matching block is not a problem at all. Nowadays there are a huge number of them available from different manufacturers. But I strongly do not recommend buying used modules or looking for them at various flea markets.
The blocks are selected based on what kind of trailer you have and the make of the car, as well as what towing device the car is equipped with. Otherwise, you may buy something incomprehensible that you will have to return and buy a normal connector.
An experienced auto electrician can connect everything without a diagram. A multimeter is used for this. But that's a completely different story.
(13 ratings, average: 4.77 out of 5)
Schematic electrical diagrams, connecting devices and pinouts of connectors
Connecting a towbar (truck trailer) is a simple procedure. Connecting a trailer to a car is really easy, but connecting the electrical to the trailer can already be a bit of a hassle. In such cases, you will need a wiring diagram for the towbar socket. And there are several types of connectors:
- seven-pin (7 pin) European-type connectors;
- American-type seven-pin (7 pin) connectors;
- thirteen-pin connectors (13 pin);
- special connectors.
The most common types of sockets have 7 and 13 contacts. In Russia, 7-pin devices are usually used, and 13-pin sockets can be seen on many cars from Europe and the USA. The difference lies in the use of additional contacts necessary to activate fog lights and other electrical components of caravans that are popular abroad.
Rules accepted throughout the world provide for the installation of left/right turn signals and stop signals on trailers for passenger cars. The connection diagram for a passenger car trailer socket depends not only on the number of contacts, but also on the standard of the country, so a trailer with European wiring cannot be connected to a socket with Russian wiring without modification. If you install it without modification, then the right dimensions of the BTS will not light up.
European and domestic wiring
On the trailer hitch itself, under the protective cover, there is a special platform - a towbar socket. Its connection diagram depends on the number of contacts. Typically, domestic cars use 7-pin sockets, while 13-pin products are more typical for foreign cars from Europe and the USA (American cars are also available with 7-pin sockets). By and large, the pinout of the towbar connector differs only in the presence of additional pins for activating the electrical components, which are installed not in ordinary trailers, but in full-fledged trailer houses. If we are talking about a standard device for transporting things, then the towbar connector is more suitable for it, the pinout of which will correspond to 7 elements.
We recommend: Transmission oil service life
Let's consider the European wiring option, where:
The towbar wiring is also connected according to the domestic scheme:
- Left turn signal (yellow).
- Fog light (blue).
- "Earth".
- Right turn signal (green).
- Free.
- Brake lights (brown).
- Side lights (black).
If the pinout of the towbar does not match the trailer (let’s say you plan to operate a domestic trailer by connecting it to a foreign car, or vice versa), then you just need to purchase an adapter and make the connection according to the diagram described above.
It's time to move on to practical recommendations on how to connect the towbar socket to the car yourself.