Benefits of using HBO
First, let's look at the advantages of installing fourth-generation gas equipment, and there are several of them, but they are important:
- Cost of gas (significantly less than gasoline);
- Consumption (in new generations of gas equipment, gas consumption is slightly higher than gasoline consumption);
- The gas contains no unnecessary impurities (which can be found in gasoline);
- Less deposition of combustion products inside the combustion chambers (affects the life of the power plant);
- When the car is fully refueled (with both gasoline and gas), the range will significantly increase.
With such a significant number of positive qualities, there is also a negative.
Disadvantages of using HBO
The first and noticeable disadvantage of the 4th generation HBO is the cost of the equipment; the higher the generation, the more expensive it is.
But even in this negative there is a positive quality of the equipment - it is universal, so by purchasing it, you can remove and install the equipment on different cars.
The second negative is the cost of installation, if you are sure that it will not be possible to install it yourself, as well as the quality of installation of the equipment.
And the third negative can be considered the advisability of using gas equipment in a car.
Since the equipment is not cheap, if the car is used rarely and for short trips, then installing an LPG will not pay off soon.
What are the advantages of gas
Many people ask why install HBO at all? After all, in fact, you have to drive with a gas cylinder in the car. This is oh so dangerous.
In fact, when it comes to professional installation of equipment in accordance with all safety standards and requirements, a gas cylinder is no more dangerous than a tank of gasoline or diesel fuel.
The cost of installation and the purchase of equipment itself is impressive if you want a truly high-quality device from famous brands. Therefore, it’s worth thinking about it, reading reviews and deciding for yourself whether you need gas.
I will tell you my personal opinion. It is important to install an LPG because the car is actively used. The same working Gazelle, which travels several tens of thousands of kilometers annually, will fully justify the costs and will save the owner money when compared with gasoline or diesel.
HBO allows you to save money only if the car is constantly in motion. I don’t see the point in spending 2-4 thousand dollars on modifications if the car spends 80% of its time in the garage and drives no more than 10-20 kilometers a day. It will take more than one year to recoup the costs of installing gas equipment.
So the main advantage is savings at gas stations. But it is conditional, as you understand.
Propane butane or methane
Another pressing question is what type of gas is best used for LPG? The answer is clear - propane-butane.
Yes, there are installations where the use of gas equipment is provided. If we take purely operational characteristics, then methane is not inferior to propane-butane.
We recommend: Why is the oil level in the engine low, what could be the consequences?
There is only one problem - lack of infrastructure. Finding a gas station with methane gas even in a large city is quite difficult. The majority of gas stations specialize in propane-butane. That's the whole trick of choice.
Features of HBO of different generations
So, it was decided to install HBO on the car. First you need to figure out which generation of equipment is best to use. It all depends on the car itself.
If a car uses a carburetor power system, then there is no particular choice - only 1st and 2nd generation gas equipment is installed on such cars.
Of course, there are craftsmen who install more modern equipment on such cars, but this is labor-intensive and expensive.
On injection cars you can install 2, 3 and 4 generations of gas equipment. Let's go through them.
HBO 2nd generation.
It is simpler in design, has mechanical control and adjustment.
This makes it possible to use it on many cars with both old and new injection power systems.
But this equipment has such a drawback as the lack of clarity in the dosage of gas supply, which often leads to its overconsumption.
HBO 3rd generation.
Already has a mechanism for precise dosing of gas supply. But the execution of the serve leaves much to be desired.
Equipment that is used as an alternative to the gasoline power system is significantly delayed in determining the amount of gas required at a certain moment in the operation of the power plant.
This drawback ensured a “short life” for equipment of this generation; it is now rare, and the feasibility of its use is a big question.
HBO 4 generations.
The most advanced equipment at the moment for use on modern injection cars.
And although gas equipment of the fifth and sixth generations already exists, at this time gas equipment of the fourth generation is the most popular and widespread.
Connected to the standard power system and using signals from the standard car power system control unit, the equipment performs a very precise dosage of the amount of gas required at a certain moment for optimal operation of the power plant.
List of equipment for installing gas equipment with your own hands
1
.
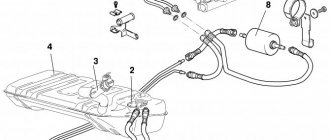
HBO kit. The choice of kit directly depends on the make of the car. The main set consists of wires, a computer, harnesses, hoses, valves, injectors, gas temperature sensors, pressure sensors and a reducer. In some cases, the equipment may differ. 2
.
Gas cylinder. When installing gas equipment, most motorists try to achieve compactness. To do this, you should use cylinders in the form of a torus. One of the most popular on the modern market is the Atiker cylinder, measuring 630 by 255 mm, holding 54 liters of blue fuel. 3
.
Multivalve. The package of modern multivalves includes the device itself, a remote system for refilling cylinders and tubes. 4
.
Gas level sensor. A device that connects to the computer of a gas cylinder installation. The main task of the sensor is to display the remaining fuel in the cylinders. 5
.
Universal programmer. Used to debug and configure the computer. 6
.
Computer and disk with setup instructions. On the disk you will find firmware, instructions and diagrams. 7
.
Injectors, harnesses. 8
. Set of tools.
This is a minimum list of equipment that will be enough to install gas equipment with your own hands. Depending on the vehicle, the cost of equipment may vary. In most cases, the amount depends on the brand, type, manufacturer, configuration and model of the cylinder. Installation of 4th generation gas equipment will cost approximately 20 thousand rubles.
Nuances of purchasing 4th generation HBO
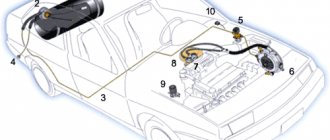
Let’s focus specifically on the 4th generation gas installation, and we will consider the sequence of installing it on a modern injection engine.
The basis will be an ordinary modern injection car with 4 cylinders and average power, since installing this equipment on a car with a large number of cylinders, or with increased power indicators has its own characteristics.
This choice is due to the massive use of cars with exactly these indicators, regardless of the brand.
We decide on the choice.
First you need to decide on the purchase of this equipment. All pieces of equipment can be purchased as a set, or individually. This has its positive qualities, as well as disadvantages.
Purchasing equipment as a set from a branded manufacturer will ensure high reliability of all elements, since they undergo quality certification.
And the installation of equipment will be easier, since the connecting elements and debugging of the equipment have already been completed. But purchasing the kit will cost much more.
By purchasing pieces of equipment separately, you can save a lot.
Many elements are common to all types of gas equipment, and their cost individually will be lower than in the kit.
But some elements of equipment are used only on installations of this generation. This includes a gas reducer, used only on the 4th generation of gas equipment, a gas train with electromagnetic injectors, an electronic control unit, and the sensors required for the operation of this equipment - gas temperature and pressure.
You need to purchase this equipment with a serious approach; it is better to overpay a little for high-quality equipment than to be disappointed in the future by the unreliability of its operation.
Having all the elements in hand, either as a kit or as an assembly, you can begin installation.
Of course, you can leave all this work to specialists, but you will have to pay. Or you can do everything yourself, which is cheaper and will give you the opportunity to fully understand how the equipment works.
Nozzle selection
Each gas equipment has its own characteristics, so it is important to select nozzles individually for each generation of gas equipment. Many motorists ask the question “Which injectors for LPG are better?” In the case of gas-cylinder equipment, this formulation is initially incorrect, because the proverb known to many applies to it: what is good for a Russian is death for a German. Naturally, the saying should be rephrased for gas equipment and understand that for one generation specific nozzles may be simply ideal, but not able to work with another.
Installation of cylinder, filling device, lines
Let's start with something simple - installing elements common to all gas equipment. Let's start with the balloon. Its installation location depends on the design features of the car.
If the car has a sedan body and there is a trunk of significant volume, then it is more advisable to use a cylindrical cylinder. Its capacity is greater; it is usually attached to the rear wall of the trunk.
If the car is a hatchback, it does not have much luggage compartment, so it is more advisable to install a toroidal cylinder in the place reserved for the spare wheel, if, of course, there is one.
The cylinder must be securely fastened. For this purpose, tapes with fasteners at the ends are used. It is desirable that these tapes have a rubberized surface.
To properly fasten the cylinder, you need to take measurements of where you will need to make holes in the body.
You will also need to mark the places where the high pressure line will exit from the cylinder. After which you will need to make holes in the body in the marked places.
After this, the holes will need to be treated with anti-corrosion treatment.
To further prevent damage to the line from the sharp edge of the hole, you can insert pieces of plastic pipe into it, through which you can then pass the line.
Although the toroidal cylinder fits into the seat of the spare wheel, it also needs to be secured to prevent it from moving.
Fastening is also done with tapes with preliminary preparation of the exit site for the highways.
In both cases of installing the cylinder, they should be installed so that the multivalve installed on it is located in the upper part of the cylinder, and there is easy access to the gas shut-off valve.
Next you need to install the filling device. The choice of its installation is extensive; it is only important to take into account that this place should not become heavily polluted during the operation of the car.
The device can be installed on the rear fender, in the body of the bumper, or under the bumper.
The main thing is to ensure that the line from the device to the cylinder is laid where it will not interfere and there will be no possibility of damaging it.
Let's move on to the highways.
The line consists of brass tubes that must run under the car and go into the engine compartment.
To prevent damage to the lines, it is better to attach them to gasoline pipelines, because they are installed where there is no possibility of their breakdown.
Installation process
For car enthusiasts who have ever carried out repairs and maintenance of VAZ-made cars with their own hands, the installation of equipment will not cause great demands.
The main thing is to follow all prescribed instructions and check the reliability of the connections made.
There is no specific algorithm for installing a gas system on a car; you can start either by inserting the injectors or by securing the cylinder in the passenger compartment or trunk.
The stages of work can be divided into:
- design (fitting connections, planning the placement of parts);
- rough installation (drilling holes, laying lines);
- gearbox installation;
- injector insertion;
- securing the cylinder;
- final installation (connecting all elements together, securely tightening nuts and bolts, checking for leaks);
- electronic pairing and setup
Injection insertion and ramp installation
Let's start with the most difficult part, with inserting the injectors into the intake manifold. To do this, you will need to disconnect the air filter, electronic chips from the throttle and other elements attached to the intake tract. To remove the collector itself, you need to unscrew the fixing studs (less commonly, bolts) and carefully pull the collector off the studs.
Once the manifold is removed, it is necessary to mark the holes for inserting the gas injectors. The distance from the adjacent plane of the cylinder head manifold to the insertion point can vary in the range from 1 to 7 cm. We select the insertion location with the largest diameter so as not to interfere with the normal air flow. Once the location for the injectors has been selected, the areas on the manifold that will need to be drilled should be marked.
The holes for the injectors must be drilled at an angle of 45-90 degrees in the direction of the air flowing into the engine. You should work with a drill at low speeds, and it is better to start with a small drill, and towards the end of drilling, replace the drill with a suitable diameter and drill the holes to the end
After drilling the holes for the gas injectors, take a tap and cut the thread. Now we thoroughly clean the intake manifold and install the injectors. Before inserting, it is advisable to use a thread locker and secure the nozzles to a locklight or clamp.
Now, depending on the fasteners, you should install the ramp. The mounting location can be on the intake manifold (most often) or on the valve cover (if convenient). To install, we repeat the operation of marking the marks, then simply drill out the landing grooves (it is IMPOSSIBLE to drill through the collector , as this will lead to its failure).
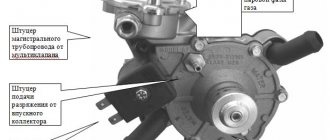
Gearbox installation
The gearbox can be placed almost anywhere. It should be placed strictly parallel to the movement of the vehicle, and the height of the location should not be very low or high. The optimal placement is just below the cylinder head valve cover.
Installing the gearbox is quite simple - we select a suitable mount, then drill holes on the car body and only after that install the gearbox .
It is advisable to treat the holes made with solid oil or pushsal, this is necessary to prevent the appearance of pockets of corrosion. During installation, it is imperative to use bushing washers in order to eliminate parasitic vibration and premature failure of the gearbox.
Installing the cylinder and pulling lines
The location of the cylinder depends on its type; toroidal ones are great for placing in the spare tire niche, and cylindrical ones are right behind the backs of the rear seats. There is nothing complicated in installing the cylinder - we select the optimal location and install the holding fasteners (in accordance with the instructions). If there is a valve on the cylinder, its outlet channel should be reliably isolated from the external environment with a sealant and led out into its nozzle.
To draw the lines, you will need to drill several holes in the trunk floor and run the tubes from the cylinder into them.
The line should be routed near the brake pipes. As practice shows, this arrangement is extremely successful.
Highways will rarely come into contact with the road surface. In the front part, “on the apron,” we also make mounting holes through which we “run” the line. As soon as the line is “stretched”, we fix its ends in the cylinder and reducer.
We recommend: Replacing the alternator belt tensioner pulley - you need to know this
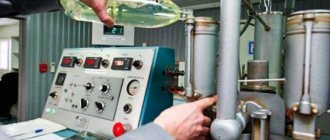
Electronics Testing and Calibration
It is better to entrust the adjustment of the electronic controller to specialists, since adjustment requires a lot of knowledge, experience and special equipment.
But checking connections for leaks is done by soaping all connections and visually checking for gas leaks; this can be done quite quickly and easily in a garage.
Features of gearbox installation
After running the lines into the engine compartment, they need to be routed along the left side to the gearbox installation site.
The gearbox must be properly secured to the car so that there are no problems in the future.
It is attached only to the load-bearing part of the car, that is, to the body or subframe. It is prohibited to install it on the engine. It is important that there is good access to it.
The gearbox is then connected to the cooling system of the power plant. To do this, it is inserted into the cooling system pipes through tees.
It is important that its insertion is parallel, that is, the flow of coolant into the gearbox should be made from one pipe, and its outlet through another, and not the same one.
Next, a vacuum pipe is connected to the gearbox. Vacuum is taken from the intake manifold.
A fitting cuts into it, and it is connected to the gearbox by a pipeline. If there is no fitting, you can wait to insert it for now.
After this, you can connect the high pressure line to the reducer. Only before this, a filter is included in the design to capture mechanical impurities - a “coarse” filter.
Gas train
Leaving the gearbox for now, we move on to the intake manifold. It will be necessary to insert gas fittings into it.
Since you will have to drill holes in the manifold, in order to prevent chips from getting into the valve mechanism, it is better to insert the fittings on the removed manifold.
You can, of course, make holes on the manifold mounted on the engine, but then you need to drill carefully to minimize the entry of chips.
We will assume that the manifold has been removed and can be drilled.
The holes for the gas supply fittings should be made as close as possible to the gasoline injectors, but at the same time take into account the position of these injectors so that they do not interfere with the installation of gas supply pipelines in the future.
Below are several options.
At the same time, a hole is drilled for the vacuum supply fitting to the gearbox.
The holes must be smaller in size than the diameter of the fittings. Then you need to cut threads in the holes.
Before screwing in the fittings, their threads must be lubricated with sealant.
After this, the collector is installed in place and further installation of equipment continues.
Next in the connection diagram is the installation of a ramp with electromagnetic injectors.
The ramp is installed at the top of the collector, but so that it does not interfere with pipelines and wiring.
Pipelines are laid from the ramp to the installed gas supply fittings. It is important to ensure that the length of the pipelines running from the ramp to the fittings must be the same, otherwise there will be a malfunction of the system.
Having installed the ramp, you need to lay a gas supply pipeline from the reducer to it. At the same time, another filter is inserted into the pipeline - fine gas purification.
Again, we return to the gearbox and connect the vacuum supply pipeline to it. All pipelines must be covered with clamps to prevent gas leakage at the joints.
This completes the technical part of the installation of gas equipment, let's move on to connecting the electronic part.
Do-it-yourself HBO installation video
The logical conclusion of the design of gas equipment on a car is injectors. They ensure the supply of fuel to the intake manifold of the engine. HBO injectors, despite the outlandish name, are designed very simply and are electromagnetic valves. We will talk in more detail about their design, the best manufacturers and other useful information about injectors in the article below.
Installation of the HBO control unit
The operation of the equipment is controlled by an electronic control unit, which comes with the 4th generation gas equipment.
Wiring to the control unit.
First you need to decide on the location of the block. Access to it should be free, but at the same time it is necessary to minimize the length of the wiring so that after connecting it, a heap of tangled wires does not form under the hood.
All wiring coming from the controller is divided into several parts, each of which performs its own functions.
The main thing is to have on hand a diagram with a color definition of which part this or that wire belongs to. Or at least this one.
Before connecting the wiring, you need to disconnect the on-board network from the battery.
First, you need to determine which wires are responsible for powering the unit. There should be three of them - to the positive terminal, to ground, and to the positive terminal of the ignition switch. Having separated them, it is better to immediately connect.
Wiring to injectors.
Next, we move on to the wiring responsible for the operation of the injectors - the fuel part. This wiring is connected to the wires going to the gasoline injectors.
After determining which wires are connected to each specific injector, they are inserted.
The color scheme determines which wire needs to be connected to which one, then the connection is made.
You can use conventional twisting followed by insulation, but such a connection is not reliable; it is still better to solder the wires from the control unit at the connection points and then insulate them.
For the fuel part of the wiring, all that remains is to connect the connectors back to the gasoline injectors, and also connect the connectors of the electromagnetic gas injectors.
The fuel part of the wiring is finished, let's move on to the next one.
Signal wiring.
Let's move on to connecting the next part of the wiring - the signal one.
This wiring is designed to transmit signals from sensors that come with the equipment - gas temperature and pressure.
The accompanying instructions indicate in which places the sensors should be placed. After installing the sensors, wiring from the control unit is connected to them.
Wiring for the operating mode switching unit.
The last part is the control of the operation of the control unit, that is, the unit for switching the operation of gas equipment.
The control unit is installed in the cabin, in a place accessible for viewing and control.
After which it is wired and connected.
It is advisable to collect all wires into bundles and secure them to prevent the possibility of accidental damage.
The control unit has one more output for connecting a computer, which regulates the operation of the equipment.
This outlet must be freely accessible to facilitate adjustment and diagnostic work.
At this point, the work on installing 4th generation gas equipment on the car is completed.
But what remains is checking the tightness of the system, and then checking and adjusting the operation of the equipment.
Wiring
The control unit is connected in accordance with the diagram supplied with this device. Usually there are 3 main wires coming from it:
- To the battery;
- To ground;
- To the ignition switch.
Having connected the unit to the power supply, move on to the injectors. These wires are connected to the wires that supply the gasoline injectors. Having determined which one goes where, a tie-in is made. It is advisable to check the color scheme when performing work. The wires coming from the pressure and temperature sensors are connected in accordance with the instructions. The last thing to connect is the HBO switching unit. The easiest way is to place it in the cabin.
Conclusion
. The last job is to check the tightness. To do this, fill the entire cylinder, drive into the inspection hole and lubricate all joints with soapy water. If there are no bubbles, then everything is fine. Now, knowing how to install 4th generation HBO with your own hands, you can do this work yourself. After completing all installation work, adjust the operation of the gas equipment using diagnostic equipment. This will improve the efficiency of use.
Checking the tightness of the system
So, the equipment is installed, you need to check the tightness of the system.
To do this, you need to go to a gas station and “blow out” the full tank. But at the same time, the gas supply valve to the system must be closed.
Then he goes to the viewing hole.
All connections and pipelines of gas equipment up to the gas train must be moistened with a soap solution before opening the supply. If gas passes through, this solution will bubble at the leak site.
The leak test can be done in parts. First, moisten the pipes coming from the cylinder with the solution.
Not only the connections are checked, but also the pipelines themselves, since a leak can occur due to a defect in the pipeline itself or in the event of a breakdown during installation.
After checking the lines going into the engine compartment, you need to check the tightness of the connections of the equipment installed there.
The gas supply to the reducer and the outlet from it to the gas train are checked. There is no need to check further until the equipment is connected to operation.
Connections downstream of the gas train can be checked later.
If the tightness test shows that there is no gas passage, you can proceed to the next step. If a leak is detected, for example, at the junction of pipelines with equipment, then the gas supply is shut off and additional crimping or repacking of the connection is performed. After which a re-check is carried out.
If a leak is found in the pipeline itself, it must be replaced from connection to connection.
Attempting to seal a leak with improvised means practically does not lead to positive results.
After replacing the damaged pipeline, a leak test is carried out again. It is important to ensure that there are no gas leaks anywhere.
Possible faults
Most malfunctions occur due to the fault of car owners themselves. In order to save money, they refuel with low-quality fuel, and also purchase components that do not meet the requirements. Bad fuel leaves a residue on all parts of gas equipment, so this breakdown can only be eliminated if all parts and filters are cleaned.
Equipment must be purchased only from trusted suppliers who can guarantee the quality of their products. For example, you can purchase a 4th generation Lovato gas reducer and various devices of this brand - this Italian company is the market leader. In addition, it independently produces all gas equipment and its components, for example, gas injectors.
You might be interested >> Spare parts for gas equipment
Also, breakdowns often occur when the driver tries to save on gasoline and does not warm up the vehicle to 30 degrees, but immediately switches to gas when starting. Because of this, the membrane begins to freeze and the system fails.
Connecting HBO to PC
Both the cord and the diagnostic program can be purchased. Typically, equipment manufacturers sell them.
After installing the software on the laptop, it is connected to the control unit.
In order for their connection to occur, the control unit must be powered, that is, the ignition switch must be turned on, but the engine must not be started.
If the connection does not occur, the laptop may have an outdated version of software installed, but you also need to check the tightness of the contacts.
If the connection is successful and the program is launched, all the basic information on the engine will be displayed on the laptop monitor - the number of cylinders, types of installed injectors, their polarity, engine speed, current temperature, pressure in the system.
In this case, the system control unit installed in the cabin should light up with warning lights.
One is green, indicating the use of gasoline as fuel, and will glow constantly, the second, red, will flash, signaling the possibility of connecting gas equipment to operation.
In the future, if the equipment is properly configured, signals will be sent to this unit in accordance with certain operating modes.
Auto-configuration of equipment
In this case, you need to press the button for forced operation on gasoline. After this, the red warning light will go out.
To configure the operation of gas equipment, the power plant must be warmed up on gasoline.
After starting the engine, the correct compatibility of the program with the control unit can be checked again by comparing the indicators of the on-board computer with the indicators on the laptop screen, since information about the operation of the engine is displayed there.
After the engine reaches the optimal operating temperature, you can begin auto-calibrating the operation of gas equipment.
This is done by clicking on the window that says “auto-tuning” on the laptop screen.
The essence of this setting comes down to the following. After turning on auto-calibration, the electronic control unit checks the main parameters of the engine - operating temperature, pressure, etc., and, if they correspond to the required parameters for calibration, begins to connect one of the gas injectors to operation.
To do this, he turns off the working injector and connects the gas one; he usually starts doing this from the first cylinder; the connection of the gas injector can be monitored on the laptop monitor.
But when connected, the control unit supplies minimal fuel, which leads to engine vibration, since the control unit has not yet adjusted to the operation of the standard control unit.
Next, the control unit begins to receive information from the standard unit and process it, that is, adapt to its operation; as a result, it adjusts the amount of gas, which is equivalent in energy output to the amount of gasoline. With the correct amount selected, the vibration of the power plant will subside.
Next, the control unit performs the same operation, but with a different nozzle.
Moreover, the control unit for calibration uses the non-sequence of the arrangement of the cylinders, but the order of their operation. If, for example, the operating order is 1-3-2-4, then he will calibrate the injector of the third cylinder next.
Since the sequence of actions of the control unit is identical to the first cylinder, when the gas injector of the third cylinder is connected to operation, the vibration of the power plant will appear again, but it will be weaker.
Next, when calibrating the remaining injectors, you can determine whether the gas equipment was connected completely correctly.
The fact is that after connecting the second gas injector to operation, if installed correctly, the activation of the remaining injectors will not manifest itself in the form of vibration of the power unit, since the supply of gas to two injectors and one gasoline during calibration is sufficient for the engine to operate without vibration.
If vibration persists even after calibrating the second injector, this is a signal that the correct gas supply to one of the electromagnetic injectors has been disrupted.
Problems with operation can be caused either by the difference in the length of the pipes from the ramp to the fittings or by a leaky fitting of the fitting.
The program installed on the laptop will indicate on which cylinder the malfunction occurred. If this malfunction occurs, it must be corrected. Next, auto-calibration is performed again.
Installation of equipment on injection and carburetor cars
Connecting all elements of the 4th generation HBO, except for wiring, is relatively simple. A cylinder is installed at a given location, lines are laid from it to the gas valve.
Pipelines go from the gas valve to the reducer. And from the reducer comes a pipeline going to the gas train. Tubes go from the gas train to the intake manifold.
Then the electronic control unit is connected to the wiring of the standard power system.
Carburetor cars.
It is possible to install 4th generation HBO on carburetor cars, but technologically it is difficult to do.
And if it is possible to install all the elements, from the cylinder to the gas train, then the problem arises in the management of this equipment.
Since the carburetor engine does not have a standard fuel system control unit, there is nowhere to get the signal to control the gas injectors.
Some craftsmen, in order for equipment of this generation to work on a car with a carburetor, begin by installing sensors that are needed to take the required indicators - gas and coolant temperature, pressure, lambda probe.
Then they make homemade control units, from which the signal is used for the LPG control unit.
In essence, they create an imitation of the operation of an injection power system on a carburetor engine. But this is all very difficult to implement.
Therefore, installing this equipment on a carburetor car is an almost impossible task for an amateur, since he will have to solve many problems that arise during the process of connecting the equipment.
Injection cars.
You can install 4th generation LPG on a fuel-injected car yourself. You just need to correctly place all the equipment and make an insert into the intake manifold and check the tightness of the system.
It is more difficult to connect to the standard power system. It is important not to mix up the wires.