4.1 / 5 ( 89 votes)
The UAZ-452 was originally developed for defense needs, so its components were designed and created, first of all, based on considerations of trouble-free operation.
Reliability and safety of operation were achieved due to the perfect and at the same time simple design of parts and mechanisms. And the “tablet”-“loaf” window lifting mechanism is no exception here.
It is not for nothing that car enthusiasts admit that the window lifter in this car is simple to the point of primitiveness. The ease of maintenance lies in the fact that it is a modular component and does not require repair - only replacement.
This window lifter features a classic, proven design. The drive through a system of blocks and cables allows for raising and lowering the glass, as well as fixing it in extreme or intermediate positions.
Removing and installing a window regulator
Removing and installing the window regulator should be done in the following order:
- Unscrew the screws securing the pillar 5 (see Fig. 317) of the sliding glass in front of it.
- Open the tilt glass and lower the stand.
- Remove the sliding glass 8 by lifting it.
- Remove the old window regulator with bracket.
- Install the new window regulator and tensioner roller bracket without tightening the bracket mounting bolts.
- Tension the cable 7 (Fig. 318) by moving down the bracket 8 tension rollers and tighten the nuts.
- Install the facing rosette 3 of the handle, insert the bracket 2 into the socket on the handle and install the handle on the window lifter rod.
- By rotating the window regulator handle, rewind the cable on the drum to the position corresponding to the lowest position of the sliding window. Then, making three turns in the opposite direction, install the sliding window bracket in the middle of the hatch and secure the sliding window to the cable.
Rice. 317. Front door: 1-door; 2-holder with seal; 3-frame with rotating glass; 4-seal for rotating glass on the stand; 5-front sliding glass pillar; 6-screw; 7-groove; 8-pane glass; 9-groove; 10-gasket; 11-sliding glass clip; 12-rear pillar; 13-buffer of the sliding glass stop; 14-bracket holder; 15-screw; 16-stop; 17-guide pin; 18,20,21,22-screws; 19-lower bracket of the front pillar; 23-door lock with drive; 24-washer; 25-outside door handle; 26-manhole cover; 27-lower door hinge on the body; 28-door opening limiter; 29-upper door hinge on the body; 30-inner door handle; 31-screw; 32-nut; 33-special washer; 34-spring; 35-washers
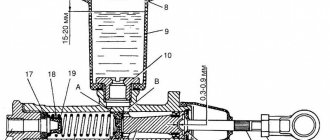
Rice. 318. Mechanism for moving the front door glass: 1-window lifter handle; 2-bracket; 3-facing rosette; 4-window lifter assembly; 5-roller; 6-axis roller; 7-cable; 8-bracket tension rollers assembly
Components of a traditional mechanism
The principle of operation and design of the front door glass movement mechanism is similar to the rear door mechanism, although the diagram is slightly different.
So, the mechanism consists of:
- equipped tension roller bracket;
- the window lift itself;
- window lifter handles;
- facing rosette;
- roller axes;
- roller;
- cable;
- staples.
As you can see, the design does not contain any technical excesses.
How to install a window regulator on a UAZ
What do you mean by window lifter? We have a mechanism with coils and a cable from Zhiguli-2101/2103/2106, sold at every auto corner. The cable length is not suitable for other Lada models. The handle is also suitable for any Lada. The block of blocks on the bottom is its own; the top block is not removed from the door; if you buy a new door, it is already in it.
How to change the blocks is obvious. When installing, do not mix it up; the top block should be the one whose axis sticks out further.
It is less obvious how to change the mechanism with a cable. First, you need to carefully wind it onto the reel so that the cable lies in the grooves on the drum, and hold it with your fingers so that it does not unwind or get tangled. then put the free loop on the upper pulley (this is not very easy, but it can be done with some practice, from below through the hole in the door), make sure that the cable is actually put on the pulley (and not on its axis), also by touch, from below. Then, holding the cable taut so that it does not fall from this block, put it on the lower blocks (they should be secured to the door in the uppermost position), then first insert the 2 lower studs securing the mechanism, then the upper one and tighten it. Of course, this won't work the first time. From the second third and fourth, most likely, too. But, as they say, “we are exhausted, but we are getting stronger,” so with some attempt it will still work out.
Next we adjust the tension. the tension is regulated by moving the block of lower blocks in the longitudinal grooves in the inner wall of the door. We release the blocks, the block or the key, 17-19, it seems, we rest vertically on them from above, the hammer handle is horizontally on it, and against the edge of the inner wall of the door we press down on the hammer handle like a lever, pulling the cable. Of course, don’t push with all your might. The tension criterion is that later, after securing the glass, when you lift the glass, the cable should not sag loosely. Having pulled it tight (as far as the M6 bolts can allow it), we tighten the blocks.
UAZ 3962 my model is not in the list › Logbook › Changing the window lifter mechanism (mothballs)
Let's get started. First, we prepare the necessary tool, and this is a wrench with an S-10, S-11 jaw and a cross and slotted screwdriver. First you need to remove the excess that will interfere with work - this is the window lifter handle and in this case the speaker, and also remove the upholstery fastening.
Then we release two screws securing the glass pillar on top of the door and one screw on the side panel of the door (in this case it is sequestered as unnecessary), bend the rubber bands and remove the pillar. The pillar is removed outside.
Then we give away the window lifter mechanism, the cable tension mechanism and we give away the fastening of the glass to the cable.
Then we take out the glass and remove the window regulator with the cable. There are two options for removing the window lifter mechanism, shown in yellow and red. The yellow direction is more convenient.
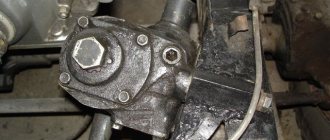
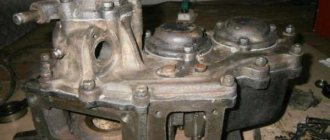
these photos are the reason for the failure of the window lifter... and this is due to a weak tension
Here's a new mechanism. By the way, they come to us from classic VAZs 01,03,03,06, but they don’t fit from classics 04,05,07, the cable is longer there. Do not remove the bracket on the mechanism until the mechanism is completely installed.
This is interesting: Gasoline trimmer does not develop speed
Well, we assemble it in reverse order. Remember that we install the glass from the inside of the door, and the glass pillar from the outside. Ideally, lubricate all threaded connections and rollers. Everything takes approximately 30 minutes of your personal time.
Diagram for installing a window regulator on a UAZ Bukhanka
04.11.2018 admin Comments No comments
The UAZ-452 was originally developed for defense needs, so its components were designed and created, first of all, based on considerations of trouble-free operation.
Reliability and safety of operation were achieved due to the perfect and at the same time simple design of parts and mechanisms. And the “tablet”-“loaf” window lifting mechanism is no exception here.
It is not for nothing that car enthusiasts admit that the window lifter in this car is simple to the point of primitiveness. The ease of maintenance lies in the fact that it is a modular component and does not require repair - only replacement.
This window lifter features a classic, proven design. The drive through a system of blocks and cables allows for raising and lowering the glass, as well as fixing it in extreme or intermediate positions.
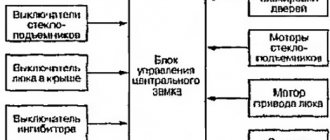
Power window button
Maybe it will be useful to someone. One of the two buttons from the set of electric windows, number 246.01.08, broke. You can’t buy one new, but there is a button (or for some reason called a “switch”, at least there was a switch, otherwise it’s difficult to find on the website) number 92.3709 from the manufacturer AVAR.
The buttons are completely interchangeable, although not copies.
It is not clear why the domestic manufacturer does not like packaging; the button for 200 rubles is just a button. For example, any air filter costs 100-150 rubles and it comes in a box.
Easy to disassemble and assemble
And to equip the door with an electric rack-and-pinion window lifter “Granat”, you must perform the following operations:
- Have a screwdriver and a wrench.
- To insert the rack and pinion mechanism into the door cavity, remove the previously installed window lift mechanism and temporarily remove the fastening of the lower point of the guide.
- In order to avoid the carriage touching the lock rod while moving the glass, the latter is removed and slightly bent, after which it is installed in its original place.
- Through the front service window, insert the rack-and-pinion power window mechanism into the door cavity.
- Using the roller hole of the standard mechanism, attach the power window rack pin.
- Insert a screw from the inside of the door into the hole in the lower mounting point of the rail and secure it from the outside.
- Lower the glass and secure the glass holder to the carriage with a screw.
- Mount and secure the guide.
UAZ Patriot and electric windows
The UAZ Patriot SUV of the Ulyanovsk Automobile Plant is equipped with both mechanical and electric window drives. Basic cars are equipped with mechanical window lift drives, but “Comfort” and “Classic” already have electric drives. What is power windows? This is an electric motor that is located in the doorway and performs the function of automatically raising the side front windows or lowering them. This process occurs by pressing a button located on the driver and passenger doors. The rear doors on the UAZ Patriot SUV are equipped only with mechanical window lifts.
We replace the window regulator on a UAZ “loaf” ourselves
The design of the installed window regulator on the UAZ van is distinguished by its proven classic design. At the same time, emerging malfunctions may necessitate replacement of the UAZ loaf window regulator. To accurately determine a possible malfunction and how to restore functionality, you should understand the operation of the mechanism.
Features of the mechanism and possible malfunctions The drive mechanism allows, using a system of blocks and a cable drive, to raise and lower the glass, as well as fix the glass in the extreme or intermediate position. Structurally, the diagram is represented by a mechanism that represents a cable that unwinds on one side and twists on the other. The work of the cable is aimed at raising or lowering the support bar along with the glass.
Soundproofing UAZ
Sound insulation of a UAZ car in Moscow, within a day, or rather within a few hours, in your presence, with a photo report, with a guaranteed result!
We present to your attention our photo reports, examples of our work on maximum sound insulation “Olympus” of UAZ vehicles.
Please select topics you are interested in to view
- All photo reports on sound insulation of other car models Please > > >
- I would like to read in more detail about the Olimp sound insulation Please > > >
- I would like to get acquainted with all the options for complete sound insulation Please > > >
- I'm interested in reviews from people who have already done soundproofing. Please > > >
Sound insulation of UAZ cars
Photo reports will be issued soon
UAZ Hunter
Over many years of practice, our company has accumulated extensive experience in installations for UAZ vehicles. Along with sound insulation, UAZ car owners ordered installation services from us:
- UAZ radio installation
- installation of rear windows UAZ Patriot
- UAZ alarm installation
- roof rails for UAZ Patriot installation
- installation of alarm system on UAZ Patriot
- UAZ patriot radio installation
- UAZ Patriot installing a tow bar
- installing an antenna on a UAZ Patriot
- installing a towbar on a UAZ
- installing a kenguryatnik on a UAZ Patriot
- installation of speakers in UAZ
- installing a sunroof on a UAZ Patriot
- installing a window regulator on a UAZ
- installation of alarm system on UAZ Bukhanka
- installation of locks on UAZ
- UAZ Bukhanka window lift installation diagram
- UAZ loaf installation of window lifter
- installation of protection on UAZ Patriot
- UAZ Hunter radio installation
- installing a headlight detector on a UAZ
- UAZ Patriot installation of speakers
We specialize in sound insulation of cars of the UAZ model range:
Soundproofing crossovers and SUVs UAZ (UAZ)
- Soundproofing UAZ Hunter SUV
- Soundproofing UAZ Patriot SUV
Soundproofing minivans and pickups UAZ (UAZ)
- Noise insulation UAZ Pickup pickup
Noise insulation of previously sold and other UAZ models (UAZ)
Soundproofing UAZ 2206 3rd generation, 1990 – present. Sound insulation of UAZ 3151 1st generation, 1985 – present. Soundproofing UAZ 31512 2nd generation, 1989 – present. Soundproofing UAZ 31514 4th generation, 1995 – present. Soundproofing UAZ 31519 2nd generation, 1995 – present. Sound insulation of UAZ 3153 1st generation, 1996 – present. Sound insulation of UAZ 3159 1st generation, 1999 – present. Soundproofing UAZ 3160 4th generation, 1998 – present. Sound insulation of UAZ 3162 1st generation, 2000 – present. Sound insulation of UAZ 3163 1st generation, 2005 – present. Soundproofing UAZ 3303 2nd generation, 1990 – present. Soundproofing UAZ 33036 1st generation, 1996 – present. Soundproofing UAZ 33094 1st generation, 1996 – present. Soundproofing UAZ 3741 2nd generation, 1990 – present. Sound insulation of UAZ 3909 1st generation, 1990 – present. Soundproofing UAZ 39094 2nd generation, 1996 – present. Soundproofing UAZ 39095 1st generation, 1996 – present. Soundproofing UAZ 39099 1st generation, 1997 – present. Soundproofing UAZ 3962 3rd generation, 1995 – present. Soundproofing UAZ 39625 2nd generation, 1992 – present. Soundproofing UAZ 396259 1st generation, 1997 – present. Soundproofing UAZ 469 1st generation, 1972 – 2013 Soundproofing UAZ Hunter 1st generation, 2003 – present. Sound insulation of UAZ Patriot 1st generation, 2005 – present. Sound insulation of UAZ Patriot Sport 1st generation, 2010 – present.
Additionally recommended for cars
Liquid fender liners - protective anti-corrosion treatment and sound insulation of car arches from the outside. This is the silence from the road, from potholes, holes and unevenness, from stones, sand and rain. This is a reduction in noise from wheels (especially studded ones) and almost inaudible operation of your car’s suspension.
Liquid fender liners - sound insulation of car arches from the outside
How and where to find us
Soundproofing of the car is carried out in a specialized center Olymp Auto at the address: Moscow, st. Tashkentskaya 28 (South-Eastern Administrative District, on Volgogradsky Prospekt, 1 km from the Moscow Ring Road towards the center, territory 19 of the taxi depot).
Consultation and registration are carried out daily from 9-00 to 20-00
Diagram for installing a window regulator on a UAZ Bukhanka
04.11.2018 admin Comments No comments
The UAZ-452 was originally developed for defense needs, so its components were designed and created, first of all, based on considerations of trouble-free operation.
Reliability and safety of operation were achieved due to the perfect and at the same time simple design of parts and mechanisms. And the “tablet”-“loaf” window lifting mechanism is no exception here.
It is not for nothing that car enthusiasts admit that the window lifter in this car is simple to the point of primitiveness. The ease of maintenance lies in the fact that it is a modular component and does not require repair - only replacement.
This window lifter features a classic, proven design. The drive through a system of blocks and cables allows for raising and lowering the glass, as well as fixing it in extreme or intermediate positions.
We repair and change the window lift cable without the help of specialists at a service station
If the car's power window does not work, this entails inconvenience, especially in hot weather and for drivers who are accustomed to smoking while driving. The article discusses the types of window lifters, as well as the window lifter cable, its structure, operation and malfunctions, and provides replacement instructions.
A window regulator is designed to raise and lower the side windows of a car. There are several types of these devices, which differ in their operating principle and location.
According to the principle of operation, lifting devices are divided into:
There are also so-called automatic ones - this is an addition to the electric one. The glasses are automatically activated. At the same time, the door locks are blocked. Most often they are installed on cars with an anti-theft system, in parallel with electric windows.
The design of all types is the same: using a button or handle, the mechanism of the device raises or raises the bar on which the glass rests. The glass moves only vertically. Movement is limited by a window seal at the top and a rubber damper at the bottom.
Mechanism design
Depending on the type of window lifter, there are two types of drive mechanisms: mechanical and electric. In the first case, the drive mechanism is activated using a handle/lever located on the inside of the door. By rotating the handle, the driver transmits movements to the drive gear, which begins to move.
Automotive window regulator
The electric drive is driven by a reversible motor. It, in turn, starts when you press a button located on the driver’s or passenger’s handrail. The drive uses a worm gear; with its help, the engine drives the gear of the drive mechanism (the author of the video is Sergey Zukol).
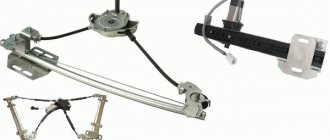
The drive is connected to a device that moves the glass. The lifting mechanism can be lever or rack type.
Lever has three subtypes:
Lever devices are compact and reliable in operation. Another advantage is their ease of installation and dismantling. The versatility of the mechanism allows it to be installed on any car. The disadvantage is the inability to move the glass evenly. At first it moves quickly, then more and more slowly, and at the end even with jerks.
In a rack-and-pinion device, a plate of glass moves up and down along a vertical toothed rack. A gear is mounted on the plate, which meshes with the drive gear.
Thus, the movement is either down or up. The advantage of a rack and pinion window lifter is the reliability and smooth movement of the glass.
The disadvantage is the massive design, which limits its use.
Rack type device
The third type is a cable mechanism, which will be discussed in more detail below.
The operation of the window lift cable, or the cable mechanism for raising the glass in a car
The cable window lifter consists of the following components:
Cable driven device
The mechanism works as follows:
If the glass is too wide, distortions are possible, since one cable will not hold it. To avoid this, two guide pipes are installed. The cable runs through them and holds the glass in two places.
The design resembles two triangles, the vertices of which are the rollers and the drum. The cable mechanism is more popular. It is compact because it can be installed on any car model. Its big drawback is the stretching and breaking of the cable, which makes it impossible to move the glass.
Typical cable faults
There are three main cable faults:
In addition to the listed malfunctions, cable wear can occur for a number of other reasons. For example, if the device is installed incorrectly or foreign objects get into the glass groove.
A malfunction of the mechanism can be determined by the following signs:
The cable can weaken not only due to long-term use, but also when the plastic clamps break, which should be replaced. If the window lift cable is broken, it must be replaced.
DIY replacement instructions
To replace the window lift cable, you must prepare the following materials and tools:
Photo gallery “Changing the cable with your own hands”
Before changing the window lift cable, you need to turn off the door drive and handle rod.
The replacement procedure consists of a sequence of steps:
After the replacement has been completed, it is necessary to check the operation of the glass lifting mechanism.
Video “Replacing the window lift cable”
How to replace a window lift cable is demonstrated in this video (the author of the video is Igor Ivanov).
Easy to disassemble and assemble
And to equip the door with an electric rack-and-pinion window lifter “Granat”, you must perform the following operations:
- Have a screwdriver and a wrench.
- To insert the rack and pinion mechanism into the door cavity, remove the previously installed window lift mechanism and temporarily remove the fastening of the lower point of the guide.
- In order to avoid the carriage touching the lock rod while moving the glass, the latter is removed and slightly bent, after which it is installed in its original place.
- Through the front service window, insert the rack-and-pinion power window mechanism into the door cavity.
- Using the roller hole of the standard mechanism, attach the power window rack pin.
- Insert a screw from the inside of the door into the hole in the lower mounting point of the rail and secure it from the outside.
- Lower the glass and secure the glass holder to the carriage with a screw.
- Mount and secure the guide.
Installed front solid windows with electric windows
It's finished! I haven't been so satisfied and happy for a long time! Finally, solid glass with electric windows took its rightful place in the front doors of the cab of my UAZ. It was raining, snowing, the wind was blowing, electricity was turned off in the garages... Everything was against what was planned! But we are not used to retreating. Govindi smiles only at the brave and unyielding.
With the first rays of the sun, I ordered from Sergei from Off-Road Window Solutions a kit for self-installation of continuous sliding windows in the front doors of UAZ 452 family. Of course, with electric windows, how could we do without them!
Site about off-road vehicles, SUVs, off-road vehicles
All body doors and cabins of the UAZ-452 family consist of two stamped panels with reinforcements, external and internal, connected by welding. The front doors have rotating windows and sliding windows. The side doors of the UAZ-452A ambulance and the UAZ-452B bus have a window with a rotating window. In the back of a van, this door is made without a window. The rear door of the body is double-leaf, with a window in each leaf. The window glass is motionless.
Window lifter of the front door of cars of the UAZ-452 family.
The front door windows are lowered and raised by a cable-operated window lift mounted on their inner panel. The cable moves using rollers. The cable is attached to the window lift drum and is attached with a clip to a bracket welded to the roller window frame.
Raising and lowering the glass is carried out by rotating the window lifter handle, which has a spline connection with the roller and a pin held on it. Next, the rotation is transmitted using a gear to the ring gear of the drum. The upward movement of the glass is limited by the stop of the glass in the upper groove, and downward by the stop of the glass frame in the rubber buffer inserted into a bracket fixed to the inner door panel.
The glass is held in any position by a brake spring located inside the window regulator brake cup. Due to the fact that normal operation of the window lift is possible only with proper cable tension, the design provides for the possibility of changing the cable tension as a result of the movement of the lower rollers relative to the door panel.
Door seals for cars of the UAZ-452 family.
All doors of the body and cabin are equipped with seals made of soft sponge rubber of a rectangular profile. The front doors have an internal seal, the side doors have an external seal and an internal seal in the upper and lower parts of the door opening. The rear door of the bodies has a double seal, the outer seal is fixed on the door, the inner seal is attached to the body opening. The seal is attached using glue No. 88. On the front doors, the seal is additionally secured with metal holders.