Replacing the front door window regulator of a VAZ 2101, 2106 with your own hands
Hello! Today we’ll talk about such a simple, but at the same time not without secrets, matter, about replacing the window lifter on the VAZ 2101 and 2106. That is, the story will be about how to tame this unruly cable, in the post we mean short windows (2101), on long glasses (2107-05) have a slightly different cable movement pattern.
Window lifter VAZ
It is necessary to start the replacement with theory, so I present to your attention a diagram according to which a regular window lifter works.
As you can see, the cable moves along three rollers; when replacing a window lifter, it makes sense to lubricate them and check whether they rotate freely.
I won’t go into details about how to disassemble the door, it’s not difficult and everything is clear. The replacement must begin by dismantling the unusable window lifter; it is secured with three nuts on “8”; also, using a Phillips screwdriver, you need to unscrew the fastening of the glass strip to the cable and move the cable to the side.
Here you need to unscrew and move the cable to the side
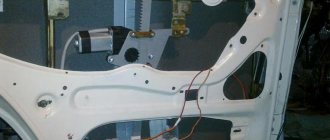
After dismantling the old window regulator and checking the free rotation of the rollers, you can begin installing the new one. We take the new window regulator out of the box - it will look similar to the one shown in the first photo.
The rollers are in these places
Attention! You cannot remove the bracket on an uninstalled window lift that secures the cables in a wound state; if the cable comes off, the lift will get tangled and returning it to its previous position is oh, how difficult.
Next, we unwind the cable wound by the manufacturer, without touching the latch!
Latch! Do not remove until installation!
Next, you can screw the new window regulator onto the door, and put the cable on the rollers according to the diagram (photo 2). Near the lift body, the cable must cross, that is, the cable that comes out from the bottom of the drum goes to the upper roller, from the top of the drum to the lower roller.
It should look like this at first
After this, you can pull the cable onto the rollers; in order to do this, you will need to loosen the lower adjustable roller and stretch the cable according to the diagram. If suddenly there is not enough cable to put it on the rollers, then you need to put the cable on two rollers and remove the latch that secures the cables and, without loosening the tension of the cables, put it on the rollers.
Tension roller
Next, using this roller, we tighten the cable; it should not sag, but it should not be stretched like a string. Also, if you did not remove the lock, you can now remove it.
Now we put on the handle and try to rotate the lift; the cable should rotate easily, without jamming. Now we lower the glass to the very bottom, do the same with the window lifter, screw the cable to the bar, and now the installation can be considered complete.
Once!
Two!
Three!
Everything must work perfectly!
Electric window lifts "six"
The newly installed electric window lifts on the VAZ 2106 make it possible to eliminate the rotation of the window lifter handles when it is necessary to open the windshields at the front of the cabin. It also makes the trip more comfortable and allows you not to be distracted from the process of driving the vehicle.
Another serious advantage appears: when an additional electrical circuit is used in the installed alarm circuit, a method appears for operating the automation when closing the vehicle doors.
Many car enthusiasts are wondering how to replace the window regulator on a VAZ 2106 with a similar mechanism, but with an electric drive. Let us explain that there is nothing complicated in this technological operation; you must have basic plumbing skills and be able to use the tool.
The electric window lifter diagram for the VAZ 2106 is located here:
Common faults and solutions
Over time, the window lifting mechanism becomes unusable - it is impossible to raise or lower the glass.
There may be several reasons for a device malfunction:
- cable break;
- foreign objects entering the mechanism;
- gearbox wear.
There is no point in repairing window regulators, since their cost is low; it is easier to buy a new device and replace it.
Device assembly diagram
Electric lifts may have the following faults:
- All power windows do not work: the fuse is blown, there is no connection to ground, the wiring is broken. The repair consists of replacing fuses, restoring ground connections and electrical circuits.
- The lift on one of the doors does not work. The switch is faulty, the reverse current relay is broken, the electric motor is broken, the wiring is broken, the connector is disconnected. Faulty parts should be replaced, the wiring restored, the connector connected.
We recommend: What does your car smell like? We determine the malfunction by smell
How to remove the front door window regulator of a VAZ 2106
Hello!
Today we’ll talk about such a simple, but at the same time not without secrets, matter, about replacing the window lifter on the VAZ 2101 and 2106. That is, the story will be about how to tame this unruly cable, in the post we mean short windows (2101), on long glasses (2107-05) have a slightly different cable movement pattern. Window lifter VAZ
It is necessary to start the replacement with theory, so I present to your attention a diagram according to which a regular window lifter works.
As you can see, the cable moves along three rollers; when replacing a window lifter, it makes sense to lubricate them and check whether they rotate freely.
I won’t go into details about how to disassemble the door, it’s not difficult and everything is clear. The replacement must begin by dismantling the unusable window lifter; it is secured with three nuts on “8”; also, using a Phillips screwdriver, you need to unscrew the fastening of the glass strip to the cable and move the cable to the side.
Here you need to unscrew and move the cable to the side
After dismantling the old window regulator and checking the free rotation of the rollers, you can begin installing the new one. We take the new window regulator out of the box - it will look similar to the one shown in the first photo.
The rollers are in these places
Attention! You cannot remove the bracket on an uninstalled window lift that secures the cables in a wound state; if the cable comes off, the lift will get tangled and returning it to its previous position is oh, how difficult.
Next, we unwind the cable wound by the manufacturer, without touching the latch!
Latch! Do not remove until installation!
Next, you can screw the new window regulator onto the door, and put the cable on the rollers according to the diagram (photo 2). Near the lift body, the cable must cross, that is, the cable that comes out from the bottom of the drum goes to the upper roller, from the top of the drum to the lower roller.
It should look like this at first
After this, you can pull the cable onto the rollers; in order to do this, you will need to loosen the lower adjustable roller and stretch the cable according to the diagram. If suddenly there is not enough cable to put it on the rollers, then you need to put the cable on two rollers and remove the latch that secures the cables and, without loosening the tension of the cables, put it on the rollers.
Tension roller
Thanks for subscribing!
Next, using this roller, we tighten the cable; it should not sag, but it should not be stretched like a string. Also, if you did not remove the lock, you can now remove it.
Now we put on the handle and try to rotate the lift; the cable should rotate easily, without jamming. Now we lower the glass to the very bottom, do the same with the window lifter, screw the cable to the bar, and now the installation can be considered complete.
Everything must work perfectly!
The VAZ 2106 window lifter has a reliable design, but, like any mechanism, it can fail. The article discusses typical malfunctions of power windows on the “classic” and provides instructions for removal and installation.
Content
[ To uncover]
[Hide]
The mechanical window lifter on the VAZ 2106 has a simple design and consists of a control handle, a glass lift transmission system, a cable and three rollers.
Many drivers install electric windows instead of classic ones.
They come in two types:
- Cable. The design includes an electric motor with a drum on which the cable is wound, and a gearbox. The upper drum is connected to a conventional window lifter using a spline. With its help the cable is activated.
- Rack and pinion. They use the principle of a steering rack in a car.
To install the electric mechanism, you need to purchase a kit consisting of wires, fasteners, backlit control keys, a decorative plug, and installation instructions (the author of the video is VALENTIN VERNIGORA).
Over time, the window lifting mechanism becomes unusable - it is impossible to raise or lower the glass.
There may be several reasons for a device malfunction:
- cable break;
- foreign objects entering the mechanism;
- gearbox wear.
There is no point in repairing window regulators, since their cost is low; it is easier to buy a new device and replace it.
Device assembly diagram
Electric lifts may have the following faults:
- All power windows do not work: the fuse is blown, there is no connection to ground, the wiring is broken. The repair consists of replacing fuses, restoring ground connections and electrical circuits.
- The lift on one of the doors does not work. The switch is faulty, the reverse current relay is broken, the electric motor is broken, the wiring is broken, the connector is disconnected. Faulty parts should be replaced, the wiring restored, the connector connected.
To complete the work you will need the following tools:
- Phillips and flathead screwdrivers;
- a set of keys;
- knob;
- extension.
The removal procedure consists of the following steps:
- First of all, you need to remove the casing.
- Next, the glass is lowered as far as possible. Use a Phillips screwdriver to unscrew the bolt holding the clamp.
- After unscrewing the bolt, lower the clamp down.
- Then on the left side of the door, just loosen the roller nut using a wrench.
- The cable is now free and can be removed from the roller.
- Next, unscrew the three nuts holding the window regulator.
- When unscrewing the third bolt, the mechanism should be held from the inside.
- When the window lifting mechanism is free, move it to the side.
- After unscrewing the last nut, you can remove the window regulator from the door.
Next, repair or replacement is carried out. The rear mechanism is installed in the same way.
Installation of a new or repaired window lifter is carried out in the reverse order of removal.
To carry out repair work on the removal and subsequent installation of the front door windows of the VAZ 2106, we will need wrenches “10” to “8” and a screwdriver.
- The first step is to remove the front side glass so that it does not interfere with our work.
- Remove the window lift cable from the upper guide pulley. The upper guide roller is not visible from the outside of the door and is in the same vertical line as the lower guide roller. Unscrew the nuts securing the window lifting mechanism and remove the mechanism along with the cable from the inside of the door.
The front door window regulator of the VAZ 2106 has been removed, replace it with a new one and install it in the reverse order of removal.
Read more: All about changing the oil in the VAZ 2106 gearbox step-by-step instructions photos and videos
On a note:
- Before installing the window lifting mechanism, wind the cable onto the drum two turns on each side.
- The window lifting mechanisms of the front and rear doors differ in cable length, so they are not interchangeable.
- When installing the mechanism on the door and the cables on the rollers, do not allow the cable to jump off the drum, hold it with your hand.
At this point, the repair of replacing the front door windows of the VAZ 2106 is completed.
Window regulators are an integral part of driving a car.
The driver should be aware of the main malfunctions of this unit and how to fix them independently, and also know what to do if the glass jams, falls, or there is a need to remove/install the power window lift. Of practical interest is also the choice and independent installation of electric windows on the VAZ 2107.
Every car enthusiast knows what a window lifter is. Its functions are simple: open and close the window, thereby regulating the microclimate and level in the cabin. There are two types of window lifters: manual (colloquially crutches or meat grinders) and electric, controlled from the dashboard or individual buttons.
At the manufacturer's factory, the VAZ 2107 was equipped with manual window lifters, which have a fairly simple design. They are based on the operation of a mechanism to which glass is attached using special fixing devices. The side windows are lowered and raised by turning a handle located inside the cabin.
The standard window lifter of the “seven” is controlled by a handle and is very inconvenient to use
During its existence, the VAZ 2107 was equipped with two types of window lifters:
- Rack and pinion. They are considered more reliable. Installing this type of window lifter completely eliminates glass distortion. The mechanism works by transmitting the rotational force of the gear, which interacts with a linear rack, to the glass carriage. The main disadvantage is the need for constant lubrication, since the gears of the mechanism were made of plastic, which wears out quite quickly and can damage the entire mechanism. Rack and pinion window lifters are considered more reliable, but require constant lubrication
- Cable ones - due to their design, they are weaker and more often fail. The fundamental element of this type of window lifter is a cable attached to the twisting mechanism. The device operates rather slowly due to the low functional properties of the drive, which with force overcomes the resistance of the sealing rubber bands. It may also happen that it begins to overheat and at some point simply fails. The advantage of this type of mechanism is its good maintainability, but too frequent need for repairs practically eliminates this advantage. Cable window lifters fail more often, but are characterized by high maintainability
The operation of the window lifter is configured and adjusted by the manufacturer, so you should interfere with it extremely carefully and carefully, otherwise the mechanism may jam, crackle and crackle.
From personal experience, I advise you to carefully study the device and read the detailed troubleshooting instructions before starting to independently repair the window lifter mechanism. Even though many of them seem quite possible to fix with a screwdriver and a wrench, in some cases it may be necessary to completely replace the window regulator.
Before you begin self-repair, you need to study the structure of the window lifter and the principle of its operation.
At first glance, the creaking of the window regulator does not seem to be a serious malfunction, but you should pay attention to this signal, since this is the first sign that the mechanism is wearing out and may soon break. Methods to combat this symptom are extremely simple, accessible to everyone and do not take much time:
- lubricate the window lifter - lubricants from any manufacturer, widely available in car dealerships, are suitable for these purposes; At the first sign of squeaking, the window lifter must be lubricated
- Replace the rubber bands in contact with the glass. When the window is open, dust and sand inevitably enter the car interior, which scratches the glass and rubber bands, resulting in a squeaking sound. The entry of dust and moisture through the gap between the glass and the seal can subsequently lead to jamming of the mechanism, so it is necessary to regularly monitor its cleanliness.
Replacing the classic mechanism
The classic mechanism on the VAZ 2106 is a simple device for raising and lowering the windows, which is controlled using a handle. Despite its simplicity, Six car owners encounter situations when the device needs to be replaced. Given the age of the car, the mechanism may break or malfunction.
- Remove the door where the window regulator will be replaced.
- Disconnect the bar that secures the glass to the lifting cable. Move the cable itself to the side and remove the device.
- Check how easily the rollers rotate. If necessary, lubricate them with lithol.
- Attach the new mechanism to the standard connections, passing the cable along the rollers, as indicated in the installation diagram.
- Pull the cable over the rollers without sagging or strong tension.
- Secure the handles while rotating the lifting mechanism of the VAZ 2106 window regulator. The entire structure should rotate smoothly, without jolts.
- Fix the glass in the lower position, lower the device, attach the cable to the bar.
Installation Features
Installation of a new or repaired window lifter is carried out in the reverse order of removal.
Photo gallery “Installing a window lifter”
1. Installation kit 2. The process of unscrewing the screw and retracting the cable 3. Installation locations of the rollers
To install the power window, follow these steps:
Dismantle the door, remove the door trim. Next, the electric window lifter is installed using self-tapping screws. After installation, you need to check the sliding of the glass. Connection to the vehicle's electrical network should be made according to the electrical diagram. Next, the door is installed on the car. A control button is mounted on the toolbar.
After installation, the electric window lifter must be checked for functionality. You can install a heated rear window.
Installing rear power windows
Rear electric windows for VAZ cars are also sold in sets, 2 pcs. For front-wheel drive cars, ESP 2109 is suitable for models 21099/2114/2115; these parts are not produced for 2108, since the “eight” does not have rear side doors. The VAZ 2109 “Forward” kit includes:
- two lifts with electric motors;
- buttons 2 pcs.;
- electrical wiring for each rear door with plugs;
- fasteners - self-tapping screws;
- decorative plugs;
- installation instructions, passport.
The rear window lifters 2109 are installed in their standard places without drilling the doors; each of them is secured with two nuts.
Forward electric window lifts are manufactured in the city of Izhevsk, the parts have a rack and pinion design - the carriage moves on the rack along with the glass. For car models 2110/2111/2112, there is also no need to re-drill anything - the mechanisms fall into place without additional adjustment.
On VAZ cars 2101-07, electric lifts are installed with additional drilling of two holes. The work of installing the rear lifts is not difficult, and is practically no different from installing the front ESPs.
Installation.
A new product ready for installation in the door of your car should be removed from the packaging and prepared for installation.
Do not remove the bracket that secures the wound cables. If they come off, you will tangle the part and spend a lot of time untangling it. Unwind a little of the cable without touching the latch. Screw the new joint into the standard places in the door of your VAZ 2105 and put a cable on the coils. Near the body of your lift, the cable should cross and correspond to the reverse pattern. To explain more precisely, the lower one should go to the roll at the top, and the upper one - at the bottom. Now the ropes are pulled onto the washers, for which you will need to slightly loosen the bottom roll. If suddenly you don’t have enough cord, you can slightly loosen the bracket that secures it, then perform the necessary operations and fix the bracket as before. Now, using a roller, you can tighten the rope so that it does not sag, but is not taut like a guitar string. But right now you can finally remove the lock that was included with the part. Having completed the work done, you can put the door handle back in place and try the new window regulator in operation. Everything should rotate easily and work without jamming. Do not forget to screw the rope to the bar and it is at this point that the work is completed.
We will install electric windows on a VAZ 2105
. In this case, a scissor-type electric window lift (ESW) is used. The use of cable ESP implies its joint operation with standard mechanical handles, but its design is too complex and massive, so we refuse this option. We will install a rack ESP.
It is advisable to familiarize yourself with its electrical circuit in advance, study its appearance and mark the location of the wiring. Next, we purchase the required number of wires, fuses and holders for them. In addition, control buttons for the lifts that we will install in the cabin, insulating tape, corrugated wires and terminals will be useful. It is recommended to place the buttons not on the doors, but in the area of the center console, this will save on the length of the wires. We remove the door trim, it’s very simple, so we won’t focus on this. After this, we remove the standard window lifter and be sure to dismantle the lower tension roller, otherwise the glass will not be able to go all the way down. We take an electric drill and drill a couple of holes of the appropriate diameter, that’s where we put the ESP and secure it. We also insert the adapter plate to the lift and to the glass. We can say that the ESP is installed, you need to check its performance. To do this, we extend the wires directly to the battery. Now you need to figure out where to install the rubber tube with wires.
If your VAZ 2105 car is equipped with an alarm system, then it already has corrugations into which you can insert our rubber tube. It happens that the ESP drive is too powerful and after the glass rises all the way up, it bends the glass frame. How can you make the device work properly? To do this, dismantle the lift and move the carriage stop lower. We determine the exact parameters of the carriage transfer on site; we need to ensure that the glass stops as soon as it reaches the seal. Before installing ESP on a VAZ 2105
, make sure there is lubricant in it. Often the drives are completely dry, although the box says otherwise. After installing the drive, it's time to start wiring it. The power wire originates directly from the battery; it passes into the passenger compartment through a rubber plug in the engine compartment. It is recommended to lay the wire in the corrugation in advance. In the area of connection with the battery, install a fuse, tightly compress the terminal and screw it to the positive terminal of the battery. Make sure that the block does not have its own fuse. The other end of the wire runs to the center console and is connected to the terminals of the ESP control buttons. The drive buttons themselves are not designed to fit into mounting spaces for standard buttons, but the kit includes special sites that are more or less suitable for the location. They don't stick tightly, so you need to secure them with hot glue. The wiring is connected in strict accordance with the manual that comes with the kit. We crimp the wire connected to the buttons. It is important to connect the buttons correctly so that the raising and lowering of the glass corresponds to the arrows on the buttons.
Adjusting the doors of a Lada 2107 car, replacing the hood of a VAZ 2104, VAZ 2105, VAZ 2107. Adjusting the glass travel Repairing doors of VAZ 2107, VAZ 2105, VAZ 2104 do-it-yourself body repair doors and hood
Adjusting the tension of the VAZ 2104 window lifter cable and the stroke of the rear sliding window: 1 - sliding window; 2 — rubber glass buffer; 3 — pressure plate screw; 4 — sliding window drive cable; 5 — tension roller for adjusting cable tension
At the front doors, remove the upholstery, lower the glass all the way into the rubber buffer and remove the screws of the 3 pressure plates securing the cable. Tighten the VAZ 2105 window lifter handle until the bushing (mark) on the front vertical branch of the cable aligns with the middle of the front glass bracket and tighten the screws of both clamping plates. Check the smooth operation of the window regulator. If necessary, adjust the cable tension with tension roller 5. At the rear doors, remove the upholstery, lower the glass and loosen the screws of the pressure plate securing the VAZ 2107 cable. Lower the glass until it stops in the rubber buffer. Turn the window handle of the VAZ 2104, VAZ 2105, VAZ 2107 all the way in the direction of lowering the glass, and then half a turn in the opposite direction. With the glass and cable in this position, tighten the screws of the pressure plates. Check the smooth operation of the Lada Classic window regulator. If necessary, adjust the cable tension using the tension roller.
Window lift repair
Since repairing a window regulator in most cases involves replacing the mechanism, it is worth considering the step-by-step process from removal to installation. To do this you will need the following list of tools:
- heads or keys for 8 and 10;
- extension;
- ratchet handle;
- flat and Phillips screwdrivers.
Removing the window regulator
The procedure for removing the device from the car is as follows:
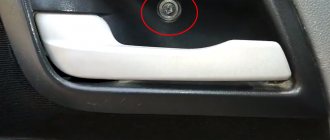
- Use a screwdriver to pry up and remove the plugs on the armrest. Use a screwdriver to pry the armrest plugs out
- Using a Phillips screwdriver, unscrew the fastening of the armrest to the door and remove it. Unscrew the armrest fastening and remove it from the door
- We remove the trim of the window lifter handle by inserting a flat-head screwdriver between the socket and the trim element. Use a screwdriver to pry off the window handle trim
- We dismantle the handle and socket. Remove the window handle and socket from the door
- Use a flathead screwdriver to pry off the inner door handle trim. To remove the door handle trim, pry it off with a flat screwdriver.
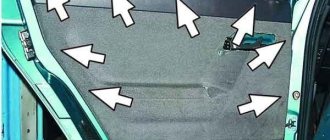
- We start the slotted screwdriver and push out the 7 clips that hold the door trim on the sides. The door trim is held in place with clips that need to be pryed off with a screwdriver.
- Slightly lower the upholstery and remove it from the inside door handle. We remove the upholstery from the door, lowering it slightly
- Lower the window completely and unscrew the cable clamp with a Phillips screwdriver. The cable is attached to the door glass using a suitable clamp
- We unscrew the tension roller fastening, then move it and loosen the tension on the window lift cable. To release the tension roller, unscrew the nut with a 10mm wrench.
- Remove the cable from the remaining rollers.
- We unscrew the fastening of the mechanism and remove it from the door. To remove the window lifter, unscrew the 3 fastening nuts.
- If the tension roller has become unusable, which can be determined by its external condition, then completely unscrew its fastening to replace it with a new part. To replace the tension roller, you must completely unscrew its fastening.
Replacing rollers
Window lifter rollers fail over time. Since replacing the top element is the most problematic, we will dwell on this process in more detail. The part to the door is fixed with hooks at the top, and with welding at the bottom. To work you will need the following set of tools:
- set of drills;
- electric drill;
- flat screwdriver;
- hammer;
- new video.
The upper roller consists of the roller itself and the mounting plate
The replacement procedure consists of the following steps:
- To remove the roller, we drill out the metal at the place where the plate is attached with a 4 mm drill.
- We drive a flat screwdriver inside the door under the roller plate and knock it down with a hammer, dismantling the roller. Over time, the window lift rollers wear out with the cable.
- Using the hole in the new plate, we drill a mounting hole in the door.
- We install a new roller and secure it with a rivet or bolt and nut. The new roller is secured with a rivet or bolt and nut.
Video: replacing the upper window lift roller
Window lifter installation
Before installing a new window lifter, you must check whether the rollers rotate freely. If necessary, lubricate them with Litol. The bracket that secures the cable should not be removed in advance so as not to confuse the mechanism, since returning everything to its original position will be quite problematic. We carry out installation as follows:
- We install the window regulator in place, securing it with nuts.
- We remove the bracket and place the cable on the rollers according to the diagram. The window lift cable must pass through the rollers according to a certain pattern.
- We adjust the tension of the cable with the appropriate roller and tighten the fastening of the latter.
- We fix the cable to the glass. Use a Phillips screwdriver to tighten the fastening screw of the clamp.
- We check the functionality of the mechanism.
- We install the upholstery and door handle, as well as the window lifter handle.
We recommend: Lancer throttle body: possible breakdowns and repair algorithm
Video: replacing the window regulator on a VAZ 2106
Repairing a VAZ 2107 window lifter: step-by-step instructions for the front door
An undoubted advantage of VAZ cars is the maintainability of most of their components for “field” conditions. In this case, we are talking about the fact that the car owner can repair the window regulator himself (in the conditions of his garage, for example). Let us describe the algorithm for carrying out such corrective actions.
Removing the window lifter handle
Alas, all kinds of handles and handles that are not made entirely of iron must be used with extreme caution on “Soviet” cars. The complaints here are both about the quality of the plastic used for their manufacture, and directly about the design (power loads are not properly taken into account)
As a result, window handles break much more often than on cars from alternative manufacturers. An undoubted advantage is the fact that these elements are very easily replaced:
- the handle must be freed from the locking ring. To do this, use a flat blade screwdriver to move the outer ring away from the inner ring. After this, the retaining ring is removed;
- After that we replace the handle.
Removing the window regulator
The technical algorithm here is more complex than in the previous case:
- The glass should be lowered all the way, then remove the window handle.
- If you plan to mount and install the lift back in the future, you will need to secure the cable with wire, screwing it to the mechanism drum. The cable should not leave the guide grooves, as it will be extremely difficult to return it to them. It is because of this that an installation bracket is installed on new units.
- Next, loosen the bolt that secures the lower roller.
- We move the lower roller up, thus loosening the tension of the cable.
- Then remove the cable from the rollers (from all but one).
- Unscrew the screws securing the window regulator to the metal door leaf.
- We take out the window lift mechanism.
Installing a new mechanism
When buying a new mechanism, pay attention to its quality. Here is one of the typical defects
Trying to file away casting defects, the assembler “overdid it”
After replacing the necessary parts (if required) and lubricating all elements of the window lifting mechanism, we install it back and return it to working condition:
- we put the mechanism back and fasten it to the door with three standard nuts;
- we throw the cable over all the rollers (the fixing wire or bracket is removed at the last moment);
- then we adjust the cable tension on the lower roller and tighten the fastening nut on it;
- We test the performance of the window regulator (if raising/lowering the glass is difficult, then the cable tension should be slightly loosened);
- we check the position of the glass - whether it rises (lowers) all the way, whether it is level, if necessary, we correct it;
- The inner door trim is reinstalled;
- the door opening handle is installed back and tightened with bolts;
- The window lift handle is attached last (and secured with a lock washer).
Design Features
Most owners of the seventh new generation model are confident that the process of replacing a window regulator is somewhat complicated. This is because the glass is connected to the supports and cable in not one, but 2 places. This decision required adding another video. Now there are 4 of them used (three for direction, one for tension).
It is quite possible to make the replacement yourself if you have simple tools:
- Keys (8, 10).
- Phillips screwdriver.
VAZ 2104 window lifter repair
From the very beginning of production of the VAZ-2107 until the very end of production of the model in the 21st century, exclusively manual window lifters were installed on it. Automatic (electric) ones were installed only starting with the VAZ-2110 model and newer ones.
At the same time, there were several types of manual window lifters:
Their peculiarity is that their gears are made of plastic, as a result of which the mechanism wears out extremely quickly, and in addition, its device requires more space, lubrication and maintenance. The undoubted advantage of such lifts is that glass distortion is eliminated, and in addition, these mechanisms produce significantly less noise than other models. Used mainly on trucks.
Replacing the "six" window regulator
How to install a window regulator on a VAZ 2106? The procedure for replacing the product is as follows:
- We disassemble the door where it is necessary to install a window regulator to replace the faulty product;
- We begin dismantling the defective product by removing the glass fastening strip to the window lift cable;
- We move the cable to a position that does not interfere with work;
- We remove the old window lift mechanism of the VAZ 2106;
- We check the rollers for free rotation; if they lock during rotation, they must be lubricated with lithol.
Important addition:
1. It is forbidden to dismantle the bracket that secures the cable in the reel in assembled condition, otherwise, if the cable comes off the rollers when the reel is wound, the lifting mechanism will malfunction and it will be quite difficult to restore it to its previous condition.
2. When unwinding the cable for installation work, it is prohibited to touch the latch.
- We attach the window regulators on the VAZ 2106 to the standard connections and pass the cable along the rollers according to the installation diagram;
- In the area of the body part of the lifting mechanism, the cable must overlap, that is, its section coming out from the bottom of the drum is directed to the top roller, and from the top of the drum to the bottom roller;
- We tension the cable on the rollers, for which we loosen the roller from below, which is subject to adjustment, and tighten it according to the attached diagram:
- If the size of the cable is not enough, then you need to pull it onto 2 rollers and release the latch - clamp and place it on the roller elements without sagging;
- After installing the window regulator, we tighten the cable without sagging, but also without special tension. If the locking device was not removed, it can now be released.
- When securing the handles of the VAZ 2106 window lifters, we rotate the window lifter mechanism, and the entire system should rotate smoothly, without jolts or jams. Now we move the glass to the lower position, lower the windows, and attach the cable to the bar.
The procedure for removing and installing a window regulator on a VAZ 2106 on a video clip can be viewed on our Internet resource.
Step-by-step replacement sequence on the front door
To install a new window regulator, you must first dismantle the old mechanism.
- Remove the three bolts that secure the handle to the door.
- Remove the handle.
- Remove the door trim.
Before dismantling the factory lift, tie the two branches of the cable with wire.
This is necessary so that the cable does not fly out of the grooves in the drum, and the mechanism can be reused.
Removal of the structure is performed as follows:
- Lower the glass within one turn of the glass lift handle so that you can reach the cable clamp and the glass supports through the technological door openings.
- One fixing screw needs to be unscrewed completely, and the other one should be slightly loosened at the bracket securing the cable to the supporting protrusion. Take him out.
- Raise the glass to its highest position and secure it using a regular screwdriver. You can use other available means for this.
- Take a 10mm wrench and slightly loosen the nut that secures the tension roller. It is located at the bottom center of the door.
- Remove the cable from the tensioner and three guide reels.
- Remove the three nuts that secure the window regulator to the door.
- Unscrew the 2 nuts securing the guide groove and move it to the right.
- The final stage is the removal of the window regulator from the door.
After the mechanism is removed, you can check how the rollers rotate.
Design and types of window lifters
The mechanical window lifter on the VAZ 2106 has a simple design and consists of a control handle, a glass lift transmission system, a cable and three rollers.
Many drivers install electric windows instead of classic ones.
They come in two types:
- Cable. The design includes an electric motor with a drum on which the cable is wound, and a gearbox. The upper drum is connected to a conventional window lifter using a spline. With its help the cable is activated.
- Rack and pinion. They use the principle of a steering rack in a car.
To install the electric mechanism, you need to purchase a kit consisting of wires, fasteners, backlit control keys, a decorative plug, and installation instructions (the author of the video is VALENTIN VERNIGORA).
Types of window regulators - what will VAZ please?
Electric windows have recently been increasingly installed on domestically produced cars. The installation of such devices began at the dawn of the 2000s. Before this, all VAZ cars were equipped with ordinary cable-operated windows with manual controls.
The VAZ 2107, the production of which began in the late 80s of the last century, is equipped with a manual window lifter. This type of window control is familiar to most owners of VAZ cars. The VAZ 2110 model already has an electric window lifter, which is much more convenient and practical compared to the manual control type. Electrical devices are not something new. They began to be installed in imported cars back in the 80s, but this “know-how” reached our automobile industry only recently.
Based on the type of operating mechanism, window lifters can be divided into several types. The most basic and widely used in VAZ 2107 cars are rack and pinion, they require constant care and lubrication. It often happens that the gears of this mechanism are made of plastic, which is why the mechanism wears out catastrophically quickly.
Due to the type of construction, they require much more space in the car than cable ones. When using such window lifters, glass distortion is completely eliminated. The operation of the device is to transmit the rotation of a gear, which interacts with a linear type of rack on which the glass carriage is placed. Rack and pinion windows are reliable and produce less noise than cable windows.
The second type of window lifter is on a cable; by design, they are very weak and often fail. The main element of such window lifters is a cable and a torque mechanism. The advantage of this type of mechanism over others is its high maintainability. It is not difficult to carry out partial or complete repairs or replacement of parts in such a window regulator. Most often, the cable wears out, since it is very thin. The gears of this mechanism are made of plastic and tend to break when the glass is skewed. The cable window mechanism works quite slowly, especially if the glass rubber seals prevent this, so the electric motor tends to overheat and fail.
The newest window lifters that have recently begun to be used in VAZ 2110 cars are lever ones; their work is carried out using hinges. Such devices work very quickly and do not create noise inside the car, but they consume a considerable amount of power. They are used only in conjunction with an electric drive. The operation of the window lifter occurs due to the execution of a certain number of revolutions of the main flat gear, which transmits the revolutions to the levers of the mechanism. After this, the levers rotate and move the main plate on which the glass is attached.
The main disadvantage of the lever mechanism is the low speed of glass movement - the higher the glass rises, the lower the speed of its movement. The main feature of lever window lifters is the small size of the mechanism and the ability to install them on many VAZ cars. This type is installed on fully equipped VAZ 2110 cars, since it is more expensive and practical in its use. If your car has a cable or rack and pinion mechanism, then installing a lever mechanism will require some modernization of the car. It is better to carry it out at a specialized car service center.
Removal instructions
To complete the work you will need the following tools:
- Phillips and flathead screwdrivers;
- a set of keys;
- knob;
- extension.
The removal procedure consists of the following steps:
- First of all, you need to remove the casing.
- Next, the glass is lowered as far as possible. Use a Phillips screwdriver to unscrew the bolt holding the clamp.
- After unscrewing the bolt, lower the clamp down.
- Then on the left side of the door, just loosen the roller nut using a wrench.
- The cable is now free and can be removed from the roller.
- Next, unscrew the three nuts holding the window regulator.
- When unscrewing the third bolt, the mechanism should be held from the inside.
- When the window lifting mechanism is free, move it to the side.
- After unscrewing the last nut, you can remove the window regulator from the door.
Next, repair or replacement is carried out. The rear mechanism is installed in the same way.
Brief instructions for replacing the mechanism
In general, the procedure for replacing a window regulator looks like this:
- The door trim is removed.
- The cable is disconnected from the clips that hold the glass.
- The cable is removed from the rollers.
- Next comes the removal of the guide chute and the lift mechanism.
- Installing a new window regulator.
- Threading the cable.
- Fixing the glass brackets and tensioning the cable.
- Reinstalling the door trim.
To summarize, we note that the process of replacing a window regulator on a VAZ-2107 is a completely feasible task for the car owner. During the repair process, the main thing is to carefully follow all the recommendations and installing a new mechanism will not be a problem for you.
Installation of power windows on a VAZ 2106
Unlike the windows of the Zhiguli “Seven”, windows are installed on the windows of the 2106 models. Front ESP kits are also produced for the six, the parts are installed on VAZ 2101/2102 (station wagon)/2103/2106 cars. The Forward kit includes:
- two electric windows;
- screws, bolts and washers;
- decorative plugs;
- clamps;
- adapter plates;
- wires with connectors for connection;
- two buttons.
We recommend: Fuel filters for VAZ 2110–2112: do-it-yourself replacement
The installation of the ESP is carried out in the same way as on the 2107 car; we begin the work by disassembling the door. The old mechanical window regulator can be left in place by cutting the mechanism cables. Next we proceed as follows:
- Having disconnected the glass holder from the MSP, lift the glass up;
- secure it in the upper position with masking tape;
- we assemble the lift with the adapter plate;
- to install the ESP, two holes are drilled (according to the instructions in the Forward passport);
- we insert the ESP through the lower niche in the door and secure it with two screws;
- we combine the installed power window with the glass, install the screws;
- We mount the buttons and connect them to the ESP using electrical wiring.
Installing window regulators on a VAZ 2106 is not difficult, you just need to do everything according to the instructions.
Installation of ESP "Granat" on a VAZ 2107
Before we start work, let's prepare everything we need.
- Tools and materials
- ESP “Granat” kit for VAZ 2107.
- Flat blade screwdriver.
- Calipers.
- Ruler.
- Marker.
- Set of open-end wrenches.
- Set of socket heads.
- Electric drill with a set of drills.
- Grease CV joint-4.
- Silicone grease.
Sequence of actions when installing ESP
Related video: installing ESP on a VAZ 2107
Electric windows for VAZ 2106
Having electric windows in modern cars is not a luxury. This convenient device, which facilitates the process of raising and lowering the windows, simply must be in the car, including the VAZ 2106. Let's figure out how to install window regulators, how difficult it is to replace the standard mechanism and how to do it yourself.
Replacing the classic mechanism
For the VAZ 2106, mechanisms for raising windows come in two varieties:
| Kinds | Characteristics |
| Cable. | They consist of an electric drive with a gearbox and a reel with a wound cable. The upper drum is connected to the classic window lifter through slots and is designed to operate the cable. |
| Rack and pinion. | They have a different design and work on the principle of a steering rack in a car. Such devices are good for hard-moving car windows, since the mechanism itself moves easily. |
The classic mechanism on the VAZ 2106 is a simple device for raising and lowering the windows, which is controlled using a handle. Despite its simplicity, Six car owners encounter situations when the device needs to be replaced. Given the age of the car, the mechanism may break or malfunction.
The order of your actions when carrying out the procedure for removing a faulty product and installing a new one is as follows.
- Remove the door where the window regulator will be replaced.
- Disconnect the bar that secures the glass to the lifting cable. Move the cable itself to the side and remove the device.
- Check how easily the rollers rotate. If necessary, lubricate them with lithol.
- Attach the new mechanism to the standard connections, passing the cable along the rollers, as indicated in the installation diagram.
- Pull the cable over the rollers without sagging or strong tension.
- Secure the handles while rotating the lifting mechanism of the VAZ 2106 window regulator. The entire structure should rotate smoothly, without jolts.
- Fix the glass in the lower position, lower the device, attach the cable to the bar.
Replacing the “six” window lifting mechanism is quite simple and does not require a lot of time and money.
Sequence of actions when installing a power window
In order to tune the “six” by installing electric window lifts, it is not necessary to go to a car repair shop. You can do this yourself. On the modern automotive parts market there is a large selection of power window kits. To install the device yourself, no special knowledge or skills are required. Typically, the power window kit includes electrical wiring, control keys, and fasteners.
Installing the mechanism is quite simple and is done in the following sequence.
- Remove the door and install a power window. Use self-tapping screws to attach to the car door frame. This should be done carefully so that the door does not become deformed as a result.
- Check the glass movement for ease of sliding. Adjust the guides if necessary.
- Connect the electrical wiring, referring to the wiring diagram. Route the wires under the panel.
- Assemble the door by installing the plugs in place of the handles.
- Mount the control key in the instrument panel.
- Connect the battery and check the system's functionality. This completes the installation.
When carrying out work on electrical equipment, disconnect the ground on the battery. Do not forget that the circuits of new mechanisms must be protected by fuses.
About the design of the VAZ 2107 window lifters
The VAZ 2107 began to be produced in the 80s of the last century, and therefore, the window lifters in this car were only manual, rack and pinion type. The main disadvantage of the rack structure is its fragility. The reason is simple: in order to save money, domestic automakers installed plastic gears in these window lifters, which failed very quickly.
By the early 90s, the designers of the VAZ 2107 realized their mistake and began to equip the car with cable-operated windows, which were more reliable than rack and pinion windows (although not much). The glass in these devices was lifted using a cable attached to a twisting mechanism. The main advantage of cable window lifts was their high maintainability. With rack and pinion lifts, replacing a broken plastic gear was a real challenge, as it was extremely difficult to find the part for sale. But there have always been a lot of parts for cable window lifts in car dealerships.
The device of a cable window lifter on a VAZ 2107
The operating principle of both rack and pinion window lifts is approximately the same: the glass is secured to the lifting mechanism, activated by rotating the handle, with special clamps. By rotating the handle, the driver either moves the gear along a vertical rack (in the case of a rack and pinion window lift) or pulls the cable, which causes the glass to slide out of the door.
Power windows (ESP) are the next step.
Articulating-lever window lifters "Granat"
The most popular among car enthusiasts are articulated-lever ESPs, which have a number of advantages:
- ESP has a reasonable price;
- ESP is easy to install;
- ESPs, as a rule, have excellent equipment: the driver does not have to look for activation buttons and wires to them - everything is already there;
- ESPs are reliable, work quickly and make almost no noise;
Features of replacing the VAZ 2107 window regulator
For owners of other VAZ “classic” cars, replacing the VAZ 2107/2105 window regulator may seem unnecessarily complicated.
Since there are four rollers in total, one tension roller and three guides, and the cable is connected to the solid glass brackets in two places, the cable around the rollers can be routed in two ways - through the upper or lower rolling bearings.
When passing through the lower roller , the upper cable coming out of the mechanism is directed through: the lower left guide roller, the upper left guide support, the lower central tension roller, the upper right roller. As an alternative, a stroke is also made through the upper roller , which is done in the reverse order. In the same case, the lower cable is guided.
You should prefer the optimal tension force of the cable drive: the cable should not be overtightened, but should not dangle.
Replacing a window regulator on a “classic” with your own hands
How to replace the window regulator on a VAZ classic?
Today, a car is no longer a luxury. First of all, it is a means of transportation. But unfortunately, absolutely any technique requires due attention.
And this manifests itself mostly in the repair of components and assemblies. Contacting a service station every time is unprofitable for the owner for several reasons:
1. The repair price will include not only the cost of the part, but also the labor to replace it.
2. Not all masters begin their work with due attention. And since this is not their own car, they will not treat it with reverence.
In addition, it is now quite difficult to find an intelligent repairman who would know his business perfectly. Therefore, if possible, it is better to repair your car yourself. So, you will not only save your own money and nerves, but will also be aware of upcoming breakdowns and sores of your “iron friend”.
Today we will learn how to replace the window regulator on a classic model from the AvtoVAZ line.
The entire operation can be divided into several stages:
1. Unscrew the door handle from the inside. It is held on by three bolts, one of them is closed with a cap.
2. After this, carefully remove the door trim. It has a plastic fastening, so we don’t try to roughly pull the casing towards us. In order not to tear the frame, carefully insert a screwdriver into the gap between the door and the upholstery in the fastening area, and help disconnect it from the door.
3. Then, lower the glass a little so that you can disconnect the cable from the special lifting fasteners, which are located at the bottom of the glass.
4. Now you need to remove the old window regulator. To do this, take the “10” key and unscrew the three nuts. And you also need to disconnect the guide rubber that stands across the door. It is located behind the mechanism we need, so until we remove it, it will be difficult for us to pull it out. It comes off very easily. Using a “10” wrench, unscrew the two nuts. Now the window regulator comes out easily.
5. Now is the most crucial moment. We are starting to install the new mechanism. The cable on it is fastened with a special piece of iron, which does not need to be cut yet. We will do this later, when tension is created. We insert the part into the desired hole and secure it with nuts. Now we begin to tension the cable. To do this, take the half that is located closer to the glass and pass it through the upper left roller. Then we circle around the center and direct it to the upper right roller. After this, we pass to the lower right corner and the operation is completed.
6. Now all that remains is to tighten the cable. To do this, release the central roller and, using a hammer, begin to press it down. At the same time, we bite through the metal plate that holds the two threads together. Once the entire cable has straightened, we twist the central roller in such a position that the tension is maintained. Now we attach the cable to the glass with the expectation that it is slightly open. Tighten the nuts and put the guide rubber in place.
Now all that remains is to put all the door elements back together, and the repair is complete. There is absolutely no point in paying someone money for such a simple operation when you can do everything yourself.
Source