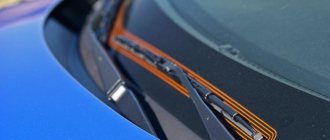
Not a single car is produced without such a basic option as heated rear window.
And windshields that can defrost themselves are gradually appearing on the list of accessories even on the most inexpensive cars.
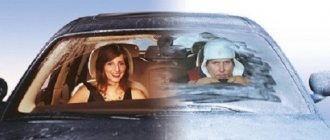
Progress is obvious, but once upon a time, heated glass was a luxury not available to everyone, and car enthusiasts used various tricks to get rid of the ice crust on the outside of the window and fogging from the inside!
It’s a paradox, but in the USSR, one of the “winter” countries in the world, for a long time insufficient attention was paid to heating car windows... While foreign manufacturers were already beginning to experiment with electric heated windshields, USSR cars were not always equipped with heated rear windows.
And the heating systems of Zhiguli, Moskvich, ZAZ, GAZ and UAZ cars were clearly not designed for domestic frosts - used Japanese cars, the first waves of which surged in the 80s, pleasantly shocked Russian owners with their “nuclear” stoves.
It would seem that the latitudes are still somewhat more southern, but what a difference!
On VAZ cars, rear window heating appeared in 1976 on the 2106 model. And the “barn” received this function (plus a rear wiper) only on the VAZ 2104 model in 1984.
Its predecessor, the VAZ 2102 station wagon, did not have it... On Muscovites it’s about the same story: the 412 did not have heated glass; Only its successor, 2140, received “warm” glass in 1976.
GAZ introduced heating on the 2410 in 1985 - however, in a relatively progressive form for its time - with two heating positions: strong and weak due to the serial and parallel inclusion of two groups of heating threads.
It should be noted that, in relation to this kind of options in domestic cars, the year is a very arbitrary matter.
The capacity of the Borovsky Glass Factory, the main supplier of glass, was traditionally not enough to provide glass with heating filaments to the entire Soviet automobile industry, and many cars, where this option was mastered long ago, actually rolled off the assembly line without it, even in the 90s. Impeccable provision of equipment was carried out only in relation to export cars...
DIY alternative
The “caring” Soviet industry tried to help out car owners who were deprived of electrically heated windows by the plant.
In addition to banal fans, the effect of which appeared only after the engine and interior had completely warmed up, several types of glass heaters were also produced - both direct and indirect heating.
Both of them, traditionally found by us in the form of “time capsules,” were, to put it mildly, far from perfect...
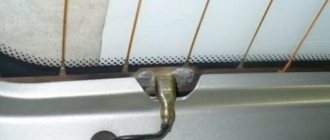
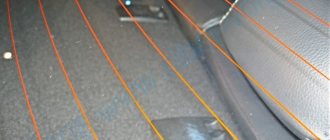
In the photo there is a direct heating heater in the form of a grid of threads glued to the glass, and an indirect heater in the form of a housing heating element attached to the glass with suction cups.
The heater adhesive to glass was a grid of nine strands of aluminum foil connected in parallel. Glue was applied to the threads, and they themselves were united with plastic film on one side and a protective paper layer on the other. The protective layer was peeled off, the mesh was glued to degreased glass, after which the plastic film was removed.
To be honest, it’s not easy to understand how effective the self-adhesive heated rear window was... After lying on the shelf for a long time, the contact in the device was broken, and the heating resistance floated when measured. It was not possible to determine it and calculate the current and power. Yes, and stick it on the sample too, because the adhesive layer has dried out hopelessly for more than a quarter of a century...
In any case, it is worth noting that the design was executed in a rather artisanal and illiterate manner (the ends of the aluminum threads were very weakly pressed against the common contact strips prone to rust), and the absence of a logo and the name of the plant on the packaging hints at a small-scale cooperative origin. It’s hard to envy the “lucky ones” who, in the era of total shortage of everything and anything, managed to purchase this device...
The case-type heater produced by the Leningrad Electromechanical Plant with the touching name “Equality” has a different design. The product is solid and neatly made. It is a metal perforated tube of triangular cross-section, inside of which a nichrome spiral with a power of 65 watts is stretched.
The gadget turned on without a relay - inside the car, the instructions prescribed installing a small unit with a powerful multi-ampere toggle switch and an indicator LED inside. The standard design of the switch does not shine with elegance, but it obviously would not spoil the interior of a Lada or Volga...
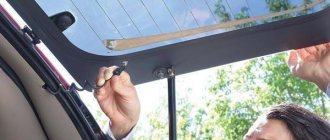
The device was attached to the windshield using suction cups, allowing air to be blown through it from the windshield deflectors. Or to the rear window - then the circulation of warm air was carried out naturally. According to the instructions, in passive mode, within 10-20 minutes of operation (the time depends on the temperature outside), a thawed strip will form on the frozen glass... 35x15 centimeters.
In car
Forgive me, forgive me, brand new Volkswagen Passat - but it was you who had to take a photo to understand the dimensions and scale of these antediluvian vulgar accessories of the Sovavto industry... It is clear that offering to “try on” THIS car with standard electric heating of both the rear and windshield, plus a powerful, well-thought-out system interior heating - like offering crutches to Usain Bolt! But it just so happened that I had a Passat on my test drive that day...
So, a retroheater glued to glass. Its height is small, but the width is enough for the glass of any car, in principle. The only problem is the adhesive used to glue vinyl stickers: it is not very suitable for heating strips. Either they will sooner or later come unstuck due to overheating, or the resistance is initially designed for low heat, which makes the device ineffective...
Spiral type heater. Easy to attach and holds up well despite its advanced age. Oddly enough, it doesn’t spoil the interior of a modern car that much, looking like some kind of auxiliary technological element. Is that the power button is too brutal...
Today, all these accessories are, fortunately, only memories of a bygone era... Let us pay tribute to the car owners of previous years - when leaving the entrance to a car, the interior of which is heated by command from a smartphone, the seats and steering wheel are hot, and the windshield is thawed by electric heating, we already it is difficult to fully understand the problems of that time and the degree of joy from solving them using methods that sometimes did not have to be chosen...
Source: https://www.kolesa.ru/article/ten-dlya-zhigulej-test-sovetskih-gadzhetov-dlya-razmorozki-stekol
General concepts
In order for the glass to heat evenly and to a strictly defined temperature (sufficient to evaporate moisture, but not exceeding safe limits), a special electrically conductive thread (thin flat wire) is used, which has a certain strictly standardized resistance.
READ How to Open a Car Door If It's Stuck
When current flows through it, it heats up - just as the coils in electric stoves and kettles heat up, only at a much lower temperature. Thanks to this heating, and also because it occurs evenly over the entire plane of the glass (since the thread is applied to it at equal distances), the latter quickly dries and is cleared of moisture.
Heating and ventilation system VAZ 2106
Home • VAZ • 2106 • Heating
Heater device for VAZ 2106
1 – deflector; 2 – air duct for heating the windshield; 3 – air supply cover; 4 – radiator; 5 – radiator casing; 6 – heater tap rod; 7 – outlet pipe; 8 – underwater pipe; 9 – heater tap; 10 – air distribution cover; 11 – heater fan electric motor; 12 – fan impeller; 13 – additional resistor; 14 – internal ventilation duct; 15 – lever of the air distribution cover; 16 – control lever bracket; 17 – air supply cover control handle; 18 – heater tap control handle; 19 – draft of the air supply cover.
Scheme of operation of the VAZ 2106 stove
How the stove works on a VAZ 2106: 1 – air distribution cover; 2 – fan electric motor; 3 – impeller; 4 – heater tap; 5 – underwater pipe; 6 – outlet pipe; 7 – radiator casing; 8 – air supply cover; 9 – hood; 10 – deflector; 11 – air duct for heating the windshield; 12 – drive rods; 13 – control lever bracket; 14 – control handles; 15 – radiator; 16 – internal ventilation duct; 17 – lever of the air distribution cover.
The heating system of the VAZ 2106 is liquid. Coolant from the engine cooling jacket is used as a coolant. The system consists of the heater itself, a bracket with control levers and air ducts. The heater housing contains a radiator with a tap, an electric fan and two air dampers.
The valve and air intake damper of the VAZ 2106 stove are connected by flexible rods to the levers of the control unit. The extreme right position of the upper lever corresponds to the full opening of the valve and the maximum flow of coolant through the heater radiator.
With a similar position of the lower lever, the outside air intake damper is fully open, which corresponds to the maximum air flow through the heater. Rotating deflectors on the instrument panel allow you to direct air flow to heat the windshield, front door glass and interior. The lower damper (air distribution cover) is not connected to the heater control unit.
We open and close the flap using the lever attached to it on the left (driver's) side. The air flow rate through the heater is controlled by a three-position switch. They can set one of two operating modes of the VAZ 2106 electric fan - minimum and maximum.
ATTENTION! It is forbidden to turn on the electric fan of the VAZ 216 stove with the air intake damper closed and the heater tap open.
New comment
Source: https://remocars.ru/vazman/2106/otoplenie/sistema-otopleniya-i-ventilyatsii-vaz-2106.html
Improved windshield
As you know, in VAZ 2107 cars the manufacturer did not provide such a function as heating
windshield. There is only its air flow, which allows you to remove the “foggy glass” effect. If you want to improve your car, you can become the owner of a heated windshield. This athermal glass is easily delivered on its own as all the necessary components are attached to it.
This type of glass is ideal for the VAZ 2107, so a snowy, frosty morning can no longer ruin your mood. Of course, heated glass is quite expensive compared to its simple counterpart. But you probably won't regret this windshield upgrade.
Source
How to connect the heated rear window of a VAZ 2106
Read about how to connect the heated rear window on a VAZ 2106 - go here. Repairing a car at home using video lessons. We know how to restore a car with minimal investment. Video instructions for car repair.
Category: DIY car repair
Laughter on topic: I was gluing ceiling tiles. Many people are probably familiar with it. Now I understand why the glue is called “Titan”. You spread it on the tiles and then just stupidly hold the ceiling for half an hour.
Published by Admin: at the request of Tofik
Reviews from the car owner: Very long 5th gear, which is very convenient. My model has luggage capacity of 520.l. I have 2 daughters and a stroller, a bicycle and a scooter fit in without any problems.
Good ground clearance, electronic gas pedal too +++, the steering rack copes well with the work, according to comparative feelings (I had a VAZ-21011, 21095, 21100) the car is more comfortable and more spacious.
There are no crickets yet :))))))))))).
It's easy and interesting to communicate here. Join us!
What's the problem? One wire to ground, no need to even drag it. Install the 15 ampere relay under the hood, apply + to the winding and power contact, connect the second contact of the winding (I’m talking about the relay) to the heating on/off button. The second contact of the button is to ground.
Connect the wire that goes to the glass to the second power contact of the relay. Here's + where to submit it - choose for yourself. If the memory is OK, at least with the battery.
If there are concerns, then you need to look at the diagram, where this + appears only when the ignition is on, which in principle is more correct.
You will need - wide terminals; - bolt terminals; - wires; - circuit breakers; - relay; - relay block; — glass heating switch; — bolts;
- rubber tubes and nut
Sensor on the carburetor VAZ 2109
Remove the instrument panel. Next, instead of a plug, you must install the existing rear window heating switch in this one.
Attach the relay behind the instrument panel opposite the tachometer. Then do the wiring, choosing the length of the wires relative to the dimensions of your car (experienced craftsmen advise taking the length with a margin).
It is highly undesirable to ignore the installation of the relay and connect the wires directly.
Otherwise, all the contacts will burn out, the switch button will melt and you will have to do everything all over again, only, of course, not forgetting to install the relay.
The overhead fuse you have has a looped wire on it. It must be cut at a distance of about six centimeters from the edge. From the short end of the wire, it must be crimped with a wide terminal and connected to the fuse. On the other side, also crimp with a wide terminal and insert the wire into the relay block.
- Stretch two wires from the heating switch, with a cross-section of about one and a half square millimeters, attach one to the fuse (connect after the fuse), the other to the relay block.
- Attach the relay next to the fuse in any location convenient for you.
- Remove the trim on both sides of the rear window.
- Connect the wire to the glass itself on the right.
- Connect a short wire to the rear window on the right with one end and the other to battery ground.
I have a similar question, I’ve had it since 1995 without it, it’s impossible to drive in winter - it sweats instantly, and with a window it’s not an option. As far as I can imagine, you need to connect one wire to the button and the other to the current source.
Remove the instrument panel. Next, instead of a plug, you must install the existing rear window heating switch in this one.
Attach the relay behind the instrument panel opposite the tachometer. Then do the wiring, choosing the length of the wires relative to the dimensions of your car (experienced craftsmen advise taking the length with a margin).
It is highly undesirable to ignore the installation of the relay and connect the wires directly.
Otherwise, all the contacts will burn out, the switch button will melt and you will have to do everything all over again, only, of course, not forgetting to install the relay.
DIY car door trim
The overhead fuse you have has a looped wire on it. It must be cut at a distance of about six centimeters from the edge. From the short end of the wire, it must be crimped with a wide terminal and connected to the fuse. On the other side, also crimp with a wide terminal and insert the wire into the relay block.
- Stretch two wires from the heating switch, with a cross-section of about one and a half square millimeters, attach one to the fuse (connect after the fuse), the other to the relay block.
- Attach the relay next to the fuse in any location convenient for you.
- Remove the trim on both sides of the rear window.
Source: https://nadouchest.ru/kak-podkljuchit-obogrev-zadnego-stekla-vaz-2106/
Heater design and circuit
Structurally, the rear window heater is presented in the form of conductive strips through which current flows. This current causes these strips to heat up, resulting in heating of the entire glass, which means defrosting the ice and eliminating fogging.
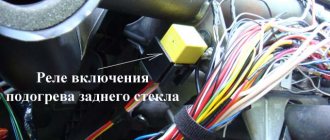
The heating circuit includes not only conductive strips, but also relays, wiring and a fuse. To turn on the device, a button is installed in the interior of the VAZ 2107 car. To understand how the design of this device works, below is a diagram that shows in detail all the components.
In the diagram, each element has its own purpose:
- A mounting block or relay and fuse block is a device that houses a relay with two fuses inside.
- Relay - helps to reduce the current in the circuit, thereby eliminating overheating of the wiring and failure of the power button.
- Ignition switch - a positive contact comes from the lock, which eliminates the possibility of turning on the rear window heater when the engine is not running.
- The button is dual-mode - turns the device on and off.
- The warning light is an indicator indicating the operation of the system and is located on the dashboard.
- Heater - has the form of conductive strips or threads that are glued to the glass on the inside.
Knowing the circuit diagram of the device, it will not be difficult to eliminate various malfunctions. We will consider below what types of malfunctions most often occur in the rear window heating system of the VAZ 2107.
For what reasons does the heating not work?
Owners of sevens know all the “sores” of this domestic vehicle, so when a malfunction occurs with the rear window heater, you don’t have to look for a breakdown for long. However, beginners and those who have not yet encountered such a malfunction are wondering how to check the system to find the cause and the faulty part.
The following reasons are identified for the inoperability of the heated rear window of the VAZ 2107:
- The fuse is faulty - if, when you turn on the rear window heating button, you find that it does not light up, then the first thing you need to check is the serviceability of fuse F7. It is he who most often burns out, which leads to the inoperability of the system. The reasons for its burnout are known - the passage of a large amount of current.
- Malfunction of the rear window heating relay - the relay, the main purpose of which is to reduce the current supplied to the power button, can also fail. If it malfunctions, it will need to be replaced.
- Malfunction of the power button - the reason for its failure is oxidation or carbon deposits on the contacts that occur when turned on. After all, it is known that when the rear window heating is turned on, a current is generated whose value is ten times the nominal value. This phenomenon contributes to the formation of carbon deposits on the button contacts.
- Damage to conductive threads. The cause of their malfunction is a broken contact. However, any breakdown in the system can be eliminated if the cause and location of the damage are correctly identified.
Heating the rear window of a VAZ 2106 with your own hands
- Below watch the video about connecting the rear heated glass of a VAZ 2106 and express your opinion about it in the comments to the article.
- Video quality: DVD
- The video was uploaded to the admin from the user Avtandil: for immediate viewing on the portal.
To give the correct answer to the question Connecting the rear heated glass of a VAZ 2106, you need to watch the video. After viewing, you will not need to seek help from specialists. Detailed instructions will help you solve your problems. Enjoy watching.
Humor on the topic: Boys and girls, if you experience awkwardness and embarrassment during dating, then it’s better to immediately move on to sex.