Characteristics of the Lada Vesta cabin filter
| Length | Width | Height |
| 216 mm | 200 mm | 35 mm |
You can also install one of the most popular substitutes:
- Pilenga FA-P0443 Price — 170 rub. Manufacturer: Pilenga. Has a regular filter element (not carbon). This model has higher popularity than the original. The reason is the good quality of the filter paper and the average cost is 3 times lower than the original. The coal model is not produced;
- GB-9978 Price – 110 rub. Manufacturer: BIG FILTER. Having a low price, spare parts from this manufacturer have good reviews from Vesta owners. The filter element is slightly stiffer than the original. Coal version - GB-9978/C. Price - 130 rubles;
- Finwhale AS433 Average price - 300 rubles. Manufacturer: Finwhale. Advantages over the original spare part - high-quality filter element and 2 times less cost. Coal version of Finwhale AS433C. Price — 390 rub.
Cabin filter Pilenga FA-P0443
Cabin filter GB-9978
Cabin filter Finwhale AS433
Instructions for Lada Vesta
| Length | Width | Height |
| 216 mm | 200 mm | 35 mm |
You can also install one of the most popular substitutes:
- Pilenga FA-P0443 Price — 170 rub. Manufacturer: Pilenga. Has a regular filter element (not carbon). This model has higher popularity than the original. The reason is the good quality of the filter paper and the average cost is 3 times lower than the original. The coal model is not produced;
- GB-9978 Price – 110 rub. Manufacturer: BIG FILTER. Having a low price, spare parts from this manufacturer have good reviews from Vesta owners. The filter element is slightly stiffer than the original. Coal version - GB-9978/C. Price - 130 rubles;
- Finwhale AS433 Average price - 300 rubles. Manufacturer: Finwhale. Advantages over the original spare part - high-quality filter element and 2 times less cost. Coal version of Finwhale AS433C. Price — 390 rub.
Cabin filter Pilenga FA-P0443
Cabin filter GB-9978
Cabin filter Finwhale AS433
Procedure:
- remove the glove compartment cover (you don’t have to remove it if you feel the tunnel lining clamps (from step 2) with your hand, putting your hand behind the shield on the engine side);
- Remove the tunnel lining on the front passenger side by unscrewing the screw and unclipping the fasteners at the top.
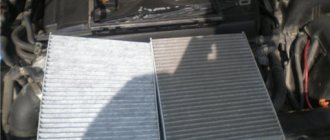
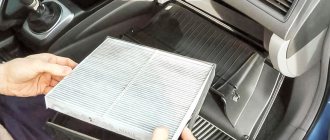
Look under the panel. Remove the cabin filter cover (No. 2) by squeezing the clips (No. 3).
To remove the filter element from the heater housing, pull it down by its lower edge (the hole in the housing is smaller than the dimensions of the cabin filter). Clean the seat from dust and debris (for example, dried leaves). Installing the cabin filter is carried out in the reverse order, observing the markings indicating the direction of the air.
11 January 2021 LadaOnline 36,598
On Vesta and XRAY, the cabin filter (catalog number 272773016R) is located in the housing of the heating, air conditioning and ventilation unit. To gain access to it, you do not need to remove the frill (wind cover), as on other Lada cars.
Air filter selection
Most car owners try to purchase original spare parts when replacing. But not everyone has the opportunity to get them for various reasons, for example, there are no official sales points nearby, or lack of funds to purchase an original part. Therefore, such drivers often turn to analogues, and there is nothing wrong with that. The main thing is to choose the right product correctly.
| Name | Manufacturer | vendor code | price, rub. |
| Air filter (original) | RENAULT/LADA | 165460509R | 730 |
| SIBTEK | AF27030 | 370 | |
| Air purifier (analog) | FORTECH | FA239 | 312 |
| CORTEX | KA0299 | 250 | |
| FILTRON | AP135/7 | 300 | |
| TSN | 9.1.1736 | 170 |
A clean filter element is the key to good car acceleration, fuel economy, and efficient engine operation. Some motorists themselves negatively affect engine performance by violating the regulations for checking the replacement of the air filter. Any driver can cope with its replacement without special knowledge and experience in carrying out similar work. On auto sites you can find many videos about replacing this element. But you should be as careful as possible, since any error during installation can lead to the supply of clogged air to the engine.
Review of Manufacturer Prices
| Name / Catalog article | Price, rub.) |
| Original | |
| Pilenga FA-P0443 from Renault | From 800 |
| High-quality analogues | |
| Nevsky filter NF6433 | From 350 |
| NF6433C (carbon filter) | From 400 |
| TSN Citron | —/— |
| SibTEK | —/— |
| BIG Filter, GB9978 | From 450 |
| Ekofil, EKO0441 | —/— |
| LADA Vesta/X RAY 272773016R (Vesta 1.8) | —/— |
| Mann CU22011 | —/— |
| Patron 5454211 | —/— |
*prices are as of January 30, 2019.
Recommendations for selection
Service center specialists strongly advise purchasing consumables with original factory catalog numbers. However, the high price of the “original” is not affordable for every car enthusiast. Therefore, they are forced to look for cheap but high-quality analogues.
Always check the integrity of the packaging, the presence of protective holograms, and quality certificates. If anything is in doubt, it is better to refuse the purchase.
Conclusion
The process of replacing the cleaning element is simple, but requires care on the part of the repairman. Prevention will take no more than 10 minutes.
It is not necessary to contact a service station, but provided that there are no major breakdowns that require the prompt intervention of a specialist. Observe replacement intervals, buy original consumables.
How to remove and replace the cabin filter on a Lada Vesta - instructions
To replace the cabin filter element on a Lada Vesta, you will need to prepare the necessary tools: a flat-head screwdriver, a Phillips screwdriver that matches the size of the screws, and a T-20 wrench. With this set in hand, you can begin dismantling the element. From the lining of the floor tunnel located on the side of the front right seat, remove the fastening screws
Afterwards, carefully pry up the decorative panel and remove the cladding, having previously pressed the fasteners with a flat screwdriver.
Access to the element is open. To replace the cabin filter unit, remove its cover. This is done by pressing the latches. Afterwards, they calmly remove the old filter and install a new one in its place. Some car owners clean the old element from dirt and put it back; this is not advisable. Since the material of the part significantly loses its functional characteristics, it will not do the job of cleaning the air.
How to properly replace the cabin filter of a Lada Vesta with your own hands
Before you start replacing, you need to prepare a small list of tools:
- new filter element;
- Phillips and minus screwdrivers;
- slotted screwdriver - “asterisk” 20;
- car vacuum cleaner;
- soft rags.
It is necessary to change the cabin filter in stages, in several steps:
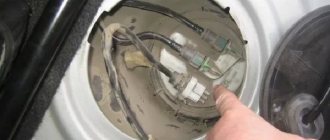
- The electrical wiring clips are disconnected. There are only two of them. At the bottom left of the glove compartment there is a latch for the backlight switch - it can be disconnected by feeling it with your hand and easily squeezing it. Having opened the glove compartment, you need to carefully pry the lampshade through a special hole using a thin minus screwdriver. The lampshade will easily come out and this clamp can also be detached.
- Now you need to disconnect the glove box itself. To do this, unscrew the five fastening screws with a slotted screwdriver: two from below and two from above. Before this, for convenience, you can unclick the lid travel latches, which prevent the box from opening completely.
- On the right side of the glove compartment there is a plastic flap that covers the instrument panel. It is pryed off with a minus screwdriver and also removed. After this, the glove compartment is pulled out and put into the back seat so as not to scratch the surface.
- At the bottom left there is a facing plastic panel, which is held in place by one screw. After unscrewing it with a slotted screwdriver, you need to carefully press out the three latches holding it: two on top and one on the side.
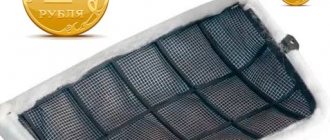
- At the bottom left is the cabin filter cover. It is held on by spring latches. Just squeeze them and the lid will come off easily. In order to pull out the element itself, it needs to be slightly compressed; when installing a new element, it is also compressed; after installation, it will straighten out and take the correct shape.
Before placing a new filter element, it would be a good idea to vacuum the installation area and wipe with a soft cloth.
To avoid confusion, all cabin filters have an arrow on the side indicating the direction of air movement. On a correctly installed consumable element, the arrow points inside the passenger compartment.
After installation, all removed elements are assembled in the reverse order.
Replacing the cabin filter of Lada Vesta at home
- We find a plastic trim on the passenger side, such as in the photo. Then we take TORX T20 and unscrew the only screw securing this cover.
- Now the cover is held in place by latches that need to be snapped off. To do this, you can use a plastic spatula or try to pry this pad at its bottom. We insert our fingers into the hole at the bottom and carefully snap off this decorative part.
- Next, find the location of the cabin filter. Using two fingers, press the latches located on both sides of the cover under which the filter is located and remove it.
- At this stage, nothing prevents you from taking out the old filter and replacing it. Be careful when taking out the filter, dirt, sand, leaves and much more may fall off it, so lay something down if you don’t want to stain the interior.
- Installing a new filter is an unpleasant and very complicated procedure. The fact is that the filter is soft, and access to the mounting socket is not entirely convenient. Before installing a new cabin filter, make sure you install it correctly. The filter has arrows indicating the direction of the air. In general, if you are not sure, just try to fill it as the old filter was. Lightly compress the filter into an “accordion” and then carefully insert it into the mounting socket. In its place, the filter will straighten and take the correct position.
Next comes the assembly, it is done in reverse order; there is nothing complicated here, so I will not describe the process.
As you can see, there is nothing complicated! If you approach any work with intelligence and understanding, you can do anything. I have everything, write if it worked for you and what difficulties you encountered in the process of replacing the cabin filter on a Lada Vesta.
Replacing the cabin filter Lada Vesta -
The cabin filter on the Lada Vesta is designed to purify the oxygen entering the interior of the car. Long-term operation without replacing the element leads to deterioration in throughput, clogging, and sedimentation of solid particles on the fibers. The first sign indicating a replacement is the appearance of a fetid odor in the cabin, something like dampness or foulness.
If you have experience in servicing equipment, you can change the cabin filter on a Lada Vesta yourself. If you don’t have the time or skills, contact a certified service center to order a service.
The manufacturer of passenger vehicles in the operating instructions indicates an interval of 25 - 30 km. mileage In practice, the resource is not relevant for domestic transport; it is too increased. Motorists recommend “updating” the cleaning element at around 15,000 km. This is the best option, which is acceptable both for densely populated megacities and for peripheral areas.
Replacing the cabin filter for most motorists is, frankly speaking, a “trifling task”; however, on some models this task requires special skills and dexterity. For example, in order to change the interior of a Vesta, you have to disassemble the glove compartment...
The essence of the work, or rather the trick, is not to remove the glove compartment, but instead remove the plastic trim that covers the tunnel. Then, through the resulting window, we will replace the Vesta cabin filter.
We will need TORX T20, as well as a plastic spatula, but you can do without it.
Let's get started!
- We find a plastic trim on the passenger side, such as in the photo. Then we take TORX T20 and unscrew the only screw securing this cover.
- Now the cover is held in place by latches that need to be snapped off. To do this, you can use a plastic spatula or try to pry this pad at its bottom. We insert our fingers into the hole at the bottom and carefully snap off this decorative part.
- Next, find the location of the cabin filter. Using two fingers, press the latches located on both sides of the cover under which the filter is located and remove it.
- At this stage, nothing prevents you from taking out the old filter and replacing it. Be careful when taking out the filter, dirt, sand, leaves and much more may fall off it, so lay something down if you don’t want to stain the interior.
- Installing a new filter is an unpleasant and very complicated procedure. The fact is that the filter is soft, and access to the mounting socket is not entirely convenient. Before installing a new cabin filter, make sure you install it correctly. The filter has arrows indicating the direction of the air. In general, if you are not sure, just try to fill it as the old filter was. Lightly compress the filter into an “accordion” and then carefully insert it into the mounting socket. In its place, the filter will straighten and take the correct position.
As you can see, there is nothing complicated! If you approach any work with intelligence and understanding, you can do anything. I have everything, write if it worked for you and what difficulties you encountered in the process of replacing the cabin filter on a Lada Vesta.
11 January 2021 LadaOnline 36,598
The manufacturer recommends changing the cabin air filter on Vesta and XRAY every 15,000 km or once a year, whichever comes first. When operating a car in harsh conditions (heavy gas pollution, dust, etc.), the cabin filter should be replaced 2-3 times more often.
On Vesta and XRAY, the cabin filter (catalog number 272773016R) is located in the housing of the heating, air conditioning and ventilation unit. To gain access to it, you do not need to remove the frill (wind cover), as on other Lada cars.
Procedure
- remove the glove compartment cover (you don’t have to remove it if you feel the tunnel lining clamps (from step 2) with your hand, putting your hand behind the shield on the engine side);
- Remove the tunnel lining on the front passenger side by unscrewing the screw and unclipping the fasteners at the top.
To remove the filter element from the heater housing, pull it down by its lower edge (the hole in the housing is smaller than the dimensions of the cabin filter). Clean the seat from dust and debris (for example, dried leaves). Installing the cabin filter is carried out in the reverse order, observing the markings indicating the direction of the air.
Self-installation of cabin filter Lada Vesta
According to AvtoVAZ regulations, the cabin filter on Lada Vesta must be replaced every 30,000 km or once every 12 months. However, mechanics advise carrying out the operation at least once every 15,000 km, and if the car is operated in unfavorable conditions (lots of dust, etc.), it is recommended to reduce the interval by half or even three times.
The peculiarity of the domestic sedan is that its filter is located directly in the housing of the heating unit, which means that the owner does not have to remove the frill from the windshield. All work is carried out directly from the inside of the car.
Where can I buy?
Usually coal is more expensive. The most popular sites are given in the table.
As you can see, the price can vary significantly. As a rule, this depends not only on the type of cabin filter for Lada Vesta, but also on the manufacturer. For example, foreign components produced by Mann and Pilenga brands (Italy) are significantly more expensive than domestic ones and even more expensive than original components.
Where can I buy?
Self-installation of a large air filter on Lada Vesta
Attempts by LADA Vesta owners to increase engine power and make its operation more flexible do not stop. Particularly valued are methods that do not require significant processing and costs, not to mention chip tuning, to which the attitude is ambiguous.
Finalization
And now, another way has appeared - a cold intake and a large air filter on the Lada Vesta, the same as the one on the Sport modification. The peculiarity of this method is that it is suitable for both engines of the model - 1.6 and 1.8 liters.
Lada Vesta Sport has an enlarged air filter created specifically for this version. In addition, this modification has a different air intake location - it is located next to the left headlight behind the radiator grille.
Components
The entire Lada Vesta Sport air filter kit consists of a number of elements. Their names and articles are presented in the table.
| Air filter half housing (upper) | 8450032859 |
| Filter element | 8450032860 |
| Semi-housing (lower) of the air filter | 8450032858 |
| Bolt | 7703008226 |
| Screw M6x30 | 8450002332 |
| Washer 6x18 | 8450003738 |
| Elastic bushing for fixing the electric fan | 8450001134 |
| Intake pipe hose assembly | 8450032835 |
| Screw clamp assembly | 8450001108 |
| Clamp 16 | 7703083470 |
| Hose (upper) crankcase exhaust ventilation | 8450008594 |
| Connection pipe | 8450101902 |
| Air intake assembly | 8450032837 |
| Screw clamp assembly | 8450001108 |
| Connection pipe | 8450032838 |
| Washer 6x18 | 8450001123 |
| Bolt M6x25 | 8450006008 |
Alternative
However, one of the owners of Vesta, whose name is Evgeniy and is known on Drive under the nickname gps-nav, found an alternative way of installing a large air filter on the Lada Vesta, which is several times cheaper. It involves purchasing components from different cars and their subsequent modification.
Elements:
- filter element - Filtron AP 074/3 is suitable - 330 rubles;
- air filter housing from the Ford Mondeo 3 model – 600 rubles – can be purchased under article number 4609885902;
- air filter pipe from the VAZ 2111 model – 700 rubles;
- sewer pipe 75 mm and sewer bends 90° and 67° – 220 rubles;
- fitting - 30 rubles;
- plastic ties (2 units) and a metal clamp (2 units).
After all the listed components have been purchased, you can begin work.
Work progress
Self-installation of a large air filter on a Lada Vesta begins with modification of the housing itself. First of all, it is necessary to solder the factory hole through which air is taken in.
Next you need to solder the purchased pipe. You can do this in different ways - using epoxy resin, soldering a metal mesh, using a stapler, etc. But in general, soldering using a metal mesh provides the most durable fixation.
Next you need to connect the sewer pipes and outlets.
To prevent the connector from interfering with the installation of the filter housing, it must be recessed and secured with a tie.
Then you need to move the car’s battery to the right and back until it stops, since otherwise it will interfere with the installation of the large air filter housing on the Vesta.
The case itself needs to be tightly fixed, and to do this, place it in such a way that the rear legs rest on the corrugation with wires.
This completes the independent installation of a large air filter on the Lada Vesta.
Effect
If you consider the reviews of the owners who went through with this modification, it becomes clear that the effect is quite noticeable. They note that the engine begins to “breathe”, and not only at the bottom, but also works more vigorously after 3,000 rpm.
The engine revs noticeably easier up to 5,000 rpm. Those who often drive in traffic jams claim that the car has stopped shaking in traffic jams.
In general, installing a large air filter on your Lada Vesta yourself is completely worth it, especially if you don’t buy branded products.
Other options
Below are modification options from other West owners, using several other components. All details can be viewed in their logbooks.
Option from Ivan Kiselyov. On Drive under the nickname BAHO and his car Lada Vesta *Blues Sky*
Option from Alexander. On Drive under the nickname MiheyA and his car Lada Vesta sedan 1.8 AMT
On Drive under the nickname WaPJIaTaH and his car Lada Vesta Fantan
Replacement sequence
Since Lada Vesta is a new product on the automobile market, it cannot yet boast of a variety of cabin filters. The following cleaners are used in the machine:
- Fortech (standard);
- NAC (carbon).
Having selected the required part, you can proceed directly to replacement. The filter is located in the cabin at the bottom of the dashboard, to the left of the glove compartment.
- To replace this part, it is necessary to dismantle the lining of the floor tunnel on the right, and then remove the glove box.
- Using a T20 wrench you need to unscrew the screw that secures this cladding to the bracket.
- Use the tip of a flat-head screwdriver to pry up the fasteners, after which the casing can be removed.
- Unscrew the screw (with a T20 key) securing the glove compartment from the bottom.
- Using the same tool, you need to unscrew the lower screw that secures the glove compartment on the right side, and then the three upper ones.
- Now you need to move the glove compartment away from the dashboard and disconnect the glove box connector from the left lighting element.
- Release the latch, after which the backlight element and the electrical wiring harness must be disconnected.
- The glove box has been removed.
- The filter cover needs to be removed only to the right side (by squeezing the latches with your fingers) so that its bottom moves along the guides.
- Next, the filter element must be removed from its place, slightly bent in height.
- The interior cleaner has been removed. Now use a vacuum cleaner to clean the seat of this element.
Replacing the cabin filter of Lada Vesta - Leading auto portal
The cabin filter on the Lada Vesta requires replacement primarily from a hygiene point of view. Comfort in the cabin plays an equally important role, as does the resource of the heating and climate system. The process of replacing the cabin filter takes just a few minutes, despite this, many owners wait until the last minute. Let's figure out how to change the cabin air filter with your own hands and at the same time save time and money on visiting a service station.
The cabin filter is one of those parts that are most deprived of driver attention.
This is due to the fact that the quality of movement of the vehicle does not depend in any way on its serviceable (or, conversely, faulty) condition.
That is why car owners often do not remember its existence at all, let alone promptly replace the clogged cleaner.
However, this approach is fundamentally wrong. Although a faulty cabin air filter will not impair the vehicle's dynamic performance, it will greatly affect the condition of the air inside the cabin.
After all, all harmful substances, as well as road dust, are retained by this part when it is in good condition. In addition, a properly functioning purifier filters out pathogenic bacteria.
You can recognize that the cabin filter is inoperative by the following signs:
- In the warm season, the interior heats up too much from the inside, and this is felt much more strongly than with a working filter.
- Foreign odors that were previously not felt in the cabin become very noticeable.
- Contamination quickly accumulates on the front window of a car, as well as on the dashboard, and regular periodic cleaning of the interior is no longer enough to keep the car clean.
- Vehicle windows constantly fog up, regardless of the time of year.
The appearance of even just one of the listed symptoms indicates the need for an urgent replacement of the cabin cleaner. It is also advisable to change this filter while preparing the car for the summer.
You should not ignore signs of malfunction of this element or delay replacement, which should be carried out in accordance with the regulations, since in the future such carelessness can result in serious health problems.
Replacement procedure
The cabin filter on the model in question (Lada Vesta) should be changed in accordance with the manufacturer’s recommendations at least after every 30,000 kilometers. However, it should be borne in mind that if the car is mostly operated in areas with heavy dust, then this figure must be reduced by 1.5 or even two times.
| Model | Filter type | Price |
| Fortech | Standard | 230 rub. |
| NAC | Carbonic | 280 rub. |
Having purchased the necessary spare part, you can proceed directly to replacement. The cabin filter is located at the bottom of the dashboard, on the left side of the glove compartment.
To replace this element, you will need to remove the floor tunnel lining on the right side, and then remove the glove box.
Using a T-20 wrench, you need to unscrew the fastening screw, with which the floor tunnel lining, located on the right side, is fixed to the bracket.
Using a flat-tip screwdriver, you need to pick up the latches shown by the arrows...
...after which the cladding can be dismantled.
Using the same wrench, unscrew the lower fixing screw of the glove compartment on the right side...
...and then the three top fasteners.
Then the glove compartment should be moved away from the dashboard, and then disconnect the connector from the left element of the glove box illumination.
Release the latch, after which the electrical wiring harness and the backlight switch must be disconnected.
The purifier cover should be removed strictly to the right (by squeezing the latches with your fingers) so that its bottom follows the guides.
The purifier cover itself is shown here, as well as the fasteners.
After this, the filter element should be slightly bent in height and pulled out from its place.
The cabin filter has been removed. Now you should use a vacuum cleaner to clean its seat.
Please note that you can insert a new filter only by slightly deforming it (bending it diagonally). The fact is that the purifier has a greater height than the niche intended for it. There is no need to be afraid of damage to the part; when the cabin filter takes its place, it will straighten out and will not lose its ability to perform its function.
All that remains is to install the filter element cover, moving it along the lower guides until the latches engage. Subsequent assembly occurs in reverse order.
Leading automobile portal
Lada Vesta Lada Vesta air filter replacement
2 years ago
We change the cabin filter in Lada Vesta ourselves. It is advisable to replace the filter based on its condition. And not only during maintenance.
2 years ago
Which AIR FILTER is better to choose for VAZ/LADA VESTA, X RAY. Replacing the air filter Lada Vesta, XRAY. Renault 16 54 605 09R BM FA 2180 Sibtek AF27030 Nevsky filter NF-5590c TSN 9.1.1736 Ekofil EKO-01.200 Pilenga FA-P 2180 MANN-FILTER C 27 030 ———————————————— —————————————————- Auto parts (reviews, tests, testimonials)
1 years ago
Using ordinary silicone seals. I eliminate dirt and splashes from vehicles in front. I think this simple solution will help keep the under hood clean longer.
4 months ago
watch the second part https://www.youtube.com/watch?v=BvnAQx5H5EY subscribe to my Instagram
Replacing the cabin filter of Lada Vesta with your own hands
Signs of a malfunctioning cabin filter:
- in hot weather, the car interior gets too hot inside, and this is felt much more strongly than when the filter is working;
- foreign odors, previously unnoticed, become very pronounced;
- The dashboard and windshield of the car become dirty very quickly, and regular cleaning inside the car is no longer enough to keep the car clean;
- Regardless of the time of year, car windows regularly fog up.
The appearance of even one of the above symptoms indicates the need for urgent filter replacement. It is also recommended to install a new interior cleaner while preparing the car for the summer season. You should not ignore signs of malfunction of this spare part and delay the replacement, which must comply with the regulations, since such carelessness in the future can lead to serious health problems.
Where is it located, when to change it and which cabin filter to install
Location - Vesta cabin filter is located in the area of the front passenger seat, on the left, behind the tunnel panel.
Replacement frequency - Lada Vesta maintenance regulations indicate a replacement interval of 30,000 km.
It would be a good idea to check and clean the filter at 15,000.
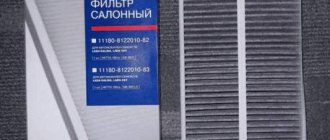
Suitable filters are original, with catalog number - 272773016R. Analogs: FRAM CF11706, BOSCH 1987435011, MAHLE LA923, MANN-FILTER CU22011.
Place where the filter is located
To carry out preventive maintenance, temporary dismantling of the storage compartment will be required. However, experienced specialists practice replacing the cleaning element in a different way, which we will consider below.
When to change
In accordance with the manufacturer's recommendations, maintenance of the interior cleaner is carried out every 30,000 km. As applied to the CIS, Russia, among others, the interval is large.
Taking into account climatic conditions, the level of dust and gas contamination of the territory, the purifier needs to be updated every 15,000 km, with the exception of unscheduled maintenance situations.
- reducing the force of air flow from the deflectors;
- the appearance of a fetid odor and rot in the cabin, which is dangerous for the human respiratory system;
- Leaves, dust, and dirt fly out of the deflectors when the stove heater is activated;
- the onset of the time interval according to the instruction manual.
The algorithm for preventing the stove heater on Lada Vesta 1.8 is identical.
Preparatory stage:
- new cleaner;
- aerosol for cleaning the air conditioner evaporator (if necessary, its prevention);
- screwdriver with a Phillips bit, TORX key set to “20”;
- rags, plastic spatula;
- additional lighting provided that there is not enough daylight for work.
Sequencing:
- We place the car within the perimeter of the repair area, provide priority safety measures, and squeeze the parking brake.
- On the passenger right side, open the glove box and remove the contents.
- We unscrew the three fixing screws and lower the glove box housing to the floor. First disconnect the lighting limit switches.
- On the left side of the opening, we snap off the plastic cover, squeeze the cleaning element with an accordion, and remove it.
- We blow out the cavity with a household vacuum cleaner or other device with a stream of compressed air.
- Place the new filter in the direction of the arrow towards you.
The second and most rational way to replace the interior air purifier:
- On the right side of the central channel, use a plastic spatula to pry off the cover. It is secured with three clips.
- We unclip the cover of the filter housing and remove it, after squeezing it with an accordion.
- We install a new cleaner.
Maintenance of the cabin air filter has been completed. We replace the carbon air element by analogy.
What analogues of the original Lada Vesta filter are there?
The manufacturer of the original element for the Vesta was Renault. The filter device is made of a special nanofiber; it does not contain a carbon element. The cost of a spare part can reach 1000 rubles. You can save money by purchasing one of the high-quality analogues. One of the most popular filtration elements is the Pilenga FA-P0443 model from Pilenga. The quality material is not inferior to the original sample, but costs slightly less than the original. For car owners who prefer air purification using a carbon element, BIG FILTER and Finwhale companies offer their parts. Their main advantage is that coal retains not only dust, but also allergens, which is important for drivers with problems in the respiratory system. There are several Russian manufacturers focused on creating consumables for the Lada Vesta: Nevsky Filter, TSN Citron, SibTEK and others.
It is best to install a new element at the beginning of the summer season, for example, when replacing tires. This will prepare the car for a large amount of dust on the roads, get rid of flowering products, and improve the operation of the air conditioner. The replacement process should not be completely ignored. A low-quality part is harmful to health and affects the operation of the filtration system. Even a young car owner can handle the replacement process without turning to the help of specialists.
Lada Vesta cabin filter - from analogues to replacement
You can reduce money waste by changing the filter device yourself. The installation of new equipment is preceded by its purchase; before making it, find out the article or catalog number of the part to avoid mistakes.
Let's look at the topic and you will learn a lot about the cabin filter on the Lada Vesta, learn 2 ways to change the filter, including without removing the glove compartment.
Anyone who has ever changed the cabin filter in Vesta knows that it is located in the housing of the ventilation system, but access to it is through the left wall of the glove compartment.
This is not typical for Lada cars, and is slightly confusing for owners who are starting to replace the part for the first time. Previously, these spare parts were installed under the hood of different Lada models (Grant or Priora). This is not very convenient for drivers.
Manufacturers of Lada Vesta have made life easier for owners by moving the filter device inside the cabin.
When driving a Lada 2180 in a dusty area, the cabin filter will have to be changed as it gets dirty, without taking into account the mileage. You should look for signs that indicate that further use of the item is useless. The most notable of them:
- Poor operation of the air conditioner, leading to strong heating of the interior in sunny weather;
- Constant unpleasant odor, regardless of the environment;
- In winter, the stove barely heats the interior;
- Active contamination of the front panel of the car and windows;
- The humidity inside the cabin is so high that the windows sweat in any weather.
To replace the cabin filter element on a Lada Vesta, you will need to prepare the necessary tools: a flat-head screwdriver, a Phillips screwdriver that matches the size of the screws, and a T-20 wrench.
Having this set in hand, you can begin to dismantle the element. Remove the fastening screws from the floor tunnel lining located on the side of the front right seat.
Afterwards, carefully pry up the decorative panel and remove the cladding, having previously pressed the fasteners with a flat-head screwdriver.
Access to the element is open. To replace the cabin filter unit, remove its cover. This is done by pressing the latches. Afterwards, they calmly remove the old filter and install a new one in its place.
Some car owners clean the old element from dirt and put it back; this is not advisable.
Since the material of the part significantly loses its functional characteristics, it will not do the job of cleaning the air.
You can install the cleaning element in the Lada Vesta without disconnecting the glove box from the instrument panel. To do this, disassemble the tunnel panel, as described above.
In the far right corner there is a filter device cover; after removing it, access to the old part opens.
This option requires less time, fewer tools, and allows you to keep the drawer lighting on, but it is recommended to use it with great caution, since the likelihood of damaging the latches becomes higher.
The manufacturer of the original element for the Vesta was Renault. The filter device is made of a special nanofiber; it does not contain a carbon element. The cost of a spare part can reach 1000 rubles. You can save money by purchasing one of the high-quality analogues.
One of the most popular filtration elements is the Pilenga FA-P0443 model from Pilenga. The quality material is not inferior to the original sample, but costs slightly less than the original.
For car owners who prefer air purification using a carbon element, BIG FILTER and Finwhale companies offer their parts. Their main advantage is that coal retains not only dust, but also allergens, which is important for drivers with problems in the respiratory system.
There are several Russian manufacturers focused on creating consumables for the Lada Vesta: Nevsky Filter, TSN Citron, SibTEK and others.
This will prepare the car for a large amount of dust on the roads, get rid of flowering products, and improve the operation of the air conditioner. The replacement process should not be completely ignored.
A low-quality part is harmful to health and affects the operation of the filtration system. Even a young car owner can handle the replacement process without turning to the help of specialists.
Lada Vesta cabin filter - how to remove and which one to choose Link to main publication
Replacing the cabin filter on Lada Vesta
Below we will consider when to change the cabin filter correctly, what is required for this, and what components are best to use.
Briefly about the purpose
The cabin filter is an element necessary to filter dust and dirt passing through the air flow from the outside. Such products are installed at the manufacturer’s factory, and are later replaced at a service station or by the car owner.
Common replacement options are a dust or carbon filter element. The latter provides a “deeper” cleaning from phenols and benzenes. The disadvantage of a carbon filter is its higher price.
Replacing the cabin filter of Lada Vesta 1.6 is simplified by the fact that the necessary element is located inside. This means “finishing” work, but with the dismantling of some parts.
Experts distinguish two options - with removing the glove compartment or without performing this work. The second method is preferable because it requires less time. For the purity of the “experiment” we will consider both ways.
Timing for replacing the cabin filter on Lada Vesta
Replacing the cabin filter on a Lada Vesta, provided that a high-quality part is installed, is needed after 15-20 thousand kilometers. Car developers set more flexible deadlines - 30 thousand kilometers.
But the manufacturer clarifies that its recommendation implies operating the vehicle in conditions of minimal air pollution.
In current realities, it is almost impossible to achieve this state, because in urban or rural conditions the level of dust is very high. That’s why it’s better not to delay the work and make a replacement after 10-15 thousand.
Signs of a malfunctioning cabin filter on Lada Vesta
In order not to waste time and money, it is important to identify the problem in time. Many car owners wait until the Lada Vesta service to replace the cabin filter.
This approach allows you to increase the time of use of the part and money. But in some circumstances it is better not to take risks and do the work right away.
Replacing the cabin filter on a Lada Vesta with and without air conditioning is necessary when a number of symptoms appear.
Let's highlight the main ones:
1. Deterioration in airflow quality when the corresponding function or heating system is activated. The malfunction is diagnosed by poor operation of the stove, which does not produce the required portion of warm air flow. In such a situation, the cause of the malfunction may not only be the filter element. Sometimes cleaning the air intake is enough to fix the problem.
2. The appearance of unpleasant “odors” in the cabin. The main sign indicating that the filter in the Lada Vesta is dirty is a stench when you turn on the blower or heating. This indicates that the filter device does not perform direct functions of air purification. To avoid illness or other consequences, a failed part must be replaced.
3. A layer of dust on the “tidy”. This is another sign that the cabin filter is not doing its job.
4. Fogging of windows. This symptom indicates a deterioration in the quality of the ventilation system, which is often caused by a dirty filter.
Consequences
If you ignore the problem, dust, small rubber elements, exhaust gases, harmful bacteria and other dangerous elements will enter the cabin, and then into the lungs of the driver and passengers.
In addition, contamination of the cabin filter is fraught with problems in vehicle operation:
1. The air flow deteriorates, which leads to a high load on the heating system. The motor operates at the peak of its capabilities, and this is fraught with overheating and failure. To change the stove, you will have to spend more time and money. It is not always possible to cope on your own, so you have to involve experts in the work.
2. Dust that accumulates on the air conditioner evaporator collects water. As a result, optimal conditions are created for the development of rust and the proliferation of dangerous microorganisms.
What to change for
Before starting work, you need to select and buy a cabin filter suitable for the Lada Vesta. The manufacturer supplies the simplest dust version (made of paper).
To install a similar part, it is important to know the catalog number (the original from the factory is Renault 272773016R). If desired, you can install another analogue or spend money on a higher quality carbon filter element
How to determine that the cabin filter on the West is clogged
When driving a Lada 2180 in a dusty area, the cabin filter will have to be changed as it gets dirty, without taking into account the mileage. You should look for signs that indicate that further use of the item is useless. The most notable of them:
- Poor operation of the air conditioner, leading to strong heating of the interior in sunny weather;
- Constant unpleasant odor, regardless of the environment;
- In winter, the stove barely heats the interior;
- Active contamination of the front panel of the car and windows;
- The humidity inside the cabin is so high that the windows sweat in any weather.
The cabin filter on the Lada Vesta is located at the bottom left of the storage compartment. To replace it you need to perform the following steps sequentially:
- Use a TORX T-20 wrench to unscrew the screw holding the floor tunnel lining in place. Then release the 3 fasteners. After this, the lining can be easily removed. It is better to remove it so that it does not interfere with further operations.
Next, use a flat-head screwdriver to separate the side plug from the panel.
Now, using a TORX T-20 wrench, you need to unscrew five screws of the glove compartment, three of them are located on top, two on the bottom. The box pulls out, but not all the way, since you need to disconnect the electrical contact of the backlight. After this, the glove compartment can be removed completely.
Now the cleaner is already in the access area, but you need to remove the plug from it. To do this, you need to press two latches and move the plastic socket to the right.
The cleaner itself is easy to remove; you just need to press it lightly.
- Do not ignore the seat; it is as clogged as the filtration element itself. You can clean it with a car vacuum cleaner or a rag.
- Now you can install a new cabin filter. The seat is slightly smaller than the dimensions of the module, so it will have to be slightly deformed. This can be done by pressing diagonally. There is no need to be afraid of damage: the cleaner, once in place, will return to its shape.
- Now we install everything in the reverse order: plug, connect the electrics, install the glove compartment, tighten the screws, side panel plug, trim.
For the procedure for replacing the Lada Vesta cabin filter, watch the video:
Below we will consider when to change the cabin filter correctly, what is required for this, and what components are best to use.
Briefly about the purpose
The cabin filter is an element necessary to filter dust and dirt passing through the air flow from the outside. Such products are installed at the manufacturer’s factory, and are later replaced at a service station or by the car owner.
Common replacement options are a dust or carbon filter element. The latter provides a “deeper” cleaning from phenols and benzenes. The disadvantage of a carbon filter is its higher price.
Replacing the cabin filter of Lada Vesta 1.6 is simplified by the fact that the necessary element is located inside. This means “finishing” work, but with the dismantling of some parts.
Experts distinguish two options - with removing the glove compartment or without performing this work. The second method is preferable because it requires less time. For the purity of the “experiment” we will consider both ways.
Timing for replacing the cabin filter on Lada Vesta
Replacing the cabin filter on a Lada Vesta, provided that a high-quality part is installed, is needed after 15-20 thousand kilometers. Car developers set more flexible deadlines - 30 thousand kilometers.
But the manufacturer clarifies that its recommendation implies operating the vehicle in conditions of minimal air pollution.
In current realities, it is almost impossible to achieve this state, because in urban or rural conditions the level of dust is very high. That’s why it’s better not to delay the work and make a replacement after 10-15 thousand.
Signs of a malfunctioning cabin filter on Lada Vesta
In order not to waste time and money, it is important to identify the problem in time. Many car owners wait until the Lada Vesta service to replace the cabin filter.
This approach allows you to increase the time of use of the part and money. But in some circumstances it is better not to take risks and do the work right away.
Replacing the cabin filter on a Lada Vesta with and without air conditioning is necessary when a number of symptoms appear.
Let's highlight the main ones:
1. Deterioration in airflow quality when the corresponding function or heating system is activated. The malfunction is diagnosed by poor operation of the stove, which does not produce the required portion of warm air flow. In such a situation, the cause of the malfunction may not only be the filter element. Sometimes cleaning the air intake is enough to fix the problem.
Replacing the cabin filter on a Lada Vesta without removing the glove compartment (+ video)
Replacing the cabin filter for most motorists is, frankly speaking, a “trifling task”; however, on some models this task requires special skills and dexterity. For example, in order to change the interior of a Vesta, you have to disassemble the glove compartment...
However, thanks to the “handy folk” craftsmen, this work can be done much easier and faster. In this article, I will tell you, dear friends, how to replace the cabin filter on a Lada Vesta without removing the glove compartment.
The essence of the work, or rather the trick, is not to remove the glove compartment, but instead remove the plastic trim that covers the tunnel. Then, through the resulting window, we will replace the Vesta cabin filter.
We will need TORX T20, as well as a plastic spatula, but you can do without it.
Let's get started!
Replacing the cabin filter of Lada Vesta at home
- We find a plastic trim on the passenger side, such as in the photo. Then we take TORX T20 and unscrew the only screw securing this cover.
- Now the cover is held in place by latches that need to be snapped off. To do this, you can use a plastic spatula or try to pry this pad at its bottom. We insert our fingers into the hole at the bottom and carefully snap off this decorative part.
- Next, find the location of the cabin filter. Using two fingers, press the latches located on both sides of the cover under which the filter is located and remove it.
- At this stage, nothing prevents you from taking out the old filter and replacing it. Be careful when taking out the filter, dirt, sand, leaves and much more may fall off it, so lay something down if you don’t want to stain the interior.
- Installing a new filter is an unpleasant and very complicated procedure. The fact is that the filter is soft, and access to the mounting socket is not entirely convenient. Before installing a new cabin filter, make sure you install it correctly. The filter has arrows indicating the direction of the air. In general, if you are not sure, just try to fill it as the old filter was. Lightly compress the filter into an “accordion” and then carefully insert it into the mounting socket. In its place, the filter will straighten and take the correct position.
Next comes the assembly, it is done in reverse order; there is nothing complicated here, so I will not describe the process.
As you can see, there is nothing complicated! If you approach any work with intelligence and understanding, you can do anything. I have everything, write if it worked for you and what difficulties you encountered in the process of replacing the cabin filter on a Lada Vesta.
Read with this
- Lada Vesta cross ground clearance ground clearance
- Replacing the air filter for Lada Vesta. expert advice on choosing
- Life hack: cabin filter on Priora
- How to change cabin filters on Nissan X-trail crossovers of different generations
- Replacing the cabin filter on a viburnum
- What will the Lada Vesta be like: body dimensions?
- VAZ Priora (Lada 2170)
- Replacing the cabin filter in a ford focus 2
- Where is the cabin filter located and when should it be changed?
- How to replace the fuel filter on a Lada Granta
How to change the cabin filter of a Lada Vesta quickly ⋆ I Love My Lada
The cabin filter on the Lada Vesta requires replacement primarily from a hygiene point of view. Comfort in the cabin plays an equally important role, as does the resource of the heating and climate system.
The process of replacing the cabin filter takes just a few minutes, despite this, many owners wait until the last minute.
Let's figure out how to change the cabin air filter with your own hands and at the same time save time and money on visiting a service station.
A Lada Vesta branded cabin filter or a good quality equivalent can wait about 20 thousand km for replacement.
Nevertheless, the plant claims that the element is designed for 30,000 km, but with the caveat that the car must be operated in conditions of low dust content and low air pollution.
Since greenhouse operating conditions have not yet been created in our country, experienced drivers recommend replacing the cabin filter at least once every 10-15 thousand km. And it's not just the dust itself that matters.
This filter definitely won't work.
Therefore, no one changes the cabin filter based on mileage. Of course, you can time the filter replacement to coincide with scheduled maintenance, but you also need to know the obvious signs of a clogged cabin. At least the most basic ones:
- The airflow intensity decreases when air recirculation or heating is turned on. The stove may blow warm air weakly, and the air conditioner will no longer be effective. True, in these cases the filter is not always to blame. It is quite possible that the air intake is clogged, this is especially true for autumn with its eternal fall of leaves and for the snowy winter.
- The windows from inside the cabin often fog up. This again occurs due to a decrease in ventilation intensity.
- There is a constant layer of dust on the front panel, sediment on the front glass. True, if the sediment or deposit is sticky to the touch, it is worth checking whether the heater radiator is leaking.
- Foreign odors in the cabin.
If these symptoms appear, you need to find the time to replace the cabin filter. If this is not done, dust and microparticles of silicon, small particles of rubber, dust from brake pads and clutch friction discs, heavy fractions of diesel engine exhaust, as well as bacteria and microorganisms will freely enter the cabin and, accordingly, into our lungs.
There are also technical issues. Firstly, when the cabin filter is clogged, the throughput of the air ducts deteriorates, and this entails an increased load on the electric motor of the heating system.
As a result, it can easily overheat, the winding will short-circuit and the motor will fail, and changing the stove motor is not the most pleasant procedure, both in terms of work and time spent, and in terms of the money spent on replacing it.
Stock cabin filter Lada Vesta
Secondly, dust accumulated on the surface of the air conditioner evaporator absorbs moisture. A warm and humid environment is ideal conditions for the growth of bacteria and the appearance of corrosion on the evaporator itself, which will also not be a pleasant surprise for the owner.
From the factory, Lada Vesta is equipped with a new cabin filter, a regular paper dust filter. Its Renault catalog number is 272773016R. There is a nuance.
The Renault filter package actually contains a German Mann CU22011 dust filter.
But if you buy both in retail, they are both identical in size and characteristics, since, as you know, Renault-Nissan-Mitsubishi does not produce filters.
There is a whole brood of analogues, and in addition, you can buy a carbon filter. It is more expensive, but for the first few thousand runs it will have an antibacterial and adsorbing effect on the air. After 4-5 thousand, as a rule, the carbon filter already works in the same way as a regular dust filter.
There is certainly a difference between them and it is felt immediately. True, they are somewhat different in price. For example, a regular dust filter for Vesta NF6433 costs $3, while its carbon counterpart NF6433 C costs one and a half dollars more.
Here are several replacements for original cabin filters for Lada Vesta:
- AIKO AC0203C;
- AMD AMDFC738C;
- Fortech FS146;
- LYNXauto LAC1925;
- Fortech FS146;
- Bosch 1987 435 011;
- FranceCar FCR21F090.
Another cheap analogue of a Renault filter And a number of other manufacturers offer both two- and three-layer dust filters and carbon elements.
Theoretically, to replace the cabin filter, you need to remove the panel to the left of the front passenger on the center console and disassemble the glove compartment. In general, there is not much work, but it also takes some time. Practice has shown that it is possible to change the cabin filter without disassembling the glove compartment. This is done like this:
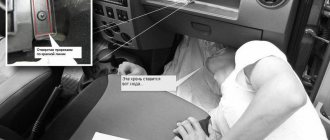
- Unscrew the self-tapping screw with a TORX-20 bat at the bottom of the panel.
- Use a thin screwdriver or a plastic mounting spatula to pry up the upper part of the panel...
- ... and remove it, lifting it up and disengaging it from the eyes.
- We look under the glove compartment and find the cabin filter cover closer to the engine shield. It is secured with two plastic latches. You can easily reach them with your fingers.
- Unclip the cover latches and remove it.
- All that remains is to remove the filter, slightly bending it, from the cartridge. The filter is quite soft, although it fits tightly into the cartridge.
Now we carefully clean the inside of the cartridge, preferably with a vacuum cleaner, wipe it and install a new filter, paying attention to the arrow at the end.
We carry out assembly in reverse order.