Changing the axle bearing on a Niva Chevrolet: bearing number and articles
The axle shafts in the rear axle of the Niva Chevrolet experience very serious loads. The oil seals and, naturally, the bearings, which we will talk about today, get a fair amount of damage. If there is a conversation about replacing them, the manufacturer modestly advises changing them along with the axle shafts. It’s not cheap, so today we’ll try to replace the axle bearing on a Chevrolet Niva, look at the article numbers and manufacturers, and listen to the advice of experts.
Essential tool for DIY repairs
Replacing a Niva Chevrolet axle bearing does not always go smoothly, so you should make sure you have a special tool in advance.
We will need:
- a set of keys and screwdrivers;
- Bulgarian;
- reverse hammer or inertial puller;
- metalworking tools – hammer, chisel, file;
- gas burner or blowtorch;
- pipe with a diameter of 40 mm and about a meter long, wall thickness 3-4 mm;
- lubricant like litol24 or analogues.
When to change bearings on Chevrolet Niva axle shafts
Since our car is often operated in very difficult conditions, the loads on the bearings are very high. In addition to loads, the bearing may be subject to moisture attack when the axle shaft seal fails . At the same time, oil may begin to leak from the rear axle housing. As a result, the bearing is poorly lubricated and the grease is washed out over time.
A crunching sound from the rear wheel indicates a wheel bearing failure.
The most obvious symptom of bearing failure will be increased noise at any speed. In more severe cases, both radial and axial play may be observed.
The factory allows axial clearance of the axle shaft of no more than 0.7 mm , but most often the axle shaft will indicate the destruction of the bearing with strong noise and crackling.
At the first symptoms of a bearing failure, you need to start replacing it.
Numbers and articles
Fortunately, the axle bearing is not the most scarce part. It is one of the most popular of the 500 series of single-row bearings and is produced by a huge number of factories in the CIS, as well as in many European countries. Its industrial index is 180508 , the index of its foreign analogues is 62208-2RS . Automobile factory article number - 2121-2403080 .
Axle bearing - 180508.
The technical parameters of the bearing are:
- inner race diameter - 40 mm;
- outer ring diameter - 80 mm;
- Clip width - 23 mm;
- weight - 440g;
- the bearing has 9 balls with a diameter of 12.7 mm;
- rated speed - 5600 rpm.
The best imported manufacturers are NSK (62208DD), FAG, SKF, SNR. The average price of a domestically produced bearing is 200-250 rubles . It’s not worth buying cheaper, since it will be low-quality China or outright illiquid. Imported analogues can cost up to 800–1000 rubles . Actually, using these parameters it is easy to select a suitable bearing for the Shnivy axle shaft.
Basic parameters of factory parts for repair
Main technical indicators of the unit: diameter and length of the axle, number and length of the spline belt, type of bearings and sealing seals. These indicators are determined by the design features of the system and the calculated traction forces under comparable operating conditions at the time of design and production.
Often, under the influence of large loads, deformation of the axle shafts occurs, premature wear and jamming of the support ball bearings occurs, deformation and fatigue wear of the sealing seals, followed by leakage of transmission oil from the axle.
Factories producing spare parts for the domestic automotive industry are constantly striving to improve manufactured vehicle components and assemblies. They regularly offer consumers a newer, more reliable, more modern product.
Let's consider the technical parameters of the drive elements of the rear axle of an SUV.
Half shaft
Existing analogues:
Rolling ball bearings
Foreign bearing manufacturers - NSK, SKF, SNR. Average price from 600 rubles.
Oil seals
Existing alternative options:
It is also worth noting the German manufacturer Corteco. This company produces a wide range of oil seals for the VAZ-2123.
Ready-made repair kits
On the spare parts market you can also purchase a ready-made repair kit for servicing the rear axle shafts of the VAZ-2123.
The repair kit for the rear axle shaft of the VAZ 2123 Chevy Niva from ESPRA consists of bearing 2121-2403080, sealing oil seal 2110-2301034 and locking ring 2123-2403084. The average price of such a set is 690 - 890 rubles.
Interesting! Some Niva owners prefer to purchase ready-made kits from one manufacturer, considering this to be a kind of guarantee of the compatibility of the parts being replaced.
We remove the axle shaft, select tools, consumables and accessories
First of all, you should pay attention that when replacing a bearing, you need to install not only it, but also new axle shaft seals and new retaining rings. For cars with and without ABS, the locking rings are different - on cars without an anti-lock braking system, the axle locking ring has a smooth surface, and on cars with ABS, the locking ring is splined. It is impossible to confuse them. We assemble tools and accessories :
- Bulgarian.
- Standard set of tools and screwdrivers.
- Inertia axle puller.
Inertia axle puller.
New set - oil seal, retaining ring and bearing.
The tool has been selected and the axle shaft can now be removed. This is done in the following sequence :
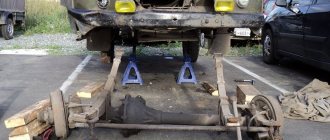
- We place the car on a flat surface and install wheel chocks under the front wheels.
- We tear off the wheel mount, jack up the car, and install a stand under the rear axle.
- Remove the wheel and unscrew the brake drum mounting screws.
We unscrew the bolts securing the brake drum to the axle shaft.
We knock down the brake drum using a wooden block.
We unscrew the four nuts of the axle bearing mounting plate bolts.
We remove the axle shaft using an inertial puller.
When removing the axle shaft, you need to try not to damage the oil seal if there is no desire or need to change it. After this, the entire brake mechanism is suspended from the spring using a wire.
Replacement of the rear and front axle shafts, as well as the axle bearing on favorable terms
In car repair shops, replacing an axle shaft is considered one of the most popular chassis repair services.
At the same time, at the top of the hit parade, of course, is the replacement of the axle bearing as the most loaded element of this unit. Our experienced and qualified craftsmen replace the rear and front axle shafts on cars of all possible brands: VAZ, Gazelle, UAZ, Chevrolet, Ford and many others. At the same time, we guarantee short deadlines for completing the work, their exceptional quality and affordable cost.
Prices for replacing axle shafts
| Name of works | Domestic cars | Foreign cars: | SUVs, minibuses |
| Replacing the gearbox seal | from 1,500 rub. | from 1,700 rub. | from 2,000 rub. |
| Replacing the axle shaft | from 1,000 rub. | from 1,500 rub. | from 2,500 rub. |
| Replacing the axle shaft seal | from 1,000 rub. | from 1,500 rub. | from 2,600 rub. |
| Replacing the axle bearing | from 900 rub. | from 1,500 rub. | from 2,600 rub. |
Replacing an axle shaft - signs of a malfunction of this element
However, first, let's figure out what an axle shaft is and what this part is needed for. An axle shaft is a transmission shaft that serves to transmit torque from the differential to the wheels of the drive axle, and also connects the wheels of the vehicle’s drive axle to the differential, which, by the way, ensures the distribution of power between the wheels of your car.
- External and internal (in relation to the universal joint);
- Unloaded, ¾ unloaded and semi-unloaded - according to the degree of load.
Signs that the axle shafts are faulty and replacement of the axle shaft or its bearing is just around the corner are the following:
- There is a lot of noise (knocking at the joint) when moving, especially when turning;
- Excessive heating of the element flange, and through it - the wheel rim;
- Stopping transmission of torque to the drive wheels.
Replacing the axle bearing - a brief algorithm of actions
- Raise the car.
- Remove the desired wheel (or wheels).
- Remove the caliper.
- Remove the brake disc.
- Unscrew the 4 nuts securing the axle shaft.
- Dismantle and remove the axle shaft.
- Clamp the axle shaft in a vice.
- Cut off the retaining ring.
- Remove the old oil seal and worn bearing from the axle shaft.
- Wash the axle shaft with gasoline.
- Install a new oil seal onto the axle shaft, followed by the bearing and retaining ring.
- Reassemble the knot in mirror order.
Replacement of axle bearing - price and other advantages of contacting Maximum Security
If you find at least one of the symptoms we described, indicating that the axle shaft needs to be replaced, then you should not put off solving this problem - you need to carry out repairs in accordance with the algorithm presented above.
However, despite the fact that this procedure is not considered technologically extremely complex, it is better to entrust it to qualified craftsmen, who will not only replace the axle bearing or replace the rear or front axle shaft, but will also provide a guarantee for all spare parts used and for the quality work performed. You will be confident that all bolts are securely and correctly tightened and that all parts are in their rightful places.
To carry out the work you will need a regular set of tools. The only special tool you will need is a puller for the axle shaft, but if you don’t have one, you can do without it.
Before carrying out work, ensure that the machine is as motionless as possible. To do this, wheel chocks are installed under the front wheels. First gear is engaged. The work is carried out in the following order:
- The wheel fastening becomes loose. The car is raised on a jack. The wheel is completely removed. Supports are placed under the thresholds in case of problems with the jack; ordinary blocks or several wheels folded in a stack will do;
Changing the axle bearing of a Chevrolet Niva
The axle shaft has been dismantled, now it’s worth inspecting it carefully. If it requires editing or there are cracks and mechanical damage on its surface, it must be replaced. The splined part of the axle shaft is also carefully inspected. In case of any damage, the axle shaft will have to be replaced. If everything is in order with the axle shaft, change the bearing and retaining ring :
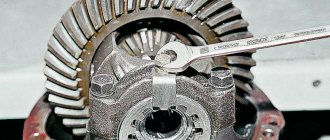
- The bearing and retaining ring are pressed onto the axle shaft with thermal tension, so to remove them you will have to use a grinder and a chisel. We clamp the axle shaft in a vice.
We clamp the axle shaft in a vice and saw off the old bearing with a grinder.
Removal and installation of Chevrolet Niva axle shaft
Tools:
- Straight box spanner 17 mm
- Driver for 3/4 socket bit
- Knob attachment 19 mm
- Inertia axle puller
Parts and consumables:
- Half shaft
- Sealing ring
- Wire
Notes:
The axle shaft assembly with bearing is replaced if there is increased noise from the rear wheels of the car, both when driving in a straight line and when cornering, compared to normal. At the same time, increased axial and radial play of the axle shaft is observed. An axial clearance of no more than 0.7 mm is allowed.
Helpful advice:
Editing the axle shaft and replacing its bearing is labor-intensive and requires special equipment. Therefore, we recommend that if axial or radial play of the axle shaft appears, replace the axle shaft assembly.
1. Remove the wheel and brake drum as described here.
2. Remove the four nuts from the axle bearing mounting plate bolts.
3. Install the support and lift the rear axle.
4. Remove the shock absorber bracket from the axle bearing mounting plate bolts.
5. Remove the axle shaft using an inertial puller.
Helpful advice:
If there is no puller, install the wheel on the axle shaft and secure it with three nuts, without fully tightening them so that there is a gap between the wheel and the axle shaft. Press the wheel against the axle shaft and then sharply pull the wheel towards you. In most cases, after several attempts, the axle shaft can be removed.
Warning:
If you are not going to change the oil seal, be careful not to damage its working edge. If the seal is damaged or requires replacement, replace the seal as described here.
6. Secure the brake mechanism with wire.
7. Inspect the axle shaft; if it is bent or cracked, replace it.
8. Assess the condition of the spline joint; if the splines are wrinkled or heavily worn, replace the axle shaft.
9. Check the condition of the O-ring, if the O-ring is wrinkled or torn, replace it.
10. Install the axle shaft and removed parts in the reverse order of removal, paying special attention to the correct location of the O-ring.
The article is missing:
- Photo of the instrument
- Photos of parts and consumables
- High-quality photos of repairs
Replacing a Chevrolet Niva bearing axle shaft
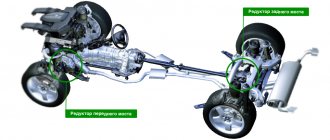
The Chevrolet Niva belongs to the class of SUVs with all-wheel drive. This is realized through the installation of a rear axle, through which torque is transmitted to the rear wheels. For this, a system of gears and axle shafts is used, which are located in the bridge. One of the elements that is subject to excessive load, and therefore the one that most quickly fails, is the rear axle bearing. Therefore, it is necessary to diagnose its condition in a timely manner and, if necessary, replace it. You can find out how to do this by reading this article.
How to notice a malfunction in time.
If you fail to pay attention to the failure of this element in time, the rear axle may jam while driving, which can lead to unpredictable consequences at high speed. Therefore, you need to periodically pay attention to the sound of the wheels in order to notice the characteristic hum in time. This usually occurs even at the lowest speed. After this, it is necessary to measure the wheel play, which should not exceed 0.7 mm.
If you fail to pay attention to the failure of this element in time, the rear axle may jam while driving, which can lead to unpredictable consequences at high speed. Therefore, you need to periodically pay attention to the sound of the wheels in order to notice the characteristic hum in time. This usually occurs even at the lowest speed. After this, it is necessary to measure the wheel play, which should not exceed 0.7 mm.
Purpose of the bearing
This part is located in the rear axle of the Niva Chevrolet, closer to the outside of the car. Like any bearing, its main function is to smooth out the rotation coming from the rear axle. The axle shaft extends from the gearbox, where it is driven by gears, and ends at a flange on which the brake drums and wheel are located. In order for it to rotate smoothly inside the structure, a ball bearing is installed on it.
It is mounted in a special seat on the bridge, where an increased load on the axle shaft is provided. To prevent its movement inside the bridge, a special locking sleeve is used, which ensures double fixation of this element. An additionally installed oil seal ensures the tightness of the entire structure.
It is important to remember that if the seal is damaged, lubricant leaks, which leads to increased friction inside the bearing and rapid failure. Therefore, if damage is detected, the oil seal must be replaced.
These elements are among the most exposed to loads and therefore require periodic inspection and replacement.
We identify a malfunction on the VAZ 2123
As garage mechanics say, “The knock will always come out.” You should not wait for this, otherwise you will have to call a tow truck or repair the unit in the field. In fact, it is easy to diagnose the problem yourself . The first sign of bearing failure is increased noise, unpleasant metallic sounds from the hub, and increased heating of the metal at the place where it is installed.
Attention! In addition to the bearings on the axle shafts in the rear axle of the VAZ2121 and Niva Chevrolet, there are also bearings in the differential and gearbox. The noise may come from them or from a worn main pair.
The following steps will help you accurately determine the source of the noise::
You should not delay repairs if at least one of these signs appears . The savings in this case are questionable, and a bearing that fails in motion can result in expensive repairs with the replacement of the entire axle shaft assembly.
Bearing device.
Like most parts in a car, a bearing has several indicators based on which you can select the necessary part:
- number
- internal and external dimensions
- height
Knowing these parameters, you can select a replacement element that will be suitable for a given car and perform its functions correctly.
The number is the value in the catalog - 21212403080. In most cases, this data is enough to purchase a bearing model for a Chevrolet Niva in a store. If the required element is not available, you can find analogues, knowing the technical characteristics:
- internal diameter 40mm
- outer diameter 80mm
- height (meaning product thickness) 23mm
Replacement
To change a worn part, you need to remove the wheel, then unscrew the brake drum and axle shaft. To do this, you need to jack up the rear of the car.
Removal of the axle shaft is carried out in several stages:
- Using a jack, the axle is raised so that when the axle shaft is removed, oil does not leak out of it.
- By unscrewing the nuts to 17, the axle shaft is unscrewed
- If the repair is carried out on time and the axle is not jammed, then it can be knocked out with a hammer and a wooden board.
If an anti-lock braking system is installed on a Chevrolet Niva, then the work is carried out in a slightly different sequence. The difference is in the splined retaining ring, which is clearly visible when compared:
If the vehicle is equipped with an ABS system, the following procedure is necessary:
- checking the condition of the bearing
- the oil seal is removed
- The axle shaft is secured in a vice, after which the retaining ring is knocked out using a hammer.
- The bearing is removed.
- The new bearing is lubricated and replaced with a new one
- For better installation, the retaining ring is heated with a blowtorch and set in place.
- The axle shaft is pressed into place using a tube.
During work, it is necessary to carefully inspect the axle shaft for cracks and chips.
Removing the axle shaft
Removing the axle shaft
Post by Magellan » 12 Dec 2009, 03:07
After this, the axle shaft should come out.
Re: Removing the axle shaft
Post by muzolya » Dec 12, 2009, 04:33
Re: Removing the axle shaft
Post by MEW » Dec 12, 2009 12:59 pm
Re: Removing the axle shaft
Post by Himalaev » Dec 12, 2009, 01:17 pm
Re: Removing the axle shaft
Post by Pilot » Dec 12, 2009, 4:18 pm
Re: Removing the axle shaft
Post by ivan1 » Dec 12, 2009, 5:52 pm
Re: Removing the axle shaft
Post by muzolya » Dec 12, 2009, 07:26 pm
Colleague must disagree with you
The machine is old. The last time the axle shaft was removed. Hmmm. For a long time.
Re: Removing the axle shaft
Post by ivan1 » 12 Dec 2009, 20:06
Colleague must disagree with you
The machine is old. The last time the axle shaft was removed. Hmmm. For a long time.
Re: Removing the axle shaft
Post by muzolya » Dec 12, 2009, 8:24 pm
Likewise, the left one came out like clockwork
The car stands on trestles, large, Soviet, strong.
Re: Removing the axle shaft
Post by Pilot » Dec 13, 2009, 00:50
Re: Removing the axle shaft
Post by Vigilant Falcon » Dec 14, 2009, 11:03 pm
Re: Removing the axle shaft
Post by Pilot » Dec 15, 2009, 00:30
Re: Removing the axle shaft
Post by muzolya » Dec 15, 2009, 05:56 pm
Re: Removing the axle shaft
Post by ivan1 » Dec 15, 2009, 10:21 pm
Re: Removing the axle shaft
Post by Serg » 03 Feb 2010, 11:46
PS: by the way, I didn’t change the brake flap afterwards, I just bent it back. True, he overdid it a little, he started hooking and hellishly warming up the drum. as a result there is a lot of smoke, a dead drum and pieces of melted silumin from the drum on the shield
I then gnawed it out of there for a loooong time, because the new drum didn’t want to get up.
Chevrolet car repair manuals and tips
DIY Chevrolet Niva axle bearing replacement
The SUV class car has all-wheel drive on all four wheels. This mechanism causes the presence of a rear axle, which is designed to transmit torque from the gearbox to the driving rear wheels. The rotation of the wheels is ensured by the presence of gears and axle shafts in the bridge. The axle shaft is connected to the wheel and sets it in motion. But why is an axle bearing in the axle needed? Since the topic of the article is called the axle bearing, it is this that will be discussed further. Let's take a closer look at this mechanism in the design of the rear axle, its purpose, design (size, number, etc.), malfunctions and the replacement process. To reinforce your skills, there is a video at the bottom of the material where you can visually study the replacement procedure. replacement kit
Replacement kit for cars with abs
Purpose of the axle bearing
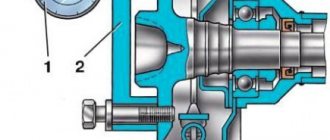
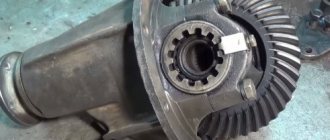
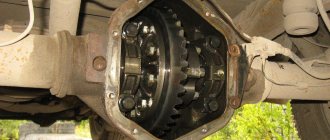
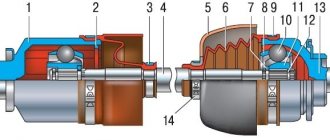
The bearing is located in the rear axle structure of the Chevrolet Niva, closer to the outer edge. Like all bearings, it performs the function of supporting and smoothing the torque of the rear axle axis. One part of the axle (internal) engages with the gears (has splines), and the second comes out of the bridge, and a flange, brake drums and a Chevrolet Niva wheel are attached to it. To ensure that the axis rotates smoothly and does not move inside the structure, there is a ball bearing.
The bearing is located in a special socket in the bridge structure, where it performs its direct function. To prevent it from moving inside the bridge, there is a special rigid fixation on the axis, which is a locking sleeve. Thus, it has a double fixation. There is also an oil seal on the axle shaft, which provides a tight connection to the rear axle structure.
Important! If the seal is damaged or worn out, there is a direct negative impact on the bearing, causing the latter to fail. Therefore, it is necessary to replace the oil seal.
When using a Niva Chevrolet frequently, it is necessary to monitor the condition of the bearing and oil seal, and if they are damaged, replace them immediately.
Like many parts, the axle bearing has its own design, which is characterized by important indicators:
1. number; 2. size internal and external; 3. height.
This data is necessary not only so that the bearing can be installed in the seat of the axle shaft and axle, but also so that it performs its intended functions. But it is worth noting that if one of these data is known, then the second need not be calculated. So, for example, the axle bearing has catalog number 2121-2403080. If the product number is known, then this is enough to purchase it at a car dealership. If you need to know the dimensions, then there is data on the Internet: height and size.
If the catalog number is unknown, then after removing the axle shaft, complete measurements of the product can be taken. After the measurement you should get the following data:
D internal = 40 mm; D outer = 80 mm; Height (thickness) = 23 mm.
Failure of an axle bearing can result in a wheel seizing on the road, which is dangerous. It’s good if the speed of a moving car is low and somewhere outside the city, but the Chevrolet Niva is used not only at low speeds and off-road. Therefore, it is very important to monitor such an important part and replace it prematurely.
faulty bearing
Failure can be determined by the characteristic sound from under the wheels, as well as by the presence of increased radial and axial play.
Important! The axial clearance should not exceed 0.7 mm.
To determine it, you don’t need to pick up speed to hear a crackling or rumble, just turn on the rear wheel drive and drive a couple of meters. A hum or crackling noise occurs when there is a lack of lubricants, which leads to the product crumbling.
Important! If you notice an uncharacteristic noise in the rear area, you should immediately make sure that the bearings are in good condition.
Removing the axle shaft and replacing the bearing
In order to replace a failed bearing, it is first necessary to remove the wheel, brake drum, and axle shaft, and only after that it is replaced. The Chevrolet Niva is installed on a flat surface and the rear part is jacked up. The wheel and drum are removed; the procedure for removing them can be read in the relevant articles. Therefore, we will not dwell on this, but will immediately proceed to removing the axle shaft.
Removing the axle shaft
So, the removal process is as follows:
1. The second jack lifts part of the bridge to avoid oil leakage when removing the axle shaft. 2. The axle shaft is secured with four nuts at “17”. Using a socket wrench, remove the nuts along with the bushings. 3. The axle shaft is removed. If it is jammed and cannot be removed, then we try to knock it out using a hammer and a beam. The Chevrolet Niva is equipped with drum brakes on the rear wheels, both with and without an ABS system. Even the first Sheviks were without an abs system. ABS is an anti-lock braking system that prevents loss of vehicle control. The difference between the axle shaft of a car with an ABS system and a simple one lies in the design of the retaining ring. The anti-lock braking system requires a splined retaining ring. Cars without this system have snap rings without splines. The photo below shows the differences.
retaining rings with and without abs
So, let's look at how to replace a bearing on a Chevrolet Niva SUV with an abs system.
1. The suitability of the bearing is checked. After removing the axle shaft, do not forget about the oil seal. It is pressed into the brake shield. 2. The oil seal is removed using a screwdriver and hammer. After replacing the bearing, the oil seal must be installed with a new one. 3. The axle shaft is clamped in a vice. 4. The knurled retaining ring is removed, which secures the bearing. We knock it out with a chisel and hammer. 5. The bearing is removed in the same way as the ring.
Important! Check the axle shaft for cracks and chips. There should not be any, otherwise boring will be required.
6. Now you need to replace the old bearing with a new one. Before installing it, check the presence of lubricant inside. Add if necessary. 7. The bearing is pressed onto the axle shaft. You can use a pipe of the appropriate diameter and length no less than the axle shaft. 8. Installation of the locking ring is best done by heating it. The ring is heated with a blowtorch for 5-10 minutes up to 200 degrees. 9. The ring is installed on the axle shaft and pressed into place with a tube.
Now the axle can be reinstalled in the reverse order of removal. At this point, the replacement is complete, all that remains is to install the drum and wheel, and begin replacing the other side of the Niva Chevrolet car.
After installation, check the functionality of the replaced parts. After driving a few hundred meters, you need to listen to see if there are any extraneous noises coming from under the wheels. If no noise is detected, then everything is done correctly. Happy renovation work!
Removing and replacing the axle shaft seal of the rear axle Niva Chevrolet
When it is necessary to replace the rear axle axle seal of a Niva Chevrolet, the owner does not have to immediately contact a service station. This operation refers to work that does not require high qualifications and special equipment, and if desired, it can be done with your own hands. This also applies to motorists driving regular Nivas - VAZ 21214 and 21213.
Enhanced modifications
Why are reinforced collapsible axle shafts of the unloaded type better than standard ones:
Practicality - replacing the bearing is much easier since there is no need to heat the retaining ring and drain the oil, this simplifies the repair process. An installed double row bearing is easy to find at almost any auto parts store.
It is worth noting other manufacturers of reinforced mechanisms for the rear axle:
How to determine that it is time to change the wheel bearings on a Chevrolet Niva and how to carry out the replacement yourself?
Installation and replacement of steering rods and ends on a Chevrolet Niva with your own hands
Detailed instructions for replacing the input shaft bearing of a Chevrolet Niva gearbox
When to change the seal
Replacing the axle seal is not tied to a specific mileage, but is done in connection with the following defects:
- Transmission oil leakage from the rear axle of a Chevrolet Niva. It is characterized by the appearance of oil stains on the brake casing and the “stocking” on the side where the axle shaft seal has lost its seal.
- In case of accidental damage to the seal when replacing the axle bearing. Happens when a part is pulled out of its socket.
A distinction should be made between transmission oil leakage from the axle seal on either side of the rear beam and from the gearbox shank where the driveshaft is secured. In the second case, greasy stains and dirt cover the rear axle gear housing, located in the middle.
If for various reasons you need to replace the axle bearing, then you should also change the oil seal at the same time. This will save you from having to disassemble the unit again due to leakage of the old part. The part costs mere pennies, its catalog number for the Chevrolet Niva is 2110-2301034 (right) and 2110-2301035 (left), and the overall dimensions are as follows:
- outer diameter - 57 mm;
- width - 9 mm;
- The diameter of the hole along the protruding rubber (or silicone) edge is 35 mm.
The catalog number and dimensions of the O-ring of the Niva VAZ 21214 axle shaft are identical. In addition to the oil seal itself, transmission oil will be needed to replenish the lost amount in the gearbox. TAD17I brand oil is considered “native” for all types of VAZ gearboxes.
Preparation and disassembly
To independently remove a leaking rear axle oil seal on a Niva Chevrolet, you will need the following tools:
- standard set of wrenches;
- slotted screwdriver and wheel wrench;
- jack;
- hammer;
- wooden stand;
- cloth gloves.
Never neglect gloves when repairing a car: they will protect your hands from damage due to accidental impacts. The height of the wooden stand should be enough to support the rear axle with the wheel removed and the shock absorber unscrewed, otherwise oil will leak from it.
Before removing the old seal, you will have to disassemble the rear hub assembly and remove the axle shaft. Disassembly is carried out in the following sequence:
- Place the car on a level surface and secure it with wheel chocks. Make sure the handbrake is turned off.
- Loosen the wheel nuts, jack up the car and remove the wheel.
- Clean the rear axle flange that protrudes beyond the brake drum from rust. Additionally, you can treat this area with WD-40 lubricant.
- Unscrew the 2 bolts securing the drum with a 12 mm wrench, then gently tap with a hammer to move it out of place.
- The drum is removed in 2 ways: by squeezing it out with the same bolts, screwed into other holes, or by knocking it with a hammer through a piece of wood. The methods can be combined, just be careful not to damage the edge of the drum with the blows.
- After dismantling, clean the seat on the axle shaft again to make the drum easier to remove.
The next step is unscrewing and removing the axle shaft. In the VAZ 2131 Niva Chevrolet, 4 bolts securing it are held on the other side by a bracket holding the shock absorber.
After unscrewing the bolts, the shock absorber will no longer hold the rear axle, and the spring will push it down, causing oil to flow.
To avoid this, you need to first adjust the stand by jacking the car higher. The rear axle “stocking” must rest with a slope in the other direction so that the oil does not leak out.
Since in a regular Niva VAZ 21214 and 21213 the shock absorber is attached to the spring cup, and not to the rear hub, there is no need to unscrew it. A stand is also not needed here; a jack is enough to lift it.
The 4 bolts holding the rear axle shaft are unscrewed with a 17 mm wrench. Pay attention to the growers: they should not get lost in the brake mechanism. If you ignore the loss of the groover and install a new one, then the old one will subsequently get between the block and the drum while driving and the wheel will jam.
After unscrewing the bolts, with a sharp movement, remove the axle shaft with the bearing from the cage. If this fails, attach the wheel to the studs with 3 nuts and try to pull it. The last option is to use a special inertial puller for removal. There is also a popular method: tie the axle shaft with a rope to an iron garage door and hit it with a hammer to knock it out of the cage. But for this you need to carefully park the car closer to the gate.
Installing a New Seal
After removing the axle shaft, the metal shield where the brake pads are attached will remain hanging on the copper pipe with the fluid, so it should be fixed by inserting the 2 upper bolts back into the holes. Then follow the instructions:
- Remove the thick rubber gasket from the rear axle flange.
- Pull out the old oil seal by prying it with a screwdriver or pliers. Clean the seat and wipe with a rag.
- Lightly lubricate the new seal with transmission oil and insert it into the socket of the Niva rear axle as evenly as possible.
- Using a round pipe adapter, press the oil seal into the socket with light blows of a hammer. You can use an old seal as an additional attachment.
At the end of the procedure, you must thoroughly wipe all parts free of oil - the brake cylinder, pads, drum and metal shield. Before reassembling, it would be a good idea to check the axle bearing for wear and grease. Wear is indicated by difficulty turning, binding, or slight noise. If you discover a malfunction, take the axle shaft to the nearest car service center; you will not be able to replace the bearing without special equipment.
To check the grease inside the bearing, you need to pry the plastic covering the rollers with an awl and remove it. Then add thick Litol-type lubricant inside and put the plastic in place, and then begin assembly.
At the end, it is important to check the oil level in the rear axle gearbox of the Chevrolet Niva. The test is carried out on a fully assembled car, standing on a level area. The filler plug is unscrewed from the gearbox housing, after which the oil level is determined visually or using a thin wooden stick. If there is a shortage, you need to insert a hose of a suitable diameter into the filler neck with a watering can at the end, where the lubricant is poured. It is more convenient to top up with an assistant: you control the level, and the assistant gradually adds oil.