Blog about UAZ
Adjustment of the gaps in the meshing of gears and in the bearings of the drive axle of UAZ-3741, UAZ-3962, UAZ-3909, UAZ-2206, UAZ-3303 cars is carried out only when replacing gears or bearings, or when axial clearance appears in the driving or driven gears of the main transfers. Replacement of main gears should only be done as a complete set.
Adjusting the bearing of the drive gear of the main gear of the drive axle UAZ-3741, UAZ-3962, UAZ-3909, UAZ-2206, UAZ-3303.
Adjustment of the bearing of the drive gear of the main drive of the drive axle must be done by selecting the thickness of the shim pack and tightening the flange nut. The bearing must have such a preload that there is no axial movement of the drive gear and the gear can be rotated by hand without much effort.
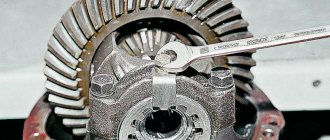
Check the bearing preload with a dynamometer. At the same time, disconnect the left half of the crankcase. Remove the drive gear bearing cap so that cuff friction does not affect the dynamometer readings. With proper adjustment, at the moment of turning the drive gear by the hole in the flange, the dynamometer should show a force of 1.5-3 kgf for run-in bearings and 2.0-3.5 kgf for new bearings.
When replacing the cover, align the lubrication holes in the crankcase, gasket and cover. The tightening torque of the drive gear flange nut should be 17-21 kgcm. You cannot even unscrew the nut a little in order to ensure that the cotter pin hole matches the slot in the nut. If the nut is not tightened sufficiently, the inner rings of the bearing may rotate and, as a result, wear of the adjusting shims and the appearance of dangerous axial play.
If axial play of the drive gear appears during vehicle operation, tighten the flange nut. If the axial play is not eliminated, then reduce the thickness of the shim pack and adjust the bearing as indicated above.
After adjustment, monitor the heating of the bearings while driving. A slight heating of the bearing is not dangerous, but if the neck of the drive axle crankcase heats up to a temperature of 90 degrees or higher, the water on the crankcase boils, this means that the bearing has been overtightened and the overall thickness of the gaskets should be increased.
Adjusting the differential bearings of the drive axle UAZ-3741, UAZ-3962, UAZ-3909, UAZ-2206, UAZ-3303.
Adjustment of the differential bearings must be done by selecting the thickness of the package of adjusting shims installed between the ends of the inner rings of both bearings and the gearbox. When replacing main gears and differential bearings, make adjustments in the following sequence:
1. Press the inner rings of the differential bearings onto the journals of the assembled differential so that there is a gap of 3-3.5 mm between the ends of the gearbox and the ends of the inner rings of the bearings.
2. Remove the axle shafts and install the differential assembly with the driven gear into the crankcase, install the gasket and cover, tighten the cover mounting bolts and, turning the driven gear with a mounting blade through the neck of the crankcase, roll the bearings so that the rollers take the correct position. Then use fasteners to evenly and completely connect the cover to the crankcase.
3. Unscrew the fasteners again. Carefully remove the cover, remove the differential from the axle housing and use a feeler gauge to measure the gaps A and A1 between the ends of the gearbox and the ends of the inner rings of the bearings.
4. Select a package of gaskets with a thickness equal to the sum of gaps A+A1. To ensure preload in the bearings, add a 0.1 mm thick spacer to this package. The total thickness of the gasket package should be A+A1+0.1 mm.
5. Remove the inner rings of the differential bearings. Divide the selected pack of gaskets in half. Install the gaskets on the journals of the satellite gearbox and press the inner rings of the bearings until they stop. After this, adjust the side clearance by moving the driven gear.
When replacing only the differential bearings, measure and compare the height of the new and old bearing assemblies. If the new bearing is higher or lower than the old one by some amount, then reduce the thickness of the existing gasket package in the first case and increase in the second case by the same amount.
Adjustment of the side clearance and position of the main gears of the drive axle UAZ-3741, UAZ-3962, UAZ-3909, UAZ-2206, UAZ-3303.
Adjustment of the side clearance and position of the main gear gears must be done only when replacing old gears with new ones in the following sequence:
- first adjust the drive gear bearings and differential bearings as indicated above, - then proceed to adjust the lateral clearance in the meshing of the final drive gear teeth.
The lateral clearance in the meshing of the gears must be adjusted by moving the shims from one side of the differential box to the other. If you remove shims from the side of the driven gear, the gap in the mesh increases, but if you add shims, the gap decreases. The gaskets only need to be rearranged without changing their total thickness, so as not to disturb the tension of the differential bearings.
The circumferential side clearance should be in the range of 0.35-0.77 mm. Measure on the flange of the drive gear at a radius of 40 mm, check in four positions of the drive gear after each revolution. Having finished assembling the drive axle, you need to check its heating after the car is moving.
If the heating of the crankcase in the area of the double-row bevel bearing, drive gear or differential bearings is over 90 degrees, the water on the crankcase is boiling, then it is necessary to increase the total thickness of the package of selected gaskets for the double-row bevel bearing of the drive gear. And for differential bearings, reduce the thickness of the gaskets on the crankcase side, with a circumferential side clearance of 0.64 mm or more, or on the cover side, with a circumferential side clearance of less than 0.64 mm.
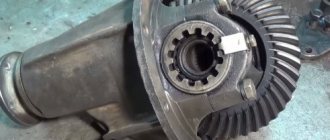
Features of unit dismantling
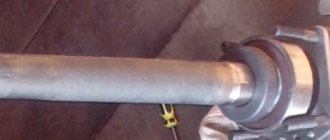
When removing the rear axle, you need to unscrew the tail unit nut, remove the washer, mating flange, cover of the front gear roller assembly, and press the assembled gear with bearings out of the oil cooler at the rear of the car.
This circuit is excellent for disassembling a differential device. The next step is to unscrew the splines connecting the driven gear to the gearbox and reset it. Divide both parts of the box, pull out the gears, planetary gear rods, and support nuts. When assessing disassembly, pay attention to the integrity of the gear wheel teeth. If they are damaged, the part must be replaced. To remove rollers, outer and inner rings, special tools are required. Strictly study and understand the disassembly sequence so that you can accurately perform all steps in reverse order when reassembling.
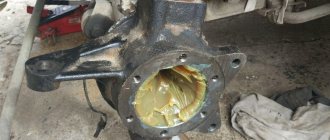
When inspecting the oil stripper ring, check for surface irregularities. If yes, process to a thickness of 5 mm. The same goes for the cardan flange. Grinding height up to 53 mm. Wash the protective surfaces. Blow out the oil outlets. Drive design parts and axle shafts should be replaced if there are scuff marks or severe wear.
Main pair adjustment
After repairing the front axle associated with replacing gears, it is necessary to adjust the contact patch:
- Select a spacer ring (parts are produced with a tolerance of 0.025 mm in both directions) that provides the required clearance in the tapered bearings of the drive shaft. When selecting, the distance between the center of the axle shaft and the lower edge of the spacer sleeve (parameter A) is taken into account. It is also necessary to take into account the gap between the edge of the inner ring and the opposite edge of the outer ring (parameter B). The thickness of the ring is determined by the formula C=A-(111.96+B).
- Place the ring in the seat.
- Insert the outer bearing races of the drive shaft into the crankcase.
- Place the oil drain ring onto the drive shaft, and then mount the rear bearing.
- Install the spacer sleeve and insert the shank into the crankcase.
- Place the 2nd bearing on the drive shaft, the ring is mounted until it stops.
- Install the washer on the spline part, and then put on the flange (used to connect the driveshaft).
- Secure the ring and flange with a nut, tighten the threaded connection until the axial play is eliminated. The shaft rotation force should not be higher than 2.0 N*m if new bearing supports are used. If old bearings are used, the torque value is 0.4-0.8 N*m. The tightening torque of the nut should be in the range from 180 to 250 N*m; when increased force is applied, the spacer sleeve is compressed.
- Apply marks to the surface of the flange and nut (for example, with oil paint or nitro enamel), which are used for further adjustment of the bridge.
- To mount the differential in the crankcase cavity, you need to purchase several sets of adjusting washers that differ in thickness.
- Install the original washer (which was used with the old gears), and then open the structure with the nut, which is located on the right side.
- Apply oil paint or other coloring material that does not dry for 30-40 minutes to the gear teeth.
Turn the gears 3-4 turns and inspect the imprint that appears on the drive gear. If the spot has an oval configuration and is located in the central part of the teeth, then the adjustment is correct. The shift of the spot towards the top of the tooth indicates the need for the shank to move closer to the differential gear, but at the same time the driven wheel is moved away from the drive gear.
If the spot is shifted to the base, then the drive wheel is moved away from the driven wheel (by reducing the thickness of the adjusting ring). To keep the side clearance within acceptable limits, it is necessary to move the driven gear towards the drive gear. When the spot moves to the narrow or wide end of the tooth, it is necessary to move or move the driven gear accordingly.
After the adjustment is completed, an oil seal is installed to prevent oil leakage. Then the shank bearings are tightened (until the paint marks align). To prevent spontaneous unscrewing of the threaded connection, the nut flange is jammed into a special groove provided on the side surface of the shaft.
Malfunctions and repair work
Common malfunctions of the UAZ front axle and possible repairs:
- Leakage of lubricating fluids. Check the tubes and connecting elements for mechanical damage - the cuffs and flange for functionality, the oil container for the optimal fluid level.
- High wear of fasteners.
- Bearing defects caused by the use of poor quality material by the car plant.
- Broken axle teeth. Adjustment will not help; parts need to be replaced.
- Mechanical defects of the beam.
- Wear of elements. The situation is resolved by replacing it with new spare parts.
- Poor grip of the bearings and main gears indicates the need for tension adjustment.
Bridge repairs begin after diagnosing and searching for the cause of problems in the functioning of the mechanism, which are diverse:
- transmission components of a rear-wheel drive vehicle are faulty due to regular movement over difficult terrain;
- use of consumables and lubricants of unsuitable quality;
- Failure to monitor tire pressure can lead to shaft and bearing failures.
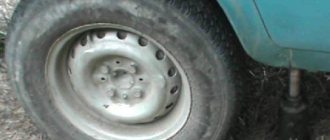
Most often, car owners are faced with a violation of the axial space of the kingpins and are knocked out of the required position. To diagnose, you need to jack up the front of the vehicle and move the wheel in a vertical plane. The presence of axial play indicates the need to adjust the clearance of the pins.
How to adjust bridges
You can adjust the UAZ axles yourself. This will require a number of tools and good knowledge of the mechanism. Access to the necessary parts and assemblies is possible after dismantling the structure and separating the crankcase parts. The first sign of the need to adjust the gearbox is loud noise and malfunctions of the part. Such work is required after diagnosing the condition of bridges. Adjustment includes a number of activities.
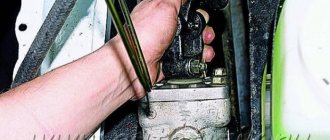
At the first stages of repair work, ensure that the nuts of the brake elements can be loosened freely. The tools you will need are a split wrench, brake fluid and a mixture of WD-40. The bridge is dismantled as follows:
- remove the fasteners between the drive gear flange and the propeller shaft;
- secure the shaft to the side;
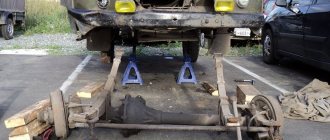
- place the front part of the vehicle on jacks, raising the wheels above the surface;
- additionally install safety supports;
- remove the nut between the brake pipe and hose and close the hole with a plug to avoid large losses of fluid;
- after removing the lower fasteners and moving the shock absorbers from the axle, the bridge will lower;
- remove the stepladder nuts and roll out the bridge (without wheels it weighs more than 100 kg).
For adjustment and repair work, you will again need a split wrench, a metal corner with pins, a universal puller, a container with brake fluid, transmission oil (if you don’t want to fill in the old one), a set of bearing spacers for adjusting the driven gear and a micrometer. Preparatory work:
- remove 10 bolts connecting the axle shafts to the hubs;
- remove the axle shaft from the crankcase;
- Unscrew the fasteners of the brake pipes;
- remove the tee from the bracket;
- remove the connecting elements between the crankcase parts, keeping the gasket;
- Remove the differential housing and driven gear, outer rings.
How to check the correctness of the work done
A basic check of the bridge's performance is carried out by measuring the crankcase temperature. The car must be driven on a dry road for 25-30 km; an electronic thermometer is used to check the degree of heating. The plant allows the crankcase temperature to increase near the installation sites of the liner bearing supports to 90°C. Water can be used to roughly estimate the degree of heating: the liquid applied to the bridge body should not boil. At elevated temperatures, the axial clearance in the bearing supports is re-adjusted.
During operation, increased noise, which occurs due to the gap between the gears and the displacement of the contact patch, is not allowed. During the grinding process of parts, the extraneous sound does not disappear, but only increases due to accelerated wear of gears and bearings. A knocking noise in the axle that occurs during sudden acceleration or release of gas indicates an excessive gap between the teeth. If extraneous sounds are detected, you need to return to the repair area and check the adjustment of the gaps in the main pair.
How to check the correct adjustment of the UAZ Patriot axle.
To check the correct adjustment of the UAZ Patriot axle, it is not at all necessary to know how to adjust it.
Before you do anything, check the temperature of the axle after driving fast. If the bridge gets very hot, then we can definitely say that it, at a minimum, needs to be adjusted. If such a bridge is not repaired, then sooner or later it will jam. 1. Unscrew the cardan from the bridge. With the car raised, rotating the axle flange (the universal joint mounting point) by hand in both directions, you can feel the presence of broken teeth, assess the condition of the bearings and other problems. 2. After removing the bridge cover, check the condition of the teeth on the main gear and differential by rotating the bridge. There should be no cracks, wear, roughness in the contact patch, cuts or torn teeth. Assess the location of the contact patch. In the crankcase you can sometimes find the remains of destroyed adjusting rings and broken elements. The problems listed above actually exist. If everything is intact, then the bridge can be adjusted. If there are problems, then... 3. Check for transverse clearances in the bearings. If there are gaps, then the bridge must be adjusted before it jams. 4. Check that the final drive is properly engaged. To do this, paint the teeth of the main gear with paint from an aerosol can and, turning the bridge in both directions, determine the pattern of engagement marks. The following figure shows the correct location of the contact patch on the teeth of the final drive gears of the UAZ Patriot axle. The following photo shows an example of incorrect adjustment of the main pair and the presence of roughness at the contact points: After adjusting the rear axle, there should be no axial play in the bearings of the main gear drive gear and in the differential bearings of the main gear. The axial clearance in the bearings of the bridge is the main reason for its noise and jamming due to the destruction of the teeth in the main pair. There are very few craftsmen who know how to correctly adjust the main pair of the bridge. Instructions on the Internet are not very helpful, since the process is iterative, requiring not only ability, but also experience. We specialize in drive axle alignment. People come to us from other cities on the recommendations of our clients to rebuild drive axles and gearboxes, including foreign cars. Drive axles, aluminum and UAZ tuning are our competitive advantage.
Change of oil
The UAZ Patriot transmission should be filled with the highest quality oil that you can afford. Too little quality can leak through low-quality seals.
Very often, in the rear axle, over time, due to moisture getting into it, the oil turns into a thick, non-flowing liquid. Simply changing the oil in such a bridge does not have the desired effect. If you are not sure, remove the axle and axle cover and clean the axle. Do not have any illusions - if the breathers are not removed, if you drove on water, if a lot of time has passed, etc., then there is no longer oil in the bridge. Moreover, the slurry is not in the gearbox, but closer to the hubs. Those. The rear axle wheel bearings are practically not lubricated.
Breathers. Exiting breathers into the engine compartment
We recommend that absolutely everyone do this modification, especially since the costs for it are relatively small.
Breathers on bridges must be brought into the engine compartment so that water does not get into the bridge under any circumstances. For this purpose, brake hoses and brake pipes are usually used. It is easier to use oil resistant hoses.
At the end of the tubes under the hood, a plastic fine fuel filter from the classics is installed so that dust does not get into the bridge. In this case, the end of the tube is bent down so that water does not get into the bridge even if the car goes into more water than the location of the end of the tubes.
On cars with a compressor, during extreme operation, they sometimes create excess air pressure in the transmission - as if they inflate the axles, gearbox and transfer case from the inside. This completely prevents water and dirt from getting inside and well lubricates the oil seals in areas of friction.
Sometimes an expansion tank with a balloon is installed at the end of the tube to create volume. In this case, the connection between the internal space of the bridge and the atmosphere is completely closed. As the volume of air in the bridge changes during heating and cooling, the balloon inflates or contracts.
If you have driven through a ford with a depth of more than 30 cm, then you should immediately (on the same day) change the oil in the transmission - these are the manufacturer’s instructions. Draw conclusions.
Repair of the rear axle gearbox (Gearbox hum, bridge hum) UAZ Patriot.
Hello dear reader!
Before owning Patr, the most difficult car repair I ever had to do was replacing the spare tire. With the purchase of the patent, I began to remember more and more often the dream of one mechanic “to keep the file from getting hot.”
After 100,000, the car began to mope, and the rear gearbox suddenly began to howl under load.
I examined the shank - the shank nut was unscrewed, I tightened it, the noise remained.
I removed the gearbox cover to inspect the main pair.
According to an entry in the technical journal, not long ago I replaced the ZM shank oil seal and in response to my question about the tightening torque, the mechanic said that he determined it by hand.
I started studying the topic, I don’t know any specialists, I decided to try to learn how to repair it myself.
Before starting work, I ordered the missing tool (hour indicator, etc.) and spare parts (main pair, etc.), the estimate turned out to be impressive. I agreed to provide a lift for a couple of days. After dismantling, a preliminary inspection did not seem to reveal critical wear on the main pair or bearings. It was not possible to really see the contact patch, but it seemed like the shank went towards the cardan and a stain along the outer edge (dusted from a can of spray paint, the special paste I ordered - Permatex Prussian Blue - Article 80038 has not yet arrived). I measured the gap between the driven and driving gears with an indicator - 0.5 mm, twice as large as required (bumps were felt in the transmission).
I decided that I was still missing one more “device” (for measuring the distance to select an adjusting ring for the shank), a bearing puller, few adjusting rings of different ratings, to limit myself to replacing the bearings on the shank, the oil flinger ring, the flange and the oil seal and adjusting the tightening of the shank nut (with replacing the nut and a new bushing). The idea of the cage and the rollers of the shank bearings are worn out and the shank has sagged. The mechanic from the service center helped me remove the large bearing from the shank using an angle grinder (I haven’t acquired an angle grinder yet). Next, I knocked out the old ones and hammered new ones into the crankcase, and pressed the new one onto the shank using the old bearing. The shank nut for the thread lock was cored. Replaced the gasket on the gearbox cover, the cover with sealant, replaced the cover bolts. Based on the results of the work
the side clearance is 0.32, I’m thinking of installing a 3.6 mm washer (stock differential 3.5 mm, shank 2.8 mm) and stop there for now. When I took it out for a test drive, the car started off surprisingly quietly. I went to Moscow (donated unnecessary spare parts - GP, etc.), and checked at the same time, the hum did not go away at all, now it is there with a sharp release of gas, the crankcase does not seem to heat up much, I threw snowballs, the snow melts quickly, but the water does not hiss.
Repair of the CV joint of the UAZ front axle, adjusting the tightening of the pins
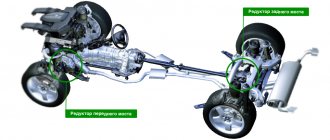
Middle drive axle
It is not recommended to disassemble the constant velocity joint, constant velocity joint, front axle of vehicles of the UAZ-452 family unless absolutely necessary. If repairs are necessary, the CV joint must be disassembled and reassembled in a certain sequence.
Dismantling the CV joint of the front axle UAZ-452.
1. Mark with paint the relative positions of the hinge pins.2. Open your fists. To do this, tap the fork of a short fist on the corner of a wooden stand.3. Clamp the joint in a vice by the long fist with the short fist facing up.4. Turn the short fist towards one of the peripheral balls. If the opposite ball does not come out of the grooves, you must press or hit the short fist with a copper hammer
In this case, care must be taken, since one of the balls may fly out of the hinge at high speed.5. Remove the remaining joint balls
After selecting new repair balls of increased size or replacing one of the knuckles, assemble the hinge.
Assembling the CV joint of the front axle UAZ-452.
1. Clamp a long fist in a vice in a vertical position.2. Insert the central ball.3. Place a short fist on the central ball so that the marks marked with paint coincide and turning it from side to side, install three peripheral balls in turn.4. By spreading the fists 10-12 mm and turning the short fist to the maximum angle away from the free grooves, install the fourth ball so that it is clamped in the grooves.5. Rotate the short fist into a vertical position. In this case, blows with a copper hammer on the rod of a short fist are allowed.
The preload in the hinge balls should be such that the moment required to rotate the fist 10-15 degrees in all directions from the vertical with another fist clamped in a vice would be equal to 300-600 kgfcm. The difference in the moments of rotation of the fist in two mutually perpendicular directions of one hinge should not exceed 100 kgfcm. To obtain the required preload and ensure proper assembly, the balls must be sorted into 9 groups.
A - 25.32-25.34B - 25.34-25.36C - 25.36-25.38G - 25.38-25.40D - 25.40-25.42E - 25.42-25.44F - 25.44-25.46I - 25.46-25.48K - 25.48-25.50
The diameter of the central ball is 26.988-0.05 mm. Each hinge must be assembled with balls of one group or two adjacent groups. For example, two balls with a diameter of 25.41 mm and two 25.43 mm. When installing, balls of the same size must be placed diametrically opposite. The difference in diameters of two pairs of balls of one joint is allowed no more than 0.04 mm.
After assembly, it is recommended to run the joint on a stand while changing the angle from 0 to 30 degrees for two minutes at a rotation speed of 300 rpm. When running in, the balls and grooves must be lubricated with oil.
Adjusting the tightening of the steering knuckle pins of the front axle of the UAZ-452.
When operating the vehicle, you should pay special attention to the tightness of the steering knuckle pins. At the factory, the pins are tightened with a preload, and the same number and thickness of shims are installed at the bottom and top
When the rubbing surfaces wear out, the preload disappears and an axial gap forms between the ends of the pins and the support rings of the ball joint.
This gap must be eliminated by removing the same number of shims from above and below. The difference between the total thicknesses of the upper and lower gaskets should not exceed 0.1 mm. To adjust you need:
1. Raise the front axle with a jack.2. Unscrew the fastening nuts and remove the wheel.3. Unscrew the bolts securing the ball joint oil seal and move the oil seal.4. Moving the steering knuckle body up and down with your hands, check for axial movement of the pins.5. Unscrew the nuts of the studs securing the swing arm (left) or the bolts securing the upper lining (right) and remove the arm or the upper lining of the king pin.6. Remove the 0.1 mm thin shim and install the lever or king pin pad in place.7. Unscrew the fastening bolts and remove the lower pin pad, taking out a thin 0.1 mm adjusting shim, and install the pin pad in place.
Check the build results. If the gap is not eliminated, re-adjust by removing thicker shims of 0.15 mm. The removed shims must be saved, since after several adjustments, only thick shims 0.4 mm thick may remain under the lever and pads, which will need to be replaced with several thin ones.
Popular methods for adjusting the UAZ rear axle gearbox
Solid domestic SUV
An excellent project from the Russian UAZ Patriot plant, released in an updated version in 2014, has captivated a multimillion-dollar army of car enthusiasts.
The new UAZ is a powerful, stylish and reliable car, and besides, buying domestic products is patriotic, as the name of the car suggests.
What are the features of this car, what are its technical features? You will find out the answers to these and other important questions below. I would like to pay special attention to such a procedure as adjusting the UAZ rear axle gearbox.
UAZ Patriot: car review
This SUV appeared on the sales scene at the beginning of the 2000s and is still a leader in the domestic market. The project modernization process has not yet been completed. The developers promise that in 2015 they will release an even more advanced version that will surprise you with a modern security system and richer equipment. But that’s later, what is there now? Let's explore in more detail.
So, we have before us a rather powerful SUV with impressive dimensions and a serious, rugged appearance. How different it is from everything that the plant produced in previous years! Previously, practicality was put at the forefront, there was no talk of any aesthetics.
Now a lot has changed, the age of dullness and dullness is over, the modern consumer audience demanded new ideas, creativity, and bold design solutions. Russian masters had to work hard to present a competitive project. Thus, in long creative searches and painstaking work, the pride of the Ulyanovsk plant was born - the UAZ Patriot.
The car still feels classic restraint, but here it has acquired a different design. Patriot can be compared to jeeps, every detail speaks of confidence and power, every element attracts the eye. This car is bright and memorable.
The salon is quite roomy and well decorated. Everything is normal, all devices are at hand, there are no special complaints. Of course, if you compare the car with its Western counterparts, you can note an imperfect ride, simple upholstery, knocking in the cardan when you hit a bump, and some other points.
But if you do not take on the role of a scrupulous critic, but evaluate it objectively, then the conclusion will be as follows. A worthy project from a worthy plant, a car that will not let you down on the difficult roads of our vast homeland and, with proper care, will serve its owner for decades.
The body length of the Patriot is 4647 mm, width - 1828 mm, height - 1900 mm, curb weight is 2170 kg. Under the hood is a 2.7-liter gasoline engine with a power of 128 hp. s, developing a maximum speed of 150 km/h. The engine takes AI-92 gasoline, burns 12.5 liters of fuel per 100 km in city mode, and 9.5 liters on the highway. The power unit works with all-wheel drive and a five-speed manual transmission.
Main characteristics of the car
A short summary. The car is reliable, practical, stable, and has good handling. If you put a little work into it and work on tuning, it can conquer vast horizons.
If you install powerful tires, the car will drive on any off-road terrain. Upgrading the engine will improve speed and dynamic capabilities.
Gear axle - what is it?
A bridge is a beam connecting the wheels that takes on the power of the load, softens it through springs and transmits torque to the wheels. Without this part, the car would not be able to solve daily work tasks; it is an integral part of the car.
There are 2 main types of bridges: civil (also called collective farm) and gear (military). There are also tuning versions. For example, portal axles that turn an SUV into a stunning all-terrain vehicle.
Patriot front axle
The military bridge has a device called the UAZ final drive. Civilians do not have a final drive. The torque of the latter falls exclusively on the main pair of wheels, while for military vehicles it is distributed between the gearboxes and the main pair. Thanks to its durability and reliability, the gear axle has found its application in military equipment. Collective farm and civil bridges are installed on ordinary passenger cars that do not require fantastic cross-country ability.
Military bridges are represented by a U-shaped beam of a rather complex design; they are installed on UAZ vehicles. Citizens also drive UAZs, but warriors offer better opportunities. They are especially advisable when you often need to overcome off-road conditions.
Advantages of gear axles over civil ones.
- The military bridge has greater ground clearance than the civilian one: 30 cm versus 22 cm.
- The gear axle has a high traction, thanks to which the car becomes capable of transporting large loads, can be an excellent tow vehicle, and can pass through mud at low speeds.
- The military bridge is considered more reliable. These units were developed for the needs of the army and approved by the Russian Ministry of Defense.
- Warriors are inexpensive. Despite the complexity of the design, their repair does not take much effort and time, they are easy to operate.
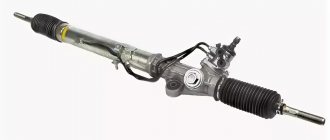
UAZ front axle structure
It consists of a crankcase (sometimes called a stocking), a differential and a final drive. The rear and front axles have no fundamental differences. The only difference is in the direction of the thread of the oil rejection ring located in the main gear. The current design of the UAZ front axle is shown in the picture below. The support placed on the casing is fixed with five hardware. Pin bushings are pressed into the support. A pair of pins “engages” in holding the fist. He also holds the housing cover of the wheel gearboxes. A pin is fixed on it along with a shield on which there are parts of the brake system.
The pins do not rotate in the fist thanks to pin-type stoppers. The fist itself is made with preload (0.02-0.1 mm). The UAZ 469 axle is adjusted using spacers. Location: between the turn lever and the trim (left or right). The spacers are located between the pads and the fist.
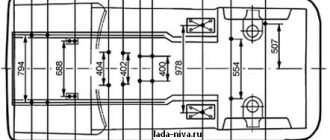
Bridge diagram
One of the features of the described mechanism is that, in addition to increasing cross-country ability, it also turns the wheels. For this purpose, Birnfield ball joints are used. Their cavities contain lubricant that does not need to be replenished throughout their entire service life. The cams, as well as the axis of the pins, are inclined, which allows the wheels to be returned to the middle position after making a turn. The main advantages of the beam (Spicer):
- track is 1.6 m, which has a positive effect on the stability of the car;
- the wheels rotate at an angle of up to 32 degrees, which gives the machine improved maneuverability;
- instead of leaf springs, a dependent suspension on springs is mounted;
- no need to replace lubricant in mechanisms (fists);
- removable cover facilitates access to parts in case of repair;
- the differential together with the gearbox are in one housing - this increases rigidity and service life;
- An improved satellite gear has reduced noise.
Particularly worth mentioning are the hinges, or more precisely the stabilization of angular velocity. This is a design that ensures the stability of rotation of two shafts: the drive and the accompanying. The hinge includes two forks: in their sockets there are 4 balls. In the middle sectors of the parts there is a fifth one, needed for installation operations. In particular, centering the fork. To deactivate the front-wheel drive, there is a special device consisting of a clutch, bolts, and balls.
Distinctive features of the military version
The main feature of the front axle in the military version is the placement of the gearbox. It is located higher. The second distinctive point is the gear ratio - 5.38. The civilian version of UAZ 469, 452, 3151, 3303 has 4.6 or 5.125. All these characteristics increase the distance from the bottom of the car to the road surface from 220 to 300 mm. Those who want to quickly replace an ordinary bridge with a military one will be disappointed: this will not work without alterations. The reason is in the design of the bipod and suspension. In addition, driveshafts differ in length.
A real “cart”!
Features of adjusting the rear axle gearbox
Patriot rear axle gearbox
The rear axle gearbox is a device that supplies a torque signal. From time to time the device needs adjustment. If at a minimum speed of 30 km/h you suddenly hear a strange hum, you should know that this is not a failure of the engine, but of the gearbox. The reason may be too much load on the car. This usually occurs if the vehicle frequently acts as a tractor-trailer.
To adjust the rear axle gearbox yourself, we will need the following equipment:
- special adjusting rings;
- torque wrench;
- calipers;
- sandpaper and thread;
- UAZ bridge.
Instructions for adjusting the rear axle gearbox.
- Any repair always begins with a thorough, careful inspection. It would be a good idea to wash the parts in kerosene and remove dust. As a rule, under a thick layer of dirt, some defects are sure to appear, which are the culprits of the failure. This is usually a defect in the gear teeth. In this case, it is necessary to replace the damaged part with a new one.
- It is important to check the edges of the teeth. If they become dull, nicked or the teeth become rounded, replace them. If the defects are minor, it is enough to simply sand the part to sharpen the teeth and polish it a little.
- When assembling the UAZ gearbox, it is important not to forget to install new parts. If the assembly is carried out on the basis of an old device, it is necessary to measure the dimensions of the drive gear and adjusting ring, since one part will be new and the other old. Inconsistencies may arise between them, which will negatively affect the further operation of the bridge. To determine how thick the new adjusting ring should be, it is worth measuring the old and new gears (the sizes are marked “+” and “-”), subtract the size of the old part from the size of the new part, and then divide by 100. So, if the old part is marked with a number “10”, and the new one is “-4”, then we get the following mathematical example: 4-(-10)=14. As we know from school, “-” on “-” gives “+”. Next: 14_100=0.14 mm. That is, the new adjusting ring should be 0.14 mm smaller than the old part.
- All openings and bends must be thoroughly sanded. We install the bearings into the crankcase, then install the remaining parts and tighten them with a nut.
- You will need a level to align the horizontal line of the crankcase. To determine the amount of gap between parts, a flat feeler gauge is needed. Now let’s use another formula: subtract the gap from the deviation of the new gear. As a result, we will obtain the required thickness of the adjusting ring.
- We will need something for the mandrel; we can take a simple piece of pipe. We install the adjusting ring on the shaft, which we place in the crankcase.
- We assemble the parts.
- Tighten the nut.
- We wind a tight thread around the flange and tie a dynamometer. Using it, we can determine the degree of rotation of the drive gear shaft. The average is 6.9 kgf. If your indicator is much less than this value, you should tighten the nut a little. If, on the contrary, it is more, then you will have to disassemble the gearbox and install a new spacer sleeve.
- We install the crankcase into the differential housing. We fix the bolts.
- We eliminate all gaps by tightening the driven gear nut. The gap should be no more than 0.1 mm.
- After tightening all the nuts, we attach the locking plates. The adjustment has been completed.
Arrangement and elimination of rear axle breakdowns
The rear axle is a support; inside it is the main transmission of the axle shaft, the differential.
It can be of two categories: with a single main gear or an additional wheel drive. Wheel regulators, which increase torque and transmit it to the hubs of the conductive wheels, are located at the ends of the beam.
Wheel roller bearings rest on the regulator housings. Wheel gearboxes provide enormous ground clearance and are gears meshed internally. The main gear is bevel, with a spiral tooth, a bearing unit, which has a main gear and a bevel drive with 4 satellites. A satellite is a gear, compact, simple, rarely fails, and facilitates quick, easy gear changes.
Assembly housing
The crankcase has a drain and fill hole and contains a certain amount of oil to lubricate the wheel hydraulic adjuster.
The rear converter support is detachable and consists of elements such as a cover, contamination protection, and pressed-in axle shaft housings. Its dimensions have been reduced, the gear ratio has been reduced to 2.77.
The driven rear axle gearbox is mounted on the shaft. It is installed in a roller bearing and bushing, tightened with a nut, and secured into the groove of the shaft. The ends of the gearbox shafts have movable couplings that help group and separate the shafts from the wheel hubs if necessary.
When the clutches are disconnected, the UAZ 469 becomes rear-wheel drive. This is useful on good paved roads. When driving in impassable terrain, turning off is not advisable. You can disconnect and connect the hubs from the start of operation of the quick response clutch or the hub cam. In this case, you do not need to crawl under the bottom of the car.
A few words about portal bridges
We have already noted that, in addition to the main 2 types, there are also portal bridges. So what is it? Portal bridges are a unique development of talented auto mechanics, which was presented to the world back in 1946. Its author was the German Albert Friedrich. For many years he had been looking for ways to improve the SUV to increase its cross-country ability, make it more reliable and durable, but all attempts were in vain.
One day, without expecting it, Friedrich found what he had been looking for for so long. It turns out that it was only necessary to place the beam a little higher than the horizontal of the wheels. This idea is not new; it has long been used in tractors, but they did not think of using it in the manufacture of cars. The result was something massive, powerful, dimensional, majestic. Various engineers worked on the development of this topic over the next 20 years.
Today, portal bridges are a device that turns an ordinary SUV into an invincible tank that doesn’t care about anything: dirt, snow, and vast swamps. Both the owner of a UAZ and any other SUV can install such a bridge.