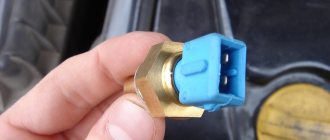
The reverse sensor is designed to turn on white lights that signal you to start reversing. For some reason, many people think that this is a completely unnecessary device. Actually this is not true.
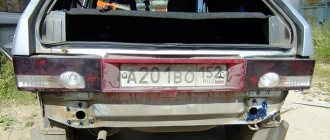
The sensor is responsible for turning on the light signal, thanks to which other road users can find out about your intentions and planned maneuvers. If it's dark outside, white lights will additionally signal to cars that you're on their way. This prevents many accidents and collisions.
But at some point the device may fail. Because of this, the risk of getting into an unpleasant traffic situation seriously increases. The only correct solution is to identify the problem and fix it.
DZH for the fourteenth
Location
First you need to understand where exactly the device is located.
You can go two ways:
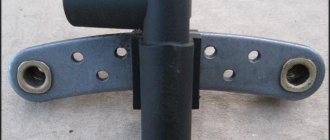
- Fly under the bottom and look up at the suspension. The desired object on the VAZ 2114 is located on the gearbox. There are only two sensors - speed and reverse.
- If you don’t want to crawl under the car or can’t, try getting to the device through the engine compartment by opening the lid. Although the first option is objectively more convenient.
Device location
Where is it located and how to check it
To begin replacing the reverse sensor on a VAZ 2110, you must first determine its location.
Device location
But really, where is he? There is nothing difficult in finding this element.
- You will need a trestle or pit. One way or another, you should end up under the car.
- Now look towards the rear wheels of the car and raise your eyes to the gearbox. To the left of it is your desired sensor.
- Can it be confused with other devices? Hardly. Only for this element is provision for wiring from the gearbox. Therefore, you definitely won’t find other similar devices nearby.
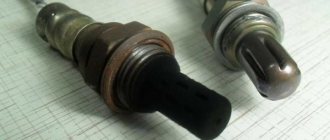
Let's start checking. We need to make sure that the sensor has failed, and that replacing it will actually produce results.
To check, do the following:
- Disconnect the terminal from the meter;
- Connect a multimeter to the connectors and turn it on in resistance measurement mode;
- Put the gearbox in reverse mode;
- Start the engine;
- Look at what the device produces;
- If the device shows a resistance of 0 Ohm, plus a beep sounds, then everything is fine, the sensor is working;
- It's bad if the meter shows infinity. This indicates that the sensor has served its purpose and needs urgent replacement.
We recommend: How to set the spark plug gap?
Functionality check
Before blaming the sensor for the malfunction of the reverse signals, make sure that the device has actually lost its functionality. To do this, run the diagnostics:
- Turn the wheels to the left all the way and look at the sensor from the driver’s side - there is a protection on the side of the gearbox, and contacts inside it;
- Remove this protection and inspect the device. There are also two contacts going to the sensor;
- Close the contacts on the frog limit switches (this is the same reverse sensor) and start the engine, engaging reverse gear;
- If everything is fine, the wires and contacts are working properly, then the white headlights will turn on;
- If the headlights do not light, use a tester to check the voltage on the wire (orange) and ground;
- If there is voltage, check the light bulb board and the quality of the contacts.
Causes of the problem and solutions
There are several most common reasons why the DZH fails. But there are countermeasures that can return the sensor to operation.
Article on the topic: Complete list of VAZ 2114 sensors: name and location
| Causes of the problem | Actions |
| The contacts on the wiring have oxidized | They just need to be thoroughly cleaned and returned. In this case, the negative terminal of the battery must be disconnected |
| The sensor is loose | As the sensor is used, it may move out of its seat. Screw it in tighter |
| There is no contact with the wiring in the gearbox | Check the condition of contacts and wires. Clean or replace damaged parts |
| There is no contact between the plug and the fuse box | Also check the condition of the contacts, clean them, change the wiring |
| Fuse blown | Here the situation can only be corrected by replacing the fuse |
In some situations, the sensor is working properly, the contacts are intact and the wiring is undamaged. In this case, the light bulbs themselves burned out. They are easy enough to replace.
Reasons why the reverse lights of a VAZ car do not light up
Why might the reverse lights not light up?
First, you need to find out why the reverse lights do not light up - maybe the bulbs are simply burned out (see Replacing bulbs in the rear light of a VAZ 2110: do it yourself) and you don’t even need to change the sensor? Here are some reasons:
- The reverse lights are burnt out. You can check their performance by removing them from the flashlights and checking them with a multimeter.
Burnt out light bulbs
- Damaged wiring is another reason. Everything is more complicated here - you will have to search longer. And it is checked in the same way - using a multimeter for continuity or resistance.
- Poor contacts on the reverse sensor. As you know, nothing with poor contact usually works.
- Violation of the insulation on the wires near the sensor leads to their short circuit.
- The fuse has blown (see VAZ 2110: how to replace fuses). Which one needs to be clarified for each car in the repair manual.
- Well, the breakdown of the sensor itself - this is evidenced by both the lights not turning on when reverse gear is engaged, and the constant glow of the lights.
To fix a malfunction of the lights, you may have to perform all the repair points, but you can start with the sensor. The price for it is small - usually about 100 rubles, so you can buy it and change it, and then solve problems as they arise.
Tools
So, what do you need to replace the reverse sensor yourself:
- A set of keys. Although this is even said loudly. You will need a 22 key and in some cases a 24 key
An extended 22mm socket will be needed to remove the reverse sensor
- Multimeter
Be sure to get a multimeter
- Small container for oil
- Screwdriver
- Pliers
- Knife
- Insulation tape
- Hammer
- Chisel
Repair methods
To repair the reverse signal, you can proceed in two ways. They differ in the way the sensor is accessed.
- Drive the car onto a lift or pit.
- Do the work by climbing under the car.
If you have already encountered a similar problem, then you will probably agree that replacing the DZH is best done using a pit or overpass. This makes access to the sensor as comfortable as possible, plus you minimize the risk of being splashed with oil from the gearbox.
Replacing the DZH is not the cleanest job
Of course, there is another cleanest way - sending the car to a car repair shop. But then you will have to pay not only for the sensor, but also for the services of the specialists. And this is another 2-3 times the cost of the sensor. The choice is yours anyway.
Self-replacement
It’s not difficult to get to and replace a failed DZH on your own. Follow the instructions, do not break the sequence of operations, and then the process will not take you much time and effort.
- Place the car on a pit or overpass. Be sure to apply the handbrake and place the transmission in first gear. This will help prevent your car from accidentally rolling away.
- Remove the protection from the contacts of your sensor, disconnect the contacts.
- Prepare a container into which the oil will be drained when unscrewing the DZH.
- When the container is ready, remove the sensor. In some cases, it may not be unscrewed by hand. In such a situation, use a 22 mm socket.
- Very rarely even the key cannot help, since the sensor becomes stuck to its location. Here you will have to arm yourself with a hammer and chisel and try to remove it as carefully as possible.
- Take out the failed device and insert a new one in its place.
- If oil gets on the gearbox housing, remove it with dry rags. There is no need for extra dirt. Plus, it can lead to a decrease in the efficiency of the device.
- Return all contacts to their places, put the protection back on.
- If a decent amount of lubricating fluid has spilled out of the box, be sure to top it up. Just use fresh ones. By the way, this is one of the reasons to completely change the oil in the gearbox if it has been there for more than the first season.
- The decision to change the oil will simplify the task when removing the sensor. If the liquid is drained in advance, it will not flow in different directions when the sensor is unscrewed. The work will be cleaner, plus you will kill two birds with one stone - replace the sensor and gearbox oil.
Removal and replacement
After completing the work, do not forget to check whether the reverse traffic warning system is now working. For this:
- Turn the ignition key, but do not start the engine;
- Engage reverse gear on your gearbox;
- See if the white lights turn on. If yes, everything went great.
The procedure for replacing the IAC on a VAZ 2114 engine
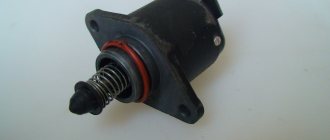
Before replacing the idle speed control of the VAZ 2114, you need to prepare the sensor, the necessary tools and materials:
- As a replacement device, you can buy an IAC marked 2112-1148300-04 “KZTA” or “omega” 2112-114830. When choosing, be sure to check the exit of the needle rod to a distance of no more than 23 mm;
- for work you need a Phillips-head screwdriver, as well as a key “13”;
- Be sure to have rags, WD-40 and carburetor cleaner ready.
Before replacing the device, you must:
- Place the car on a level surface and put the handbrake on.
- Raise the hood and lock it in the open position.
- Disconnect the battery; when replacing the IAC, this is not a requirement, but a mandatory condition.
- Remove the cover, which is the protective casing of the engine.
- After loosening the clamp, disconnect the rubber tube from the air filter pipe, otherwise it will interfere with the disconnection of the pipe itself.
- Unscrew the clamp securing the VF pipe, disconnect and move the pipe corrugation to the side.
- Loosen the fastening screw and pull out the cable running from the gas pedal to the throttle valve.
- Using a rag, clean the surface of the throttle body and around it.
- Lubricate the remote control mounting nuts and IAC mounting screws with WD-40 to make them unscrew better .
- Unscrew the two nuts to “13” and remove the entire throttle assembly.
- Disconnect the IAC connector by removing it from the sensor terminals.
- If there is dirt in the places where the IAC is attached and adjacent to the remote control housing, it must be removed by thoroughly wiping everything with a prepared rag.
- Using a Phillips screwdriver, unscrew the two screws that secure the IAC to the remote control.
- Remove the valve from the mounting socket.
- It is advisable to wash the throttle assembly with carburetor cleaner.
- Install the regulator prepared for replacement on the throttle assembly in the same position in which the device was just removed.
The rubber gasket, which should be sold together with the sensor, must be pre-lubricated with engine oil.
- Tighten the two screws and make sure that the IAC is tightly attached to the remote control housing.
- Place the throttle assembly in place and make sure the mounting nuts are tightly tightened.
- Connect the connector to the valve terminals.
- Attach the cable to the throttle valve and connect the VF pipe and the rubber tube, tightening the clamps.
- Install the protective cover on the engine.
- After installation, the IAC must be calibrated. To do this, connect the battery terminals and turn on the ignition for ten seconds. The ECU will calibrate itself. After this, the IAC is ready for operation.
We recommend: Engine oil pressure sensor
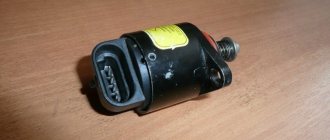
Reverse sensor: possible malfunctions
Every motorist is most likely aware that one of his most important responsibilities when driving on public roads is to notify other road users of his intention to perform a particular maneuver. For example, to indicate the desire to turn left or right, special indicators are used, controlled by a special lever.
However, progress does not stand still, and some warning signals are given automatically by the machine. A striking example of this is the reverse gear of the car, during which the moon-white rear lights light up automatically and in advance. This happens due to the presence of a special sensor in the design of the car. We will talk about the principles of its operation and repair in the article below.
Changing the speed sensor on a VAZ-2115 with your own hands
During the operation of the car, certain parts may periodically fail. The speed sensor is no exception here. Problems with its operation on the “tag”, of course, are not the most common breakdown, but they still happen. You can find out about the malfunction using the on-board computer. In particular:
- code P0500 signals the absence of information from the speed sensor;
- code P0503 – about an intermittent signal.
In addition, there are also certain signs by which you can understand that there are problems with this particular component of the car.
These include, in particular, unstable operation of the speedometer or its complete “dying”, decreased engine power and increased fuel consumption. Also pay attention to the engine speed.
If there are problems with the speed sensor, they float at idle. Sometimes a running car can simply stall while standing or rolling in neutral.
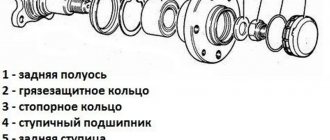
In the "tag" the speed sensor is located on the rear side of the gearbox, near the differential. Before proceeding directly to dismantling, first make sure that all wires are intact and there are no breaks.
At the same time, also check their fixation. If everything is in order here, then we disconnect the battery and proceed to removing the sensor. To do this you need to take a minimum set of tools:
- screwdrivers - figured and flat;
- pliers;
- wrenches - 10 and 21.
To make the replacement process more convenient, it is recommended to remove the adsorber. This is not difficult to do. You just need to unscrew the corresponding nuts and move the adsorber to the side. The procedure itself will take very little time, but will greatly facilitate access to the sensor. Next, tighten the latch, and then remove the block with wires.
Now you can begin to remove the sensor itself. It must be turned counterclockwise until the device is unscrewed. Then we take it out completely, using a 21 key. All that remains is to clean the place where the sensor was from dirt, and you can start installing a new one.
By the way, if you doubt that the root cause of the problems that have arisen in the car’s operation is the speed sensor, then it is recommended to carry out a small check, and only after that go buy a new one, if, of course, it is necessary. The essence of this method is simple.
Just ask one of your friends to lend you a sensor that is known to work and install it on your car. If the problems disappear, then you need to buy a new one. However, it also happens that no changes for the better have occurred.
This means that you should continue to look for the root cause of the problem.
As you can see, there is really nothing complicated in the procedure for replacing the speed sensor on a VAZ “tag”. Even if you've never done this before, the whole job is unlikely to take more than 30 minutes.
At the same time, do not forget about the savings that you would have to pay out of your pocket when visiting a car service center.
Well, satisfaction from a job successfully done with your own hands is also an important moment for any man.
Main aspects of servicing and replacing the speed sensor on a VAZ 2115
Vehicle speed is the main parameter that every driver must monitor.
Exceeding the permissible speed limit is not only fraught with a fine, but can also lead to serious consequences.
Where is the VAZ 2115 speed sensor located, what malfunctions can occur in its operation, how to check and replace the controller - you will find answers to these questions in this article.
Characteristic
Where is the speedometer sensor located in the VAZ 2115? As can be seen from the photo, the device is located in the upper part of the gearbox housing. However, accessing this controller is not very easy. To get to the device, you need to drive the car into a pit or overpass and crawl under the bottom of the car.
Functions and principle of operation
The purpose of the speed controller in injectors and carburetor engines is to transmit information about the vehicle speed to the dashboard. That is, the working sensor will be able to transmit 100% accurate information about the speed of movement to the device so that the driver can be guided by these data while driving.
As for the operating principle, the DS operates based on the Hall effect:
- the controller transmits voltage signals to the control unit with a frequency that should be directly proportional to the speed of rotation of the driving wheels of the vehicle;
- the control unit, in accordance with the received DS signals, regulates the operation of the power unit at idle speed and, using the idle speed sensor, controls the air supply bypassing the throttle;
- the frequency of the controller pulses itself should be directly proportional to the actual speed of movement.
Errors and symptoms
What signs can be used to determine the failure of the controller or the appearance of malfunctions in its operation:
- during diagnostics, error P0500 occurs - this combination indicates that there is no signal coming from the DS;
- another code - P0503 - indicates that the incoming signal is interrupted for some reason;
- one of the most likely signs of a breakdown is that the speedometer shows incorrect values, in particular, the needle on the dial moves chaotically in different directions;
- another symptom - the car engine began to idle intermittently;
- at idle speed fluctuates;
- Also, during acceleration, the driver may notice failures, that is, when he presses on the gas, there is no gain of power, the engine does not react to this in any way;
- fuel consumption has increased.
As for the malfunctions themselves, the speed controller may fail for the following reasons:
- there are no contacts between the device and the on-board network;
- there was a break in the electrical circuit of the regulator;
- another reason is a malfunction of the mechanical drive of the device;
- as a result of wear or damage, the sensitive element of the controller could break, in particular, we are talking about electronic devices (the author of the video is the Glaz Szalg channel).
Functionality check
Diagnostics of the performance of the DS can be done in two ways.
The first option, to implement it you will need a multimeter:
- First you need to dismantle the controller itself. Read more about the removal procedure below.
- Then the tester should be set to alternating voltage mode.
- After this, you should close the multimeter probes to the contacts on the controller plug. The first probe should be connected to the contact that goes to the dashboard, it is located in the center, and the second - to ground, that is, the car body.
- There is a special rod in front of the controller; when it rotates, the device starts. That is, to diagnose the functionality of the regulator, the rod should be rotated; to do this, a metal tube of the same size should be installed on it; this option is more convenient.
- When the rod begins to rotate, the multimeter display will display data on alternating voltage, or rather, its surges. Moreover, the higher the rod rotation speed, the larger the jumps in values will be. This voltage does not jump, this indicates a controller malfunction.
The device can also be checked without dismantling it, but to implement this method, you must drive your “Fifteen” onto an overpass or pit:
- When the car is in the pit, you will need to jack up the front left wheel.
- Next, you need to find the controller itself, which is located on the gearbox, and then disconnect the connected wiring from it.
- Then take a multimeter and connect its probes to the ground contact, as well as transmitting the impulse to the control unit, this is the central, as well as the outermost contact on the block.
- Now you need to rotate the jacked wheel and diagnose the values that the multimeter gives for the appearance of voltage surges. If you don’t have a tester, you can use a regular test lamp with wires connected to it. One of the wires should be connected to the left contact, that is, power, and the second to the central one. If the light source starts to blink when the wheel rotates, this indicates that the DS is working properly.
Self-replacement of the VAZ reverse sensor
Today we will change such a thing - the VAZ reverse sensor
Have your neighbors started complaining that when you reverse your favorite VAZ, it’s not noticeable to others? Well, it's time to change the reverse sensor and forget about all the problems, including the neighbors. What could be the reasons for the rear lights not shining? How to do it yourself? Is it difficult and what is needed for this? What should I do in what order? This article provides answers to all these questions; it also contains supporting photos showing how to correctly replace this sensor on a VAZ 2106, 2108 and other models:
- Reasons why the reverse lights of a VAZ car do not light up
- Tools
- Replacing the sensor
- VAZ 2107
- VAZ 2109
- VAZ 2110
- VAZ 2114
- Functionality check
- What to do if replacing the sensor did not help?
Learning how to change the reverse sensor yourself
Modern cars use many different types of controllers and sensors. Such devices can be control and executive. If for some reason the controller fails, it can cause inconvenience in terms of driving. What is a reverse sensor and what functions does it perform? The answers to these and other questions are presented below.