How to remove the wing on a VAZ 2114
You will need the following:
- Remove the travel direction repeater. First, the socket is removed along with the lamp. Then, having found two special petals, you should simultaneously press them and completely remove the cartridge.
- Unscrew the nuts; they secure the part to the side of the bumper.
- Move the bumper down so that it does not interfere with the removal of the fender.
- Remove the screw; it secures the headlight cover.
- Open the hood, find the wiring harness and disconnect it.
- Remove the spring that secures the turn signal.
- From the outside, remove it from its niche. Remove all remaining bolts that secure the fender to the car body.
Algorithm of actions
Dismantling and subsequent insertion of the front wing takes up to 1 hour, even for inexperienced craftsmen. It is important to perform the entire sequence of actions correctly:
- Unscrew the two nuts in the bumper fasteners and lower the edge of the bumper down.
- Remove the outer part of the sill trim.
- Remove the headlight cover.
- Remove the turn signal from the headlight.
- Remove the side turn signal.
To quickly remove the side turn signal, you need to squeeze the latch, disconnect the block, pull out the block with the socket and the light bulb, and push the socket inside.
The element is untwisted, the part can be removed. In some cases, it happens that the front wing on a VAZ 2114 is installed to the body by spot welding. The installation locations are near the threshold and the A-pillar. In this case, it is necessary to drill out the spot welding areas and pry out the metal joint with a chisel. After cutting, you need to clean the torn edge with a grinding machine or sandpaper. For subsequent work, the metal is primed and degreased.
Installation is carried out in the reverse order after checking the width of the gaps. Experienced craftsmen recommend removing the wheel before dismantling; this will provide full access to all the screws, some of which are located on the inside.
When the VAZ 2114 wing requires replacement
- As already noted, the impact on the wing of the environment and moisture, especially in winter, when the roads are sprinkled with salt and all kinds of reagents, becomes extremely destructive.
In order to prevent the wings and body of the car from reaching a critical state, it is necessary to carry out anti-corrosion treatment on the VAZ 2114 in a timely manner.
If the wing is deformed as a result of an accident, it is better to buy a new part. Small dents, abrasions and chips on the wing, at first do not cause serious concern. Over time, they become covered with rust, the “attractiveness” of the wing is lost, and as a result, the need to replace the wing.
In order not to spend money on repairs in a car repair shop, an experienced car owner, if he has the tools, can change the wings of a VAZ 2114 with his own hands. It is better to replace the front wing of a VAZ 2114 in a garage, following the instructions.
To perform this procedure you will need a tool such as:
- wrench with 8 and 10 mm head;
- extension cord and ratchet;
- flat and Phillips screwdriver;
- new left wing of VAZ 2114.
By the way, the price for an original VAZ front left fender with article number 21140840301100 or a front right fender with article number 21140840301000 will be about 1,800 rubles. The cost of the rear right wing with article number 21090840401400 or the rear left wing with article number 21090840401100 will be about 2100 rubles.
Prices are indicated for spring 2021 in Moscow and the region.
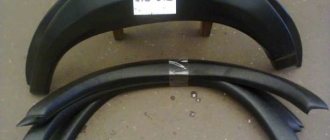
Which fenders to choose for the VAZ 2115: metal or plastic
Factory primed metal fender
From the factory, the VAZ 2115 is equipped with Togliatti-made front fenders with catalog numbers 21140840301100 (left) and 21140840301000 (right). For the spare parts market they are produced by both VAZ and KamAZ, Ekris and Nachalo companies. The price of original metal wings is at least $50-55 depending on the manufacturer.
Plastic front fenders on the 2115 cost between $20 and $27 each. Depending on your goals, you can choose either classic steel or plastic wings. The latter are distinguished by the fact that they are often offered in a variety of designs, not only in the stock design. And yet the public has tasted plastic and is more careful about it. And that's why.
Pros and cons of plastic wings of the VAZ 2115
The positive qualities of wings made of molded plastic or fiberglass are clear - they are lighter (3.5-4 kg versus 6 kg for standard wings). In addition, they are not affected by corrosion, and there is no question of design options. The wildest fantasy of a garage tuner will find wings that will satisfy its owner 100%. But at the same time, the practicality of plastic is often forgotten. Yes, it is not as susceptible to mechanical stress as metal and in some cases is capable of restoring its shape after a slight impact. But there are also significant disadvantages of plastic wings with all this:
- fragility in the cold, at minus 25-30 ° C, even a small blow will cause destruction of the wing structure or the appearance of cracks;
- excessive elasticity when heated, the plane of the wing can “play” and no longer restore the original geometry, and remain in the “propeller” state, especially under the condition of an amateurish, poor-quality installation;
- the selection of primers and paints requires experience, since only a specialist painter can accurately predict the final color after painting;
- problems during installation, very often drivers are faced with discrepancies between the landing dimensions of fiberglass or plastic fenders and the real ones;
- when the plane bends, a crack may appear in the paintwork, although this depends on the elasticity of the paintwork;
- slightly, but the level of passive safety is reduced, since plastic does not absorb impacts.
To one degree or another, these shortcomings can be compensated by the high quality of manufacturing of the plastic wings on the VAZ 2115-2113. However, in 90% of cases, wings are not produced by the most professional companies, and reviews from owners increasingly talk about the problems that we described above. Nevertheless, there are trusted brands, both local and foreign, that produce very high-quality and reliable plastic body parts.
It would be great if readers, with their reviews in the comments, could help other users navigate the huge number of companies - which wings are better to ignore and which ones to pay attention to.
Preparation for wing replacement and necessary tools
First you need to prepare the car itself. To do this, he should drive the VAZ 2114 into a technical pit or overpass. If this is not possible, then it will be enough to simply lift it with a jack on the side from which the wing will be replaced and securely fix it in this position. Next, you need to remove the wheel and remove all interfering parts. These include:
- front bumper;
- facing linings;
- thresholds;
- wheel arch liners
This is interesting: Diagnostics of injectors - how to check it yourself: step-by-step instructions Before removing the bumper, you need to disconnect the contacts of the fog lights. To do this, simply remove the terminal with “minus” polarity from the battery. Such a simple procedure will significantly reduce the risk of damage to all vehicle electronics, saving the owner from unnecessary financial costs.
Front bumper
For independent work you will need the following materials and tools:
- socket wrench with 8, 10 head;
- flat-head screwdriver;
- ratchet, extension;
- rags;
- pliers or pliers;
- knife;
- anti-corrosion lubricant WD-40;
- new part.
It should be noted that in the process of replacing a wing, not all of the above tools may be needed. It will be enough for an experienced master to have only a few of them on hand. However, if this is your first time deciding to remove the wing yourself, then it is better to prepare the entire kit so that during the work you will not be distracted by searching for the missing tools.
After completing all the preparatory work, you can begin replacing the old VAZ 2114 wing and installing a new one.
Replacing the front wing: algorithm of actions
To ensure that removing the wing of the VAZ 2114 does not cause any special problems, you should perform all the steps following the following sequence:
- Remove the front fender liner from the desired side.
- The two nuts in the bumper mount are unscrewed, and then the edge of the bumper itself is lowered down.
- The front part of the sill trim is removed.
- The covering on the headlight is removed.
- The turn signal on the headlight is removed.
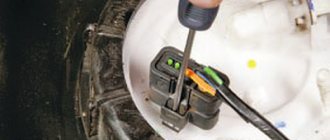
- The side turn signal is removed. To do this, you need to squeeze its latch, disconnect the turn signal, pull out the base along with the light bulb and push it under the wing (inside).
- Unscrew the self-tapping screw that secures the wing to the bracket (a 10mm wrench is suitable for this).
- The screw that secures the wing under the threshold is unscrewed.
- The two self-tapping screws fastening to the strut are screwed in (they are located on the inside of the front fender).
- Unscrew the screws (4 pcs.), with the help of which the upper part of the wing is attached to the body.
- A layer of sealant is cut along the upper flange of the wing; it is best to use a sharp knife for this).
Now the front wing of the VAZ 2114 can be easily removed.
To install the wing in place, follow all the steps listed above in reverse order.
Please note that it is advisable to install new insulating gaskets when replacing the front fender.
During the installation of the wing, it is necessary (before the final tightening of the screws) to set horizontal and vertical gaps around the wing relative to the hood and door.
Experts recommend treating the replacement area with an anti-corrosion compound. This will make the joint durable, and, as a result, will protect car parts from premature wear. It is also advisable to treat the entire inner surface of the newly installed wing with a special anti-corrosion compound.
As can be seen from the information presented here, the entire process of replacing the wing on a VAZ 2114 cannot be called complicated. If desired, each car enthusiast can independently cope with this task, significantly saving on contacting specialists.
The situation is greatly simplified due to the fact that the replacement does not require any special tools or equipment.
Taking this into account, we recommend that you proceed with the replacement on your own without fear. When the work is finished, you will have an additional reason to praise yourself for being one step closer to being called a real master.
Maintenance
In accordance with the regulations, ]engine[/anchor] 11186 must be serviced in the following order:
| Oil consumption | maximum 1 l/1000 km |
| Engine oil for 11186 | 5W-30 and 10W-30 |
| Engine oil volume | 3.5 l |
| Operating temperature | 95° |
| Motor life | stated 150,000 km |
| Adjustment of valves | washers between camshaft cams and tappets |
| Cooling system | forced, antifreeze/antifreeze |
| Coolant quantity | 7.8 l |
| water pump | polymer impeller |
| Candles for 11186 | BPR6ES, A17DVRM |
| Gap between spark plug electrodes | 1.1 mm |
| Timing belt | 163 teeth, pitch 8 mm, belt width 26.7 mm |
| Cylinder operating order | 1-3-4-2 |
| Air filter | Nitto, Knecht, Fram, WIX, Hengst |
| Oil filter | catalog number 90915-10001 |
| Flywheel | from 2110, steel crown placed on a cast iron body |
| Flywheel mounting bolts | MT box – M10x1.25 mm, length 26 mm, groove 11 mm |
| Valve stem seals | code 90913-02090 light inlet |
| Compression | 13 bar |
| XX speed | 650 – 750 min -1 |
| Tightening force of threaded connections | spark plug – 18 Nm |
| Maintenance object | Time (year) or mileage (1000 km), |
which comes first
This is exactly the frequency of maintenance that the ICE 11186 device is designed for.
Replacing the wing of a VAZ 2114. Photos, instructions on how to change the wing of a VAZ 2114
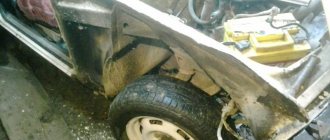
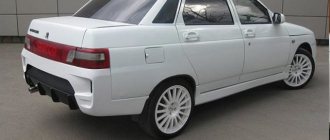
The VAZ 2114 car of the Samara 2 family is a restyled version of the VAZ 2109. The model differs from its predecessor in the original design of the front part of the body, headlights, hood, design of bumpers and moldings.
During the operation of the car, damage to the body occurs, this is facilitated by corrosion, minor accidents, and the external environment. Wings are also susceptible to these negative influences, which is why they sometimes require replacement.
This photo report shows how the front wing of a VAZ 2114 is replaced.
Features of replacing the rear wing of a VAZ 2114
It should be taken into account that the process of replacing the rear wing of a VAZ 2114 is much more difficult and complex, and requires the necessary specialized tools (for example, a welding machine) and highly qualified plumbing work. https://www.youtube.com/watch?v=hwG_-_erfbY
https://www.youtube.com/watch?v=hwG_-_erfbY
You can do your own VAZ repairs only if you understand body work and know how to work with a welding machine. When you encounter it for the first time, you are unlikely to be able to perform high-quality repairs.
Below is a DIY guide for replacing your rear fender.
- We remove unnecessary and flammable items from the trunk.
- Unscrew the bumper.
- Disconnect the headlights.
- Remove the seal.
- We remove the fuel tank if the right wing is to be replaced.
- We dismantle the glass of the rear wing, it is removed like a windshield.
- Using precise movements, using a thin chisel or a grinder, cut along the fender, adhering to the joint indentations:
From the rear wheel arch along the bend, 12–15 mm away from the edge of the fender; from the floor of the spare wheel (or fuel tank) along the bend, 12–15 mm away from the edge of the wing; from the rear panel, 2 mm away from the connection line; from the cross member panel of the rear window, 2–3 mm away from the edge of the bend; from the rear of the sidewall along the bend, 15–20 mm away from the edge of the wing. - Using a drill with a diameter of 6–7 mm, we drill out the rivets at the junction of the wing with the transverse frame.
- Disconnect the rear fender.
- Using a tool, we remove excess metal that remains on the body.
- We straighten and polish the edges of the wing.
- We attach the new wing using resistance welding in increments of 40–50 mm.
- We paint the new wing in the body color.
When the VAZ 2114 wing requires replacement
- As already noted, the impact on the wing of the environment and moisture, especially in winter, when the roads are sprinkled with salt and all kinds of reagents, becomes extremely destructive.
In order to prevent the wings and body of the car from reaching a critical state, it is necessary to carry out anti-corrosion treatment on the VAZ 2114 in a timely manner. - If the wing is deformed as a result of an accident, it is better to buy a new part.
- Small dents, abrasions and chips on the wing, at first do not cause serious concern. Over time, they become covered with rust, the “attractiveness” of the wing is lost, and as a result, the need to replace the wing.
In order not to spend money on repairs in a car repair shop, an experienced car owner, if he has the tools, can change the wings of a VAZ 2114 with his own hands. It is better to replace the front wing of a VAZ 2114 in a garage, following the instructions.
To perform this procedure you will need a tool such as:
- wrench with 8 and 10 mm head;
- extension cord and ratchet;
- flat and Phillips screwdriver;
- new left wing of VAZ 2114.
By the way, the price for an original VAZ front left fender with article number 21140840301100 or a front right fender with article number 21140840301000 will be about 1,800 rubles. The cost of the rear right wing with article number 21090840401400 or the rear left wing with article number 21090840401100 will be about 2100 rubles.
Prices are indicated for spring 2021 in Moscow and the region.
1
Unscrew the two screws securing the front fender liner to the bottom of the mudguard.
2
Unscrew the nuts securing the fender liner to the upper part of the body.
3
Remove the three screws securing the fender liner to the bottom of the front bumper and remove the fender liner.
4
Remove the door sill trim.
5
Remove the molding (if any) of the front fender.
6
After unscrewing the screw securing the headlight trim, remove the front turn signal.
7
Next, using a 10mm head, unscrew the two self-tapping screws fastening to the front pillar (under the wing).
8
Using a 10mm wrench, unscrew the front (lower) wing screw to the bracket.
9
Using the same “10” wrench, we unscrew the rear (lower) screw securing the wing to the body sill.
10
Move the side turn signal slightly forward and pull out its rear part.
11
Using a 10mm wrench, unscrew the four upper bolts securing the wing to the body.
12
Completely remove the side turn signal. Separating the left wing from the factory mastic, remove it.
13
We install the wing in the reverse order of removal.
Algorithm of actions for removing and replacing the front wing
Initially, you need to carefully remove the front piston using a screwdriver. As a result of this operation, the molding will come into a movable state. It must be moved to gain access to the rear piston. By prying the front and rear fixing parts, the molding can be completely removed. Then you need to remove the upper part of the threshold. In the VAZ 2114 and 2115 models it is secured not only with pistons, but also with eight screws. Five of them are attached to the top, while the remaining three fix the lower part of the part. By unscrewing all the fasteners, the upper part of the threshold can be easily removed from the car body.
The next step is to remove the fender liner. Since the wheel has already been removed, there is excellent access to all fastening elements. There are several of them. Two bolts with washers responsible for fixing the mudguard, and a nut with a pressure plate connecting the rear part of the fender liner and the car body can be easily removed using spanners or wrenches. Next comes the work with a screwdriver. With its help, you need to unscrew the three screws responsible for fixing the fender liner with the VAZ 2114 bumper. Only two bolts remain that secure the fender liner to the upper part of the wheel arch. They can be easily removed with a wrench.
Removing the turn signal cartridge is the next step on the path to replacing the front wing of the VAZ 2114. Simply unscrew it and pull it towards you. After completing this operation, access to a pair of locking petals will open. By clicking on them, you can easily dismantle the turn signal. Having completed this sequence of actions, you need to find the block of the wires responsible for connecting the headlight unit with the turn indicators. By pressing the latch, disconnect it from the lighting element. The wing can be installed by performing the above steps in reverse order.
It is highly advisable to treat the replacement area with an anti-corrosion compound. This operation will make the joint more durable and protect the car from wear of parts.
In what cases will it be necessary to remove the wing?
The front fenders of any car, including 2114, are one of the most vulnerable elements of the body. It is they, along with the front bumper, that are primarily subject to mechanical damage as a result of the car being involved in various accidents. In addition, due to the extensive treatment of the road surface in winter with salt and chemicals, the parts begin to rust intensively.
Typically replacement occurs when:
- Severe mechanical damage as a result of an accident.
- Mechanical wear as a result of long-term use. This refers to numerous small mechanical irregularities that can no longer be completely eliminated by straightening.
- Numerous extensive areas of corrosion. In particularly advanced cases, it “eats” through the metal.
Repair parts
Replacing the rear wing of a VAZ 2114 in 70% of cases is associated with straightening out a dent from an impact. When there is no metal rupture there is no need for replacement. They straighten, putty and install back. The rear wing can be repaired without dismantling it from the car if there are small dents. Repair methods:
- reverse hammer;
- PDR method;
- vacuum suction cups.
If there are small pockets of corrosion in the area of the wheel arch, then use the method of welding metal patches and sealing through holes with epoxy glue.
Regardless of which repair method is chosen or whether a full replacement of the part is carried out, it is recommended to simultaneously check the condition of the sills and the general geometry of the body along with the fenders.
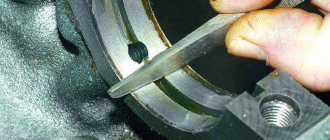
Compliance with the tightening torque of the cylinder head bolts
To control the process, it is necessary to follow a certain technique. In this way, the process can be controlled, preventing errors. To do this, you need to use a special key. A torque wrench will allow you to control the tightening torque.
First of all, using a torque wrench, set the holder to the zero position. This means the device readings are equal to the moment of the initial position of the holder
Now, you need to pay attention to the device indicator at the moment the fastener starts. We begin to twist the holder and look at the indicators. If the moment remains unchanged, then the fastener is tensile.
This is the norm. If the torque increases sharply, it is necessary to ensure that the bolt moves. This fact indicates insufficient stretching of the holder. In such a situation, adjustment is made after stabilization
If the moment remains unchanged, then the fastener is tensile. This is the norm. If the torque increases sharply, it is necessary to ensure that the bolt moves. This fact indicates insufficient stretching of the holder. In such a situation, adjustment is made after stabilization.
To control the process, you need to understand the following:
If, when tightening the bolts, the torque increases, the holder is durable and there is a need to replace it. If there is a decrease at the moment of tightening, the fastener is damaged and also needs to be replaced. During operation of a VAZ 2109 car, the cylinder head bolts are constantly exposed to destructive forces. During operation, the holders constantly heat up and cool down. This thermal effect gradually destroys the structure of the fasteners. Understanding the difficult operating conditions of bolts, you should take seriously the recommendations for their replacement.
Basic rules for adjusting cylinder head holders
Regardless of the characteristics of the engine of a particular car, there is a general number of rules that must be followed during work. It is necessary to strictly follow the parameters specified in the manufacturer's instructions. The work should be carried out using a torque wrench. Using an analogue may lead to undesirable results. Only bolts that are in good working order can be tightened. Before starting work, carefully check the condition of the holders. Tightening torque indicators must be strictly taken into account and not deviate from those specified by the manufacturer. When repairing the cylinder head of a VAZ 2109, you should follow the tightening instructions specified in the included instructions.
Most of the particularly important features of bolt adjustment are indicated in the instructions for a particular car. Therefore, it is necessary to carefully study the operating and maintenance manual of the machine. When operating a vehicle, comply with the manufacturer's requirements and regularly maintain the vehicle. Correct engine operation prevents the need to adjust the cylinder head holders.
Since the cylinder head has a complex structure, it is necessary to carry out repairs only with full confidence in your knowledge. If problems arise in the operation of the car engine, it is necessary to promptly carry out professional diagnostics. Thereby, you will prevent large-scale car repairs and high costs.
Repairing the cylinder head is a complex procedure that requires a sufficient amount of knowledge and certain experience. To carry out repairs, special equipment is used, which is usually available only in specialized service centers. Repairing the cylinder head involves changing the cylinder head gasket and adjusting the torque of the bolts. For correct adjustment, you must strictly follow the requirements specified in the instructions reviewed. Follow the manufacturer's specifications and use quality tools. With a careful approach, you can successfully make adjustments, obtaining the desired result. Happy renovation!
Screw. How to determine size?
A nut is a fastener for a screw drive or threaded connection. They differ from other parts by having a threaded hole. Together with the bolt (screw), it forms a screw pair. The nuts that thread onto a stud or bolt make up a bolted joint. Most often, hexagonal nuts are produced in factories. They are specially made for a wrench. Also on sale you can also find nuts with wings, square shapes, round ones with a notch and other shapes. They are made from automatic steel. For this purpose, special automatic machines are used.
It is worth noting that the nuts also differ in their strength class. Thus, for nuts made of carbon alloyed or unalloyed steels, a strength class of 4-6, 8-10 is established. For nuts with a normal height (more than 0.8 d), strength class 12 is established. Those nuts that have a height of 0.5 d-0.8 d have strength class 04-05. The shape of the nuts also differs. There are wing open and closed (defined by GOST 3032-76), hexagonal crown round, hexagonal slotted (defined by GOST 6393-73, 11871-80). There are lower hex nuts, especially high, high and normal height. Hexagonal castle, slotted and hexagonal nuts can be lightweight (with small external dimensions), as well as normal (photo 1).
The most common are hex nuts. Castle and slotted nuts are used when it is necessary to lock the nuts with cotter pins. Round nuts are used to fasten various parts, but for connections that need to be constantly assembled and disassembled, it is best to use wing nuts, which can be easily tightened even without using a special wrench. By the way, if you need to use a large number of nuts in your work, then it is more advisable to take lightweight ones, since they will save significant weight. When it is clear that the bolt shaft is underloaded in tension, it is best to use low nuts. To protect the threads from wear and tear during frequent unscrewing and heavy loads, use especially tall or tall nuts (photo 2).
The size of the nut should be understood as the distance that is formed between the parallel edges. Dimensions are regulated by GOST. Thus, nuts of accuracy class A, low hexagonal, high precision have the dimensions specified in GOST 5929-70. The size of accuracy class A hex nuts is specified in GOST 5916-70. Other GOSTs - GOST 5916-70, 5915-70 - give the dimensions of nuts of accuracy class B, hexagonal low and hexagonal. All sizes can be viewed in the tables given in GOST (photo 3).
The most popular nut, as already mentioned, is the hexagonal one. These nuts vary in size: M 6, M 8, M 10, M 12, M 16, M 24, M20, M30, M27, M 36, M 52, M 48, M 42. To screw such a nut onto a bolt, you need nuts keys. Today there are fifteen types of such keys. There are gas, end, cap, carob, adjustable, balloon, combination, hex and spark plug types on sale, designed for spark plugs (photo 4).
The sizes of wrenches are also different. For the nut, the size of the thread will play a role, so they can have sizes M1.6 - M110. The distance between the jaws of wrenches ranges from 3.2 millimeters to 155 millimeters. The length of the handle can be from one hundred and fifty millimeters to five hundred millimeters. Combination wrenches are popular - socket wrenches on one side and open-end wrenches on the other. It is also worth noting that special nuts are used in industry today. These are hex nuts that are used to seal joints and fasten wheels on vehicles (photo 5).
It often happens that it is necessary to use fasteners of non-standard sizes. In this case, there is no other solution but to order nuts according to GOST, OST or according to the drawings. The production and commercial enterprise “Molot” can help. From personal experience, we note that sometimes it will be cheaper to order the production of the necessary fasteners than to customize existing ones for the project.
Review of the VAZ-21116 engine of the Lada Granta Liftback
The VAZ-21116 engine of the Lada Granta Liftback car has a displacement of 1.6 liters, eight-valve, based on the VAZ-2111 engine. It has a cylinder block increased in height by 2.3 mm and an original crankshaft.
The cylinder diameter remains the same - 82 mm, the piston stroke is increased to 75.6 mm, in contrast to 71 mm for the base engine. Oil nozzles are installed in the main bearing supports.
Fig. 12. Cross section of the VAZ-21116 engine of the Lada Granta with a volume of 1.6 liters.
1 — oil pan drain plug; 2 — engine oil pan 3 crankshaft; 4 oil filter; 5 - catalytic manifold; 6 — coolant pump; 7 - piston; 8 — oxygen concentration sensor; 9 — laying of the intake pipeline and exhaust manifold; 10 — inlet pipeline; 11 — nozzle; 12 — diagnostic fitting of the fuel rail; 13 receiver; 14 — bracket for fastening the tip of the cable sheath; 15 — cylinder head cover; 16 — camshaft bearing housing; 17 - camshaft; 18 — crankcase ventilation system hose; 19 — valve pusher; 20 — cylinder head; 21 bolts securing the head to the cylinder block; 22 - valve; 23 - candle; 24 — cylinder head gasket; 25 — upper compression ring; 26 — lower compression ring; 27 — oil scraper ring; 28 — piston pin; 29 — fitting for installing the oil level indicator; 30 — connecting rod; 31 flywheel; 32 cylinder block; 33 oil pan gasket; 34 — oil level indicator; 35 - oil intake
The cylinder head of the Lada Granta Liftback VAZ-2190 engine contains one camshaft, eight valves and eight valve tappets with adjusting washers. The camshaft supports are made in the head.
Two camshaft bearing housings are bolted to the upper plane of the head. The gas distribution mechanism is closed on top with a cap with an oil filler neck.
A camshaft position sensor is installed in the cylinder head plug, and a pin is installed at the rear end of the shaft for the sensor to detect the shaft position.
The camshaft and coolant pump are driven by a toothed belt from a toothed pulley mounted on the engine crankshaft. The tension of the belt and the direction of its movement along the pulleys is carried out by a tension roller.
Removing and installing the cylinder head of the VAZ-21116 engine of the Lada Granta Liftback
Work on removing the cylinder head of the Lada Granta:
— Drain the coolant from the engine.
— Remove the tips of the high-voltage wires from the spark plugs.
— Remove the cylinder head cover.
— Remove the camshaft pulley.
— The cylinder head bolts are accessible with the camshaft installed, but a socket wrench with a special head is required.
— The cylinder head of the Lada Granta VAZ-2190 can be removed as an assembly with a receiver and exhaust manifold. But if the head is removed to repair it, then it is better to first disassemble it.
— Removing the thermostat housing from the cylinder head studs.
— Unscrew the nut and bolt of the upper fastening of the rear timing belt cover.
— Evenly, in several stages, unscrew the 10 bolts securing the cylinder head.
— Pulling the rear timing belt cover slightly to the side, remove the cylinder head.
— Remove the cylinder head gasket and remove the two guide bushings from their seats.
Work on installing the cylinder head of the Lada Granta VAZ-2190:
— We wash the cylinder head from dirt and deposits with kerosene or diesel fuel.
— Remove any remaining oil and coolant from the threaded holes of the cylinder block (under the cylinder head bolts).
— We clean the mating surfaces of the head and cylinder block from the remnants of the old gasket, degrease the surfaces with a solvent.
— When installing the cylinder head, always use a new gasket. Oil should not come into contact with the surface of the gasket.
— Install the head guide bushings into the seats of the cylinder block.
— Place the gasket on the cylinder block, and the guide bushings should fit into the corresponding holes in the gasket.
— Install the head on the cylinder block. By slightly moving the head from side to side, we ensure that the guide bushings fit into the corresponding holes in the head.
Methods for determining key diameter
Universal tools are designed in such a way that there is no need to select the right wrench size. Their working units independently adjust to the diameter of the nut. But there are copies on sale, the range of settings of which is not suitable for working with the diameter of the existing fasteners. In this case, it is worth knowing how to determine and select the size. There are two effective methods.
According to the thread diameter of the part
For a hex nut, a tool should be taken with a diameter that corresponds to the distance between the parallel edges of the nut itself. In order not to use a caliper or ruler in measurements, this value can be calculated from the diameter of the fastener thread. Such data is contained in the technical documentation, which is attached to the bolts and nuts by the manufacturer.
For standard thread diameters, two head sizes are given - reduced and normal. The first option is rare. The size chart for wrench tools is presented below:
- wrench 7 – bolt 4 mm;
- by 8 – 5 mm;
- turnkey bolt 10 has a thread diameter of 6 mm;
- 8 mm – tool No. 13;
- 10 mm – at 17;
- 12 mm – at 19;
- 14 mm - by 22.
Determining the turnkey size by the diameter of the bolt head
The second method is no less informative, but you need to use additional tools. As already mentioned, the size of the wrench corresponds to the distance between the two parallel edges of the nut. If there is no information about this value, then you should take a millimeter ruler, or better yet a caliper, and measure this distance. When using a ruler, remember that it must be placed exactly through the center point of the bolt head. It is not always possible to do this correctly, so the most reliable result will be given by a caliper. The turnkey bolt size will correspond to the tool number.
How to prepare a plastic fender for painting and installation
When adjusting and installing a plastic wing, you must take into account that the thickness of the metal rarely exceeds 0.8-1 mm, and the thickness of the plastic to achieve decent rigidity will be at least 3-4 mm. Therefore, in some cases it will be necessary to adjust the wing at the point of contact with the body with coarse sandpaper. In addition, artisanal manufacturers do not hide the fact that they allow an error of 3-5 mm or 1-3 °.
New plastic fenders without primer
Primed wings
Also, when installing the wing, take into account that the metal retains its shape after straightening in most cases. Plastic needs temperature, not a hammer, to take the required shape. When installing and adjusting the wing, the same hair dryer will help. Plastic heated in the right place to a temperature of no more than 70-80 ° C will take the required shape and configuration. You can also set gaps.
New painted fender installed. Gaps - so-soSetting the gaps and adjusting the plastic wing is carried out before priming and painting. First, the wing is hung on the body, all necessary gaps are checked, all fixation points are secured, and the geometry and strength of the installation are checked. And only after this the wing can be prepared for priming. First, the surface is matted with fine-grain sandpaper, after which the surface is primed with a special compound for plastic parts, and after that any paint coating can be applied.
What to pay attention to when installing a new one
Before installing the new wing in its place, you must immediately install the turn signal and carefully remove the wiring so that you can connect it later.
It is advisable to carry out the installation with a partner, since the part is voluminous and it is possible that it may accidentally fall.
It is very important to start the installation correctly. First you need to install the element in place of the old one and then tighten the bolts around the perimeter without tightening them completely. Then start tightening the bolts crosswise - first, not fully tighten the upper corner of the body, then the lower one on the bumper side. Then it’s the other way around – the top one is on the bumper side and the bottom one is on the body side. After this, the bolts in the middle are tightened. In this case, it is necessary to carefully ensure that the wing is at the level of the body, and does not protrude above it and does not fall through. This procedure will allow you to quickly and efficiently install a new part on the body.
When purchasing new fenders, pay attention to the manufacturer. The best metal front fenders for the VAZ-2114 car are considered to be original products from the AvtoVAZ plant. Their price in Russia varies from 2200 to 3300 rubles. a piece.