Owners of cars, especially domestic ones, often encounter rust on various body elements. For example, replacing the rear wing of a VAZ 2110 is required for this reason in almost every car of this family. Cheap metal quickly becomes corroded and destroyed, making further operation of the car problematic.
Wing repair
The cost of replacing the rear left or right wing is, on average, 3200–3300 rubles. You can do everything yourself, you just need to act carefully and have the necessary equipment on hand. So, if there is a defect on the rear wing, it is easy to repair it in this way:
- Raise the car on a jack.
- Squeeze out the affected element.
- Apply a tool with a flat but sharp end to the back of the dent on the fender. Using a heavy hammer to hit the flat part of the bit, smooth out the imperfection step by step.
- Do not hit the rear fender too hard - you risk stretching the iron, resulting in its deformation and an increase in area.
- Knock out the edges sequentially, as if walking along one line.
- Straighten the outside of the dent using a flat object.
It is not recommended to use aluminum tools for straightening - they are soft. It is better to use an iron object.
Tools
To level out dents on the fender, it is enough to have a heavy hammer and a nozzle with a blunt but sharp end on hand. If you have to completely replace the rear arch, you will need a welding machine, an angle grinder, a screwdriver, as well as a repair kit consisting of a primer, putty, a spatula, a brush and paint for further painting.
Complete rear fender replacement
You will have to completely replace the rear wing if the old one is not suitable for use: it is deformed, corroded or simply rotted. You can start replacing if you know how to remove the rear wing of a VAZ 2110, have plumbing skills and can handle a spotter. Otherwise, it is recommended to take the car to a workshop. Replacement process step by step:
- Clear the luggage compartment of carpet, flammable items, and unnecessary items.
- Using a screwdriver, unscrew the bumper and set it aside.
- Remove the headlights.
- Remove the fuel tank.
- Using a thin chisel, without damaging the body part, press out the worn fender.
- Drill out the rivets connecting the wing and cross frame.
- Remove the wing.
- Remove any strips of metal remaining on it using a chisel and wire cutters.
- Straighten and sand the wing edges.
- Prime first with reactive primer, then with regular primer.
- Clean welding points thoroughly.
- Attach the finished wing by welding.
- Paint the part the same color as the rest of the body.
If the rear wing arch begins to rot
Corrosion instantly eats up the iron if you do not take care of the car. It is necessary to start repairing the rear wing of the VAZ 2110 when the first signs of rust appear. Otherwise, rust will cover the entire body and reach the interior. Eliminating consequences of this magnitude will be more difficult.
The arches of the front and rear wings are the “sore spots” of domestic cars. Constant contact with road liquids, reagents, stones, and dirt damages parts. To replace you need:
- Disconnect the ground so you can carry out various welding jobs without fear.
- Cut off the damaged part of the arch, and thoroughly clean what remains.
- Treat the element with acid to remove corrosion. To facilitate future access to the part, drill a hole in it from the inside out.
- Cut something like a patch out of stainless metal. For convenience, take a sheet of cardboard, apply it to the damaged area and press firmly. A sample will be printed on cardboard, cut out, then transferred to iron, traced and also cut out.
- Place the patch on the wrong side - it should be welded with a welding machine.
- For better fixation, weld the edges of the patch towards the wing.
- Sand all unevenness and roughness.
- Spray with zinc, then sand until smooth.
- Degrease the surfaces, remove the remaining zinc with a solution of water and soda.
- Wait until the degreaser evaporates, then coat the part with bauxite primer.
- After drying, smooth the surface with sandpaper so that the seams are not visible. To do this, apply putty to fill the seams and cracks. Do not smooth over the entire area at once to avoid the appearance of air bubbles. After the seams, cover the remaining surface with putty.
- Paint the arch to match the body and let dry.
How to remove rust from a fender
To remove rust stains from car fenders you will need:
- sandblaster or sander;
- anti-corrosion primer;
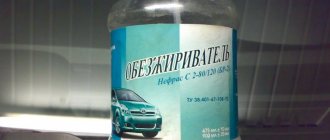
- degreaser;
- rust converter;
- putty;
- gloves.
Restoring the fenders begins with a thorough washing of the car. After this, the car is driven to a remote area so that when the sandblaster works, sand does not scatter throughout the garage and surrounding buildings.
Sandblasting machine
Removing corrosion with a sandblaster is a gentle way to remove plaque. The mechanism will quickly and without damaging the paintwork clean the wing, reaching hard-to-reach places. A jet of sand under pressure is directed at the rust-affected area and gently removes the damaged metal with the help of grains of sand.
Sanding machine
A sander will help you quickly get rid of corrosion on the wings of your car. This tool has a rotating disk that will carefully remove unsightly plaque from parts. You should work with the machine carefully, without pressing hard on the iron, sliding along the bottom of the wing and its entire surface. If done correctly there will be no damage.
Manually
In the absence of power tools, corrosion from car fenders is removed manually with a metal brush or special sandpaper. With sufficient experience, an abrasive disc is used. The method is time-consuming but economical. In addition, the brush allows you to reach the most difficult to reach places.
Chemically
Another repair option without replacing the arches is to remove them using special chemicals. A rust converter works great. It must be applied to the affected areas using a spray can or brush. Next, you should wait a while for the composition to be absorbed into the metal, then rinse with clean water and allow the surface to dry.
Wing painting
After you had to replace the rear wing on a VAZ 2110, paint it to match the body. To do this you need:
- Mark the damaged areas with a marker so that you can focus on them when painting.
- Cover the elements with a primer - it will give the paint greater adhesion to the metal.
- Apply a base coat of paint and leave for 6-7 minutes to dry.
- Apply a second coat, let dry, then a third.
- Allow the paint composition to dry completely.
Next, proceed to varnishing. To do this you need:
- Apply the first coat of varnish to the painted areas.
- Leave to dry for 6-7 minutes. Do not achieve a glossy surface; a thick layer will leave unsightly streaks. If your fingers stick slightly to the varnish, you can safely apply a second coat.
- Wipe gently with a damp cloth.
- Polish.
Do not use the car for 2-3 hours to allow the paint and varnish to dry completely.
Source: https://InfoKuzov.ru/remont/2110-zadnee-krylo
Method for straightening dents using a ball
You can use a soccer ball with a pump. The ball must be installed so that it rests against the inner element of the panel and, when inflated, presses on the dent from the reverse side. You need to be careful not to crush the metal.
p, blockquote 22,0,0,0,0 —>
- Deflate the ball completely. You want the ball to be as flat as possible so that it can fit into the small space between the dent and the stop piece.
- Place the deflated ball on the back of the dent. The air valve must be easily accessible to connect the pump to and inflate.
- When inflating the ball, place a soft cloth over the dent. Watch the force created by the ball so as not to pump too much. Pump the ball slowly.
- When the metal returns to its original state, disconnect the pump and bleed the air.
- When pulling out a dent, you can additionally heat the front part of the panel with a hairdryer to make the metal more elastic.
p, blockquote 23,0,0,0,0 —> p, blockquote 24,0,0,0,1 —>
If you drive carelessly, dents, scratches, chips and cracks appear on the car body. They negatively affect the appearance of the vehicle. One of the parts most susceptible to damage is the hood. In winter, icicles or snow falling from the roof may fall on it, leaving damage and dents. In summer, the body element is easily scratched by branches. Once the damage is done, the hood needs to be repaired.
Replacing car arches with your own hands
The wheel arches of a car are risk elements. This is due to the fact that they are constantly exposed to atmospheric factors: rain, snow, moisture, chemically active components that are often present on the highway. And also crushed stones and small stones flying from under the wheels of cars. As a result, pockets of corrosion arise, which lead to the destruction of this part of the car . The rear arches of the car, consisting of an inner part and an outer wing, are especially affected in this regard.
If we are talking about minor defects, you can get by with cosmetic repairs. If we are dealing with very pronounced foci of corrosion, we will need serious repairs or even replacement of the car's wheel arches . To do this, you can seek help from a car service station or do all the work yourself.
Self-repair of the rear arches of a car can be performed using 2 methods:
The first method is used when the wing is not rotten to the point of holes, and we are able to obtain a solid surface by removing all the rust. If the destruction led to the formation of holes, it is obvious that puttying is not enough - you will have to take the welding machine out of the cabinet.
Puttying
So, if we are talking about minor damage, the putty method is used. Step by step it looks like this:
- It is necessary to thoroughly wash and dry the car.
- Remove all bare metal rust from the damaged areas and sand them thoroughly.
- Treat areas with reactive primer and allow the surface to dry.
Car rear arch putty - Place acrylic filler on top of the reactive layer - under no circumstances should putty be applied to acidic primer.
- After the acrylic has dried, apply putty and wait for it to dry.
- Thoroughly sand the dried putty, gradually reducing the grain size of the abrasive. Thus, level the surface, preparing it for painting.
- Paint those areas of the car that have been repaired.
Options for creating bicycle fenders
You can make bicycle fenders with your own hands in several ways using different materials. Everyone will be able to choose the most acceptable, simple and inexpensive method for themselves.
Made of metal
The most difficult thing is to make fenders for a bicycle with your own hands from metal. Firstly, the difficulty lies in finding a suitable material that is durable, but at the same time easy to process. Secondly, metal is difficult to work with. You need at least minimal skills, patience, and a tool. But such wings will be a source of pride, envy and admiration.
To create such elements, you will need to cut strips of the required size from tin. To give them a rounded shape, you will need special molds and a hammer. The blows should be soft and unhurried, since it is necessary to gradually give the material the required shape.
Homemade bicycle fenders made of metal
From a plastic canister
Finding an empty five-liter canister in which motor oil, antifreeze or other product was stored is not difficult. Using a stationery knife, you need to cut out two blanks. To eliminate mistakes, not spoil the canister and save your time, you can first make a blank on paper.
Replacing a rusty rear fender arch. How to do it right
Welcome to the kuzov.info blog!
Let's talk about replacing the rear arches of a car. The rear arches of some car models are a weak point that is easily subject to corrosion.
There are options when you can “cure” rust without changing the arches, but, usually, car owners wait until the last minute, when drastic measures are needed. The need to replace the rear arches arises, as a rule, due to their through corrosion.
In such cases, all that remains is to cut off all the rusty metal and weld a new, non-rusty segment in its place. How to do this, and what subtleties need to be taken into account. Let's look at everything in detail.
First we need to determine the boundaries of the area that has been corroded. To do this, you need to clean off the old paintwork in the place where the rust is visible.
An autopsy, as they say, will show what's under the paint. It is necessary to clean, with a reserve, retreating from the zone with corrosion to the zone with normal metal.
Usually an autopsy reveals that there is much more rust than it seemed at first glance.
Next we need to cut off all the corroded metal. We use a grinder and cut everything down to bare metal. After cutting off the rusty segment, you need to check the back side of the remaining intact metal as much as possible.
Why do we need this? It happens that the front part of the part does not contain corrosion, but on the back side everything is much worse.
Usually you just have to slightly enlarge the area being cut so that the repair segment can be welded to metal that is good on both sides.
Rear wing segment cut out
Arch made by yourself from sheet metal
Next, we need to get a repair insert somewhere to weld and restore the arch. Here you can choose the following options:
- Take the desired segment from the donor's hind wing.
- Take the required part from the new repair panel for the rear fender (if there is one on sale for the car model being repaired).
- Cut the desired segment from sheet metal (usually from an unwanted body panel). It all depends on what shape you need the segment. If a large part of the arch with complex shapes and edges was cut off, then of course it is better to take and cut out a similar part from the donor wing. Again, it depends on the cost of the rear wing of a particular car. Despite the complexity of the shapes, it is also possible to bend the desired segment from, for example, an unnecessary hood. If a complex shape does not work out, then you can make a segment from several simpler ones by welding them together.
- There is another option - take the desired segment from a new or used front fender. In most car models, the front and rear fenders are similar in shape. A front fender is usually cheaper and easier to find than a rear fender. Thus, we take the desired “piece” from the front wing and adapt it to the rear one.
Welding a homemade arch New repair arch
The front fender has a similar shape to the rear fender arch
How to cut a patch of the desired shape from sheet metal?
You can use this method. Take cardboard, lean it against the cut-out area and the boundaries of the cut-out area will be imprinted on it. Now, along these boundaries, you can cut out a stamp from cardboard, and using this stamp, cut out the desired patch from metal. It is better to slightly increase the boundaries of the cut metal, since welding will need to overlap.
Welding the repair insert
The next step is to weld the repair insert. When welding, you must not overheat the metal. It is better to weld with points, starting from one end of the patch, then weld with a point on the other side and at intervals, then reduce the interval. The point is to prevent the metal from moving too much.
After welding, you need to clean the seam from oxides and grind the weld seam.
Weld protection
Next you need to protect the seam from corrosion. One option is epoxy anti-corrosion primer. After the primer has completely dried, you need to sand it without rubbing it to the metal, then you can apply putty.
It is also important to protect the reverse side of the weld. To do this, you can use anti-corrosion primers in aerosol cans. The most important thing is to get to the other side. If there is no access, then you can use a can with a long tube and a nozzle on it.
One of these options is “Movil”. Very convenient design. You can crawl into the hidden cavity by inserting a tube into a small hole.
"Movil" is not the best option for protection against corrosion, but the tube with a nozzle can be adapted to any other means of protection in an aerosol can.
Then you can proceed to the final removal of the putty, priming with acrylic primer, preparation for painting and the actual painting.
Source: https://kuzov.info/zamena-rzhavoy-zadney-arki-kak-vsyo-sdel/
Practical advice
In fact, there are a huge number of tools, methods and methods with which you can straighten the damage on the hood. You should start straightening dents with your hands and only then apply more drastic methods in practice.
The body of many cars consists of such thin metal that it easily responds to manual straightening and does not require the use of additional tools. It happens that the dent itself is not serious and can easily be squeezed out with your hands, but it is difficult to get to it. In this case, you can use a heat gun, which will heat the dent from the inside. You should be careful here, since if the temperature conditions are not observed, you can observe swelling of the paintwork. The paint should not heat above 110 degrees.
When leveling out serious dents, it will not be possible to avoid damage to the paintwork, which will have to be restored. There are such complex damages that to correct it is necessary to make holes in the hood, insert hooks into them and pull them. You can weld washers to the metal on the outside, by which the metal will be pulled or twitched. With this straightening method, each shift of the metal can be controlled, achieving high precision in the work.
It is rare that straightening does not require the application of putty. Lumps and various irregularities remain on the straightened part, which have to be painstakingly worked on. The former dent on the hood needs careful degreasing and application of automotive putty. This material quickly becomes hard, tightly adheres to the metal, can be sanded and promotes even painting. If all this work is done efficiently, then it is impossible to see the difference with the naked eye.
Now that you know how to straighten the hood, you can take further steps. First of all, you should try to bend the dent out with your hands. And only after failure you need to think about your further actions. In principle, there is nothing supernatural or impossible in removing even complex damage. No straightening master is born with his own skills, everything comes with experience. Perhaps you already have a similar talent that just needs to be revealed, and you can not only straighten your car.
A dent can form not only during an accident, but also due to careless parking, an accidental ball, a collision with a cart at a supermarket and other incidents. Despite the weak impact, the dent can be quite deep. At the same time, the paintwork may not even be damaged or have only minor scratches. In this article we will figure out how to remove a dent on a car, without painting, using affordable means, without using professional tools.
Replacing an arch on a Daewoo Lanos car
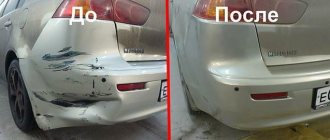
As I said in the previous article, I will write about the restoration of the Daewoo Lanos car. This article will be about fender arch restoration, or more precisely about fender arch replacement.
In my case, the arch needs to be completely changed, since it was already repaired by serious guys several years ago using foam. This is usually done before selling a car.
The part is foamed, after the foam has dried, the excess is cut off to give the foam the shape of the part. Then all this stuff is putty. Putty gives rigidity and outlines the final shape, and then the whole thing is painted.
At first glance, it is almost impossible to distinguish whether a part is welded or foamed.
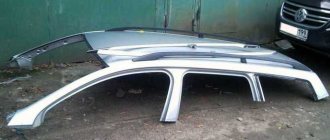
Repair arch
To replace it, I bought a repair arch, since a lot of parts were damaged, and bending the whole thing yourself would take a lot of time and would not cost much less in terms of materials.
I will not weld the entire purchased part, since this is not necessary. I need to cut out a part of it that will cover the area affected by corrosion. The part that I will weld should be slightly larger than the cut out part of the wing. First I need to find the area that is affected on the wing and that is foamed.
Search for corrosion on the arch
In order for the arch replacement to be done as efficiently as possible, you must first find and remove all corrosion. I will look with a screwdriver. I take a medium screwdriver and apply gentle blows along the entire length of the arch. Where it fails, there is probably rot and I need to replace it, where it holds the blow of a screwdriver, I will clean off the paint with a grinder and take a look.
Removing rot from a part
To remove the affected area of the wing, I will use a grinder. I cut out everything that is rotten through or will soon rot and clean the edges of the cut hole. On the internal mudguard, since there is now access, I clean everything with a metal brush and treat the corrosion with acid. All the saffron milk caps and rot have been etched and cut out, now you can begin installing the arch.
Welding a new wing arch
Having adjusted the new part to a size slightly larger than the cut out part of the wing, I place the fresh part behind the old part of the wing and grab it. In order not to overheat the wing, I place points 10 cm apart from each other.
When I’ve done it once, I let the wing cool a little and start putting intermediate points so that I get a distance between the points of 5 cm. I do this again so that I get approximately 2.5 cm between the points. If the welding areas are overheated, the metal will twist and either be squeezed out, or a depression will form, and this will be a problem area.
Even if all this is leveled with putty, the putty will burst after a while and there will be a crappy crack in the paint along the entire seam.
Finishing the arch
When the arch is welded, all that remains is to clean the welding points, putty and paint. I will paint the whole thing a little later, since I need to paint the whole car, so I’ll post a photo of the painting a little later.
This is what I got after cleaning the spots and applying the starting layers of putty. I use putty with fiberglass. I haven’t finished the putty yet. I'll post the finishing touches a little later.
Source: https://avtomoto-best.ru/zamena-arki-krila.html
Correcting a dent using the back of the panel
The most obvious method for straightening a dent can be considered from the back side of the panel. You need to provide access from the back of the damaged panel, and press with your hand or the handle of a hammer or screwdriver wrapped in a rag into the middle of the dent on the back of the panel. Additionally, you can first heat the edges of the dent, thereby reducing the stress on the metal. If the dent has a large diameter, then you need to straighten it from the edges to the center, pressing and smoothing it in a spiral. We will look at another method, which also requires access from the reverse side, at the end of this article.
p, blockquote 8,0,0,0,0 —>
Rear arch repair
The rear arch can be replaced entirely, or only damaged parts can be replaced. I'm leaning towards the second option. The main thing is due to the reduction in the amount of work.
If you change it entirely, then you need to prepare for the fact that the repair one may not exactly match in size. This applies to our arches from the market. Imported ones almost always match, but native ones match absolutely, and Taiwanese ones have small errors, even in the shape of the ribs. In any case, errors are corrected with putty.
And this is how we should treat this repair. He's forced. And by the way, it’s not always simple, easy and safe. And therefore we believe that we are simply saving the arch from further destruction. A little more putty or a little less – I personally have no worries about this.
It will be worse if we weld it nicely (minimum putty), and after a year the rust spots from the weld will come out. Because there was no Movil in the arch after the repair. After our repair, even partial, we will pour Movil or a preservative into the arch, and thereby treat the welding areas and protect the places that have not yet been touched by rust.
We need to decide right away whether we will repair it in the near future or not. If we are repairing, then there is no need to pour Movil into the arch for prevention. It will then greatly interfere with welding.
The amount of work increases, a lot of preparation, and a lot of painting as a result. A small piece is always easier to fit and there are fewer surprises. There can be such surprises - the arch is filled with factory sealant, it is flammable - along with the arch, as a rule, you have to change a piece of the mudguard. Sometimes big. — sometimes repairs go into the trunk.
Method for straightening dents using a vacuum cleaner
p, blockquote 11,0,0,0,0 —>
- Turn on the vacuum cleaner and place the end of the hose over the hole on the potty, as in the illustration. You can wiggle the hose a little to let air in. This way the vacuum cleaner will suck better if it gets a little extra air.
- If you can stick your hand to the back of the dent, you can help straighten the dent by pressing on it. Thus, the impact will be on both sides.
Replacing the inner rear wheel arch
Depending on the degree of damage, the inner arch of the rear wheels is replaced completely or partially.
Before beginning the replacement, remove the rear fenders, rear panel, rear panel reinforcement, trunk floor, fuel tank floor, spare tire floor, rear floor rails, rear outer wheel arches and rear outer quarter panels.
Complete replacement of the inner arch
Completely replace the inner rear wheel arch by disconnecting it from the trunk floor panel, rear suspension spring support, rear floor extension, rear bulkhead frame. To perform this work, use a drill with a 6 mm diameter carbide drill bit, an air hammer with a set of chisels, or a plumber's hammer with a fine-sharpened hand chisel.
To prepare the body for installation of a new arch, do the following:
- remove the remaining metal from the edges of the parts mating to the arch using special wire cutters or pliers;
- straighten, straighten and sand the edges of the arch and mating parts with a grinding machine;
- install the arch in place, aligning it according to the existing stampings, and secure it with the mating parts with quick-release pliers;
- check the correct installation of the arch along the lines of mating with adjacent parts, if necessary, install the arch again;
- grab the arch with points to the mating parts in the places indicated by the arrows in the figure using a semi-automatic electric arc welder for welding in a carbon dioxide environment. For tack welding, it is allowed to use manual gas welding with tip No. 1 or No. 2 and the necessary support;
- install and attach to the mating parts in sequence: the outer arch (right or left), the rear part of the outer side (right or left), the rear floor side members (right or left), the trunk floor, the spare wheel or fuel tank floors, the rear panel reinforcement, the panel rear and fender (right or left);
- check the correct installation of the arch according to the requirements of the technical documentation;
- weld the arch with points along the holes stitched in the overhead mating parts when disconnecting, using an electric arc welding semi-automatic for welding in a carbon dioxide environment, wire Sv-08GS-0 or Sv-08G2S-0 with a diameter of 0.8 mm;
- weld in sequence: the outer arch (right or left), the rear part of the outer side (right or left), the rear floor members (right or left), the trunk floor, the spare wheel or fuel side floors, the rear panel reinforcement, the rear panel and fenders (right or left).
After replacing the inner arch, prepare the restored area of the body for painting and anti-corrosion protection.
Using a Hot Glue Gun and Pull Tools
p, blockquote 12,1,0,0,0 —>
- For small dents, the pulling element can be glued to the center. Large dents extend from the edges.
- This way you can pull out the jammed stiffening rib, which “holds” the entire dent.
- At the same time, when pulling out dents, you need to tap the high spots, if any.
- To remove the pulling element, heat the glue with a hairdryer. Use isopropyl alcohol to loosen and remove the adhesive.
Pulling out a dent with a reverse hammer
p, blockquote 13,0,0,0,0 —>
You can make a reverse hammer to straighten out dents. To do this, you need a rod 3–5 mm thick and a piece of pipe. You can use hot glue to glue one piece of the hammer to the center of the dent. The principle is the same as when using pulling elements, only the hammer adds additional force through the inertia of the sliding load.
p, blockquote 14,0,0,0,0 —>
p, blockquote 17,0,0,0,0 —>
This kit also uses hot glue to secure the puller to the dent. The places where the pulling device will be glued must be degreased with isopropyl alcohol. You need to use a little glue.
p, blockquote 18,0,0,1,0 —>
You need to apply pulling pressure with the device and leave it for 5 minutes, periodically heating the edges of the dent. In general, when pulling with a special device (small bridge), the slow method works better than quickly pulling out the dent. Gradually reducing the size of the dent, you can do several repetitions. If there are raised areas around the dent, they must be carefully tapped with a special punch, which is included in the kit. You can read more about using the kit for straightening dents in the article “Pops A Dent kit, instructions on how to use it correctly.”
p, blockquote 19,0,0,0,0 —>
Heating and subsequent cooling
The thermal straightening method is used for large area defects with non-sharp edges. In addition to a hair dryer and a cylinder with a cooling compound, an adhesive suction cup or core must be used. We can say that heat treatment is not a separate repair method, but a helping tool when straightening dents with hooks and rolls.
It is possible to correct the defect only by heating and cooling on plastic elements and new cars, as long as the stamped metal retains the intended degree of surface tension and tends to return to its original state.
Step-by-step algorithm on how to straighten a car fender with your own hands:
- Using a hair dryer, heat the dent in a circular motion from the edges to the center for 1-2 minutes;
- cool with compressed air for 15-30 seconds;
- repeat the procedure until the metal clicks and the wing takes an even shape.
If the deformation is significant, it is necessary to heat the metal in several places, starting from the least concave edge.
Features of aluminum hoods
Repair of aluminum hoods has a number of features:
- Elimination of defects on aluminum body parts is carried out only with tools that have not previously been in contact with metal. Otherwise, the part is subject to electrochemical corrosion.
- Straightening is carried out only in the presence of minor damage, using a rubber hammer, and supporting the work area with wooden blocks.
- The work must be done promptly. Aluminum is covered with an oxide film that protects against corrosion; it is damaged after mechanical impact.
«>