When using a VAZ 2110, there may come a time when the driver realizes that it is time to adjust the clutch. There is no need to be afraid of this procedure, because with thorough study of the issue, even a beginner can complete the task without the need to visit a car service center or outside help.
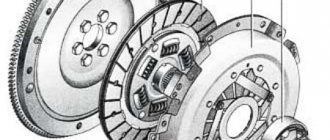
This situation occurs when malfunctions occur during the operation of the clutch drive and the friction disc becomes worn out. In this article we will analyze in detail all the steps of adjusting the clutch of a VAZ 2110 with our own hands.
How to properly adjust the clutch on a VAZ 2110?
Sooner or later, any car will experience problems with the clutch. If the system has not yet failed and the malfunction allows, then the clutch pedal cable on the VAZ 2110 can be adjusted. For details on how to tighten the clutch and make it work smoother, read this article.
Diagnosis of clutch faults
So, what about clutch malfunctions:
- wear of the main pulley or its oiling;
- failure of one of the springs (damper or diaphragm);
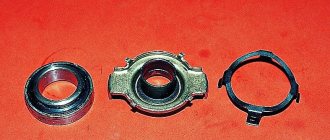
- release bearing failure;
- flywheel failure;
- wear and tear of the basket itself.
As for the symptoms that require adjustment, they are as follows:
- the pedal does not turn on or off well;
- when squeezing the accelerator, an extraneous sound appears;
- vibration appeared when the engine power increased;
- the car runs rough.
Sorry, there are no surveys available at this time.
Tens clutch adjustment
Very often it is necessary to make an adjustment if the pedal cable has recently been changed on a VAZ 2110, but this may also be due to other reasons. According to generally accepted data, the pedal travel on a VAZ 2110 should be no more than 16 cm, but the most optimal option is between 12 and 13 cm. This refers to the distance between the accelerator being turned off and the accelerator being turned on all the way when changing speed.
All work can be carried out by an inexperienced motorist. You don't need any tools for this; just prepare a ruler. We also note that you can handle this process quite well without outside help. You will learn more about how the cable is adjusted below.
Measuring the distance from the pedal to the floor
Stages
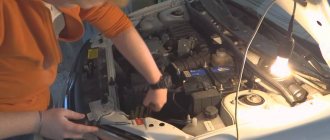
- You don't need a hole; park your vehicle on a level surface and set the parking brake. Then open the hood and disconnect the negative terminal from the battery.
- Now we will tell you how to check the need for adjustment. You need to measure the travel distance of the drive; for this, the ruler must be installed perpendicular to the accelerator and the floor. You need to measure the distance from the floor to the place where the rubber gasket on the accelerator begins. If this distance is at least a millimeter greater than 16 cm, the stroke distance must be adjusted.
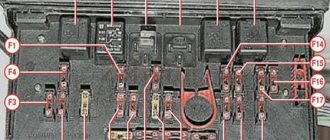
- So, open the hood of your VAZ 2110 vehicle. The first thing you need to do is find the fastening of the cable system with the pedal. As a rule, it is located opposite the driver’s seat; you can learn more about this from the video. Please note that at the end of this cable there are two nuts, in the photo they are marked with numbers 1 and 2. The nut numbered 1 should be unscrewed, but not completely, and the second one should be tightened to the desired free play of the accelerator, until the movement stops will be equal to 12-13 cm.
- Please note that the free play will increase as the second nut is loosened, and as it is tightened it will decrease.
- Then sit in the driver's seat and press the pedal to the very end several times, then release it. Having done this, check the free play indicator again. If necessary, the adjustment procedure can be repeated; of course, the result will need to be checked.
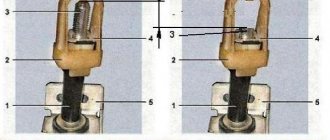
- When the adjustment procedure is completed, you can slide the restrictor bushing into the fork until it stops. This completes the adjustment process. As you can see, there is nothing difficult about this, so any motorist can cope with it.
Clutch cable adjustment process
Video “How to adjust free play yourself”
For more information about adjusting the free play, watch the video.
Diagnosis of clutch faults
Silver VAZ 2110
So, what about clutch malfunctions:
- wear of the main pulley or its oiling;
- failure of one of the springs (damper or diaphragm);
- release bearing failure;
- flywheel failure;
- wear and tear of the basket itself.
As for the symptoms that require adjustment, they are as follows:
- the pedal does not turn on or off well;
- when squeezing the accelerator, an extraneous sound appears;
- vibration appeared when the engine power increased;
- the car runs rough.
Sorry, there are no surveys available at this time.
We adjust the VAZ 2110 clutch with our own hands
In what cases does it become necessary to adjust the clutch on a VAZ 2110, and how to do it correctly? We will try to answer these questions in a short guide to establishing clear and correct operation of the clutch drive.
Clutch drive diagram
When it is necessary?
As soon as you notice any deviations in the operation of the clutch system, you need to immediately take appropriate measures, since a lot depends on this kit. The main thing is that without a clutch you will not be able to engage any gear, and therefore you will not go anywhere. It happens that the pedal fails, or, on the contrary, works very hard. In both cases, adjustment will be required.
Proper Debugging
In fact, it is not so difficult to look into the integral part of the VAZ 2110 - the Bible and the Kama Sutra - the instruction manual. Everything is described there quite clearly. But we will try and explain in an accessible, understandable, step-by-step manner how the adjustment is carried out.
Stage 1:
Checking the pedal travel. This is where you need to start. According to the factory settings, its stroke on a VAZ 2110 is considered normal if it is about 13 centimeters. But it becomes larger as the driven disc lining wears out, since in this situation the pedal rises. Measuring its progress will not be difficult. All you need is a ruler.
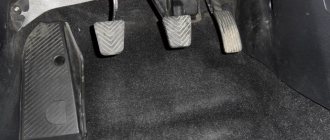
Measuring the clutch pedal travel
So, open the door on the driver’s side and lean towards the pedal. Even those who do not understand car repair at all know its location - the far left of the three available there. We rest the ruler against the mat, perpendicular to the pedal, and carefully look at what distance it is from the floor. If we see 16 cm or more on the scale, urgent adjustment is needed.
Stage 2:
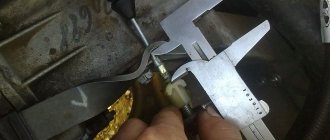
Direct adjustment. Actually, you don’t really need to disassemble anything, everything comes from the engine compartment, as well as from the interior. You only need two regular 13mm wrenches. Open the hood, find the tip of the clutch cable and the locknut on it. Use one of the keys to loosen this locknut. Using the same key, turn the adjusting nut. By “rolling” it onto the tip, we increase the full stroke of the pedal, and by unscrewing it further away from it, we decrease it.
Twist the nut and locknut on the clutch cable
So we play around with the nut, checking whether the clutch pedal has gone up or down. When the stroke distance becomes approximately 13 cm, sharply press it 4-5 times and release it. If the result does not completely satisfy us (the distance is more or less than required), then we make the adjustment again. When everything is satisfactory, tighten the lock nut, after which we move the limiter sleeve (it is rubber) all the way.
Move the stopper sleeve all the way
Actually, one of these simple steps is to adjust the clutch on a VAZ 2110. The only note is that if the cable or other components of the clutch drive are worn out, it is better not to delay replacing them, but to carry out the replacement at the same time with the adjustment, in which nothing complicated is observed.
Step-by-step adjustment of the unit
Unfortunately, it is in the popular VAZ-2110 that the injector, the most important clutch unit, most often fails. In order for the system to return to normal, you just need to adjust it, performing this process step by step and taking into account the advice of professionals who know a lot about car repair.
First you need to check the clutch pedal travel. According to the factory instruction manual, a stroke not exceeding 12 centimeters is considered normal. If this indicator increases, you need to check the disc linings, since worn elements can raise the pedal above the permissible limit. To measure the pedal stroke, you will need a regular ruler, and the measurement is carried out as follows:
- Before measuring, debris and debris are removed from around the leftmost pedal to ensure accurate results.
- The edge of the ruler needs to be rested against the mat, placing the tool in a perpendicular position.
- If the measurements show inflated results, then you need to immediately begin adjusting the unit.
To independently adjust the clutch, you will need two keys size 13. During the procedure, you will not need to disassemble anything; the process should be carried out both from inside the car and from under the hood:
- Having opened the hood, you need to find the clutch cable;
- there is a lock nut at the end of the cable that needs to be loosened with a wrench;
- Using a second key, the nut is unscrewed to adjust the stroke. It is this part that helps to both increase and decrease the stroke of the unit, so when unscrewing it, you need to monitor the change in the pedal stroke inside the car;
- As soon as the distance indicator approaches 12 cm, you need to sharply press the pedal and release it again.
If in the end it was not possible to completely adjust the pedal, the procedure should be repeated again, and after completing the adjustment, carefully tighten the lock nut.
Two methods: how to adjust the clutch drive of a Lada 2110 car yourself?
Assessing the advantages and disadvantages of their cars, owners are increasingly talking about the engine and suspension. Much less often in such conversations you can hear about the gear shift mechanism. The reason for this unpopularity is that the lack or reserve power of the power unit reminds itself regularly, and the driver quickly gets used to the controls. However, it is impossible to do without periodic adjustment of the friction clutch control during operation.
When do you need to adjust the clutch drive on the “ten”?
Car enthusiasts who already know how to adjust the clutch on a VAZ 2110 can promptly diagnose the condition of the unit. They are helped in this by having experience and knowledge; they do not need any consultations at a car service center. For example, no one will argue that replacing a clutch cable requires subsequent adjustments. Before you take a ruler to measure pedal travel, you need to pay attention to the behavior of the car:
- Jerks and impacts, as well as noise when turning on the speeds, indicate the need to adjust the drive.
- The start of the vehicle movement immediately after releasing the pedal indicates a lack of free play.
- In the case when the car does not move even with the clutch pedal fully released, the free play exceeds the norm.
How to check pedal travel?
Clear signs of trouble require a performance check of the clutch control pedal. The procedure is simple, does not require special skills and is described in detail in the instruction manual. So, before adjusting the clutch on a VAZ 2110, we perform the following steps:
- Place a ruler perpendicular to the outer edge of the pedal, resting it on the floor.
- Determine the distance from the floor to the outside of the pedal.
- The acceptable distance is considered to be 120-160 mm ; if the readings are outside the norms, adjustment of the drive is required.
Traditional method: how to adjust the clutch on a VAZ 2110 without visiting a car service center?
Over the past few years, auto parts manufacturers have respected domestic car owners. By paying a little more, they have the opportunity to buy and install an imported clutch as a kit. But installing a new basket, disc and release bearing is only half the battle. It is necessary to correctly configure the drive of the transmission mechanism, for which it is enough to repeat a few simple transitions:
- Open the hood of the car (the engine is turned off) and find the junction of the cable and the clutch release fork.
- Using two open-end wrenches “13”, unscrew lock nut 1 (see photo), and use nut 2 to adjust the free play of the control pedal within 120-130 mm. The pedal stroke increases when nut 2 is unscrewed, and when it is tightened, it decreases.
- Press and release the pedal 3-5 times, then check the pedal stroke size with a ruler.
- If necessary, repeat the adjustment and then tighten the locknut.
The given procedure for setting up a backlash-free drive is overly simplified and is designed for car enthusiasts who do not have as their goal an in-depth knowledge of the car’s design.
Reasoning about alternative regulation
Before adjusting the clutch on a VAZ 2110 in the traditional way, let’s think about how justified it is, and whether there is any point in using an alternative option. According to reviews from many owners of “ten” cars, and not only them, the clutch control pedal is quite high from the floor. The inconvenience that most drivers get used to is actually quite significant.
The driver gets tired during the trip, he wants to change gears less and less, each time lifting a heavy boot. This affects not only the speed of movement, but also the condition of the transmission. Experienced drivers assure: when the clutch pedal is released, it should be positioned so that it can be depressed without lifting the heel from the floor. It’s not without reason that on UAZs and Gazelles, where adjustment is impossible, experienced drivers place a piece of board under the mat.
The classic adjustment order indicates data that ensures the clutch disengages with a large margin. As a result, by fully depressing the pedal, the driver forces the bearing to bend the diaphragm spring much more than is technically necessary. As a result, it loses its characteristic properties, and at critical moments it simply breaks. And it doesn’t matter that you chose a branded clutch kit - everything is subject to the laws of physics.
Method for alternative clutch drive tuning
Experienced car enthusiasts prefer to make adjustments individually for each set of coupling parts. The event does not require an assistant or special equipment:
- Start the engine, depress the clutch and engage reverse gear. On almost all VAZ models it does not have a synchronizer, so the disks are completely disconnected.
- Slowly release the pedal and simultaneously engage and disengage reverse gear.
- The moment the speed is switched on is manifested by vibration on the shift knob. If the setting was made according to the official factory instructions, then the start of activation will correspond to a distance of the pedal from the floor of 75-100 mm.
- Set the cable length so that the “grasping” moment corresponds to 20 mm from the floor to the top edge of the pedal.
After we adjusted the clutch on a VAZ 2110 in this way, the clutch pedal in the initial position is much lower than the brake pedal. This allows you to instantly switch the toe of the boot without raising your foot to the handlebars. Early activation greatly simplifies the process of driving a car; gears are engaged smoothly and without jerking.
Eventually
In conclusion, it should be noted that there are some “homemade” ones who specifically move the release bearing away from the basket, explaining their actions by the fact that in this way they will be able to extend its service life. However, they will have to be disappointed - the bearing is unlikely to become more durable, but the petals of the diaphragm spring will gradually be milled by the untwisted bearing race. And, please note, we are not discussing the discomfort from increased pedal travel, which can result in much greater expenses than purchasing clutch elements.
Adjusting the clutch cable on a VAZ-2110
The VAZ-2110 is equipped with a manual transmission by the manufacturer. While driving, the clutch cable is constantly pulled out, the mechanism works worse and worse, and because of this, adjustment of the VAZ-2110 clutch pedal is periodically required.
In addition, adjustment of the VAZ-2110 clutch cable may be required after the disc and friction linings are replaced. The main symptom that indicates the need for this procedure is a noticeable increase in pedal travel, which can be detected not only when driving, but also simply by raising the pedal.
- Clutch “diseases” and where they come from
- Clutch slipping
- Jerks at start
- There is a noise when the clutch is engaged
- There is increased noise
- Clutch not fully disengaging
- Required Tools
- Step-by-step instructions for adjusting the VAZ-2110 clutch with your own hands
How to properly adjust the clutch on a VAZ 2110
In this material we will talk about adjusting the clutch on a VAZ 2110 car, define the main situations for carrying out such work, and also tell you about the sequence of performing the work.
When adjustment is needed
You need to send the car to the garage and start adjusting the clutch system of your VAZ 2110 as soon as you notice signs of deviation from the normal operation of the unit.
The pedal may be too tight or fall apart at the slightest pressure. Both situations indicate that the clutch needs to be adjusted.
In general, the work is carried out in two stages:
- Clutch travel is checked;
- The setup itself is carried out directly.
But the first thing you should start with is studying the most important tool for repairing all components, assemblies and mechanisms of the VAZ 2110. Of course, we are talking about the instruction manual. Open it at the clutch section, study the main nuances, understand the essence of the unit, its design, operating principle, and then become familiar with the adjustment process.
Now we will talk about two main setup steps.
Pedal travel
This is where the whole process begins. The factory manual states that normal travel is about 13 centimeters.
Nut and locknut
But over time, the parameter increases as the driven disc lining wears out. This leads to the fact that the pedal rises slightly. Measuring the indicator is not difficult.
- Open the door leading to the driver's seat in the cabin.
- Squat down so you are close to the pedals.
- Place a regular ruler on the mat under the pedal, positioning it perpendicular to the clutch pedal.
- Measure the distance from the mat to the extreme point of the pedal, that is, the maximum distance.
- If the indicator is 16 centimeters or more, this indicates an urgent need for adjustment.
What to do if cable adjustment does not help
If the cause of the problem is a worn cable, then it simply needs to be replaced. If the cable is faulty, then the clutch may simply fail during a trip. Then the possibility of an accident increases sharply.
You can change it by doing the following:
- the nut that secures the torso to the bracket must be loosened with an open-end wrench;
- After this, the cable can be removed. They do this very carefully;
- then it is disconnected from the clutch fork;
- then the cable is disconnected from the pedal. To do this, remove the protective cover and lock nut. After this, the pedal can be removed;
- Assembly should be done in reverse order. During this process, it is advisable to lubricate the parts with lithol.
The clutch in a car works under constant intense load when traveling. Therefore, it is not surprising that it wears out over time. Therefore, it may be necessary to compensate for its wear. For this purpose, adjustments are made. It is not difficult to perform such actions. Any beginner can handle this task. Therefore, there is no need to send the car to a technical service. The exception, perhaps, is cases of acute lack of time. A car enthusiast simply has no time to do this.
Sometimes adjustment can correct the deficiency by compensating for clutch wear. But in some cases it is so large that the cable has to be completely replaced. If any signs of wear are detected, it is better not to rely on the Russian “maybe”, but rather to immediately change the clutch elements. This will prevent the risk of emergency situations, because the clutch may simply fail while driving. Then trouble cannot be avoided.
Adjusting the clutch on a VAZ 2110 car
When using a VAZ 2110, there may come a time when the driver realizes that it is time to adjust the clutch. There is no need to be afraid of this procedure, because with thorough study of the issue, even a beginner can complete the task without the need to visit a car service center or outside help.
This situation occurs when malfunctions occur during the operation of the clutch drive and the friction disc becomes worn out. In this article we will analyze in detail all the steps of adjusting the clutch of a VAZ 2110 with our own hands.
When is clutch adjustment needed on a VAZ 2110?
You need to start repairs when you notice any problems related to the operation of the unit. It would be advisable to take your car in for repairs if you feel that:
- The pedal sinks even with the slightest pressure, and the pressure applied to the pedal is too tight.
- Extraneous sounds appeared when squeezing the accelerator and vibration when increasing engine power.
- There are jerks and impacts, various kinds of noise
Often adjustment is needed if the clutch cable has recently been replaced.
The nominal full travel of the clutch pedal should be 120 mm, and the maximum allowable travel should be 160 mm. Avoid reaching 160 mm, otherwise difficulties in operating the VAZ 2110 and even emergency situations on the road may arise.
Required Tools
To measure the travel distance of the drive, you only need a ruler or tape measure. To configure - two simple keys 13.
Adjustment steps
The work is carried out in two stages.
First, pay attention to how it all works. Study the instruction manual - the most important book for the repair of all components, mechanisms and auto parts. Expand the chapter on the clutch and familiarize yourself with all the details and subtleties, understand the essence of the unit and design features, and learn the operating rules.
Only after this proceed to the adjustment itself.
The first stage is measuring the clutch pedal travel
- Place a ruler on the edge of the clutch pedal, resting it on the mat at an angle of 90 degrees.
- Measure the distance from the floor to the outside of the pedal. If the indicator is even a millimeter higher than the norm, clutch adjustment on the VAZ 2110 is mandatory.
The second stage is the setup process itself
- Open the hood (with the engine off) and locate the locknut on the end of the clutch cable.
- Use the first key to reduce the lock nut fixation, and with the second, turn the adjusting nut and adjust the pedal free play within 120-130 mm. If you screw this nut onto the end of the VAZ 2110 cable, the full pedal stroke will increase, and if you unscrew it, it will decrease.
- Work with the adjusting nut and check the result until you get the required mark of 120-130 mm.
- Return to the car, sit in the driver's seat and sharply press the adjustable pedal 3-5 times, release and check the free play indicator again. Repeat the setup if necessary.
- Tighten the locknut. Pull the rubber limiting sleeve all the way into the fork.
If during the operation you notice that the cable or other parts of the drive are badly worn or have significant defects, then it would be better to replace them immediately, thereby protecting yourself from troubles in the future.
There are no particular difficulties in these actions; even an inexperienced motorist can perform them. Still have questions? Watch the video instructions.
Adjustment instructions
Measurements
In order to make such an adjustment, you should take the following steps:
- Apply a ruler to the edge of the pedal itself, set it at an angle of 90 into the carpet, then you need to make sure that such an adjustment needs to be made, the resulting segment should be equal to or exceed 160 mm.
- For complete safety, it is necessary to apply the parking brake and reset the wire from the negative terminal of the batteries. In the engine compartment below, you should pull out the fastening of a special cable made of metal. There are two nuts there. Using keys, the driver must loosen the fixation of the main nut; it is numbered 1). The driver also needs to adjust the clutch pedal travel to 120-130 mm at the moment of tightening the adjusting nut; after that, the pedal travel will decrease, and at the moment of unscrewing it will increase.
- After this, the driver returns to the car and presses the pedal all the way. Then he again tries to measure its progress, and if necessary, correct it.
- After all the above procedures, no adjustments are needed. The driver will tighten the locknut and pull the rubber limiter all the way into the fork. At this point the adjustment will be completed.
Sometimes the cable needs to be replaced
So, as we see, in order to keep a car in proper condition, it is necessary to constantly care for it, carry out timely diagnostic procedures, and replace the necessary parts with better and new ones. Only in this case will the car always look like new, and all the parts and components in it will work perfectly.