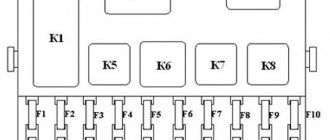
K1 – relay for monitoring the health of light bulbs; K2 – front wiper relay; K3 – repeater and alarm relay; K4 – low beam relay; K5 – high beam relay; K6 – additional relay; K7 – relay for turning on the heated rear window; K8 – backup relay (not installed on 110 series vehicles);
F1-F20 in the diagram are fuses. The circuits in the car are protected by fuses based on a certain rated current (in A). The battery charging circuit, generator circuit, ignition and engine starting are exceptions.
To replace a faulty fuse, first find the one that has blown, then eliminate the reason why it was damaged and then install a new one. Below is a list of fuses and information on each one.
* Never replace fuses with jumpers, this can lead to failure of various components and elements, including failure of the wiring tracks in the fuse box and even a car fire.
Causes of fuse blown
All fuses on the VAZ-2110 are fusible type. When the rated current is exceeded, the fuse thread heats up and melts. The contact is interrupted before a surge in the on-board network causes damage to the electrical equipment of the car.
In the case of the VAZ-2110 stove fuse, there may be several reasons for the burnout.
- Incorrect fuse selection. The interior heater of a VAZ-2110 car requires a 25 ampere fuse.
- Short circuit. A phenomenon in which the circuit from the positive terminal of the battery to the negative terminal closes on itself without resistance (energy consumer). In this case, a sharp jump in current strength occurs. Most often, there is a situation in which the insulation of the positive wire is frayed or cracked, and the wire is shorted to the ground of the car. In the case of the VAZ-2110 interior heater, this usually happens in the area of the mounting block, near the connection of the pads to the regulator or on the way to the electric motor.
- Voltage surge in the circuit. Incorrect operation of the voltage regulator on the generator or malfunctions in the energy-intensive electrical equipment of the car lead to voltage surges.
- Malfunction of the heater regulator. Technically, the rotation speed of the stove motor is controlled by combining resistors with different resistances in a circuit. The contact plates inside this step rheostat in some cases are destroyed and close the contacts chaotically, which leads to malfunction and blown fuse.
- Problems with the heater motor. There are breakdowns in which the electric motor, when starting, begins to take on more current than it requires for normal operation. In this case, the fuse may blow.
The heater fuse blows because there is a section in the electrical circuit that periodically creates a short circuit. If this happens systematically, you need to reconsider the wiring and contacts on the blocks.
Replacing the VAZ-2110 heater fuse
To replace, turn off the ignition and remove fuse F18. To do this, the designers have provided space on the mounting block for special pliers, which are convenient for removing firmly seated fuses.
We evaluate the condition of the low-melting thread. It is most convenient to work with fuses in a transparent case. If in doubt, check the integrity of the fuse link. To do this, check the fuse for a short circuit with a tester or a multimeter.
If the fuse is blown, replace it.
Remember : it is undesirable to deviate from the recommended 25 amperes, either up or down. Installing a fuse with a lower circuit breaking current will cause it to burn out faster. A fuse with a larger number of amperes may not protect the heater electronics during a power surge.
The orientation of the fuse when installed in the block does not matter.
Video: Repairing the VAZ 2110, 11, 12 fuse box. Step-by-step instructions from an HF auto electrician.
Diagnosis of the functionality of the fuse and the reasons for its combustion
Fuses are designed to protect vehicle electrical equipment. If your car's heating system suddenly stops working, the first thing you need to do is check the condition of the protective element that is responsible for the operation of the heater.
The easiest way to check is to open the glove compartment with the ignition on and check whether the backlight works. If the glove compartment light bulb worked before, but now it doesn’t, then the cause of the breakdown is a burnt-out protective element. The fuse that controls the heater controller is responsible for the glove compartment lamp and the cigarette lighter illumination.
The second method is more complicated; to determine the serviceability of a part, you need to take it out and use a tester to check its functionality. If the cause of the breakdown is a blown fuse, do not rush to immediately replace it with a new product. Initially, it is necessary to find the cause of the part burnout. The principle of operation of the product is based on receiving excess voltage in the network. The protective part burns out from high voltage and thereby protects more important vehicle devices from damage.
The cause of high voltage may be a malfunction of the electric motor of the stove or the wiring of the interior heating system, oxidation of contacts, or failure of the fan. Using a tester, you need to check the elements of the circuit of electrical heating devices and eliminate the cause of the burnout.
The most common breakdowns
One of the most common problems is the loosening of the power cable tip.
Simply tighten it and check all the other nuts at the same time. The second popular reason for the failure of this unit is considered to be oxidation of contacts. If you notice a problem at an early stage, then just clean the contacts and the unit will work properly. If cleaning doesn't help, you will need to replace them. Oxide often occurs on the winding, making it impossible to block. You can try to clean the winding, but experienced motorists recommend replacing the relay immediately, this way you will be able to drive your car much longer without problems.
Another probable cause of problems with starting the engine is a break in the retractor power supply circuit. You will have to find them and fix the problem. Find the broken wires and place new ones in their place. Upon completion of work, check the relay power circuit again. One way to check the functionality of a disassembled relay is to check it with an ohmmeter. To do this, you need to place the probes of the device on the turns of two windings.
Sometimes it is enough to replace the anchor. This must be done when it operates slowly or is idle. These signs directly indicate a malfunction of the anchor itself. It will be quite difficult for a car enthusiast with little experience to identify problems with this element.
Repairing a relay is more expensive than replacing it, so the easiest way is to immediately replace the faulty part. This will save your time, because it is unknown whether repairs, which are often very labor-intensive, will help. An attempt to restore the unit is fraught with danger - if the relay is repaired incorrectly, you can be left without a car for a long time, since engine starting will be blocked. In this case, you will need to carry out more complex repairs, which cannot be carried out without the participation of specialists.
What are the fuses on the VAZ-2110 responsible for?
Decoding fuses.
License plate lamps. Instrument lighting lamps. Side light indicator lamp. Trunk light. Left side marker lamps
Left headlight (low beam)
Left headlight (high beam)
Right fog lamp
Door window motors
Portable lamp (socket)
Engine cooling fan electric motor. Sound signal
Rear window heating element. Relay (contacts) for turning on the heated rear window
Recirculation valve*. Windshield and headlight cleaners and washers ( wiper fuse ). Relay (coil) for turning on the rear window heating
Starboard side marker lamps
Right headlight (low beam)
Right headlight (high beam). High beam warning lamp
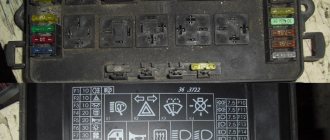
Relay and fuse box in the center console
Diagram of the relay and fuse box in the central instrument panel
Designation and numbering in the block
Location of the relay and fuse box in the console
Relay
| Relay no. | vendor code | Purpose |
| K1 | lamp health monitoring relay | |
| K2 | windshield wiper relay | |
| K3 | relay-interrupter for direction indicators and hazard warning lights | |
| K4 | low beam headlight relay | |
| K5 | headlight high beam relay | |
| K6 | additional relay | |
| K7 | rear window heating relay | |
| K8 | backup relay (not installed on VAZ-2110 family vehicles) |
VESKO-TRANS.RU
AutoNews / Reviews / Tests
Where is the Heater Relay on a VAZ 2110
VAZ Fuses and relays 2110. 2112
Fuses and relays VAZ 2110. 2112, electrical diagrams
If some devices on the car do not work for you VAZ 2110 or VAZ 2112 , the reason for this will be the fuses on the other relay. When, most importantly. check them and then draw some conclusions about the defects.
Correct diagnosis of many electrical problems will allow you to accurately find the cause of the disability, as it is called another node. To find out what the fuses and relays of the VAZ 2110. 2112 are responsible for, and find out how to find them, read this article.
As in various other cars, the VAZ-2112 and VAZ-2110 with muffled engine devices are powered directly from the battery. When the engine is running, the device receives power from the generator, which immediately charges the battery. If the current exceeds the permissible value, as it is called, a short circuit occurs, the circuit breaker will be cleared. Massive electrical appliances are connected via relays.
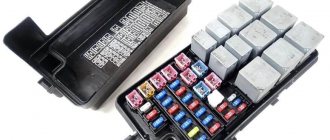
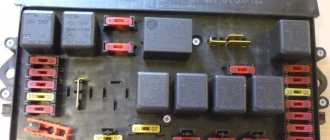
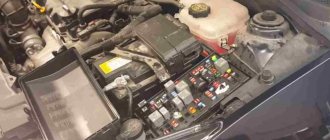
Fuse and relay box
The fuse and relay box is located in the lower left corner of the device panel. It can be accessed by pressing the button and pressing the lid. There are special non-conductive pliers available for removing the fuses on the top left side of the mounting block.
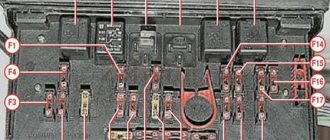
1. K5. high beam relay . If the high beams in two lamps do not work, check this relay. If one of the low beam headlights does not work, check fuses F3 and F13, as well as the lamps and light control knob.
2. K4. low beam relay . If the low beam does not work on both indicators, check this relay. If only one low beam headlight does not work, check fuses F2 and F12, as well as the lamps and the light switch itself.
3. K1. lamp maintenance control relay .
4. Non-conductive fuse removal pliers.
5. Power relay window . If your power windows are not working, check this relay. It could also be fuse F5 or the power window drive system itself. To get to the mechanism, you need to remove the door trim. Check the motor, gearbox appearance and bite mechanism.
6. K3. Rotary switch and relay . If your turn signals or hazard lights do not work, check this relay and fuse F16, as well as the turn signals themselves and the handle to turn them on.
7. starter relay . If the car does not start and the starter does not engage, check this relay. Another thing could be a dead battery, as well as the starting mechanism itself.
backup fuses.
9. fog lamp relay . If the fog lights do not work, check this relay and fuses F4 and F14. Also check the wiring diagram, wiring and connectors, as well as the headlights themselves and the power button.
10. Wiper and washer relay K2 . If your windshield wiper or washer is not working, check this relay. Also check the wiper motor, washer pump and fluid level in the reservoir.
11. K7. rear window heating relay . If the heating does not work and the rear window is dark, check this relay and fuses F8 and F9. Also check the connecting contacts to the terminals of the heating elements (at the edges of the glass on the rear pillars). If everything is fine, but the heating does not work, it may be in the wiring (broken wire or something).
12. K6. add. relay, ignition relay . If you do not turn on the ignition or have ignition related problems, check this relay. This relay protects the ignition switch contacts from fire. Also check the ignition switch and contact group.
The stove doesn't work. We search for and identify faults.
How to find the video you want. about it here Support the project! MAP.
VAZ 2110, 2111, 2112 FAN DOES NOT WORK
How to find the video you want. about it here Support the project! MAP.
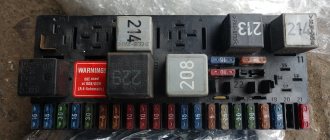
13. F1-F10 series fuses
14. F11-F20 series fuses
Circuit breakers
Now let's see which fuses are responsible for being in the same mounting block. I will also list the main reasons for troubleshooting.
F1 (5 A). license plate light, instrument panel light, panel light, trunk light, left side lights . If any of the above lamps do not work, check this fuse, as well as the lamps themselves and their contacts. If everything is ok, check the power button.
F2 (7.5 A). low beam in the left headlight . If both low beam headlights do not work, also check the K4 relay and the lamps themselves. There may also be a light switch and its contacts.
Required tools and procedure for removing the relay
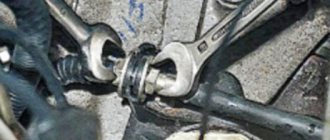
As mentioned earlier, to diagnose and replace the retractor, you will need to remove the starter from the car, since the relay is located in the same housing with it.
To dismantle the product we will need keys 8, 13 and 15.
The starter is located in the lower left (if you are sitting in the car) under the hood, closer to the gearbox. Successful dismantling will require a little skill, since one of the fastening bolts is located in an inconvenient place to unscrew. But in general, everyone copes with the task; you just need to show patience and perseverance. Dismantling steps:
- Disconnect the battery by disconnecting the negative cable.
- Remove the air filter.
All work on installing the spare part in place is carried out in reverse order.
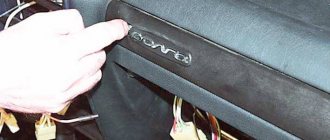
Fuse box location
F-18 is responsible for the operation of the cigarette lighter and the glove box illumination lamp.
Gain access to the VAZ-2110 mounting block. To do this, press the button under the headlight hydraulic adjustment handle. Inside the cavity that opens under the steering column is the mounting block.
Depending on the modification, three types of mounting blocks were installed in the VAZ-2110 car. The location of the fuses on the VAZ-2110 for the carburetor and injector is different.
Depending on the design of the mounting block, the VAZ-2110 stove fan fuse occupies one of two possible positions (in the top row, fifth from the left or in the bottom row, third from the right), but is always designated as F18 on the electrical diagram.
A 25 Ampere fuse is responsible for the operation of the stove
We look at the installed relays. If there are seven of them, then the fuse for the stove is in the top row, fifth from the left. The VAZ-2110 heater relay in this case is located in the bottom row: the second block from the left. Indicated on the electrical diagram as K6. This designation, regardless of the design of the mounting block, is always the same.
It’s worth making a disclaimer here that there is technically no heater fan relay on the 2110 model. According to the documentation, this is an “additional relay” that serves to relieve the ignition switch. It is impossible to pass large currents directly through the contact group. In addition to the heater, this relay is connected to several other electricity consumers, which turn on after turning the key in the lock.
Fuses and relays VAZ 2110. Location. Description.
Car modifications
VAZ 2110, VAZ 2111, VAZ 2112
Location
The relay and fuse mounting block is located on the left side of the steering column in the instrument panel.
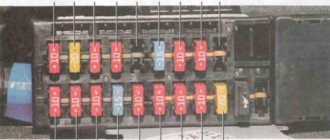
Types of mounting blocks
Block 2110-3722010
Block 2110-3722010-01
What does the second set of fuse boxes do?
The symbols F1-F20 indicated below in the electrical diagram are the elements that characterize the set of fuses. The electrical circuit in a VAZ-2110 car is protected using fuses based on the specific calculation of the model for the rated current value specified upon purchase.
At the same time, fuses are not responsible for the quality operation of the circuit consisting of a sample battery, a separate type of generator circuit, the ignition system and engine valve starting. To replace a faulty fuse in this mounting block, follow the following plan:
- Find a fuse that has mechanical damage or its body has burned out;
- According to the instructions, determine and eliminate the reason why it turned out to be faulty;
- Install a new fuse using the backup model.
Tip: Never try to replace a fuse with special jumpers. In the future, this will lead to failure of those devices that are assigned to this fuse.
Diagram with designations for the second set of fuses in the block
All fuses are divided according to their interaction with electrical equipment as follows:
- F1 (current 5A) - fuse responsible for the set of lamps that illuminate the license plate, the entire instrument panel, including the side lights and lighting in the trunk.
- F2 (current 7.5A) - element that regulates the low beam on the left headlight.
- F3, F4 (current 10A) - responsible for the operation of high beam in the left headlight and right fog lamp, respectively.
- F5 (with a current of 30A) - is responsible for the electric window motor at the front and rear car doors.
- F6 (with a current of 15A) - refers to the operation of a portable lamp.
- F7 (with a current of 20A) - regulates the operation of the fan motor in the cooling system of a 16-valve engine, as well as the operation of the sound signal.
- F8 (with a current of 20A) - supplies current to the heating elements located on the rear window. In addition, together with the contacts from the relay, it transmits current to the windshield.
- F9 (with a current of 20A) - is responsible for the operation of the recirculation valve. It also interacts with the windshield wiper and washer sensors and headlights.
- F10 (with a current of 20A) - is a backup fuse.
- F11 (with a current of 5A) - regulates the operation of lamps with side lights on the starboard side.
- F12 and F13 (with a current of 10A) - both fuses regulate the operation of the right headlight, responsible for the low/high beam, respectively.
- F14 (current 10A) - adjusts the light from the left fog lamp.
- F15 (with a current of 20A) - interacts with the electric heating of the driver and passenger seats. Protects the car from unauthorized blocking of the central locking in the trunk.
- F16 (with a current of 10A) - transmits current to the breaker relay to ensure the operation of the direction indicator of the left and right headlights, and is also used to give an emergency signal (when using the emergency signal mode on the VAZ-2110).
- F17 (current 7.5A) - works with the car interior lighting lamp, brake light lighting, individual lighting of the ignition system switches and regulates the operation of the trip computer.
- F18 (with a current of 25A) - illuminates the glove compartment, supplies current to the heating system controllers and the cigarette lighter on the dashboard.
- F19 (with a current of 10A) - is responsible for the operation of the door locks, and also informs the driver about the presence of a malfunction in the brake light lamps or side light elements.
- F20 (current 7.5A) - works with the lamps of the rear pair of fog lights of the VAZ-2110.
Having dealt with the fuses, you can also learn about how to bleed the brakes on a VAZ-2110. Often the operation of the braking system greatly affects the operation of the car in general and electrical equipment in particular.
Actions to take if the turn signal relay fails
To check the functionality of the relay located outside the mounting block, you need to turn on the turn signal and use a screwdriver to close the relay contacts; if after these manipulations the light comes on, then the cause of the malfunction is in the relay. When checking this element in the mounting block, it is necessary to close the corresponding contacts on the block with a piece of wire, and if the turn signal lights up, then the relay is faulty. This type of relay cannot be repaired, and only replacing this part will help.
Replacing devices
As mentioned earlier, replacing fuses is carried out only after identifying the cause of the main problem.
The location of all the protective elements is already known, so all that remains is to find the cause of the breakdown.
- Most often, additional electronics such as radios, computers and other gadgets put a lot of stress on the system. Removing it removes the main load.
- Installing new parts that are not suitable in terms of power for the basic configuration can also affect the operation of other devices.
- The most common reason can be considered simple wear and tear of the electronics. It will be necessary to replace the main electronic device or part of the protective assembly.
In models 2112, 2110, the electrical connection diagrams are similar, so they can be used as an analogue when installing and dismantling structural elements.