The process of replacing the vacuum booster on a VAZ-2110
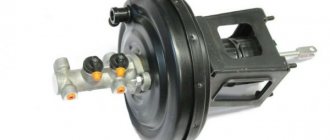
Vacuum brake booster.
To replace a vacuum brake booster, you must have some knowledge of vehicle design. On a VAZ-2110 it is not so difficult to replace a part with your own hands.
You need to stock up on a set of tools - keys and screwdrivers and you can begin the procedure. Let's consider, step by step, the process of replacing the vacuum brake booster of the VAZ-2110:
- Remove the negative terminal from the battery.
- Disconnect the wire block on the brake fluid level sensor.
Disconnect the power from the brake fluid level sensor.
Unscrew the hose from the check valve.
In the engine compartment, you need to unscrew the two fastening nuts of the brake master cylinder.
We remove the cylinder with tubes from the amplifier.
We remove the vacuum booster mounts from the passenger compartment.
Remove the locking plate with the finger.
After unscrewing the fasteners, remove the bracket.
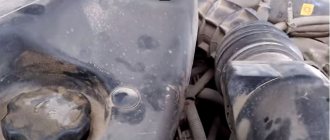
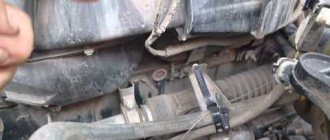
This is what the engine compartment looks like without an amplifier!
Part selection
The original catalog number of the VAZ-2110 vacuum brake booster is 21103510010.
The price of this part is 4000 rubles. In addition, there are a number of analogues that can be used. Thus, the automotive market offers the following non-original parts:
- Pekar 2110-3510010 with an average cost of 2500 rubles.
Pekar 2110-3510010 is an amplifier with a sporty twist.
Vacuum brake booster master-Sport
Symptoms of malfunction (check options)
There are several signs of a malfunction of the vacuum brake booster, and, accordingly, diagnostics of performance. Let's consider each of the options:
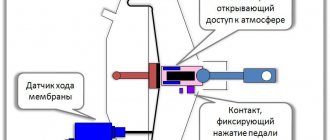
- We start the engine and let it run for a few minutes, after which it is necessary to turn it off. Press the brake pedal several times. During normal operation of the amplifier, the pedal will be depressed the first time, but subsequent times the stroke will be less and less. If the pedal stroke does not decrease the second and subsequent times, then there is a breakdown in the system and the part is not sealed. This means that the vacuum booster needs to be replaced.
- The second option assumes that the first option did not produce any results, and doubts have crept in. Depress the brake pedal and start the engine. With this turn of events, after starting the power unit, the pedal should go all the way down. If this does not happen, then there is an air leak and the amplifier does not work.
- With the engine running, hold down the brake pedal and then turn off the engine. Hold the pedal for another 1.5-2 minutes without releasing it. If there are malfunctions, the pedal will rise.
The amplifier has gaskets and O-rings, and these are the ones that most often fail.
DIY vacuum booster diagnostics
First of all, it must be said that malfunctions and failure of the vacuum amplifier are not fatal. There is only a characteristic difficulty when braking the car and, in some cases, a disruption in the stable operation of the engine. In any case, before the trip, you can independently conduct a fairly effective and not requiring special skills check of the operation of the vacuum brake booster, for this:
- When the engine is not running, press the brake pedal several times at full speed;
- Keep it pressed;
- We start the engine.
If at the same time the pedal “goes” a little to the floor, it means that everything is in order with your vacuum amplifier, but if not, then we continue further diagnostics of the system.
Main symptoms of VUT malfunctions (table)
| Signs | Diagnostics | Conclusion | Elimination method |
| Hissing when braking | The engine is running, press the brake pedal and at the same time detect a hissing sound in the pedal area | The integrity of the diaphragm is compromised | Diaphragm replacement, total VUT |
| Hissing when the engine is running | The engine is running and a hissing sound is heard in the engine compartment. The engine runs unstably; when you press the brake pedal, the speed increases slightly briefly | The integrity of the pipe connecting the VUT and the intake manifold is damaged | Search for air leaks, elimination, replacement of pipe |
| Soft “cotton” brake pedal | When you press the pedal, it steadily, non-stop “goes” to the floor. When braking there is no feeling of stable resistance to pressing force | Depressurization of the hydraulic system, air ingress | Searching for leaks, checking fluid levels, bleeding brakes. |
| The car does not “slow down” | When you press the pedal, the braking is delayed, the pedal travel is not enough to lock the wheels | Large free stroke of the rod | Adjust idle speed |
conclusions
Replacing the vacuum brake booster on a VAZ-2110 car with your own hands will not be difficult, having our instructions and the necessary tools at hand.
On average, the process takes 30-40 minutes, and there is no need to bleed the brake system.
A vacuum brake booster (VUT) is a device responsible for simplifying the travel of the brake pedal. The unit creates additional force, making the pedal easy to press. Getting to the device is quite easy, so replacement can be done by yourself. To work, you will need a standard set of tools: wrenches and screwdrivers.
Purpose and location of VUT
The VUT consists of the following elements:
- Return spring.
- Frame.
- Brake pedal pusher.
- Working valve and diaphragm.
- Cylinder rod.
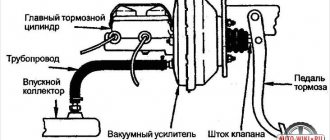
The vacuum booster is located under the hood - it forms a single unit together with the brake master cylinder. The device adds force when pushing the cylinder rod, resulting in compression in the system.
Checking the amplifier status
Even an inexperienced motorist can understand that the VUT is out of order, since pressing the pedal will require much more effort. Replacing the VUT VAZ 2110 is required if a hissing sound is heard when you press the pedal, and the pedal becomes too tight. The device should be checked with the engine turned off: the driver should press the pedal several times and then hold it in the depressed position. Next, you need to start the engine, and if the brake pedal goes down to the bottom of the car without strong resistance, then the unit is working properly.
Replacement and repair of vacuum brake booster VAZ 2110
In order to ensure safe movement through potholes and potholes on our roads, and in many cases to save the lives of drivers, passengers, and pedestrians, brakes were invented. And to minimize the braking distance, the VAZ 2110 has a vacuum brake booster, which also improves traction with the road surface.
Vacuum brake booster
Principle of operation
VUT, or as drivers say - vacuum cleaner, creates a vacuum, due to which additional force is created when the brake pedal is pressed. Thus, the vacuum booster ensures that when you press the pedal without applying much force, the brakes are applied quickly and effectively.
Vacuum brake booster
Such a system on the VAZ 2110 not only simplifies and speeds up wheel locking, but also contributes to less wear and tear on the vehicle and makes driving more comfortable. The “diagonal layout” of the vacuum brake, when the wheels are blocked due to two circuits (front right - rear left and front left - rear right) is designed so that even if one of the circuits fails, it is possible to brake quite effectively, and the car at the same time didn't skid.
Signs of trouble
If the vacuum booster on a VAZ 2110 has malfunctions, they can be identified by the following signs:
- When you press the brake pedal, it “responds” with a hissing sound, and the engine speed often increases;
- The car “troits”;
- Candles stop working;
- Fuel consumption increases.
Examination
Typically, a vacuum booster is checked for serviceability as follows:
- Without starting the engine, you need to press the brake several times (as when pumping);
- After the 5th – 6th press, lock the pedal in the pressed position, start the engine;
- As soon as the engine starts, the pedal moves forward slightly on its own. This is if the vacuum booster is working properly.
If a vacuum is not created, then the first thing you need to do is check the connections and the hose itself for leaks, as well as the check valve of the VAZ 2110 vacuum tank. Often the reason is a malfunction (ruptures, cracks) of rubber parts that require replacement.
In this case, repairs will help, namely replacing faulty parts with serviceable ones.
An internal part, such as the diaphragm, may require repair; over time, a hole may appear in it.
The diaphragm is sold as part of a repair kit. The price of the VUT VAZ 2110 repair kit fluctuates around 250-400 rubles.
Dismantling
To replace the vacuum booster, the following actions are necessary:
- Remove the engine compartment trim;
- Remove the trim from the windshield;
- Unscrew the nuts securing the vacuum booster to the main cylinder with a 17mm wrench;
- Then carefully remove the master cylinder from the studs without damaging the tubes;
- Disconnect the hose from the vacuum tank;
- Disconnect the wiring from the brake light switch from the passenger compartment;
- Unscrew the brake pedal from the body (you will need a 13 key);
- Remove the vacuum brake booster;
- Disconnect the brake light button;
- Using a screwdriver, pry up the locking bracket and remove the pusher pin;
- Unscrew the two nuts securing the vacuum chamber to the bracket and disconnect it. Now it is possible to replace this device with a new one.
The vacuum seal is replaced in the reverse order. Then the brake light button is installed and the free play of the pedal is adjusted, which should be 3 - 5 mm.
How to make a replacement?
Replacement is carried out using a set of keys and screwdrivers. The vacuum brake booster is located under the hood, so work can be done in the garage or outside. The replacement takes place as follows:
- First you need to disassemble the wall of the VAZ 2110 engine compartment, then remove the frill. This element is attached using a seal and upholstery;
Important! The most unpleasant moment in dismantling the vacuum brake booster is unscrewing the four nuts in the interior. To get to them you will have to remove several elements of the dashboard.
How to remove the vacuum brake booster of a VAZ 2110
We remove the vacuum booster and brake pedal assembly after removing the engine compartment upholstery, trim and windshield trim.
- Replacing the vacuum brake booster on a VAZ 2110. The reason for the replacement was that a hissing sound appeared when pressing the brake pedal, which could cause the engine to stall at any moment, the brake pedal became tight. To replace the vacuum booster, it is necessary to disassemble the rear wall of the engine compartment; remove the rubber seal (1), unscrew the upholstery (2) and remove the frill (3).
- Disconnect the block from the brake fluid level sensor, disconnect the hose from the vacuum booster, and unscrew the two nuts of the brake master cylinder.
- After that, carefully remove the main brake cylinder (without unscrewing the brake pipes) from the vacuum booster to a distance sufficient to remove the vacuum booster.
- Inside the car, under the dashboard (under the instrument panel), unscrew the four nuts and remove the wires from the frog. The most difficult thing in replacing the vacuum booster is unscrewing these four nuts, they are very inconveniently located.
- We remove the vacuum booster along with the pedal assembly.
- Remove the locking plate and push out the vacuum pusher mounting pin.
- Unscrew the vacuum booster from the pedal assembly.
- We install a new vacuum booster, pay attention to the correct installation, the pedal is at the bottom, and the hose fitting is at the top. Next we assemble in reverse order.
checking and adjusting brakes on VAZ 2110 cars | VAZ 2111 | VAZ 2112
Checking pipelines and connections
To prevent sudden failure of the brake system of the VAZ 2110, VAZ 2111, VAZ 2112, carefully check the condition of all pipelines and connections, paying attention to the following: metal pipelines should not have nicks, scratches, burrs, active foci of corrosion and should be located away from sharp edges, which can damage them; brake hoses must not have any cracks on the outer shell or signs of chafing visible to the naked eye; they should not be exposed to mineral oils and lubricants that dissolve rubber; by pressing the brake pedal firmly, check to see if any swelling appears on the hoses, indicating their destruction; all pipeline fastening brackets must be intact and well secured; loosening or destruction of brackets leads to vibration of pipelines, causing their breakdowns; Do not allow fluid to leak from the connections of the master cylinder with the tank and pipelines; if necessary, replace the tank bushings and tighten the nuts without subjecting the pipelines to deformation. When tightening the pipeline nuts, use wrench 67.7812.9525. Eliminate any detected faults by replacing damaged parts with new ones. Flexible hoses, regardless of their condition, should be replaced with new ones after 125 thousand kilometers or after five years of operation of a VAZ 2110, VAZ 2111, VAZ 2112 to prevent sudden ruptures due to aging.
Checking the functionality of the vacuum booster VAZ 2110, VAZ 2111, VAZ 2112
Press the brake pedal 5-6 times with the engine off to create equal pressure close to atmospheric in cavities A and B (see Fig. 6-2).
At the same time, by the force applied to the pedal, make sure that the valve body is not jammed. Keep the brake pedal depressed and start the engine. If the vacuum booster of the VAZ 2110, VAZ 2111, VAZ 2112 is in good working order, the brake pedal should “move forward” after starting the engine. If the brake pedal does not “go forward”, check the fastening of the hose tip, the condition and fastening of the tip flange in the booster, the hose to the tip and the fitting of the engine intake pipe, since loosening the fastening or their damage sharply reduces the vacuum in cavity A and the efficiency of the booster. rice. 6-2. Vacuum booster: 1 - vacuum booster housing; 2 — amplifier housing cup; 3 - rod; 4 — adjusting bolt; 5 — rod seal; 6 — sealing ring of the main cylinder flange 7 — diaphragm return spring; 8 — amplifier pin; 9 — tip mounting flange; 10 - valve; 11 — hose tip; 12 - diaphragm; 13 — amplifier housing cover; 14 — sealing cover; 15 - piston; 16 — protective cover of the valve body; 17 — air filter; 18 — pusher; 19 — pusher return spring; 20 — valve spring; 21 - valve; 22 — valve body bushing; 23 — rod buffer; 24 — valve body; A - vacuum chamber; B - atmospheric chamber; C, D - channels Adjusting the brake drive of VAZ 2110, VAZ 2111, VAZ 2112
The free play of the brake pedal when the engine is not running should be 3-5 mm.
The adjustment is carried out by moving the brake light switch 7 (Fig. 6-11) with nut 6 released. Install the switch so that its buffer rests against the pedal stop, and the free play of the pedal is 3-5 mm. In this switch position, tighten nut 6. fig. 6-11. Brake drive: 1 — master cylinder; 2 - tank; 3 - vacuum booster; 4 — brake pedal bracket; 5 — brake light switch buffer; 6 — brake light mounting nut; 7 — brake light switch; 8 - brake pedal WARNING Adjust the free play of the brake pedal when the engine of the VAZ 2110, VAZ 2111, VAZ 2112 is not running. If the brake light switch is too close to the pedal, it does not return to its original position. In this case, valve 21 (see Fig. 6-2), pressing against body 24, separates cavities A and B, which opens air access to chamber B, and the wheels are incompletely released when the pedal is released.
Malfunctions of the vacuum brake booster VAZ 2110
Devices from different manufacturers may vary in characteristics and quality, and the price of the VAZ 2110 vacuum amplifier may also vary. Since the functioning of its mechanism affects the operation of other parts and components, and above all the car engine, it is worth not saving and carefully monitoring its serviceability.
If there is a hissing sound from under the hood, a burnt smell of oil is felt in the cabin, and the brake works like a stopped car only after repeatedly pumping the brake pedal with your foot, then you should immediately contact a car service center for diagnostics and, if necessary, replacement of this device.
Table of dozens of faults in the vacuum brake booster and methods for eliminating them
| Signs | Diagnostics | Conclusion | Elimination method |
| Hissing when braking | The engine is running, press the brake pedal and at the same time detect a hissing sound in the pedal area | The integrity of the diaphragm is compromised | Diaphragm replacement, total VUT |
| Hissing when the engine is running | The engine is running and a hissing sound is heard in the engine compartment. The engine runs unstably; when you press the brake pedal, the speed increases slightly briefly | The integrity of the pipe connecting the VUT and the intake manifold is damaged | Search for air leaks, elimination, replacement of pipe |
| Soft “cotton” brake pedal | When you press the pedal, it steadily, non-stop “goes” to the floor. When braking there is no feeling of stable resistance to pressing force | Depressurization of the hydraulic system, air ingress | Searching for leaks, checking fluid levels, bleeding brakes. |
| The car does not “slow down” | When you press the pedal, the braking is delayed, the pedal travel is not enough to lock the wheels | Large free stroke of the rod | Adjust idle speed |
Shorter braking distance means safer driving. The VAZ-2110 will become a safer ride
Russian roads have a bad reputation all over the world. Of course, an accident can happen in any country, but the quality of the road surface, or rather the lack thereof, creates additional danger for drivers and pedestrians. Therefore, the brakes must be in order in any case, and if you also take into account the dimensions of such cars as the VAZ, this aspect must be monitored very carefully.
One of the ways to improve road grip, shorten braking distances, and, therefore, protect yourself and others, is a vacuum brake booster for the VAZ 2110
. In our article we will look at this device in detail.
What is it, why, how does it work
VUT for VAZs is a device that is responsible for braking the car. Due to the vacuum, it helps create additional force on the brake pedal. Thus, it simplifies the operation of the braking system - the car wears out less, stops faster, and the driver needs to put in less effort behind the wheel.
But it's not that simple. On VAZ 2110 cars, brake boosters affect engine performance,
Therefore, you need to listen to their serviceability and look much more closely than to the “jamming” of other parts. At idle, the injection on this car is equal to 3-4.5 milliseconds from 7 to 12 kg of air. At the slightest violation of the mixture ratio (air, fuel and evaporation), the engine will stop working evenly and begin to stall. There will be leaks in the cylinders, due to which the spark plugs may fail, the wear rate will increase, which, in turn, will increase fuel consumption and the cash costs of maintaining the machine. And all these problems are caused by air leaks from a faulty vacuum brake booster of the VAZ 2110.
How to check the vacuum brake booster for a VAZ 2110 for performance
To protect yourself from possible incidents on the road, you need to regularly check your brake boosters for malfunctions. This is done very simply:
- Turn off the engine.
- Press the brake pedal several times (this is necessary to check for equal pressure in the cavities). If everything is in order, the valve body itself should not stick.
- Still keeping your foot on the pedal, turn on the engine. If the vacuum brake boosters are working properly on our VAZ 2110, then the pedal will move forward along with the foot.
If this does not happen, make sure that this is the reason (the problem may also be with the fastening of the hose tips, the unsatisfactory condition of the tip flange, which, by the way, can also come off). Also, the pedal may have difficulty responding due to a poor connection between the intake pipe fitting on the engine and the hose and tip. All these indicators negatively affect the operation of amplifiers and their efficiency.
How to check the vacuum brake booster of a VAZ 2110
You can check the vacuum brake booster “tens” for proper operation yourself. To do this, press the brake pedal repeatedly with the engine off. This method checks the uniformity of pressure in the cavities. Everything is fine. Then, when you hold your foot on the brake pedal, the engine starts. If the pedal is moved forward simultaneously with the foot, then the amplifier is operational. Otherwise, you need to make sure that the problem is this and not a problem with the tip flange or its fastening.
Vacuum brake booster VAZ 2110
The pedal may still not function properly due to a faulty connection of the fitting on the engine exhaust pipe to the hose. This also has a detrimental effect on the performance of the braking system and its efficiency. when the valve body does not stick.
How to adjust the brake system on a VAZ 2110
In theory, the parking system should be able to hold the VAZ 2110 when the surface is tilted up to 25%. If it can’t cope, don’t rush to a car repair shop, where you’ll have to shell out a hefty sum - you can provide first aid to your car yourself:
- The tensioner locknut must be loosened.
- Then we tighten the cable.
- We check the full stroke of the lever (it should be 2-4 teeth per sector).
- Tighten the locknut more tightly.
- To be on the safe side, we perform several brakes, checking at the same time whether the stroke of the lever has changed.
In this simple way you can check how well the vacuum brake booster works on a VAZ 2110.
The wheels should rotate without effort, with the lever fully lowered.
Do-it-yourself design and adjustment of the brake system of VAZ 2110, VAZ 2111, VAZ 2112