Fuses and relays are designed to protect power units and vehicle circuits from short circuits or overloads.
If any mechanism in the car stops working, first of all you need to check the fuses. Perhaps the problem lies there.
In the sedan, station wagon and hatchback versions, the fuse blocks are located in the same places. The connection diagram and arrangement of elements are identical.
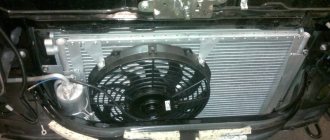
Engine compartment
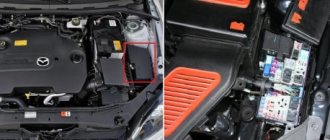
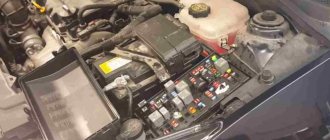
Finding the location under the hood is easy. It is located between the battery and the antifreeze reservoir of the engine cooling system.
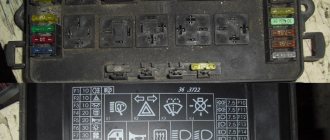
To protect against water and dust, the fuses are covered with a plastic cover (black). The housing cover is secured with two latches. Dismantling is done by hand - you need to unclip the clamps.
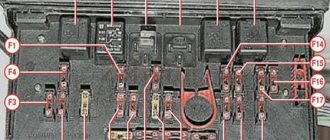
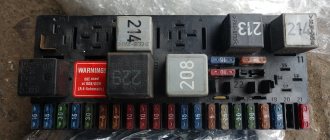
It looks like this inside:
It is strictly forbidden to remove fuses by swinging them. This action may break the legs of the insert. For dismantling, tweezers or a flat clamp are used.
Interpretation of engine compartment fuses
According to the diagram, each fuse is responsible for a specific circuit, which allows minimizing the load on it. This also prevents the simultaneous failure of several vehicle circuits.
| № | Designation | Power, A | What is he responsible for? |
| A - tweezers for removing fuses | FUSE PULLER* | ||
| Ef1 | WATT MAIN | 30 | Hazard alarm, anti-theft control unit, diagnostic connector, rear fog lights, clock, air conditioning system, air conditioning switch, audio system, immobilizer, automatic transmission control unit |
| Ef2 | ABS | 60 | ABS control unit, ABS control unit |
| Ef3 | BLOWERMOTOR | 30 | Air conditioning fan |
| Ef4 | IGN-2 | 30 | Electric windows, electric rear view mirrors, starter |
| Ef5 | IGN-1 | 30 | Fuel pump switch relay, engine control unit, exhaust gas recirculation valve, ignition system, fuel pump, evaporative emission canister purge valve, engine cooling fan |
| Ef6 | ELEC FAN LO | 20 | Engine cooling fan (low speed) |
| Ef7 | DEFOG | 30 | Heated rear window |
| Ef8 | ELEC FAN HI | 30 | Engine cooling fan (high speed) |
| Ef9 | POWER WINDOW | 20 | Power windows (except driver's door) |
| Ef10 | DIS | 15 | Fuel pump switch relay, electronic engine control unit, exhaust gas recirculation valve, ignition system |
| Ef11 | ECM | 10 | Main relay power circuit |
| Ef12 | HEADLAMP | 25 | Headlights, instrument and control lighting |
| Ef13 | STOP | 15 | Brake signal |
| Ef14 | DR'S P/WDO | 20 | Power windows (driver's door) |
| Ef15 | H/L HI | 15 | High beam headlights |
| Ef16 | HORN | 15 | Sound signal |
| Ef17 | A/C | 10 | Air conditioning compressor |
| Ef18 | FUEL PUMP | 15 | Fuel pump power supply circuit |
| Ef19 | PASS F/BOX | 15 | Instrument cluster, horn switch, power folding mirrors, dome light, interior light, trunk light, trunk lid open sensor |
| Ef20 | H/L LO LH | 10 | Low beam (left headlight) |
| Ef21 | EMS | 15 | Evaporative emission canister purge valve, heated oxygen sensor, engine cooling fan |
| Ef22 | INJECTOR | 15 | Injectors, exhaust gas recirculation system |
| Ef23 | IL LH | 10 | License plate lights, hazard warning lights, tail light, block headlight (left side) |
| Ef24 | FOG | 15 | Fog lights |
| Ef25 | WORLD HEAT | 10 | Electric drive and heated rear view mirrors |
| Ef26 | DOOR LOCK | 15 | Central locking system |
| Ef27 | H/L LO RH | 10 | Low beam (right headlight) |
| Ef28 | IL RH | 10 | License plate lights, hazard warning lights, tail light, block headlight (right side) |
| Ef29 | SPARE | 10 | Not used |
| Ef30 | SPARE | 15 | Not used |
| Ef31 | SPARE | 25 | Not used |
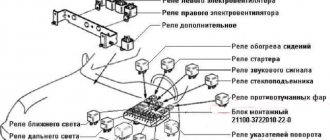
Decoding the engine compartment relay
Next to the fuses of the engine compartment module there are relays that are responsible for the operation of a number of electrical devices or mechanisms.
Explanation:
| № | Designation | vendor code | What is he responsible for? |
| 1 | ILLUMINATION RELAY | 96190187 | Illumination of instruments and controls |
| 2 | HORN RELAY | 96190187 | Sound signal |
| 3 | MAIN RELAY | 96190189 | Main relay/ignition relay |
| 4 | HEAD LAMP RELAY | 96190189 | Block lights |
| 5 | FRT FOG RELAY | 96190187 | Fog lights |
| 6 | A/C COMP RELAY | 96190187 | A/C compressor clutch |
| 7 | FUEL PUMP RELAY | 96190189 | Fuel pump, ignition coils |
| 8 | POWER WINDOW RELAY | 96190189 | Electric windows |
| 9 | ELEC FAN LO RELAY | 96190189 | Electric fan of the engine cooling system (low speed) |
| 10 | DEFOG RELAY | 96190189 | Heated rear window |
| 11 | ELEC FAN HI RELAY | 96190189 | Electric engine cooling fan (high speed) |
Chevrolet Lacetti fuse and relay block: description, characteristics
Vehicle fuses are designed to prevent electrical short circuits and possible vehicle fire. The Chevrolet Lacetti has two locations: the engine compartment and the interior. The failure of one of the elements means that the circuit opens and the corresponding element must be replaced.
Fuse and relay box: location
The fuse box in the engine compartment is located between the battery and the antifreeze reservoir. This is a black box with a lid under which the relays and fuses are located.
Location of the fuse box in the engine compartment.
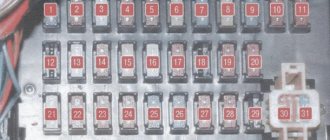
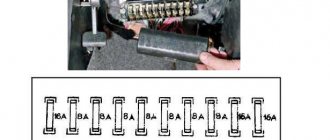
Fuse layout diagram in the mounting block, which is located under the hood of the Lacetti:
Deciphering the fuse box.
Ef1 (30 A) - operation of the main battery.
Ef2 (60 A) - responsible for ABS.
Ef3 (30 A) - stove fan performance.
Ef4 (30 A) - operation of the ignition system (starter, circuits F5-F8).
If the starter does not work and does not turn, it is worth checking relay No. 4, which is located under the dashboard, on the driver’s side. To do this, you need to check the battery, put the box in neutral and close the contacts of the solenoid relay. If the starter starts to turn, then there is a break in the wiring. Another way to check is to apply voltage directly from the battery.
Ef5 (30 A) - is responsible for the ignition system (applies to circuits F1-F4, F9-F12, F17-F19). We check relay No. K3.
Ef6 (20 A) - short circuit of the cooling system fan (radiator).
If after replacing the fuse the fan does not start working, then it is also recommended to check fuses Ef8, Ef21 and relays No. K9, No. K11.
Ef7 (30 A) - rear window heating circuit.
Ef8 (30 A) - malfunction, increased speed of the cooling system fan (radiator).
Ef9 (20 A) - operability of the electric window circuit in the right front door and rear doors.
Ef10 (15 A) - broken connection: electronic engine control unit (ECU), ignition coils, exhaust gas recirculation valve.
Ef11 (10 A) - main relay, ensures operation of the electronic engine control system (ECM) controller.
Ef12 (25 A) - headlights, dimensions.
If there is no light on the right side, then check fuses Ef23 or Ef28. The absence of the main dimensions or high beams when the switch is on means that it is worth checking the wire terminals, which may have oxidized or are loose.
Ef13 (15 A) - brake lights. Also, it is worth checking fuse F4. If only the additional brake light works, then the whole problem is in the headlight bulbs, which should be replaced.
Ef14 (20 A) - operability of the electric window circuit in the driver's door.
Ef15 (15 A) - lamps responsible for high beam in headlights. If the high beam is not working, it is also worth checking relay No. K4 and measuring the incoming voltage.
Ef16 (15 A) - horn fuse, siren, hood limit switch. Relay No. K2 is also responsible for the sound signal.
Ef17 (10 A) - responsible for the air conditioning compressor.
Ef18 (15 A) - fuel pump circuit. Also, the fuse in the passenger compartment marked F2 is responsible for the operation of the fuel pump. If after replacement there are no changes and the pump still does not work, then it is worth checking the wiring right down to the element itself. Of course, to do this you will have to remove the rear seat, since the fuel pump is located in the fuel tank itself.
Ef19 (15 A) is a fuse that is responsible for many elements. The control includes the operation of the dashboard, electric folding mirrors, circuit closure of the individual interior light lamps, the general interior light, the trunk light, and the trunk position limit switch.
Ef20 (10 A) - the circuit responsible for the left headlight and low beam. In case of malfunction, it is worth checking for a break in the wiring that goes from the mounting block directly to the light bulbs.
Ef21 (15 A) - operability of the electronic engine control unit (ECU), canister purge valve, oxygen concentration sensors, phase sensor, main CO fan (radiator).
Ef22 (15 A) - fuse for the fuel pump, injectors, exhaust gas recirculation valve.
Ef23 (10 A) - control of the side light lamp circuit on the left side, license plate lamp, warning signal. See Ef12.
Ef24 (15 A) - fog lamp fuse. The story with fog lights is the same as with low/high beams.
Ef25 (10 A) - operation of the electric drive of the side mirrors. See F8.
Ef26 (15 A) - central locking circuit.
Ef27 (10 A) - the fuse covers the right headlight and low beam.
Ef28 (10 A) - operability of the side light lamp circuit on the right side, the dashboard and center console lights, the radio and clock lights.
Ef29 (10 A), Ef30 (15 A), Ef31 (25 A) - backup fuses for repairs in the event of a malfunction of the mounting block elements.
Relay pinout in the mounting block.
Fuse box in the cabin.
- K1 - light relay for the instrument panel and center console.
- K2 - relay for sound signal operability.
- K3 - main relay of the ignition system. It is also recommended to check the fuse marked Ef5.
- K4 - relay responsible for headlights.
- K5 - relay for the performance of the fog lamp circuit.
- K6 - is responsible for the operation of the air conditioning compressor clutch relay.
- K7 - operation of the fuel pump, ignition coil.
- K8 - electric windows.
- K9 - reduced speed of the CO fan (radiator).
- K10 - heated rear window.
- K11 — coolant fan (radiator) speed regulator.
Salon
In the cabin, the fuses are located on the left side of the dashboard. To provide access to the fuse links, you must first remove the cover.
The cabin relays are located on a special bracket under the panel near the pedals. To gain free access to them, you need to remove the lower panel trim by first unscrewing two screws from the compartment for small items and removing the handle to open the hood.
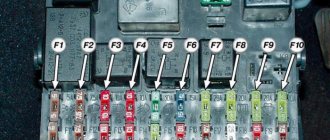
Decoding the interior fuses
| № | Designation | Power, A | What is he responsible for? |
| F1 | AIRBAG | 10 | Airbag computer |
| F2 | ESM | 10 | Engine ECU, Automatic Transmission ECU*, Alternator, Vehicle Speed Sensor |
| F3 | TURN SIGNAL | 15 | Hazard warning switch, direction indicators |
| F4 | CLUSTER | 10 | Instrument panel, electronic low beam*, horn, brake light switch, electronic variable power steering*, air conditioning switch* |
| F5 | — | — | not used |
| F6 | ENG FUSE | 10 | Air conditioning compressor relay, heated rear window relay, power window relay, headlight relay |
| F7 | HVAC | 20 | Air conditioning fan switch relay, air conditioning switch, climate control system* |
| F8 | SUNROOF | 15 | Power mirror switch, power folding mirrors*, power sunroof* |
| F9 | WIPER | 25 | Wiper gear motor, wiper operating mode switch |
| F10 | HANDS FREE | 10 | |
| F11 | ABS | 10 | ABS control unit. ABS executive unit |
| F12 | IMMOBILIZER | 10 | Immobilizer, anti-theft alarm ECU, rain sensor |
| F13 | those | 10 | Automatic transmission control unit* |
| F14 | HAZARD | 15 | Hazard switch |
| F15 | ANTI-THEFT | 15 | Anti-theft alarm control unit |
| F16 | DIAGNOSIS | 10 | Diagnostic connector |
| F17 | AUDIO/CLOCK | 10 | Audio system, clock |
| F18 | EXTRA JACK | 15 | Additional socket |
| F19 | CIGAR LIGHTER | 15 | Cigarette lighter fuse |
| F20 | BACK-UP | 10 | Reversing light switch, automatic transmission mode selector |
| F21 | REAR FOG | 15 | Relay for turning on rear fog lights, relay for illumination of instruments and controls, side lighting |
| F22 | ATC/CLOCK | 15 | Clock, climate control system, air conditioning switch* |
| F23 | AUDIO | 15 | Audio system |
| F24 | IMMOBILIZER | 10 | Immobilizer |
What to do if the instrument lights do not light up
Decoding the interior relay
Depending on the modification, the car may additionally contain a relay for climate control and forced head lighting.
| № | vendor code | What is he responsible for? |
| 1 | no data | Battery protection system control unit |
| 2 | 96312545 | Turn signal switch |
| 3 | 96344573 | Relay for turning on fog lights in rear lights |
| 4 | no data | Starter Interlock Relay (for vehicles with automatic transmission) |
| — | 96190189 | Park/Neutral Relay |
| — | 96190189 | Fan relay |
| — | 96190189 | Headlight warning light relay (daytime running lights) |
What should I do if the cigarette lighter does not work after replacing the fuse?
Inspection of the dismantled cigarette lighter.
If after replacing this element the connector also does not work, then you will need to look for the reason in the cigarette lighter itself.
There you will need to find the reason for the contacts closing. Using a flat-head screwdriver, you will have to straighten the contacts so that the “+” does not penetrate the car body. After such manipulations, the nest will be ready for use again.
Melting of the washer and antennae
After checking the individual fuse for the socket, you need to start inspecting the cigarette lighter itself.
But it is also possible that the reason is that the cigarette lighter does not work, due to the melting of the washer , which is intended to protect against short circuits. It is made of melting material. In this case, the socket must be freed from the cigarette lighter and a new element must be installed in its place.
Conclusion
The Chevrolet Lacetti has two mounting blocks, which are located in the engine compartment and interior. All fuses and relays are responsible for the performance of electrical elements and also prevent short circuits in systems that can lead to fire or other serious consequences.
We carry out work when fuses and relays fail.
When removing fuses and relays, be sure to disconnect the wire terminal from the negative terminal of the battery.
To access fuses and relays located in the engine compartment mounting block...
...by pressing the plastic latch, remove the cover of the mounting block.
On the back of the cover there is a diagram of the location of fuses and relays and their purpose is indicated.
A faulty fuse is identified by a blown jumper.
Use tweezers to remove the fuse.
Replace the blown fuse with a new one.
We remove the large fuse from the block by hand.
We remove the relay from the block by hand.
To access the fuses of the mounting block in the car interior, open the left front door.
By pulling the handle, overcoming the resistance of the latches...
...remove the cover at the left end of the instrument panel.
Using tweezers from the mounting block in the engine compartment, replace the blown fuse with a new one.
On the back of the cover there is a diagram of the location of the fuses and their purpose is indicated.
A new relay or fuse should be installed in place of a failed one only after the cause of the malfunction has been determined and eliminated. It is allowed to use only standard fuses designed for a certain rated current (the rated current of the fuse is indicated on its body).
If you need to remove the mounting block in the engine compartment...
... use the “10” head to unscrew the nut.
Remove the wire tip from the stud.
Using a screwdriver, press out two latches on one side of the block and two on the other...
...and lifting the block, disconnect the wire blocks from it.
Remove the mounting block.
Install the mounting block in reverse order.
To replace the relays located under the instrument panel, remove the lower trim of the instrument panel (see Removing the lower trim of the instrument panel).
The relays are mounted on a bracket fixed to the instrument panel frame.
We remove the faulty relay by hand and replace it with a new one.
Install the lower trim of the instrument panel.
The Chevrolet Lacetti has two sockets that can be used both for lighting a cigarette and as power for connecting various external devices.
Where is the fuse located
Lacetti cars with sedan, station wagon or hatchback bodies use a unified electrical wiring diagram with mounting blocks in the engine compartment and interior of the car. The cigarette lighter fuse is located in the cabin module, which is located under a plug on the end plane of the instrument panel on the driver's seat side. The 15 A insert is located 3 positions from the top in the far right row of protective elements.
How to check and replace
If the cigarette lighter in the car does not work, the driver must follow these steps:
- Turn off the ignition and remove the key from the lock.
- Open the door and then remove the decorative plastic cover, under which there is a mounting block. To dismantle the cover, a handle is used; under the influence of force, the plastic latches are compressed, and the panel comes out of the mounting socket. There is a sticker on the inside of the cover indicating the rating and purpose of the fusible protection elements.
- To remove the fuses, use plastic tweezers, which are stored in a separate slot in the mounting block under the hood (mounted behind the battery). To access the tweezers you need to remove the box cover.
- The removed protection element must be inspected; the transparent case allows you to visually determine the integrity of the metal jumper. If the circuit is open, a new 15 A fuse must be installed. Parts with different ratings or homemade designs must not be used.
- Close the unit cover, place the tweezers in their original place, and then check the functionality of the devices. If the cigarette lighter does not work or the fuse blows again (without connecting an additional load), then it is necessary to check the condition of the electrical circuit and the device. Damaged parts should be replaced with original parts.
Installing a new illuminated cigarette lighter
Before removing and installing the device, you should obtain suitable tools. You will need:
- protective gloves;
- standard screwdriver.
To repair and remove the cigarette lighter you may need:
- multitester;
- electrical tape or heat shrink tubing;
- blowtorch with solder.
The following provides step-by-step instructions on how to remove the cigarette lighter on a Chevrolet Lacetti model.
- Open the hood, where we remove the negative terminal from the battery. This will eliminate the possibility of a short ignition when removing the device. You can remove fuse F19 from the mounting block.
- Carefully pry up the central panel, releasing the plastic latches. It is better to release the two upper fasteners, and then the lower ones. It is important to ensure that the metal elements on the latches do not fall inside the console when removed.
- Disconnect the wire connectors that go to the radio.
- Disconnect the air conditioning cables (for cars with climate control this is not relevant).
- Carefully pull out the entire front panel along with removing the ashtray.
- Remove the three-pin connector.
- Removing and dismantling the cigarette lighter itself.
We repair or replace the device. The installation procedure is carried out in the reverse order of removal. Some owners install backlighting from LED lamps for the device. Instructions on how to remove the cigarette lighter and install the backlight on it are shown in the video using the Lacetti hatchback as an example.
Location of the device and its repair
Depending on the equipment with certain fuses and relays, the blocks in the Chevrolet Lacetti are located in different places. It is worth noting that their location is similar in both sedan and hatchback models.
Location of Lacetti fuse boxes:
- At the end of the dashboard. The device is located on the left side of the dashboard. Access to it is gained by opening the driver's door and removing the special cover of the safety block.
First Chevrolet Lacetti fuse box:
- Under the hood. The block is within walking distance and can be easily detected even by an inexperienced car enthusiast. It is a black plastic box next to the battery.
Second Lacetti fuse box:
- Under the dashboard. This device contains only electrical relays. It is fixed on a bracket under the “tidy”.
Repair of any safety block is carried out in compliance with the following recommendations:
- It is important to start repairs by turning off the engine, turning off the ignition and disconnecting the battery terminals.
- Dismantling of all plastic elements of the car must be done very carefully so as not to break (which is not uncommon).
- Replacing a fuse is only possible with a completely identical one and with the same current rating.
- After all repairs have been carried out, the unit must be put back as it was and also closed with a lid.
Repair and connection
Cigarette lighter repair involves checking the integrity of the coil with a test device. There is a washer made of dielectric material inside the device, designed to protect against short circuits when using the product. If the part is damaged or melted, then it is necessary to install a new cigarette lighter. The design of the device contains metal plates that hold the insert with the spiral in the on position. If elasticity is lost, the antennae no longer fix the part; to restore functionality, the plates must be bent.
If after installing a new product the functionality of the heating element has not been restored, then you need to check the power cables. The negative wire goes to the cigarette lighter, which is connected to the car body. There is also a positive power cord that runs through the junction box. To check the wiring, use a test light or digital multimeter, which switches to the “ring” mode of the circuit. Broken or oxidized sections of the wire must be replaced with a copper cord with a similar cross-section.
In recent years, on the roads of Russia and the CIS countries you can often find a car like the Chevrolet Lacetti. Due to its functionality and budget, the machine became a real bestseller and was widely distributed. Regardless of whether your car is used or not, a problem with any electrical device can happen at any time. Often the culprit is a blown fuse located in one of the blocks. This malfunction is not fatal and can be easily corrected on your own.