The process of diagnosing longitudinal and transverse steering rods
One of the common causes of tie rod failure is the wear of the ball joint.
Some mechanics, if the rods are faulty, recommend restoring them. It is impossible to confidently call this measure correct, since it is not known how long the restored element will last. The only option would be to completely replace them. Moreover, acquiring the necessary spare parts is not a problem today. Signs of a faulty steering linkage:
- the appearance of third-party noise in the area of the steering rack, which is unusual for the normal operation of the mechanism;
- steering wheel vibration;
- sudden pull of the car to the side when driving in a straight line;
- the occurrence of play in the steering column;
- heavy steering.
If at least one of the symptoms described above is noticed on the car, it is necessary to urgently check the control system, in particular the steering rods. During the diagnostic process, you need to pay attention to the following points:
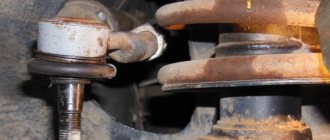
- The distance by which the steering tips can move relative to the axis of the fingers should not exceed 1.5 mm. It is also necessary to determine the presence of play in these parts, which is evidence of their wear. In this case, you can restore the performance of the rod by replacing the hinge and steering tip. But, it is better to install a new part on the car.
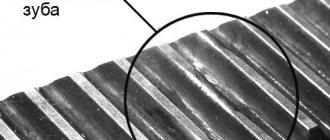
- There are special adjusting couplings on the rods, which are tightened with clamps. Let's examine the condition of these elements. The presence of a hole indicates the need for repair work.
- During the diagnostic process, the protection of the ball joint tip must not be left without inspection. Damage to it significantly increases the wear of the part, since small abrasive particles (dirt, sand, etc.) accumulate on its surface. Damaged protective covers must be replaced.
How to replace tie rod ends yourself
Tie rod ends are an important component of driving a car, the condition of which directly affects traffic safety. The slightest wear immediately affects the quality of this safety and indicates that the steering tips need to be replaced.
The tips are hemispherical fingers with threaded connections to the steering rods; they are responsible for the “connection” of the steering wheel with the front wheels of the car and allow the driver to make turns in a given direction.
Required Tools
To replace the steering tip, you must prepare the following tools and accessories:
- jack;
- a wheel wrench for unscrewing the wheel mounting bolts;
- hammer;
- crowbar or pry bar;
- metal brush for cleaning parts;
- WD-40 lubricant;
- calipers;
- set of heads and open-end wrenches;
- graphite lubricant.
Experienced motorists carry this set of tools in the trunk; it can come in handy on the road.
Replacement process
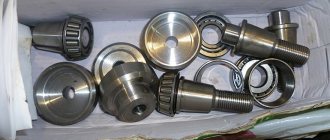
Buy a new part
It must match the design of your car
If you still decide that replacing the steering rod is necessary, then you should get ready for work. The first step is to select new rods complete with tips. It is recommended to change both at once to avoid problems later.
To perform this work, you will need the following tools: jacks, goats, devices for removing steering rods, wrenches, pliers, hammers, etc. You should also prepare technical lubricant WD-40.
When replacing a steering rod, specialists identify the following steps:
- We lift the car with a jack and install it on the “goat”;
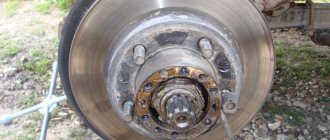
- Remove the front wheel, unscrew the nut;
- We install the puller and tighten the nut, hit the swing arm with a hammer;
- We completely unscrew the steering tip from the coupling (use lubricant if it is tight);
- Remove the boot, unscrew the nut from the steering rack;
- We install the new steering rod exactly at the level of the old one (you can make a special mark for this);
- Let's put everything back together in reverse order.
Raising the car with a jack
Removing the wheel
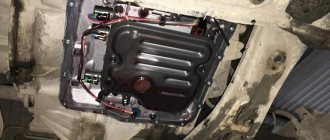
Replace the steering rod
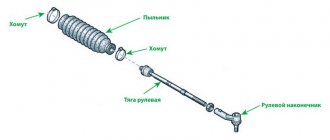
Disassembly diagram
During the work process, it is recommended to use a variety of lubricants, and you should also immediately get rid of dirt. Thanks to this, you can ensure that you can more easily complete the task in the future. Plus, clean parts simply work better.
After replacing the steering rod, the first thing you need to do is adjust the wheel alignment.
Even the presence of marks and the exact fulfillment of all conditions does not guarantee compliance with all parameters, so you still should not ignore the “breaker” specialist. Otherwise, new problems may appear, and the rubber will wear out very quickly, so that it will soon need to be changed.
If you do everything exactly according to the recommendations of specialists and do not ignore any procedures, then the result will be at the highest level. Otherwise, it is better to immediately take your car to the nearest car workshop and ask for help from professionals. They are also ready to complete everything in the shortest possible time and replace the steering rods without any problems, however, in this case you will need to pay a certain amount of money, which, of course, is not always pleasant.
Steering rod - its functions and vulnerabilities
All tie rods perform the following two functions. They transmit forces from the steering mechanism to the rotating arms of the hubs, thanks to which the wheels turn, this happens due to the hinges installed at the ends of the rods. Also, these elements of the car provide the necessary angle of rotation of the wheels, because during turns the radii along which the wheels move are not the same. And by adjusting the required rod length using a special thread, you can adjust the angle of the wheels (toe angle).
Most often, the hinges become unusable, or more precisely, the rubber liner; this, by the way, renders the entire control unusable. This happens as a result of long-term use. Due to the ingress of dust and dirt, the tie rod boot may also deteriorate. The rods themselves become faulty, mainly only after mechanical impact. This could be a collision of wheels with the edges of deep holes or a direct impact with a stone, etc.
The first signs of the need to replace steering tips
The main cause of wear and damage to hemispherical pins is poor road conditions. Any hit of wheels in holes, potholes, single stones, bumps and irregularities “hits” the spherical joint, sooner or later leading to a change in the original shape of the “bed” of the tip and the spherical component of the “finger” itself. The appearance of wear makes itself felt in this way:
• when driving, extraneous noise occurs in the form of knocks and extraneous sounds, this is especially noticeable on uneven roads;
• the steering wheel does not turn well, or some “dips” of rotation of the steering wheel occur when turning;
• when driving, a car can independently change the forward direction by a certain angle, you have to constantly “steer”;
• there is increased play in the steering wheel.
Hint: To thoroughly check the quality of the tie rod end, the car is installed on an overpass or above an inspection hole.
Steering rod and rod end: purpose
The main task performed by the steering linkage is to transfer force from the steering mechanism to the wheels. However, additional difficulties arise due to the fact that the wheels are movable and the steering mechanism is rigidly fixed. The tie rod end solves the problem.
To put it simply:
- the rod itself is attached to the steering rack rod by means of an internal tip;
- the middle rod of the trapezoid is attached using a swivel joint;
- The connection of the rod with the steering knuckle lever is carried out through the outer steering tip.
In this design, the internal tips and ball joints are responsible for the mobility of the rod in the vertical plane (the rods do not break when driving over uneven surfaces).
In turn, the external tip allows for mobility of the rod and wheel in any plane. As a result, the drive works normally when cornering, when driving over uneven surfaces, etc.
Tie rod and tip device
As for the device, the rod itself resembles a steel rod. The design of the steering tip is more complex, since it serves to connect moving and fixed elements.
In fact, it is a hinge joint where the pin sphere rotates inside a hemispherical body. A bushing is installed in the housing and lubricant is filled to avoid friction and allow the pin to deflect at a given angle. The hinge is protected by a rubber boot.
Some installation details
If both rods are changed, they must be tightened at the same time, making sure to fix the rack shaft.
This will help prevent damage to the nut that holds the shaft inside the rack. During factory assembly, both rods are simultaneously screwed to the rack and tightened equally, without destroying the block or its stop. If it is possible to use a vice when replacing, you must carefully clamp one of the rods in it and tighten the second. To do this, it is advisable to use a torque wrench. During tightening, the rack body will rotate slightly. It's not scary. After tightening the rod, you should process its hinge, since burrs may remain on its plane after clamping in a vice.
Important! When installing parts without dismantling the steering rack, they should be tightened extremely carefully and correctly in order to obtain the required tightening torque, while avoiding the occurrence of increased torque on the rack shaft. The shaft has special flats for which it is secured with a key. But this is not always possible, since not all shafts have them; in addition, due to the peculiarity of their location, a special key is needed. Please note that it is strictly forbidden to use pliers to fix the shaft, as their jaws will damage the polished surface.
As you can see, the procedure for replacing rods is not complicated. Difficulties can only arise with tightening them, which is why motorists prefer to carry out this procedure in a car service center.
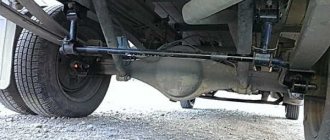
Purpose and operation scheme of the trapezoid
The rod system serves as an intermediary between the steering shaft and the steering knuckles of the front hubs. The task of the mechanism is to synchronously turn the wheels in one direction or another, obeying the rotation of the steering wheel. The trapezoid is located under the engine at the level of the bottom of the car, attached to the body stiffening elements - the lower side members.
The part of the steering mechanism in question consists of 3 main parts:
- the middle link is screwed to two bipods - a pendulum lever and a worm steering gear;
- the right link is attached to the swing arm of the pendulum and the steering knuckle of the front right wheel (in the direction of travel of the car);
- The left rod is connected to the gearbox bipod and the left front hub knuckle.
Trapezium levers mechanically connect the steering wheel with the front wheel mechanisms
The method of connecting the swivel brackets to the trapezoid parts is a conical pin, inserted into the counter hole of the bipod and secured with a nut. The pendulum arm and gearbox are rigidly attached to the side members with long bolts.
The middle link is a hollow metal rod with two hinges. Two side rods are prefabricated elements consisting of 2 tips - long and short. The parts are connected to each other by a threaded clamp, tightened with two bolts.
The middle section is designed for rigid connection of the gearbox bipod and the pendulum
How does a trapezoid work:
- The driver turns the steering wheel, rotating the shaft and shank of the gearbox. The worm mechanism transmits fewer revolutions to the bipod, but increases torque (force).
- The bipod begins to turn in the right direction, dragging the left and middle rods with it. The latter transmits force to the right rod through the pendulum bracket.
- All 3 elements move to one side, causing the front wheels to turn synchronously.
- The pendulum arm, mounted on the second spar, acts as an additional hinged suspension for the system. In older versions of pendulums, the bipod rotates on a bushing, in new elements - on a rolling bearing.
- Ball pins at the ends of all rods allow the trapezoid to move in one horizontal plane, regardless of the compression of the front suspension springs.
The side lever consists of two tips fastened with a clamp
Increasing torque with a worm gear makes it possible to do without hydraulic and electric power steering. On the other hand, the driver physically feels problems with the chassis - as soon as the ball joint or rod end becomes sour, it becomes much more difficult to rotate the steering wheel.
Replacing tie rod ends with your own hands, instructions
To carry out the operation you need:
• buy new tips (do not forget that they are different for the left and right sides, and that you need to change them on both sides at once, and not just on the one where wear is detected);
• a special puller, but if you don’t have one, you can get by with a hammer and a pry bar;
• 19”, 13” and torque wrenches;
Instructions on how to replace tie rod ends yourself
1) Place the car on a jack and unscrew the wheel.
2) Clean the junction of the steering tip with the steering knuckle from dust and dirt (you can use a wire brush) and treat it with penetrating lubricant to facilitate the unscrewing process (brake fluid can be used instead of penetrating lubricant).
3) Using pliers, remove the cotter pin securing the threaded connection of the tip and unscrew the nut.
4) Using a special puller or a mounting tool with a hammer, press the hemispherical pin out of the fist.
5) Unscrew the bolt securing the tip to the rod and unscrew the pin.
Tip: When unscrewing the tip, try to count the number of turns so that when installing a new part, maintain the same distance. This will allow you to avoid the wheel alignment procedure.
Hint: You need to twist your finger clockwise.
1) Screw in a new tip instead of the old one and attach it to the steering rod, insert the hemispherical pin into the fist, tighten it with a nut and secure its position with a cotter pin.
2) Put the wheel in place and lower the car from the jack and carry out the procedure for replacing the steering tip on the other side.
3) After the repair, it is recommended to go to a service station to check whether a wheel alignment is necessary. This is the only way you can avoid possible control problems.
If the procedure for replacing steering wheel ends with your own hands seemed too complicated to you, you do not trust your competence in this matter, or you simply do not have time to do it, entrust this matter to professionals. Do this immediately as safety comes first.
↑ How to remove steering rods on a VAZ without a puller, video
Keywords
car repair tips from experienced
Similar news
VAZ 2106 (21061) / Steering VAZ 2106
Steering device VAZ 2106
VAZ 2110 - operating and repair instructions / VAZ 2110 steering
Steering mechanism VAZ-2110, 2111, 2112
VAZ 2107 - repair and operating instructions / VAZ 2107 steering
Removal and installation of rod and ball joints of the VAZ 2107 steering drive
VAZ 2107 - repair and operating instructions / VAZ 2107 steering
Removal and installation of the VAZ 2107 steering mechanism
VAZ 2107 - repair and operating instructions / VAZ 2107 steering
General information about the steering of the VAZ 2107 car
VAZ 2107 - repair and operating instructions / VAZ 2107 chassis
Determining the condition of the front suspension parts of the VAZ 2107
Steering Types
Vehicles can be equipped with either a worm-type steering gear or a rack-and-pinion steering system. Steering with a worm-roller mechanism is distinguished by a slight tendency to transmit shocks from road unevenness, the ability to transmit greater force and large wheel turning angles. But, at the same time, the design provides for a large number of steering rods and articulated joints, which contributes to the “accumulation” of backlash and makes the steering wheel uninformative and “heavy”. There are more negative aspects when using worm steering mechanisms than positive ones, and most modern cars are equipped with a rack and pinion steering mechanism. Steering with a rack and pinion steering mechanism is distinguished by compactness, a minimum number of steering rods and hinges, and a low price. All these factors contribute to its widespread use.
The steering rack is ideally combined with the McPherson suspension in the front-wheel drive layout, providing precise and light steering. But rack and pinion steering is not without its disadvantages in operation. This is the transmission of any push to the steering wheel, which is due to the simplicity of the design, which is actually not acceptable for heavy cars.
Causes of tip wear
One of the main reasons for premature wear of the tips is poor quality road surface. Potholes, potholes and other road defects increase the load on steering parts, which negatively affects their service life. However, style and driving style also play an important role. Even on relatively smooth roads, many drivers manage to damage the steering wheel precisely because they do not take care of their car.
A simple example: overtaking with a sharp change in direction provokes the occurrence of critical force loads on the vehicle's control elements. The weakest point of the system are the tips. However, the rods and steering rack are also subject to premature wear.
It is quite easy to check the condition of these parts: you need to drive out onto the road and accelerate to 60 km/h. While driving, the steering wheel turns in different directions. At the same time, you should make sure that there are no other road users nearby, and the maneuvers will be safe. If the condition of the rods and ends is ideal, the car will instantly respond to all manipulations with the steering wheel by the driver. Otherwise, you should think about the need to replace tie rods and ends.
Article on the topic: Labeling of motor oils
Analysis of vehicle control problems
What symptoms indicate that something is wrong with this node?
- play appeared on the steering wheel;
- the steering wheel became unusually heavy;
- Suspicious knocking noises are heard when turning the steering wheel;
- oil began to leak in systems with hydraulic booster;
- The steering wheel occasionally sticks in one position.
If you notice something similar on your car, then it’s time to think about visiting a car service center or try repairing the steering rack yourself.
The second option will help you save not only money, but also time, because there are often queues at service stations, and no one wants to be left without a car even for a short period of time.
So, let's look at the sequence of simple self-repair of the rack using the example of popular domestic cars VAZ 2109 and VAZ 2110.
Adviсe
- Turn the steering wheel towards you. This will make the steering parts easier to access for the side you are working on.
- Some of these instructions may vary slightly depending on the make, model, and year of your vehicle.
- As a rule, it is not recommended to reinstall all parts removed during installation.
- Select a clutter-free work area that allows you plenty of room to move around the vehicle.
- For your safety and the preservation of your car, do not improvise with tools.
- An alternative to marking for replacing tie rods is to measure the distances on the steering gear as a whole.
Required tools for replacement
An experienced driver can immediately notice changes in steering
First, to replace the tie rod with your own hands, you need to buy tie rods that are suitable specifically for your car model, and, if possible, two ends at once to avoid replacing the old end in the future and save your money.
Here is a list of the most popular and necessary tools for replacing this mechanism: