Reasons for failure
Any tie rod end is negatively affected by dirt and dust. This element consists of a hinge; even a small crack in the boot will cause a lot of inconvenience - moisture, dust, and various small particles get inside through it. They are capable of destroying the element very quickly. There should be lubrication inside, it facilitates control and reduces friction. If dust gets inside, it will act as an abrasive.
The wear of tie rod ends is affected by the quality of the road surface. These elements are part of the front suspension design and are closely related to it. Therefore, all the unevenness of the road affects the wear inside the joint. The most common failure is vertical play. This significantly increases the steering wheel's beating and free play. Only a complete replacement of the steering ends of the VAZ 2114 will help.
What are the signs that indicate a faulty steering wheel?
The main one is the beating and noticeable vibration of the steering wheel.
This is due to the fact that the element has completely exhausted its resource, is in a faulty condition, and needs to be replaced. However, this symptom may also indicate the presence of other problems with the steering or chassis of the car. If you have any suspicions about the serviceability of a part, you need to perform simple testing, which will help confirm or refute them. Signs of faulty tie rod ends are quite easy to recognize. For example, when moving, a characteristic sound begins to appear, more like a knock. It often intensifies when entering a turn, accelerating, sharp braking, or driving on a road with an unsatisfactory surface condition. If the knocking continues to be present, and its magnitude increases each time, it is necessary to immediately diagnose the car’s steering system, in particular, check the tips in order to assess the degree of wear of their hinge joints.
In conclusion, we can say the following: since the part is a consumable element of the vehicle, in order to maintain its control system in good condition and ensure correct operation, you should not wait for the scheduled replacement period. The tie rod end will fail, which will create certain problems.
Many motorists have encountered the fact that a car service center told them that the tie rod end on a VAZ-2114 needs to be replaced. But how can you determine that a part has failed? This article will tell you about the structure of the steering tip, signs of malfunction, as well as the consequences caused by untimely replacement.
Symptoms of failure
It is necessary to check the condition of the steering, suspension, and brake systems as often as possible. The design of the car has a lot of rubber boots that protect the components from foreign objects and dirt. To carry out diagnostics you need to perform several steps:
- Park the car on a level surface.
- Turn on the ignition (so that the steering wheel lock does not operate).
- Turn the steering wheel to the left.
- Check the condition of the boot on the right side. There should be no damage to it. If necessary, thoroughly clean the surface from dirt.
- Turn the steering wheel to the right and inspect the left side.
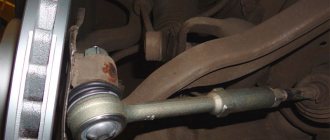
If there are even the slightest cracks, the boot must be replaced. If the rubber is completely torn, it is better to install a new steering end on the VAZ 2114. Malfunctions of this unit can significantly affect the condition of the car and ease of control. To check the play, you need to install a mounting blade between the tip and the steering knuckle. If there is vertical play, you need to replace the VAZ 2114 steering tips.
What are the best steering tips for the VAZ 2114
Tie rod ends are steering control elements that are present on every modern car.
The VAZ 2114 model was no exception. The purpose of the tie rod ends is to provide a connection between the linkage and the steering knuckle of your car's wheel. When the tips move, the steering rack rods move, turning the wheel. In essence, steering tips provide the ability to make maneuvers, turns, and change the direction of movement of the car.
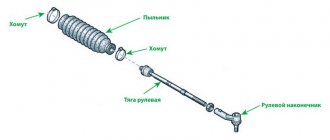
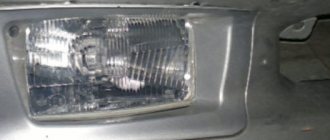
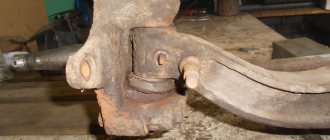
Element appearance
Signs of breakdown
Tie rods have two main enemies.
- Dirt. PH are hinged parts, therefore, when the boot is damaged, various solid particles of debris, dust, and dirt begin to enter the mechanism. Friction occurs, parts begin to wear out faster, and moving components are destroyed.
- Bad roads. How many bumps, holes, curbs do you have to overcome every day? All these impacts negatively affect the condition of the tips - the hinge begins to actively wear out, and play occurs in the vertical direction.
If a tip is found to be faulty, it must be replaced. It is better not to do with restoration and restoration of functionality.
Many people are interested in the question of how you can check the steering tips and make sure they are worn out or, on the contrary, intact. It is not necessary to go to a service station and pay money for this.
There is one more important measure that is recommended to be carried out even if there are no signs of wear on the launch vehicle. To do this, a pry bar is inserted between the steering knuckle and the rod, after which the parts are moved relative to each other. If no vertical play occurs during these manipulations, everything is fine. If it is, you will definitely have to change the component.
Preparatory activities
Many experts advise taking certain steps to prepare for the replacement so that everything goes easier and faster. These actions include the following.
- Treat all nuts and fasteners with penetrating liquid. WD40 works great.
- If the tips last longer than one winter, to remove their fist you will need to use a 17 socket to unscrew the nuts.
- If the nuts stick, try heating them with a hair dryer. A gas burner is also suitable, but you need to be as careful as possible with it.
- Prepare tools for removing tips.
Today, two methods are used to dismantle steering tips - modern and traditional. The first involves the use of a special puller, and the second - a sledgehammer.
Jack and WD40 at the ready
The traditional dismantling method involves the following actions:
- The steering wheel is turned all the way;
- Several strong blows are applied to the steering knuckle;
- Vibration causes the tip to pop out.
But the method has two serious drawbacks.
- It will take special skill to deliver precise, but at the same time accurate and strong blows.
- This method can reduce the service life of steering racks.
Therefore, the best option is a puller. You can literally buy it for 200-300 rubles, but it will be useful in the future and will significantly preserve the integrity of the remaining parts when replacing the launch vehicle.
Dismantling works
Replacement
The replacement procedure is quite simple. Especially if you have prepared the connecting elements in advance and acquired a puller.
- Using a jack, lift one of the sides where you will begin to change the tips.
- Turn the steering wheel to such an extent that it is convenient for you to replace damaged elements.
- Treat the elements again with a penetrating liquid.
- Unscrew the fastening nut.
- Remove the tip from the steering knuckle hole. Here you just need a puller or the traditional old-fashioned method using a sledgehammer.
- Check the condition of the steering rods. Sometimes it is better to replace them in the first couple of wears. Besides, you still got into this knot.
- Replace damaged tips with new ones.
- Perform the reassembly procedure.
Assembly
- Do the same with the second wheel.
- We recommend that you think additionally about protecting threaded fasteners from moisture and dirt. To do this, the threads can be lubricated with lithol, graphite grease, a tube of a suitable diameter can be put on, or heat shrink can be used.
- After completing the replacement of the steering tips, visit a service station to adjust the wheel alignment.
- If you don’t want to go to a service station, then count in advance the number of revolutions when removing the old tip. The new one is twisted by the same number of revolutions.
- Drive onto a straight road and check whether the car does not skid to the sides when driving in a straight line.
One of the main conditions for a successful replacement is the choice of quality parts.
New part
What to choose
Finally, we will present several options for the most popular steering tips, which are used today when replacing a VAZ 2114. So you can decide for yourself what to choose and which ones are better.
They vary slightly in price, but are of good enough quality to serve your vehicle faithfully and reliably.
What do you need to remember?
Before starting repairs, be sure to treat all threaded connections with penetrating lubricant such as WD-40. If there is none, you can generously lubricate it with brake fluid in advance. Since there is a conical hole on the steering knuckle, it is necessary to use only a puller during disassembly. The nuts used to adjust the length of the rod must also be treated with lubricant.
If you do not do this, unscrewing the nuts will be problematic. As an option, completely dismantle the draft and heat it with a gas burner. Be sure to measure the distance from the center of the hinge to the edge of the adjusting nut on each side. You also need to measure the distance from the edge of the rod to this nut in order to place the new tip as accurately as possible. In the future, this will allow you to achieve the most accurate wheel alignment. But this does not mean at all that adjustments are not necessary - camber and toe will definitely have to be done.
Preparatory work
Sequencing:
- Park the car on a level surface.
- Place wheel chocks under the rear wheels.
- Loosen the front wheel bolts.
- Raise the side to be repaired on a jack and place a reliable support under it.
- Remove the wheel completely.
Note. There is no need to disassemble the suspension before removing the steering end on the VAZ 2114. But be sure to install the car on reliable supports, otherwise it will fall. You need to place the removed wheel under the engine.
Replacing tips
Replacement is performed in this order:
- Unscrew the nuts that secure the ends to the rods.
- Remove the pin from your finger.
- Use a key set to “19” to unscrew the nut on the tip.
- Place the puller on the pin and slowly turn the bolt.
- As soon as the tip pin comes out of the steering knuckle, disassembly is complete.
- Install the new tip and screw it until the total length of the rod is the same as on the old element.
Be sure to make wheel alignment and camber adjustments. You can roughly adjust. And in this case, rubber wear will occur much faster. At a service station, such a procedure costs no more than 800 rubles and takes about an hour. A prerequisite is that all threaded connections must be new, otherwise the technician will not be able to unscrew the bolts and nuts. It is also advisable to replace struts, silent blocks, ball joints, and other suspension components.
Algorithm for replacing the tie rod end of a VAZ 2114
The need to replace the tie rod end of a VAZ 2114 can be determined by squeaks alternating with knocking noises. The first thought that comes to mind when such problems occur is that the ball joint has broken. But sometimes detailed diagnostics reveal the need to replace the tie rod end.
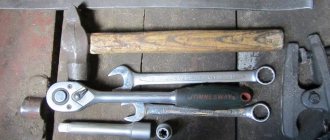
Required tools:
Replacement progress:
- Hang the wheel and remove it.
- Turn the steering wheel as far as possible in the direction where the repair is being made.
- Take out the cotter pin. Using a 19mm wrench, unscrew the nut that secures the tip.
- Using a puller, press the pin out of the lever. If you don't have a puller, use a pry bar and a hammer.
- Use a caliper to measure the distance. This will be useful during the assembly and installation of wheel corners.
Also check out
- Use a 24mm wrench to hold the clutch. At this moment, unscrew the lock nut from left to right using a wrench set to “27”. If the locknut is difficult to move, treat it with WD-40 penetrating fluid or brake fluid.
- Unscrew the tip (from right to left).
- To complete the replacement of the VAZ 2114 tie rod end, you need to install a new tip. Before applying lithol-24, thoroughly lubricate the threads.
Reassemble everything in reverse order. Remember to measure distances. If necessary, adjust wheel alignment.
We recommend reading
It is necessary to remove the cylinder head (cylinder head) when replacing the gasket, block, and also when repairing the piston group mechanism and its valves or.
Integral components of the chassis are support bearings and front struts. Because of the shock absorbers and struts, the shocks coming from the car are softened.
A malfunction of the chassis can cause very serious problems with the vehicle's operation, even leading to loss of controllability. Replace steering wheels.
If the engine overheats severely, major repairs and large cash injections will be required. To prevent this, you need to monitor the coolant level.
Assembly
After installing the new tips, the entire assembly must be assembled. For this:
- Install the tip pin into the steering knuckle.
- Refit the nut (be sure to use a new one). It should be twisted by hand.
- Tighten the nut with a wrench to “19”.
- Make sure the hole in the pin lines up with the slot, then install the pin.
- Bend the pin antennae to the sides using pliers.
- Install the wheel and tighten the bolts.
- Lower the side being repaired and tighten the wheel bolts completely.
In a similar way, on a VAZ 2114 the steering tip on the other side is replaced. After assembly, be sure to check that all nuts are securely tightened.
Please note that it is not advisable to knock the tip out of the steering knuckle with a hammer or sledgehammer. This can damage not only the tip itself, but also the strut, support bearing, and ball. And as a result, you replace one node, but break three.
Replacing the steering tip of a VAZ 2109
Replacing the steering tip on a VAZ 2109 will take literally half an hour, if you have the right tools. To carry out the procedure, it is not even necessary to have a hole.
A lot has already been said about how important it is to monitor the serviceability of the steering. However, we will still dwell on them. A small educational program about why timely replacement of steering tips on a VAZ 2109 is so important.
First of all, safety. On the road, the wheel makes a huge amount of vertical and horizontal vibrations, the steering tip, ball joint, silent blocks, wheel bearings - all of this experiences a colossal load. Therefore, it may happen that the tip finger is simply torn out of its seat. Further consequences are unpredictable, it all depends on the speed of movement.
Another point that is indirect, but still quite important, especially from the financial side. When the steering knuckle becomes loose, it cannot hold the wheel without lateral play. This play, in turn, greatly affects the geometry of the wheels, their installation angles, namely, toe. And when the toe-in does not correspond to the norm, very significant and accelerated wear of the tires occurs, not to mention the fact that it is simply impossible to catch the car on the road.
Replacing the steering tip on a VAZ 2109
Now let's proceed directly to the instructions. First of all, you need to get long keys for 27 and 2. When we say “long”, we mean about 80 cm, no less, otherwise it is simply unrealistic to rip off the locking couplings.
If we change the right tip, then we turn the steering wheel to the left, if we change the left tip, then vice versa. In general, if it is possible to carry out operations with a removed wheel, then it is worth doing just that. Using a 22 wrench, unscrew the nut securing the tip in the bipod of the strut, then dry this very tip with hammer blows.
Next, we open the hood, find the rods that come from the rack, after which we hold the coupling with a 24 key, and unscrew the nut with another 27 key. On the right side the nut unscrews towards the front, and on the left – towards the interior, it’s worth remembering. Now remove the old tip. We install the new one by screwing it on with about the same number of threads as the old one. After this, tighten the coupling locknut.
Video: replacing the steering tip 2109
Manufacturers and prices
There are several manufacturers on the automotive parts market that have proven themselves well. This:
- AvtoVAZ is the official supplier for conveyors, the cost of the set is 650-700 rubles.
- "Track" has about the same cost.
- FINWHALE - cost - 850-950 rubles.
- LEMFORDER – price – no more than 900 rubles per pair.
- “VIS” – 700-750 rubles per set.
These are the steering tips you can find on the VAZ-2114. The price depends on the manufacturer, the quality is almost the same for all. If you operate the car correctly and carefully, then they will serve faithfully for a guaranteed period.
Do-it-yourself replacement of steering tips for VAZ 2113, 2114, 2115
The service life of VAZ 2113, 2114, 2115 steering tips is significantly reduced due to dirt and bad roads. Contamination disrupts the integrity of the boot, vibration causes accelerated wear of the joint. These two factors are a problem throughout Russia. Therefore, replacement of VAZ 2113, 2114, 2115 steering tips is carried out as soon as the first signs of malfunctions appear.
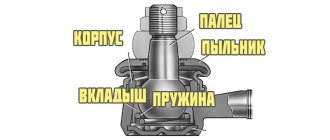
Failed parts need to be urgently replaced, since they convert the movement of the steering rack rod into the angle of rotation of the wheel. Faulty tips are the cause of difficulty changing the direction of the car. Removal and installation can be done with your own hands; this will be discussed below. But before starting work, it is advisable to familiarize yourself with the diagram.
Required spare parts
No. 1, 5 and 8 in the diagram indicate the steering ends. You need to buy them as a set:
- right - article 2108-3414056;
- left - article 2108-3414057;
- internal - 2108-3414060 or 2108-3414060.
Cost of parts in pairs by brand:
- LEMFOERDER - 850 rubles;
- “Track” - 610 rubles;
- VIS - 720 rubles;
- "AvtoVAZ" - 610 rubles;
- FINWHALE - 850 rubles.
Tools required for repairs
To work you will need the following tools:
- jack;
- pliers;
- a set of keys;
- calipers;
- puller;
- "liquid key";
- hammer;
- mount.
Do-it-yourself work is economically feasible: replacement and repair of VAZ 2114 steering ends, the price in car services as of July 21, 2019 per unit is an average of 400 rubles. At the same time, you will be able to assess the control condition of your vehicle.
Sequence of operations
If the steering tips are out of order, knocking noises are heard from the suspension while driving on poor road surfaces, and when accelerating, the steering wheel may begin to vibrate and shake. These parts are for wheel alignment. The work must be carried out in a timely manner, otherwise the rubber will begin to wear unevenly and intensively. Do-it-yourself replacement of VAZ 2114 steering tips is carried out in the following sequence:
- Jack up the vehicle on one side and remove the chassis completely.
- Turn the steering wheel until the tip is in a comfortable position for performing work.
- Coat all fasteners and connections with penetrating liquid.
- Wait and unscrew the fastening nut.
Check the condition of the rods; if problems are found, they should also be replaced.
Press the tip out of the seat using a puller (you can use a pry bar and a hammer).
During dismantling, regularly measure the distances, this will be useful during installation.
Now you can remove the tip.
A new part is installed in its place, but we should not forget that the threaded connections must be thoroughly lubricated.
- Assembly is performed in the reverse order to that described above.
- The operation is duplicated for the 2nd wheel.
Let's summarize
As you can see, the work will require some skill. But, if desired, they can be performed by a beginner who knows how to handle the tool and has common sense. Repeating the operation no longer causes problems.
To protect fasteners with threaded connections from dirt and water, experts recommend using lithol or graphite-based lubricants. Parts must be lubricated carefully. You can further enhance the protection with tubes. They are put on the joints of the steering tips and traction devices (heat shrink can also be used).
For greater clarity of the above actions, you can watch the video: