The Renault Logan chassis has earned recognition among domestic motorists for its softness, energy intensity and maintainability. The design of the chassis is quite archaic: in front there is a MacPherson-type structure, in the rear there is a continuous beam.
The advantage of this solution is excellent value for money. The owner of the Logan model receives good driving characteristics for a low repair cost.
Thanks to the solutions of Renault Logan designers, fault detection methods are simple and can be carried out even in a garage environment. Having carried out diagnostics, you will prepare for repairs in advance, without waiting for the chassis to make itself known with unpleasant knocks, vibrations and unpredictable behavior of the car on the road.
External signs of possible malfunctions:
- Cracking sound when turning the steering wheel in place - the support bearings have failed.
- Rocking of the car on bumps, when turning and braking - mechanical damage and wear of the shock absorbers.
- Vibrations, deterioration of directional stability, decreased ground clearance - sagging of springs or broken coils.
- Renault Logan roams along the road; at speed, vibrations on the steering wheel are possible - wear on the steering tips.
- When driving over uneven surfaces, the chassis knocks - the ball joint has worn out.
- While driving, Logan pulls to the side - mechanical damage or deformation of the lever, subframe, anti-roll bar.
- Body roll when turning, deterioration of directional stability - wear of stabilizer bushings and rod fastening elements.
- When driving over uneven surfaces, the car makes strange sounds - the silent blocks are worn out.
- A hum that increases in proportion to the speed is a bad wheel bearing.
- A cracking noise from the wheel when turning is wear on the constant velocity joint.
- The appearance of vibrations at speed is due to improper wheel balancing.
It must be remembered that external symptoms are only indirect indicators of malfunctions in the Renault Logan chassis. If signs of improper operation of the CV joint or wheel bearing most likely indicate the cause of the malfunction, then determining where the ominous knock is coming from can be very difficult. Accurate diagnosis and identification of faulty Logan suspension components is carried out using specific methods.
Design features
The front suspension is of an independent type, classic MacPherson¸ spring-lever, mounted directly on the subframe, which is attached directly to the body, increasing its rigidity. Essential elements:
- anti-roll bar, in most cases require replacement of the stabilizer bushing, the connection diagram to the lower arms is very interesting, it does not have rods with tips as an intermediate link, as in other cars;
- lower arms, ball joints are pressed into them (the Logan ball joint is the most controversial solution in a French car; while in other cars it can be easily unscrewed from the arms, in this model the ball joint is replaced as an assembly with the arms);
- shock absorber telescopic struts;
- twisted, cylindrical, Logan springs;
- silent blocks are used to attach the lower arms directly to the body.
The rear suspension is semi-independent, torsion beam with U-shaped profile. As a rule, a stabilizer bar is installed in the beam. Note that the springs and shock absorbers are separate, the lower trailing arms are attached to the body using silent blocks.
Fault definition:
- Damage to the rack support is indicated by the difference in the distance between the upper support and the glass. The distance on both glasses should be approximately the same: 1–1.5 cm. The steering wheel should be level! Have an assistant turn the steering wheel while you place your hand on the support. Cracking and jamming indicate a bearing failure.
- Rock the car on each side one by one - a working shock absorber will immediately dampen the vibrations. Inspect it for leaks and mechanical damage.
- Apply force to loosen the tie rod and ball joint. This type of hinge joint allows for smooth lateral movement. There should be no vertical play! Do a similar procedure with the stabilizer bar. The play will indicate wear of the bushings on the Logan. It is better to check the stabilizer struts when the car is parked on a flat surface.
- Visually inspect the silent blocks: they should not be torn. The separation of the bushings can be checked by shaking the lever. Even the slightest play indicates the need for repair.
- Using photographs of new parts, compare the appearance of the stabilizer link, subframe and lever for mechanical deformations. Rear suspension components and connection types are checked according to a similar type.
This kind of diagnosis can be done not only by a service station specialist, but also by a novice motorist in his garage. The repair manual will help in the process, where photos are provided for greater clarity.
Logan is a budget model. The manufacturer has made sure that car repairs and diagnostics are carried out as simply and cheaply as possible.
What is the reliability?
Based on the experience of a multi-million army of Renault Logan owners, you can generate a list that reflects the service life of specific chassis components.
- The silent blocks on the front levers can please you with survivability comparable to 50 thousand mileage (before the need for replacement).
- For stabilizer bushings, a fair resource value would be 25-30 thousand km.
- The struts included in the stabilizer assembly have comparable durability - 30 thousand km.
- Ball joints are among the record holders here, because their service life expires only at the 80 thousand km mark. If replacement is required, choose original products.
- Steering rods in tandem with ends begin to bother the owner after a mileage of approximately 50 thousand km.
- Front shock absorber struts with supports are leaders in reliability, since they will begin to signal the need for replacement after an impressive mileage - 100 thousand km.
- Springs are endowed with an unpleasant property - a tendency to corrosion and breakage. This fact can be noticed by hanging the car with a lifting device.
- If we neglect ball joints and silent blocks, then the wishbones have an inexhaustible resource that can only be defeated by corrosion.
The resource intensity values given here are the average parameters that many Loganovods have been able to identify using the operational method.
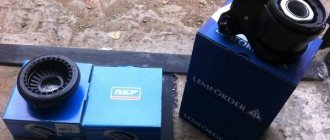
To maintain the resource level at the proper level and reduce interference with the chassis to a minimum, we recommend purchasing and installing only original elements.
We will separately touch on wheel bearings and CV joints assembled with axle shafts. The resource component of these parts can exceed 100 thousand km.
Front suspension
General view of the front suspension structure: 1 — suspension subframe; 2 — suspension arm with silent blocks and ball joint; 3 — steering knuckle with hub and bearing; 4 — shock absorber strut; 5 — anti-roll bar
It uses independent suspension and MacPherson-type front struts, consisting of springs and telescopic shock absorbers, which are designed to dampen wheel vibrations when driving without transmitting them to the body. The shock absorber strut is attached to the body at its upper end through a rubber-metal base, and at the bottom to the front hub using a welded bracket and two bolts. Bearings, calipers and brake discs are installed on the outside of the hub. The front hubs are attached to the lower control arms via ball joints. The shock absorber is located in the shock absorber. In the middle of the shock-absorbing strut there is attached a thrust cup, into which a twisted shock-absorbing spring placed on the strut rests. The top of the tire also rests against the support cup.
Front suspension structure of Renault Logan (view on the car): 1 - suspension arm;
2 — subframe; 3 — bolt securing the suspension arm to the subframe; 4 — anti-roll bar; 5 — bracket for attaching the stabilizer bar to the subframe; 6 — shock absorber strut; 7 — steering knuckle; 8 — elements for fastening the stabilizer bar to the lever; 9 — coupling bolt of the steering knuckle and ball joint pin; 10 — ball joint Design of the front shock absorber strut: 1 — telescopic strut; 2 — shock absorber spring; 3 — shock absorber compression buffer with rubber boot; 4 — nut securing the shock absorber strut to the body; 5 — support washer; 6 — nut for fastening the upper support; 7 — upper support of the rack; 8 — upper support bearing; 9 — upper thrust spring cup
General view of the front suspension subframe: 1 — front holes for bolts securing the subframe to the body; 2 — brackets for mounting the suspension arm; 3 — hole for the rear bolts for fastening the subframe, as well as the anti-roll bar; 4 — bracket for fastening the rubber suspension cushion of the exhaust system; 5 — mount for the rear support of the power unit
The subframe, which is like a suspension frame, is attached to the car body with four power bolts. At the rear of the subframe there are brackets ( 5 ) for attaching the anti-roll bar. The suspension arm ( 1 ) is attached to the subframe with two bolts ( 3 ). The ball joint is pressed into the hole in the suspension arm ( 10 ) and attached with a pinch bolt to the steering knuckle of the front suspension ( 9 )
Front suspension lever: 1 — lever; 2 — support cover; 3 — ball joint (pressed into the lever); 4 — silent block
Anti-roll bar: 1 - nut; 2 — lower rubber bushing; 3 — intermediate rubber-metal bushing; 4 - plastic washer; 5 — upper rubber bushing; 6 - screw; 7 — stabilizer bar; 8 — stabilizer bar cushion; 9 — bracket for fastening to the subframe
The stabilizer bar ( 7 ) for transverse stability has a bent shape and is made of special steel. Using brackets and rubber pads ( 8,9 ) it is attached to the subframe. Its ends are connected to the suspension arm.
Front wheel hub assembly: 1 — steering knuckle; 2 — hub bearing; 3 — speed sensor mounting ring; 4 - wheel hub
The wheel bearings installed on models with ABS are different from the bearings on models without ABS, and cannot be interchanged. The bearing nuts are the same.
Wheel bearings wear out over time, which can lead to poor handling. Raise the car on a lift. Check for free play in the bearings by trying to move the wheel back and forth on the hub. Also turn the wheel and make sure that it rotates smoothly without jamming. If free play is detected in the hub or if the wheel does not rotate smoothly, the wheel bearings must be removed and inspected for signs of wear and damage.
Causes of knocking in the suspension
A knock in the suspension can be caused by various reasons, among which the following can be identified: the fastening of the mounting brackets for the anti-roll bar bar, or its attachment to the suspension arm, may be loose, the rubber cushions of the stabilizer may have worn out and need to be replaced, the rubber base of the upper shock absorber mount may be worn out, The ball joints may wear out, the hub bearing may wear out, or the nut securing it may be loose, the shock absorber spring may break, or there may be beating due to unbalanced wheels.
Reasons for pulling a car to the side
If the wheels are inflated with different pressures, or have a large difference in wear, then the car may pull to the side, and if while driving it suddenly begins to pull to the side, this may indicate a punctured wheel. A pull to the side can be caused by a violation of the wheel alignment angles and camber angles, and since their adjustment is not provided for by the design, this can be corrected by replacing all worn parts and tightening all loose front suspension fasteners
Tightening torques for threaded connections of front suspension elements
Tightening torques for front suspension elements: 1 - Nut securing the shock absorber strut to the body - 44 Nm;
2 - Lower arm mounting bolts - 105 Nm; 3 — Bolt securing the rod to the subframe — 62 Nm; 4 — Tie rod end nut — 37 Nm; 5 — Anti-roll bar mounting bolt — 105 Nm; 6 — Anti-roll bar mounting nut — 8 Nm; 7 - Brake caliper mounting bolts - 105 Nm; 8 — Bolt securing the rod to the body — 21 Nm; 9 - Bolts securing the shock absorber strut to the steering knuckle - 105 Nm. 11 — Spring cup mounting nut — 62 Nm; 12 — Tie rod end mounting nut — 14 Nm; 13 - Lower arm ball joint bolt - 62 Nm; 14 - Axle nut - 280 Nm; 15 — Wheel mounting bolts; 16 — Adjusting nut — 50 Nm; 17 — Ball joint to the steering mechanism — 34 Nm; 18 - Brake disc mounting bolt - 14 Nm.
Upper rack support
This also causes knocking in the front suspension on small bumps. On auto forums, a topic dedicated to this knock is very popular. Everyone's background is different. In the process of trying to fight with snowballs with this annoying sound, car enthusiasts go through the entire suspension, but often the knock
remains.
One possible circumstance is the upper strut support. It consists of a rubber part as a damper and a bearing. If this rubber element has lost its elasticity, then this is the cause of this third-party knock, which our client drivers are struggling with.
In order to find out exactly whether this is so, measure the gap between the limiter and the support. In most cars this is easy to do, but in some models this unit will be closed. If measurements show that the gap is more than 10 mm, then the support needs to be changed urgently.
But this common rumor gap is not often uniform. When measuring, it is recommended to focus on the average figure. It is worth carefully checking this support: in many cars } myth the sound only appears.
6.1. Renault Logan Front suspension. Description of the design.
Front suspension: 1 — subframe; 2 — suspension arm with silent blocks and ball joint; 3 — steering knuckle with hub and bearing; 4 — shock absorber strut; 5 — anti-roll bar
The front suspension is independent, MacPherson type with triangular wishbones and an anti-roll bar mounted on a subframe. The basis of the suspension is a telescopic shock absorber strut, which allows the wheels to move up and down when driving over uneven surfaces and at the same time dampening body vibrations. The rack is attached from below with two bolts and nuts to the steering knuckle, and from above with a nut through a rubber-metal support to the body. To effectively dampen body vibrations and improve vehicle controllability and stability, a double-pipe gas-filled shock absorber is installed in the strut housing, which has higher characteristics than a conventional hydraulic shock absorber. The lower spring support cup is welded to the middle part of the strut body, and a bracket for attaching the strut to the steering knuckle is welded to the bottom of the strut. A compression stroke buffer is installed on the shock absorber rod, made integral with the protective cover. From above, the spring rests against the upper support cup mounted on the shock absorber rod. A thrust ball bearing is installed between the upper spring cup and the upper strut mount, allowing the strut body to rotate with the spring while the shock absorber rod remains stationary. Braking and traction forces when the car is moving are perceived by suspension arms connected through ball joints to the steering knuckles and through silent blocks to the subframe.
This is interesting: Why does a gasoline lawn mower not start?
Elements of the front suspension on a car: 1 - lever; 2 — subframe; 3 — bolt securing the lever to the subframe; 4 — anti-roll bar; 5 — bracket for attaching the stabilizer bar to the subframe; 6 — shock absorber strut; 7 — steering knuckle; 8 — elements for fastening the stabilizer bar to the lever; 9 — coupling bolt of the terminal connection between the steering knuckle and the ball joint pin; 10 - ball joint
The subframe is rigidly attached to the body with four bolts, two rear bolts also secure the stabilizer bar brackets to the subframe. On the front bolt securing the suspension arm to the subframe, a bracket is secured with a nut, the second end of which is attached to the body. The ball joint housing is pressed into the hole in the suspension arm, the support is covered with a rubber boot. The ball joint pin is secured with a clamp connection to a coupling bolt in the steering knuckle eye.
Shock absorber strut parts: 1 - telescopic strut; 2 - spring; 3 — compression stroke buffer with a protective cover; 4 — nut securing the strut to the body; 5 — support washer; 6 — nut for fastening the upper support; 7 — upper support of the rack; 8 — upper support bearing; 9 - upper spring cup
A closed-type double-row angular contact ball bearing is pressed into the steering knuckle hole, and the wheel hub is pressed into the inner rings of the bearing. The inner rings are tightened (through the hub) with a nut on the threaded part of the shank of the outer wheel drive joint housing. In operation, the bearing is not adjustable and does not require replenishment of lubricant.
Subframe: 1 — points of front attachment of the subframe to the body; 2 — points of attachment of the suspension arm to the subframe; 3 — rear mounting points for the subframe and anti-roll bar; 4 — bracket for fastening the suspension cushion of the exhaust gas system; 5 — bracket for fastening the rear support of the power unit
Wheel bearings for vehicles with and without ABS are not interchangeable. The hub bearing nuts for both wheels are the same, with right-hand threads. The anti-roll bar is made of spring steel. The rod in its middle part is attached to the subframe with brackets through rubber pads. Both ends of the stabilizer bar are connected to the suspension arms through screws with rubber and rubber-metal bushings. In the middle part of the stabilizer rod there is a bend above the exhaust pipe.
Front suspension lever: 1 — lever; 2 — support cover; 3 — ball joint; 4 — silent block
The longitudinal inclination angle of the front wheel turning axis (2°42'±30′) and the wheel camber angle (–0°10'±30′) are specified by design and cannot be adjusted in operation. These angles can only be checked at a special stand (at a service station) and compared with control values. If the values of the front wheel alignment angles do not correspond to the control values, it is necessary to check the condition of the front suspension elements.
Elements of the anti-roll bar: 1 - nut; 2 — lower rubber bushing; 3 — intermediate rubber-metal bushing; 4 - plastic washer; 5 — upper rubber bushing; 6 - screw; 7 — stabilizer bar; 8 — stabilizer bar cushion; 9 — bracket
Front wheel hub assembly: 1 — steering knuckle; 2 — hub bearing; 3 — speed sensor mounting ring; 4 - wheel hub
Wheel toe (–0°10'±10') is adjusted by changing the length of the tie rods (see “Replacing the tie rod end”).
Structure of a double-row hub bearing (for clarity, elements of one row are removed from the outer ring of the bearing): 1 - outer ring of the bearing; 2 — inner ring of the bearing; 3 — separator with balls; 4 - oil seal; 5 - protective washer
The main causes of vibration in the steering wheel
Among the main factors that cause a small knock in the front suspension on small bumps, there is a large gap between the control rack and pinion. This is the result of wear and tear. To make a clear diagnosis, it is recommended to pull the control rods up and down.
At the same time, closely monitor the movement of the rod. If she doesn't move, then she's in a good period. On the contrary, the rod will dangle, then, most likely, there is wear on the bushings.
If the rack turns, then a clear diagnosis is a large gap in the engagement. But this problem can be easily removed if this very rail is tightened. Also, when pulling the control rod, it should be noted that the bushings securing the control rods to the control rack, broken in a different way, are very worn.
Another probable cause of knocking is the control joint. To test this guess, it will be quite difficult to control it with two hands. A friend's help will come in handy.
The assistant must quickly and sharply turn the steering wheel, and the car enthusiast. grasp the hinge in such a way as to hold the hinge itself, its body and the finger. If there is wear, then of course you can feel the free movement.
Renault Logan front suspension repair
The Renault Logan model is a car that is in great demand among domestic car enthusiasts. Its advantages are reliability, a decent level of comfort and suspension adaptability to Russian roads. Despite this, the chassis of the car requires periodic maintenance - repair and replacement of faulty elements. This approach guarantees extended service life of key components , as well as reducing the risk of failure of adjacent elements.
How to diagnose faulty chassis components? In what sequence, and taking into account what rules should you repair the Renault Logan front suspension?
What's in the rear suspension?
Due to the budget pedigree of the Renault Logan car in question, the rear suspension itself is distinguished by enviable simplicity. This does not imply frequent concerns for the owner in terms of the reliability of the node. In the structural basis you can find a beam fixed to the body elements using large silent blocks. A non-alternative addition is shock-absorbing struts combined with spring inserts. Thanks to the simplicity of the rear suspension design, the service life of most of its components can easily exceed the 150,000-mile barrier. A diagram will help you figure it out.
Due to the enviable rigidity of the beam, the designers rightly and rationally refused to use a stability stabilizer in the stern suspension. The identified aspects do not at all mean that there is no need for repairs. The silent blocks of the beam can upset the owner of a Renault Logan if they fail under the influence of aggressive reagents that abound on city roads in winter. Also, under the pressure of these aggressive substances, the springs give in offensively and are destroyed by corrosion.
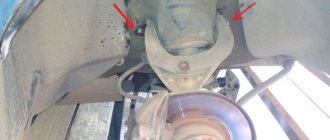
Symptoms of a subframe malfunction
Repair of a failed device must be carried out in a short time and using original spare parts. The main thing is to promptly diagnose a malfunction of the subframe - the basis of the front suspension. A number of additional components are attached to the device - a rubber cushion of the exhaust system, a suspension arm, a stabilizer bar and the rear part of the engine (a photo of the subframe is shown below).
Wear can be easily recognized by the following signs:
- Knocks when driving on rough roads.
- The appearance of play in the places where the main units are fixed.
- Deviation of Renault Logan wheel alignment parameters.
How to recognize the failure of the shock absorber strut and springs?
Shock absorber struts are a device that stabilizes the smoothness of the ride when the vehicle is moving. Together with the springs, the struts take on the load, eliminating excessive body sway and increasing ground clearance. A photo of the shock absorber strut (without spring) is shown below.
A faulty shock absorber strut can be recognized by the following symptoms:
- The appearance of an oil leak.
- Increased car sway when hitting a pothole on the road.
- Vibrations or knocking noises when driving on a flat road.
- Deterioration of car controllability, decreased sensitivity.
- Shocks and “breakdowns” when hitting uneven surfaces.
No less important devices are springs that work together with the struts. Malfunctions of these Renault units are recognized by a number of symptoms:
- Reduced clearance.
- Deterioration in smooth movement.
- The appearance of swaying or jolting in the event of hitting an obstacle.
- Tilt of the body in one direction or another without movement (when the car is static).
Anti-roll bar: signs of malfunction
Keeping the Renault body in a level position, as well as eliminating diagonal swaying, is the task of the stabilizer (shown in the photo below).
The device works in tandem with levers, interacting with them through racks. Despite its long service life, the stabilizer requires periodic repair and replacement.
A malfunction of the stabilizer struts can be recognized by a number of symptoms:
- The appearance of metallic sounds (knocks) when driving over potholes.
- Excessive roll when entering a “sharp” turn.
- Rocking of the body when the brake pedal is pressed sharply.
Suspension arm faults
The suspension arm design limits the movement of the front wheels to the required angle. This unit is connected to the steering knuckle using a ball joint through a special bolt. The lever is fixed using silent blocks, which often fail and need to be replaced.
Signs of a faulty suspension arm:
- Knock when hitting a bump.
- Wheel imbalance.
- Excessive tire wear.
- The machine pulls to the left or right while accelerating or decreasing speed.
- The appearance of steering play.
Rack diagnostic methods
There are a lot of methods. The classic one is to swing the body down, and it should smoothly rise to its normal position and stop. If everything is so, then the rack is working.
It happens, although quite rarely, that the strut makes extraneous sounds due to its internal problems, for example, the nut that holds the piston has become unscrewed. However, this does not cause knocking. When driving, the car sways and controllability decreases.
In this case. strut replacement and suspension repair.
Various shock absorber breakdowns are the consequences of its improper use. The oil in these systems must have a special specific viscosity, which also depends on the air temperature. Having warmed up the engine, the driver immediately takes off, but the oil in the rack has not warmed up.
If it’s frosty outside, then the viscosity in the stand is too high. In this case, thin and very fragile parts fail.
Thick oil may also not be related to the weather. Sometimes excessively thick liquid is poured into shock absorbers. This is done to increase the resistance force and so that the oil does not “run away”. But as a result, stability and controllability deteriorate, because hard does not mean good.
How to recognize a malfunction of the hub and steering knuckle?
When driving a car, suspension elements (in particular, the steering knuckle and the hub part) experience increased load and may fail. Photo of the rotary knuckle:
A problem with devices can be recognized by the following symptoms:
- The car pulls to the side when driving at speed.
- Tires wear unevenly.
- The car is driven in one direction or the other.
- Squeaks appear when turning the steering wheel.
How to check the suspension?
Before you begin repairing the suspension, it is worth diagnosing it and identifying the failed elements. The verification scheme is as follows:
- Inspect the supports for the size of the distance between the top of the assembly and the glass. It is optimal when the parameter is 1-1.5 cm on both glasses. Control the movement of the steering wheel - it should rotate easily. If there is a cracking sound or jamming, we can talk about bearing failure.
- Walk around the car and rock it, stopping at each corner. If there are no problems with the shock absorbers, the body makes 1-2 vibrations, after which it takes a fixed position. Otherwise, repair or replacement of the part is required.
- Shake the ball joint and rod. A working device has no play. Perform the same actions in relation to the stabilizing bar. The presence of play indicates failure of the machine bushings. Test the device only on a flat surface.
- Assess the condition of the silent blocks. It is important that they show no signs of tears or damage. Shake the lever - the appearance of play indicates the need for repair work.
- Inspect the car's subframe, lever and linkage for deformations and malfunctions. If any, repair or replacement of the failed device is required.
How is the front chassis arranged?
The front suspension of the family Renault Logan is structurally implemented on the well-known McPherson model. The basis of its structure is shock absorbers and springs combined into single struts. The transverse arms are stamped triangular structures, which are attached to the steering knuckle by means of a ball joint and to the subframe by brackets with silent blocks. To keep the Renault Logan car from rolling on the road, a transverse stabilizer is used, represented by a metal rod, which, through its own struts, rests on other elements of the chassis. Direct contact of the stabilizer with the subframe occurs through bushings. This is a suspension device. The shock-absorbing struts, through their supports, rest against the body cups of the side members, and with the lower brackets they are “planted” on the steering knuckles and secured to them with two bolts (each side).
This chassis design, proven by operation and many tests, has proven itself to be very reliable. Among the undeniable advantages of the suspension is the relatively low cost of its parts.
How to change the stabilizer?
When using a Renault Logan car, pay the main attention to the weakest parts of the stabilizer (rubber bushing and cushions). If the integrity is damaged or there is damage, play appears, which reduces the life of the suspension and leads to breakage of other elements.
The installation diagram for the new device is as follows:
- Suspend the front suspension of the car (use a lift or jack, as shown in the photo).
- Keep any dirt off the screw heads to make it easier to tighten the bolt. Otherwise, there is a risk of damaging the key or screw during the unscrewing process.
- Unscrew the nut holding the stabilizer bar. At the same time, secure the screw to prevent it from turning.
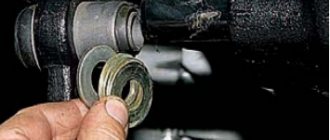
- Remove the bushing (it is easy to recognize - the product is made of rubber). Pay attention to the recessed end (on the nut side) - there is a washer there.
- Remove the screw (the assembly is removed simultaneously with the bushing and plastic washer). Pull the end of the rod down and then remove the bushing. Similarly, remove the fasteners holding the lever and the Renault stabilizer bar.
- Install new units using the reverse algorithm and tighten the nuts. The main thing here is not to apply excessive force. When installing the industrial bushing, proceed in such a way that the device faces up with the grooves.
- To change the stabilizer bar cushion, twist the bolted connection that secures the device to the subframe.
- Remove the pin and then remove the bracket.
- Remove the cushion and install the whole part in the reverse order. In the same way, change the pillow installed on the other side.
- Inspect the bar for damage at the mounting points of the cushions. Remember that excessive wear increases the likelihood of Renault rod failure. After inspection, replace the old or new product (depending on its condition).
This is interesting: Repairing small dents without painting
Additional noise sources
Let's consider additional sources of extraneous noise!
Sometimes sounds coming from the suspension are actually coming from the brakes. It happens that a car enthusiast has checked everything and replaced everything that can be replaced. The front suspension layout has already been learned by heart, but the knocking was still there.
To make a diagnosis, you need to move. If the knocking noise disappears when braking, and when the pedal is released, it resumes again, then the brake pads are to blame. The same problems can occur after installing new pads.
https://www.youtube.com/watch?v=tA18P6ihPcc
If the car is knocking, do not rush to repair the chassis. Perhaps the extraneous sound is caused by a completely different reason. In this case, only a complete diagnosis can help. It may be enough to replace the front suspension silent blocks and the sound will disappear forever.
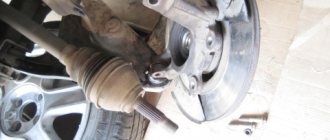
How to change the lever?
The Reno front suspension requires special attention in terms of installing new silent blocks and a ball joint. To solve the problem, it is necessary to dismantle (replace) the front lever (photo).
Follow the work flow diagram below:
- Raise the front of the car so that both wheels are suspended. If you lift only one wheel, the stabilizer will not allow you to remove the lever.
- Discard the rod fasteners from the lever and remove the motor casing, which protects the unit from dirt.
- Unscrew the nut that tightens the ball and steering knuckle. At the same time, secure the bolt to prevent twisting. Next, knock out the bolt.
- Use a screwdriver with a regular blade to loosen the connection between two parts - the ball pin and the steering knuckle.
- Loosen the bolt holding the subframe to the body part. Then unscrew the nut on the subframe bracket and remove it from the bolt.
- Use a spanner to loosen the nut holding the lever, and then remove the bolt.
- Dismantle the unit and install a new product using the reverse algorithm, or do other repair work on the Renault chassis.
Replacing the front lever
Sometimes when repairing a Renault Logan chassis with your own hands, you need to replace or remove the lever, for example, when replacing a ball or silent blocks. Suspend the front of the car - be sure to have two wheels at once. If you hang only one, the stabilizer will prevent you from removing the lever, tightening the suspension elements. See the picture for what the left lever looks like. It consists of the following elements:
Disconnect the rod mount from the Logan lever and remove the engine mudguard. Unscrew the nut of the coupling bolt connecting the steering knuckle and ball joint, holding the bolt with a wrench.
Pull out the bolt and knock it out. Using a reliable slotted screwdriver or a special spatula, loosen the connection between the steering knuckle and the ball pin. Place the mounting blade against the steering knuckle and press the lever down, moving the ball pin out of the steering knuckle hole. Using a socket, loosen the bolt that holds the subframe bracket to the body. Unscrew the nut securing the subframe bracket and remove it from the front bolt that holds the lever on the subframe.
Using a spanner, unscrew the front arm bolt nut, holding the bolt with the appropriate size head. Pull out the bolt and knock it out with a mandrel. Unscrew the rear nut securing the lever and remove the bolt. Dismantle the lever and install a new one in the reverse order or carry out other work to repair the Renault Logan chassis with your own hands.
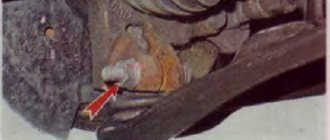
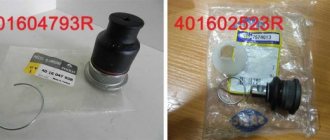
How to change a ball joint?
A damaged boot, its distortion or increased play in the hinge mechanism is a reason to replace the vehicle's ball joint (photo of the part).
To solve this problem, proceed as follows:
- Remove the suspension arm along with the ball according to the diagram described above.
- Alternately, on each side, use a screwdriver to pry up the support casing, and then press the ball out of the lever hole (the point of emphasis should be the edge of the product).
- Assess the condition of the eyelet for damage.
- Before installing a new part, clean the installation area from dirt and traces of rust, then place a tube of the required size or head and put the part in place.
- Using a hammer, carefully push the support into place by striking the head (mandrel).
- Collect everything using the reverse algorithm.
How to check silent blocks?
For diagnostics you will need a flat mount. She will let you know how worn these parts are. With the use of a mount, the lever will move longitudinally and transversely. If, of course, there is free movement or damage, then the silent blocks of the front suspension are to blame for the knocking.
https://www.youtube.com/watch?v=kV8ZOhmzhxc
From time to time the levers are collapsible. Then they replace it with a silent block. For this purpose, you dismantle the lever, and then, in the presence of a special mandrel, the part is squeezed out. It is better to lubricate the new silent block before installation. The landing surface must also be cleaned. After installation, knocking must {amp}gt; be over.
A flat mount will be required for diagnosis. This will allow you to determine how badly these parts are worn. Using the mount, the lever will move in the longitudinal and transverse directions. If there is play or damage, then the front suspension silent blocks are to blame for the knocking.
Sometimes the levers can be collapsible. Then you can replace it with a silent block. To do this, the lever is dismantled, and then, using a special mandrel, the part is squeezed out. It is advisable to lubricate the new silent block before installation. The seating surface must also be cleaned. After installation, the knocking should stop.
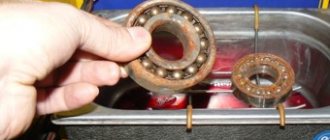
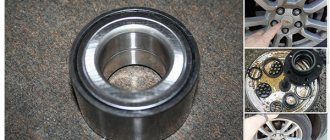
How to change a wheel bearing?
The greatest difficulty for many car enthusiasts is installing a new wheel bearing (its photo is below).
This work is done when the hub is dismantled or broken.
The scheme of work is as follows:
- Raise the handbrake to secure the car, then engage first speed.
- Place wheel chocks under the wheels to prevent the vehicle from moving.
- Unscrew the nut holding the wheel bearing. If this cannot be done due to the wheel spinning, instruct an assistant to apply the brake during dismantling.
- Suspend the required wheel with a jack, then remove it.
- Remove the speed sensor, brake guard assembly and disc.
- Separate the fist and the tip, then remove the ball pin.
- Separate the shock absorber from the fist, and then remove the fist itself, mounted on the splined shank.
- To press out the hub, place your fist in a vice, substitute a special mandrel (head) and use a hammer to gradually “knock out” the part. Please note that the bearing ring installed from the inside remains in the same place.
- Use a screwdriver to pry up the washer, then release the oil seal, and then remove the washer.
- Fix the oil seal in the jaws of the vice, place a chisel between the hub boundary and the ring from the inside, then move the latter along the hub, making gentle blows with a hammer. As soon as a small gap appears, install the puller and press the ring.
- Remove the retaining rings with pliers, then remove the bearing ring, and then remove the part itself.
- To press out the bearing, hit the end part of the outer ring, placing a spacer (for example, a head). On photo This process is shown below.
- Clean the seating area in the knuckle, as well as the recess for mounting the locking ring. Then, using a needle file, clean out any nicks that may have been left by the chisel.
- Install the speed sensor ring into the recess, and then press in a new wheel bearing (it will not be possible to repair the old unit).
- Place the puller screw, and then the bearing. To install the product in place, press on the cup. The puck should rest against your fist.
- Upon completion of bearing installation, place the ring in the recess and press the hub. Do the remaining work using the reverse algorithm.
Restoring the Renault front suspension requires certain skills and knowledge from the car enthusiast. But if you strictly follow the algorithm, have the required tools and original replacement parts, you can do everything yourself.
Replacing a Renault car wheel bearing
The Renault Logan chassis requires periodic replacement of the wheel bearing. This is required when it wears out or when the hub is dismantled, since this will inevitably damage the bearing. You can see the structure of the front wheel hub unit in the picture, and it consists of:
- rounded fist;
- wheel bearing;
- speed sensor mounting ring;
- hub.
Before work, tighten the handbrake and engage first gear, placing chocks under the wheels. Unscrew the wheel bearing nut. If you are unable to do this due to the wheel spinning, brake the car by pressing and holding the brake pedal (ask an assistant to do this). Next, hang up and remove the wheel. Remove the wheel speed sensor, disc and brake protection. Disconnect the rod end from the steering knuckle and remove the ball pin from the knuckle holes. Disconnect the shock absorber from the steering knuckle and remove the latter from the splined shank of the outer hinge housing. Place the steering knuckle on a vice and press it out with a hammer through the head or mandrel at the end of the hub. The inner ring of the bearing will remain on the hub.
Pry up the protective washer with a screwdriver, freeing the bearing seal, and remove it. Clamp the flange in a vice and insert a chisel between the ends of the inner ring and the hub shoulder. Using a hammer, slide the inner ring along the hub. Insert the puller's grips into the gap that appears and press the ring off the hub.
MacPherson is our everything!
At the front, Logan's chassis is designed like a MacPherson strut - on an independent basis. This is the most popular suspension scheme today. MacPherson strut combines comfort and controllability, while the design is quite simple - this is the secret of the popularity of this type of suspension.
Key structural elements of MacPherson:
- suspension subframe;
- suspension arm with silent blocks and ball joint;
- steering knuckle with hub and bearing (the rear suspension also has a hub bearing);
- shock absorber strut;
- anti-roll bar
To better understand the purpose of each node, it is necessary to consider each of them in more detail.
Stretcher
It is considered the basis of the pendant. Made by a load-bearing structure.
The following are attached to it:
- front holes for bolts securing the subframe to the body;
- brackets for mounting the suspension arm;
- holes for the rear subframe mounting bolts, as well as the anti-roll bar;
- bracket for fastening the rubber cushion of the exhaust system suspension;
- mount for the rear support of the power unit
The subframe when removed does not look like a key element of the suspension at all
The subframe itself is attached to the body with silent blocks. The latter additionally dampen vibrations emanating from the body and suppress noise.
Wear
The subframe is reliable, but over time, the mounting holes located in it can increase in diameter, and the silent blocks can wear out under the influence of shock loads. All this is fraught with:
Shock absorber struts
- telescopic stand (you can read about its dismantling and replacement in this material);
- shock absorber spring;
- shock absorber compression buffer with rubber boot;
- nut securing the shock absorber strut to the body;
- support washer;
- upper support fastening nut;
- upper rack support;
- upper support bearing;
- upper thrust cup of the spring.
Shock absorbers (telescopic) are needed to stabilize the ride when driving on the road.
Springs work together with the struts and their task is to take on loads, prevent swinging, maintain the desired ground clearance and improve ride comfort. In turn, the compression stroke buffer regulates the degree of spring stiffness.
Fixation points for shock absorbing elements:
- From below - to the steering knuckle.
- From above - into the wing (fasteners - thrust spring cup, support bearing, washer).
Signs of a faulty suspension strut
- Oil leak on the strut.
- Increased swing.
- An increase in vibrations even when driving on a relatively flat road surface.
- “Looseness” - decreased sensitivity on the steering wheel, yawing under the road, susceptibility to ruts.
- Inability to handle impacts from road irregularities, which manifests itself in the form of noticeable shocks and breakdowns.
Signs of a Worn Spring
- Reduced clearance.
- The skew (roll) of the car even in a static state, when the vehicle is standing still.
- Deterioration in ride quality.
- The appearance of strong swaying and jolting when driving over uneven surfaces.
Anti-roll bar
- screw;
- lower rubber bushing;
- intermediate rubber-metal bushing (stabilizer bushing) - about its replacement in detail here;
- plastic washer;
- upper rubber bushing;
- screw;
- stabilizer bar;
- stabilizer bar cushion;
- subframe mounting bracket
The main purpose of the unit is to combat roll and diagonal sway of the body - this allows you to drive the vehicle more confidently and safely. The stabilizer can be recognized by the appearance of the metal rod. It interacts with the suspension arms through the struts. They last a long time, but the racks are consumable components and often wear out, requiring replacement.
Signs of faulty racks
- Huge rolls during sharp maneuvers and when taking turns.
- Predisposition to drift of the front axle at the time of rearrangement.
- Metallic knocking that occurs on uneven surfaces.
- Body sway during emergency deceleration.
Suspension arms
They provide limited movement of the wheels in a vertical position and fix them at a certain angle; the radius of a standard wheel on a Renault Logan from the factory is no more than R15. They are a triangular design. The arms have integrated ball joints that interact with the rotary cam through a coupling bolt. The levers are attached to the subframe structure with silent blocks - together with the ball ones, they are vulnerable points and wear out quickly and may require replacement. However, the lever itself may become unusable due to excessive loads.
Signs of a lever problem
- Knocks when hitting potholes.
- Noise while driving.
- Steering wheel play.
- Wheel alignment, cluster violations.
- Balance imbalances.
- Uneven and increased wear of rubber.
- Deviation from the trajectory when decelerating/accelerating.
Rotary cam, hub
Without a turning mechanism, it is impossible to fully control the vehicle and rotate the wheels in a vertical plane. In addition, the rotary cam is the mounting base for the hub - using hinges.
Catalog part number: MP0075 (hub, Italy).
- On top is a shock absorber strut.
- Below is a lever.
Symptoms of a problem
- Sideways pull during acceleration.
- Increased and uneven tire wear.
- Yaw on a straight line (requires replacement of the ball joint).
- Knocks and squeaks when turning the steering wheel.
Stabilizer, hub, steering
To eliminate lateral rolls, the Renault Logan suspension design has an anti-roll bar. It belongs to the torsion bar type of stabilizers and is equipped with rubber cushions. The element is connected to the subframe using two brackets. The stabilizer is also connected to the suspension arm (however, using bolts). It is worth noting that the price of the Renault Logan suspension arm itself is low. The Turkish version costs 1900 rubles.
Hubs are provided to rotate the wheels. They are mounted on angular contact ball bearings. In the first versions, they did not last long - only 40 thousand kilometers. The fact is that on cars without ABS there was a through hole in the steering knuckle (it was provided for the sensor). It was through it that dirt flew into the bearing cavity and thereby destroyed it from the inside. Models after 2006 have been modified. A special plastic plug was installed on cars, which prevented the passage of water and dirt to the bearing. This significantly increased its service life. Now wheel bearings on Renault Logan last up to 130 thousand kilometers.
Steering ends are also an integral part of the Logan’s front suspension. These elements have a resource of 70 thousand kilometers. If they malfunction, a characteristic knocking sound is noticeable in the front suspension of the Renault Logan. Ball joints begin to knock after 100 thousand kilometers. According to the dealer, they change in the assembly with the levers.
Steering rods have a good service life - 150 thousand kilometers. After this run, play may occur in the inner tips. The rack is of the gear type, capable of serving about 400 thousand. Some owners do not replace the rack (this is the most expensive element, the cost of which starts from 50 thousand rubles), but simply tighten it. This way the backlash disappears, but the force that needs to be applied to rotate the steering wheel increases significantly. This is especially noticeable on cars without a hydraulic booster.