The Renault Logan car and its modified version Logan 2 are in great demand among Russians. The need to repair components of a vehicle with front-wheel drive and a manual transmission often arises due to the fact that you have to drive on broken roads. Replacing the Renault Logan clutch cable is a simple operation. Installing and adjusting a new part takes no more than half an hour.
Why and when do you change the clutch cable on a Logan?
Intensive use of a vehicle inevitably leads to wear and tear on the components. The signal that the cable needs to be changed is the appearance of squeaks in the clutch pedal. The sound is especially clear in hot weather, after a long trip. There can be several reasons for a squeak:
- The clutch cable has reached its service life and needs to be replaced.
- The pedal stop is very dirty and requires cleaning and lubrication.
- The release bearing has failed
- The basket is worn out.
Replacing the Logan clutch cable when squeaks occur is the best way to solve the problem.
The resource of the element depends on the intensity of driving, as well as on the quality of the spare part. Replacement is an inexpensive procedure and no special tools are needed. Compared to other common operations, such as replacing the end, installing a new cable is faster.
What tools will you need?
Replacing the Renault Logan clutch cable is done by one person. The tool you will need:
- 2 keys for 10;
- 1 key for 7;
- pliers;
- a simple screwdriver;
- small ruler.
To lubricate the fork and adjust the system, you will need a standard medical syringe. To avoid frequent replacements, adjustments must be performed every 15 thousand kilometers.
Preparing to replace the cable
Before starting the procedure, the vehicle must be stopped and the ignition turned off to prevent spontaneous movement of the car. Keys and ruler are placed in a convenient and accessible place.
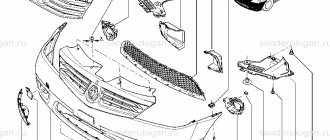
The filter bellows must be removed. If the car is equipped with a 16-valve power unit, you will need to loosen the clamp. The work will be greatly hampered by the intake muffler in the form of a plastic box. After removing the corrugation, the element is moved to the side and ceases to obstruct access to the cable. Consecutive execution of operations takes no more than 5 minutes, then you can proceed directly to replacing the equipment.
Changing the cable on Logan: step-by-step plan
After completing the preparatory operations, the car owner will see a cable with a rod tip. There is a load attached to it. In the initial state, the weight is not visible. Removal and installation of the element is carried out as follows:
- Behind the weight there is a nut and a locknut that need to be unscrewed using wrenches. This weakens the fixation of the cable, it can be pulled out of the fork and bracket.
- Inside the cabin, part of the sound insulation located under the steering column is removed. You will need to move the driver's seat as far back as possible. Sound insulation should be removed carefully, as the material can easily be torn.
- The clutch pedal bends upward and the cable is released from it with some effort.
- The cable is attached to the hole in the engine compartment shield with sheath tendrils, which need to be snapped off with pliers.
- There is a fastening clamp under the left support. It also needs to be opened.
- We pull out the old spare part through the engine compartment. This completes the dismantling.
After removing the part, the fork is lubricated. You can use a medical syringe with the cap cut off at an angle. Remove the boot from the fork. You don't need a lot of lubricant, 2-5 ml is enough. It is difficult to install the boot in place. To simplify the process, before dismantling it is advisable to remember its original position.
What signs indicate the need for replacement?
Signs that it is time to change the clutch cable on a Renault Logan will be a creaking sound when you press the clutch pedal, or its difficult movement. This means that the part has expired and needs to be replaced. There is no need to wait for the cable to break; you must replace the spare part with a new one in advance. The reasons for the appearance of a squeak during a long trip in hot weather can be other breakdowns, for example, severe contamination of the pedal, wear of the basket, malfunction of the release bearing.
To avoid troubles with the clutch cable, experts advise adjusting it every 15 thousand kilometers. Signs by which one can judge that the cable is malfunctioning:
- the clutch pedal fails and does not return to its original state;
- Gears do not change when the clutch pedal is depressed;
- the clutch does not disengage completely;
- the appearance of extraneous sounds when pressed;
- clutch pedal slipping.
If such signs appear, you should check the condition of the clutch cable; do not wait for it to break.
Articles
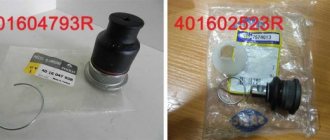
For all cables suitable for cars of the first and second generation, the Renault catalog contains two article numbers - 8200215961 and 6001546867. We are talking about different designations of one part.
But number 307705043R is a new generation of cars, that is, 2014. Make no mistake!
Substitutes
3074 600 294 - the most common option for replacing the original spare part
In what cases is it necessary to replace the clutch cable?
This spare part is changed depending on its quality, driving intensity, and in case of a break. The Renault Logan car is equipped with a cable drive for traction. When the driver presses the clutch pedal, force is transmitted to the lever system through this cable. It moves the master disk away from the slave disk. This action disengages the clutch, disconnecting the engine from the transmission when changing gears or applying the brake. This clutch system is reliable, but the cable sometimes breaks at the most inopportune moment.
If the clutch cable breaks, you will immediately feel the clutch pedal sinking. There is no need to panic, even if this happens on a busy road for the first time. Experts advise turning on the hazard lights, shifting the gear lever to first gear, starting the engine, and slowly driving to the side of the road. Replace the spare part there. You can simply push the car to a safe place.
We are looking for a solution
Replace the clutch cable if it shows signs of mechanical stress and damage.
3074 600 294 — article number of the clutch cable for Renault Logan SACHS.
If the car's mileage is not too high and there are no problems with the clutch, first of all, pay attention to the condition of the transmission pedal cable. Visual damage, tears and corrosion are the determining indicators for its replacement.
This spring needs to be lubricated first.
If the cable is intact, then it is recommended to treat all rubbing surfaces (including the pedal spring) with silicone grease or WD-40. If such manipulations do not solve the problem, then it is necessary to look for it through the engine compartment, removing that same cable and replacing it with a new one. If this does not help, then the clutch assembly will need to be replaced.
Clutch cable adjustment
A mandatory operation both during replacement and maintenance is adjusting the cable. The clutch disc linings wear out, causing the original adjustments to change. After replacement, it is also necessary to return the original values of the cable release length. To set intervals, you can use a ruler prepared before starting work. Two parameters are subject to adjustment: the distance between the clutch fork and the bracket, as well as between the bracket and the cable tip. The first interval should be 86 mm, the second - 60 mm. The tolerances in both cases are 0.5 mm up or down. To adjust, you will need to rotate the tip nut after loosening the lock nut. To prevent the flexible element itself from rotating, it must be held by the faceted part with a key number 7. After setting the intervals, the pedal stroke and ease of use are checked. You may need to change the settings up or down again. The nut and locknut are tightened to their original state, the car is ready for use.
How to replace the clutch disc, and what is its service life?
The clutch is an important thing in a car, and many people are interested in how long does the clutch last? The average disk resource reaches 150 thousand km, and for more “calm” owners this part can last about 200 thousand km. After this, the clutch needs to be replaced.
Usually, when the disc wears out, it is recommended to replace the entire clutch. To find out the pricing policy for this mechanism, you should contact a dealer located in your region. Clutch replacement is carried out on Renault Logan using special tools that will allow you to perform the operation professionally.
We are starting the replacement.
- Replacing the clutch is a responsible procedure. We hang the car on a lift and remove the front wheels.
- We remove the battery, and then disconnect the parts that create difficulty in accessing the gearbox.
- Unscrew the cable securing nut and remove it.
- We unscrew the bolt securing the upper transmission mount, as well as the entire cage of bolts by which the box is attached to the Renault Logan engine block.
- We dismantle the suspension elements, and also completely remove the drive axle shafts. Do not forget to drain the oil from the crankcase before separating the internal shaft joints from the transmission differential.
- We place a support (stand) under the box and raise the Renault Logan engine to the required height.
- After this, we dismantle the box and put it aside.
Replacing the clutch is carried out mainly with an assistant, because the weight of the transmission unit reaches 50 kg.
- Unscrew the 6 bolts securing the basket to the flywheel and remove the assembly
- Having prepared the new unit for installation, center the disk in relation to the flywheel
- We mount the basket using the indicated six bolts
- It is recommended to replace the release bearing, which will eliminate the need for repeated disassembly in order to replace the clutch, and lubricate the guide forks.
Changing the cable on Logan: step-by-step plan
After completing the preparatory operations, the car owner will see a cable with a rod tip. There is a load attached to it. In the initial state, the weight is not visible. Removal and installation of the element is carried out as follows:
- Behind the weight there is a nut and a locknut that need to be unscrewed using wrenches. This weakens the fixation of the cable, it can be pulled out of the fork and bracket.
- Inside the cabin, part of the sound insulation located under the steering column is removed. You will need to move the driver's seat as far back as possible. Sound insulation should be removed carefully, as the material can easily be torn.
- The clutch pedal bends upward and the cable is released from it with some effort.
- The cable is attached to the hole in the engine compartment shield with sheath tendrils, which need to be snapped off with pliers.
- There is a fastening clamp under the left support. It also needs to be opened.
- We pull out the old spare part through the engine compartment. This completes the dismantling.
After removing the part, the fork is lubricated. You can use a medical syringe with the cap cut off at an angle. Remove the boot from the fork. You don't need a lot of lubricant, 2-5 ml is enough. It is difficult to install the boot in place. To simplify the process, before dismantling it is advisable to remember its original position. Reinstalling the clutch cable also requires some effort. You need to do this:
- We mount the cable under the support of the power unit, fix it in the bracket and fork.
- Loosen the adjusting nut and insert the flexible element into the car interior.
- We snap the cable cover, which allows you to secure it in the hole in the engine compartment.
- We lift the clutch pedal up, insert the cable into a small recess, and make adjustments using a ruler.
- We fix the loose clamp under the support.
- We install the nut and locknut, which securely fix the element in its original place.
- We return the intake muffler and air duct corrugation to its original state.
If there are no problems with the procedure, you can start driving.
How to change the cable
The main thing in replacing any traction cable is removal, that is, disconnecting the cable from the “actuator”. The gas cable in Renault Logan is connected to the throttle valve, and we will work with it in the first step. You also need to remove the cable end from the gas pedal. And only then the shell is pulled into the engine compartment.
Damper assembly
The cable loop will be placed on the damper lever. Remove the loop.
Pull the cable out of the clamp
Then, without removing the bracket, simply slide the rubber bushing towards you. A slotted screwdriver will help with this (see photo). Finally, the cable is pulled out of the latch hole.
Gas pedal assembly
If you crawl up to the right pedal with a flashlight, you will be able to see the slot (see photo).
Remove the cable from the pedal
The tip of the cable is easily removed from the eye, but you need to pull the cable into the cabin.
Under the hood
On the partition you can find a bushing into which the cable sheath rests. But since the cable itself is not held in place by anything, the sheath is pulled forward (see photo).
Pull out the sheath with the cable
If the sequence of steps is changed, then, of course, nothing will work.
Installation
All steps discussed above must be repeated in reverse order. We bring the cable inside the cabin, connect it to the pedal, and so on. And when the cable loop is put on the lever, adjustment may be required (see below).
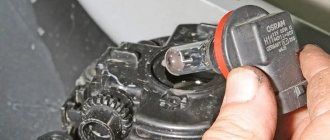
How to lubricate the fork
Remove the power steering fluid reservoir. To do this, unscrew T20 screws (2 pcs.). Then the tank is tilted to the side and secured with wire. If the fluid level in the tank is insufficient, then it is necessary to add oil to the power steering.
Removing unnecessary elements
When there is no reservoir, you can get close to the fork boot.
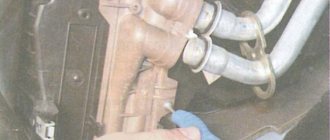
It is clear that the clutch cable in Renault Logan cannot creak. If there is a creak, the fork is at fault. The clutch fork hinge is covered with a boot, which is simply pushed up (see photo).
After cleaning is completed, apply a protective lubricant. And the guide rod (yellow) needs to be lubricated.
Use only high temperature grease designed for clutch bearings.
To return the boot to its place, it should be “softened”. Any silicone-based compositions are suitable here.
All steps to replace the clutch cable
The lever itself that holds the weight is called a “fork.” Pull the weight out of the slot by pulling the cable in the direction “away from the fork” (Fig. 1).
Two actions in the engine compartment
Then they move on to the bracket: the rubber coupling is removed from the slot. This coupling ends the cable sheath (Fig. 2).
Inside the cabin
By slightly pulling the cable toward you, remove tip 1 from the pedal holder (Fig. 1). Then tip 2 must be pushed forward. And to do this, two petals are squeezed on it. You can even damage the part itself, which will not be a big deal.
Carry out dismantling and remember: the cable cannot be seen through
The main thing is to squeeze the cable tip into the engine compartment. And then the cable assembly is replaced with a new one.
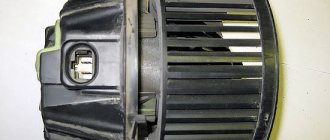
The problem of pedal squeaking and its elimination
The creaking of the pedal when squeezing is often associated with poor lubrication of the system of rubbing parts. As a rule, this creaking comes from a manual gearbox, namely the disc release fork. The resource of this mechanism directly depends on the regularity of lubrication of the fork support rod for easy squeezing of the disc.
To eliminate the unpleasant creaking pedal, it is quite enough not to remove the gearbox and solve all the problems on the spot.
- Remove the cable tensioning the fork.
- Remove the rubber protective cover and expose the plug.
- Apply grease to a long screwdriver or similar object and lubricate the release fork support lug.
- This operation must be carried out several times to ensure that the correct amount of lubricant is in the right place.
The rest of the assembly must be done in reverse order. There are detailed videos on the Internet that clearly demonstrate this process. We carry out this operation in the same way on both 1.4 and 1.6 engines.
Step-by-step instruction
1. Open the hood and remove the air duct marked below. Removable by hand.
2. Remove the cable from the fork and then remove it through the cut.
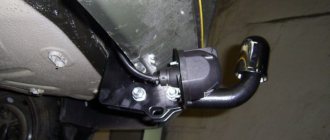
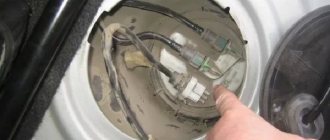
3. Next, the cable is secured to the body with a clip just under the engine support. It is impossible to see this clip from under the hood, but you can stick your hand under it and open it. You can see this clip in the photo below.
The clip opens easily; you just need to pull the edge of the clip down. In the photo below, I think everything is clear.
Engine support 4. Next from the passenger compartment. You need to lift the clutch pedal up and remove the cable barrel from its engagement on the pedal. We grab the cable and move it towards us. Now we lift it up and pull it out. Everything is clear in the photo below. The photos were taken specifically with the pedal assembly removed.
5. The cable also snaps into the body. We squeeze the two clamps and squeeze the cable into the engine compartment.
Photo from the salon.
Photo from the interior of a disassembled car. The arrows indicate the clamps that need to be compressed. 6. Go under the hood and remove the cable.
Before removing the cable, you need to pay attention to how it is routed. It runs between the gearbox and the gearbox support
7. We assemble in the reverse order:
- We put the cable in place and snap it onto the body
- We engage the barrel of the cable with the pedal
- Snap the clip
- We wind the cable by both forks
- Installing an air duct
If anyone doesn’t understand anything, watch the video lesson and write questions in the comments.
To understand whether your cable is good or bad, after removing it, move it back and forth with your hand. The cable should move easily and the white braid of the cable that peeks out from the edge should remain in place. It often happens that the braid comes off.
I am writing this because tight clutch release, squeaking, and sticking are not only associated with a bad cable. So if your cable is good, install it back and look for other reasons.
Substitutes
3074 600 294 - the most common option for replacing the original spare part
3074 600 294 in Exist
We list analogues suitable for machines from the first two generations:
- CABOR 10.2890
- TRISCAN 8140 25250
- ATE 24372810312 or 591031
- AUTOMOTOR FRANCE AVC6867SAE1 or AVC6867
- BAV DISAN96
- CAUTEX 28439
- ADRIAUTO AD41180, AD410180, 41180, 410180
- CEF RT01186
- CMB AN96
- QUARTZ QZ-154-6867
- FRANCECAR FCR210148
- COFLE 102890
- FTE FKS20023
- KAWE RT01186
- HI-DRIVE CC708
- MALO 26545
- NPA NP51105151
- SPJ 911112
- QH KA93657
- TRW GCC109
- TIMMEN 01441528
- SACHS 3074600294 (pictured above)
- MASTER-SPORT 6001546867PRPCSMS
- ABS K27640
- ASAM 30360 or 31071
- HELLA 8AK 355 700-921
- BRECKNER BK19004
- SEIM 401712
- KAGER 192756
- LEX TR2193
- RICAMBIFLEX 01441528
- METZGER 102890
- TEXTAR 58013900
Preparing to replace the cable
Before starting the procedure, the vehicle must be stopped and the ignition turned off to prevent spontaneous movement of the car. Keys and ruler are placed in a convenient and accessible place. The filter bellows must be removed. If the car is equipped with a 16-valve power unit, you will need to loosen the clamp. The work will be greatly hampered by the intake muffler in the form of a plastic box. After removing the corrugation, the element is moved to the side and ceases to obstruct access to the cable. Consecutive execution of operations takes no more than 5 minutes, then you can proceed directly to replacing the equipment.
We are preparing to replace the cable, removing all unnecessary
Of course, the car must be stopped before replacement. Next, remove the filter bellows (Fig. 1). On a 16-valve valve, the corrugation is held in place by a clamp, but it will also be easy to remove.
Then, if we talk about 16 valves, it is better to remove the "intake muffler". The plastic box, when there is no corrugation, can be immediately moved to the side (Fig. 3).
The cable ends with a tip-rod on which a weight is attached. This detail was hidden from us by the corrugation.
Clutch cable end
We will unscrew the nuts:
- Take two “10” wrenches and unscrew nut 1, holding nut 2. If the thread is “sour,” clean it with a solvent;
- Unscrew nut 2, holding the pressed part of the tip with a “7” wrench.
Now the weight will be easy to pull out of the slot.
Why and when do you change the clutch cable on a Logan?
Intensive use of a vehicle inevitably leads to wear and tear on the components. The signal that the cable needs to be changed is the appearance of squeaks in the clutch pedal. The sound is especially clear in hot weather, after a long trip. There can be several reasons for a squeak:
- The clutch cable has reached its required service life and needs to be replaced.
- The pedal stop is very dirty and requires cleaning and lubrication.
- The release bearing has failed
- The basket is worn out.
The resource of the element depends on the intensity of driving, as well as on the quality of the spare part. Replacement is an inexpensive procedure and no special tools are needed. Compared to other typical operations, such as replacing the end, installing a new cable is faster.
What is the cause of the squeak and how to eliminate it?
Creaking from the pedal during squeezing is often caused by a lack of lubrication in the system of mutually “contacting” parts. The source of sound is mainly observed in the clutch housing adjacent to the transmission unit. The sound is generated by the disc release fork. The lifespan of this mechanism is directly affected by the regular lubrication of the fork support rod, which, in the presence of a lubricating compound, ensures ease of squeezing of the clutch disc.
To eliminate the unpleasant squeak there is no need to dismantle the transmission. The problem is solved on the spot.
Let's take action.
- To do this, remove the cable that provides tension on the fork.
- Next, we begin dismantling the rubber protective casing in order to expose the fork.
- We apply a thick layer of special lubricant to the tip of a long screwdriver, which we apply to the support protrusion located on the fork. We repeat the procedure the required number of times until the assembly contains a sufficient amount of lubricant.
The mechanism is assembled using the reverse disassembly sequence. Today the Internet is replete with many videos on this procedure.
The operation is performed according to a single algorithm and does not depend on the type of engine of the Renault Logan car: 1.4 or 1.6 liter version.
Cable repair
Sometimes the assembly called the throttle cable can be repaired. First you need to remove it. The point is to make a new cable yourself by “transplanting” both ends onto it. The length of the new cable must also be selected correctly.
Transplantation
The cable loop suitable for K7 engines contains several parts. The assembly itself is disassembled, and the boss attached to the cable is sawed off.
Don't be afraid to saw the tip
The center of the boss can be drilled out, although the hole is present from the factory. The main thing is to make a countersink, otherwise it will be difficult to solder the cable.
Tip installation
The solder should be recessed into the recess.
Now let's learn how to deal with the T-shaped tip. In principle, the same technology is used:
- Drill out the cable fastening;
- We carry out countersinking;
- We fasten and solder the new cable.
All actions are explained in the photo.
Preparing T-Tips
Steel solders well. You just need to use active flux. Soldering iron power – 100-120 watts.
Site navigation
Yes, I almost forgot, I also need to adjust the throttle valve drive. We check what position the damper is in with the help of a friend or any persistent object like a stick, pressing the gas pedal and pressing the other end against the seat.
When the pedal is pressed, the damper is fully open, and when pressed in the opposite direction, it is closed well. If everything that I described does not happen, then during operation it is necessary to adjust the tension of the replaced Logan throttle cable.
How is this replacement done, YOU ask me? I’ll tell you that replacing the throttle cable is done like this: we remove the springy iron clamp from the slot and move the body, ensuring that the damper is fully open, and finally we fix the end by inserting the springy clamp bracket into its corresponding slot.
Drill out the cable fastening; We fasten and solder the new cable. All actions are explained in the photo. Preparing T-tips Steel can be soldered well.
You just need to use active flux. Soldering iron power - Watt. Any repaired cable is a temporary solution.
At the first opportunity, it is advisable to buy what is indicated in the chapter on articles. Adjusting the throttle cable The cable is adjusted as follows: Use pliers here. The steel bracket must be completely removed from the corrugation.
For this, pliers are used. The corrugation is moved forward or backward - there are no other options.
There is no tension when the gas pedal is released. The damper is completely closed; The cable should not sag.
It is necessary that with the slightest pressure the damper begins to open. The correct setting will result in minimal cable slack. And this result can always be achieved.
Transplantation
The cable loop suitable for K7 engines contains several parts. The assembly itself is disassembled, and the boss attached to the cable is sawed off. Don't be afraid to saw the tip. The center of the boss can be drilled out, although the hole is present from the factory. The main thing is to make a countersink, otherwise it will be difficult to solder the cable.
The solder should be recessed into the recess.
- Drill out the cable fastening;
- We carry out countersinking;
- We fasten and solder the new cable.
All actions are explained in the photo. Preparing T-tipsSteel can be soldered well. You just need to use active flux. Soldering iron power – 100-120 watts.