Replacing the Renault Logan heater motor with your own hands (+ video and photos) In order to feel comfortable in the car at any time of the year, you need to monitor the serviceability of its heating system
In order to feel comfortable in a car at any time of the year, it is necessary to monitor the health of its heating system, or in other words, the “stove”. We are replacing the heater radiator with a Renault Logan. Such a system is responsible for the heating, cooling and air circulation functions in the cabin. How much can it cost to repair a stove for a Renault Logan? Hits How to remove radiator for a Nissan Primera p12 Since we haven’t yet created a car that is 100% protected from malfunctions, you should know how to do such work with your own hands as replacing a heater motor on a Renault
Logan.
Replacing the stove (heater) radiator Renault Logan + video
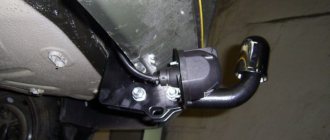
We fix the hose with a worm clamp with a diameter of 40 mm. Removing the radiator To access the heater radiator, you must first remove the lower trim of the instrument console. The console is secured on the sides with two spring latches.
How to Change the Heater in a Renault Logan Video
To remove it, we proceed as follows: By prying the lining on both sides by the lower edges, we snap them out of the mounting sockets. We pry out the lower edges of the instrument console trim from the mounting sockets. We remove the lower trim and gain access to the heater radiator. We remove the lower trim of the instrument console. Use a flat-blade screwdriver to remove the plastic latch that secures the carpet on the left side under the radiator, then move it to the side.
We unscrew the bolts securing the cross beam bracket. We take out the wiring harness from the plastic holder in the upper part of the bracket and move it to the side. In the previous figure, the plastic holder is visible, but without the wiring harness.
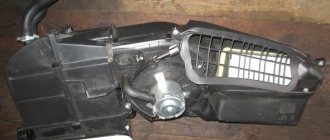
When you remove the bar, don’t rush, you still need to disconnect one wiring harness. After removing the strip we had access to the heater core. We unscrew the three screws under the Torx T. Having placed a rag under the replacement of the heater radiator for Renault Logan video, we take it out.
We bend the latches and remove the radiator.
Video Review of Renault Megane Hatchback New Renault Megane - premiere is just around the corner The debut of Renault Megane will take place on September 15 this year at the Frankfurt Motor Show. The car will be presented personally by the company's CEO, Carlos Ghosn.
In the meantime, Renault has made an easy and, admittedly, not entirely planned announcement of a new product that will soon be presented. VAZ Rear hubs and their replacement Rear wheel bearing On a VAZ, the bearings of the rear assembly play an important role, and without them, about any normal functioning of the car, I think it’s not worth it.
On the VAZ rear hub bearings, over time, they are out of order, and then you need to replace them, which can be safely done by yourself. An air lock in the heat exchange system does not heat the radiator. The thermostat is faulty, the engine does not heat the fluid. The water pump is not working properly.
Logan's heater radiator is clogged. Engine malfunction. Weak air flow or no heat. The fan motor is faulty.
The main part of the work to replace this device involves dismantling the cladding. Leaks in heating radiators occur due to mechanical damage or corrosion. Most often, a leak occurs where the heat exchanger tubes are soldered to the radiator tank.
But if the radiator is subjected to shock or very strong and prolonged vibration, then cracks can occur anywhere in this device.
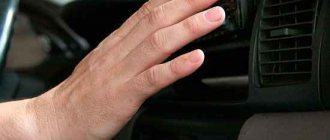
It takes a lot of time for these channels to become clogged with dirt to the point of complete obstruction, and this malfunction can only be identified by elimination. A gap opens, into which we penetrate with our hand and find the heater fan.
Step-by-step instruction
1. Pull the lower casing off the latches and remove it. We take it as shown below and pull it to the sides (towards the doors).
2. Remove the clip to move the carpet aside. The clip can be pryed out with a flat screwdriver.
3. We gained access to the bolts for fastening the strip that supports the rack, and the torpedo is already attached to this rack. The bar must be removed to gain access to the radiator.
Unscrew the two bolts that are marked in the photo below.
4. Squeeze on the sides and push the clip marked below inside. The wiring harness is secured to this clip.
5. Remove the ignition switch connector from the strip. We press the latch and tighten it.
6. After removing the connector, we gain access to the nuts securing the bar. Unscrew the fastening nuts and remove the bar.
When you remove the bar, don’t rush, you still need to disconnect one wiring harness.
7. After removing the strip, we had access to the heater radiator.
8. Unscrew the three Torx T20 screws.
9. Place a rag under the pipes and take them out.
10. Bend the latches and remove the radiator.
The latches literally do not bend, you just need to press them and remove the radiator.
11. Before installing a new radiator, it is advisable to blow out the seat with compressed air or clean it manually.
12. Replace the O-rings on the pipes. After replacing the rings, lubricate them a little so that they fit into the radiator easily.
13. Install the radiator.
14. Fasten the radiator with two screws.
15. Insert the pipes into the radiator and secure the retaining bar with a screw.
16. Next, fill in the coolant, bleed the system, and remove air. We check for leaks in the pipes.
17. If there are no leaks, install a metal strip and the rest. I don't think this needs any details.
Video lesson
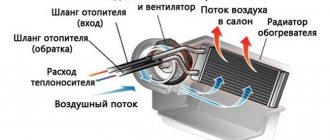
The heater (heater) radiator is part of the heating and ventilation system of the car; it provides comfort and coziness in the interior of your car during the cold season. The heater is connected to the engine cooling system. To heat the air in the stove, the heat generated when the engine heats up is used. Heat from the engine to the heater radiator is transferred by antifreeze circulating inside the cooling system. An electric fan blows on the heater radiator and directs the heated air through the air duct system into the car's interior. If the cooling and heating systems are working properly, the inside of the car should be warm even in severe frosts.
Read more: Car battery sizes table
Diagnosis of heater radiator malfunction
Replacing the heater radiator may be required in two main cases:
- radiator leak. Signs of a leak are the appearance of antifreeze on the carpet in front (under the feet of the driver and passenger), as well as a drop in the coolant level in the expansion tank;
- ineffective operation of the radiator caused by its clogging. In this case, with the engine warmed up to operating temperature, the heater heats up weakly, and the air flow from it becomes hot only at high engine speeds.
If you identify these malfunctions, you should not be upset; you can do the work of replacing the stove radiator yourself in a garage.
Removing the heater system
Most Renault Logan owners are convinced that replacing the heater motor requires completely dismantling the front panel. Power steering fluid reservoir on the new Renault Logan (editorial photo of the car) How to remove the radiator of the Nissan Primera P12 heater The same position is described in the car repair and operation manual. Logan Renault Club • View topic - how to remove the heater radiator in a Logan Since such a process is quite expensive and inconvenient, many owners prefer to leave this problem unresolved. Since the operating manual (instructions) does not contain this information about the names of all liquids poured into Renault Captur, I therefore decided to collect information that is available on the Internet and in various forums. How to put on and install covers on a Renault Duster: photos and videos News How to remove the wing on a Renault Sandero However, in fact, to dismantle the housing with the heater fan it is enough to unscrew only a couple of screws. How to change the oil in the Renault Logan power steering? Everyone knows about the need to periodically replace vehicle fluids. You can handle a similar task with your own hands.
Radiator replacement
heater for
Renault Logan
, Sandero, Lada Largus Great knowledge about Renault
Why the stove
does not heat well on
Renault
Logan Sandero, Lada Largus, Nissan Almera G15, you can find out from this...
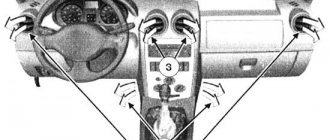
But at the very beginning, make sure that the cabin filter is clean; sometimes, due to its contamination, air cannot get into the cabin. How to change the thermostat on a Kalina Rogozin Sergey The filter is installed on the right side of the front panel.
Causes of failure
There are three main reasons why a radiator can fail. The first and simplest is elementary pollution. The honeycombs regularly become clogged with dust and small debris. This leads to worse heat transfer. The simplest solution to the problem is to clean the radiator. You can use a regular stream of water. If you want a better result, resort to chemical compounds. The main thing is that they do not destroy the metal from which the radiator itself is made. Naturally, for the highest quality cleaning, it is recommended to completely dismantle the unit.
The second problem is clogged channels. If you use low-quality coolant or a composition not recommended by the manufacturer, various deposits will appear on the walls. You can get rid of blockages using special cleaning products. However, the blockages can be so large that in some situations replacing the Renault Logan air conditioner radiator or stove radiator will be easier and more profitable.
The third and most dangerous malfunction is cracks, ruptures and other types of damage. Many auto repair shops offer restoration services. Small holes can indeed be “patched”, although the quality of workmanship is important. But to fully guarantee performance, it is recommended to purchase a new radiator and replace the damaged one.
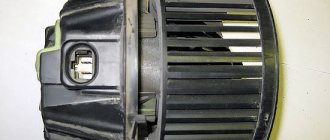
DIY stove motor repair
Typically, failure of the stove fan is caused by high wear on the motor brushes. In order to replace them, you just need to press out three latches, or use a Phillips screwdriver and unscrew 2 bolts.
The easiest way to bend the latches is with a flat-head screwdriver.
After access is opened, we check the condition of the brushes and replace them if there is high wear.
The location of the brushes is marked with a marker.
Dimensions for brushes: 4 by 4 mm, and length up to 2 centimeters. If you find any that are longer, you can sharpen them. After repairs, it is necessary to lubricate all rubbing elements with high-temperature oil.
If the malfunction is related to a technical part, the housing has collapsed or individual parts have burned out, then the entire element must be replaced with a new one.
Installation of a repaired or new part should be carried out in the same way as removal.
Reasons for replacing heating radiators in Renault Logan
There may be two reasons why a car owner will have to change the heating radiator:
- The heater radiator is leaking;
- The heater radiator is clogged.
Leaks in heating radiators occur due to mechanical damage or corrosion. Most often, a leak occurs where the heat exchanger tubes are soldered to the radiator tank. But if the radiator is subjected to shock or very strong and prolonged vibration, then cracks can occur anywhere in this device.
Leaks in Renault Logan heating radiators occur from mechanical damage and strong vibration
Clogged radiator channels are the second reason for replacing the radiator. It takes a lot of time for these channels to become clogged with dirt to the point of complete obstruction, and this malfunction can only be identified by elimination. If all components of the heating system are working normally, but the stove still does not heat, then the problem is a clogged radiator, which is time to replace.
If the Renault Logan radiator is clogged, it is almost impossible to wash it
- Antifreeze is drained from the cooling system.
The lower cover of the instrument panel is removed.
- By moving the carpet under the dashboard, the two mounting bolts are unscrewed, securing the reinforcement of the panel cross member to the base of the body.
- The instrument cluster is dismantled.
- After removing the instrument cluster, you will see a window in the dashboard. It is necessary to unscrew the nuts (2 pcs.) that secure the reinforcement of the dashboard cross member.
- The gain is removed.
- The bolt that secures the clamping bar, the antifreeze supply and discharge pipes, and the pipes is unscrewed.
- The pipes are disconnected from the radiator block.
- The bolt securing the radiator unit to the heater body is unscrewed.
- We take out the radiator block from the base; in this case, it is necessary to press out the clamps on the sides and the upper plastic stopper.
- The new radiator is installed in the opposite order of removal.
Antifreeze is poured in, the car is warmed up and the connections are checked for leaks and the heat dissipation of the stove.
In some cases, it is necessary to remove the heating and air conditioning control unit.
Removing and installing the control unit
The block removal process occurs in the following order:
- The negative terminal is disconnected from the battery.
- The main dashboard trim is removed.
- Unscrew the two bolts securing the dashboard of the control unit.
- Pull the control unit towards you and disconnect it from the supplied wires.
- The air damper cable is disconnected.
- The drive cable for the recirculation flap is disconnected; it is located on the left side in a green sheath.
- The temperature adjustment drive cable is disconnected and is located on the right side in a white sheath.
- The control unit can be easily removed.
Installation of the block occurs in the opposite order of removal.
Reasons for replacing heating radiators in Renault Logan
There may be two reasons why a car owner will have to change the heating radiator:
- The heater radiator is leaking;
- The heater radiator is clogged.
Leaks in heating radiators occur due to mechanical damage or corrosion. Most often, a leak occurs where the heat exchanger tubes are soldered to the radiator tank. But if the radiator is subjected to shock or very strong and prolonged vibration, then cracks can occur anywhere in this device.
Leaks in Renault Logan heating radiators occur from mechanical damage and strong vibration
When replacement is needed
This part is not included in the list of consumable items, so the automobile manufacturer does not make any requirements regarding the frequency of replacement. From a technical point of view, the radiator is designed for the entire life of the car. The only reason a replacement may be needed is if the stove is not working properly or has some other symptoms.
Several signs indicate a broken heater core:
- Fogging of glass. If the windows in your car regularly and very heavily sweat, then it is possible that very heated coolant entered the cabin, which led to the formation of a large amount of condensation.
- The appearance of a cloying fruity smell in the cabin, most often melon. This is what coolant smells like. When it leaks, there will be a corresponding aroma in the cabin. Typically, the leak can be found under the car itself, even if it is relatively small.
- Reduced coolant level. Wherever the leak occurs, it will affect the amount of coolant, so be sure to check the coolant level regularly.
- A noticeable drop in the efficiency of the stove. If in relatively mild frosts the stove does not heat the interior, it’s time to diagnose, prevent or repair the system.
- Motor overheating. An indirect sign indicating the low efficiency of the cooling system, which in turn is not capable of fully cooling the internal combustion engine due to damage to the heating radiator.
In most cases, these signs are enough for general diagnosis. The final conclusion can be made only after a visual inspection and a leak test. We will talk about this further.
How to Change the Heater in a Renault Logan Video
Renault oven does not work Logan
Despite the fact that the Renault Logan is a fairly reliable car, some owners may still complain that the stove does not warm up in winter. Design of the idle speed sensor and Renault Logan, how to replace the sensor. Naturally, there are reasons for concern, and they are due to the fact that in the terrible Russian winter you need warmth in the cabin. Have you been looking for how to remove a bumper on a Renault Logan video? Watch the detailed video and read useful information here! How to remove a fan for Renault Megane 2. Renault owners are concerned about a number of defects associated with a poorly functioning heating system. Now we will study all the prerequisites for defects in the heating system, and also try to give advice and ways to eliminate them.
Causes of heater malfunction
If the inside of your Renault Logan is getting colder, you don't have to feel depressed or anxious as most furnace faults can be fixed independently. So let's find out which harms are most common among older people. Renault Logan related to the operation of the interior heater.
- The air seal in the heat exchange system does not heat the radiator.
- The thermostat is faulty, the engine does not heat the fluid.
- The water pump is not working properly.
- Logan's hammer began to hammer.
- Engine malfunction.
- Low air flow or no heating at all.
- Faulty fan motor.
- The fan speed controller has failed.
- Renault mixer does not work.
The most common malfunctions in the heating system are listed above. Renault Logan . Next we will talk about each problem separately.
Problem solving
To troubleshoot the heater heater , we will try to reveal the essence of each of them.
- An air gap in the Renault heating system can be caused by early replacement of antifreeze. As a rule, the cooling system of a Renault Logan car is designed to automatically remove air pockets. The video guide shows how to replace the timing belt and drive belt for the Volga Cyber with your own hands. Despite the perfection of this design, air pockets still appear, usually during cooling. You can remove the air lock on Renault Logan in one simple way. Removing the front bumper on a Renault How to securely fasten the bumper, part 1, p. No. 196. Disconnect both pipes from the internal heat exchange, and then, connecting each pipe in turn, pour coolant into the expansion tank. After such manipulations, the antifreeze should flow through the opposite tube, after which the second hose should be inserted. How to remove and install thresholds on Renault Duster: photo. Usually after such actions the oven heats up noticeably better.
- If the thermostat does not work on the Renault Logan, the engine does not receive the desired operating temperature and the coolant cannot heat the heater core. It is enough to solve this problem by changing the thermostat, fortunately it is not difficult. The thermostat housing is located at the bottom of the cylinder head next to the gearbox housing.
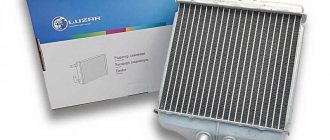
Replacing a radiator for Renault Logan, Sandero, Largus
replacement
heater radiator included
Renault Logan
, Sandero, Lada Largus Kaifu Knowledge Renault
Replacing the heater fan (hob) for Renault Logan, Sandero, Duster, Lada Largus
Video details
- instructions for removing and installing a heater fan (
furnace
, air conditioner) without disassembling.
Warning! Before performing this work on the Renault Logan, you must first pour the antifreeze into a separate container.
- If the Renault Logan water pump is not working properly, it does not create the proper pressure, the coolant cannot enter the radiator and therefore does not heat the air. A detailed article on how to replace a low beam headlight on a Renault Duster can be found in the following articles: video and photos, tips on replacement and selection. This problem usually causes the engine to overheat, so the water pump needs to be replaced immediately. Make a video review of how to remove and install the front bumper on Renault Logan and Lada Largus cars. In order to change the water pump, it is necessary to disassemble the gas distribution system in advance and drain the antifreeze.
- If the vehicle has not previously been used properly and water has been added to the system instead of antifreeze, corrosion products can clog the cabin heater core, which in turn will negatively affect its operation.
Unfortunately, cleaning the radiator of the Renault Logan heating system is impractical. How to replace generator bearings on Renault Logan 1.4-1.6 (2008-2014). Replacement instructions, catalog number, dimensions. Video description of how to replace all the lamps in an improvised Renault Logan headlamp. This part needs to be changed.
Design and meaning of the node
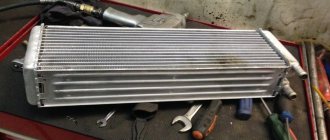
From a design point of view, the stove is a special, ordinary heat exchanger that performs the function of transferring heat from the coolant to the environment. In this regard, it is practically no different from the main radiator, which performs a similar function. This particular radiator is connected to the cooling system in parallel. For this purpose, the design has special fittings through which the coolant enters the stove and transfers heat to the cabin.
The product is made in the form of an oblong honeycomb. This design is considered classic, and it is this design that allows for the most efficient transfer of thermal energy from the coolant to the environment. The required inlet and outlet valves are used to supply and discharge coolant, respectively.
The main radiator operates in a large circuit, while the heater radiator operates in a small circuit. When the car starts, the small circuit is started first, when the coolant flows from the engine to the small radiator and back. Due to this, car owners can turn on the heater immediately after starting the engine.
Most models have a special expansion tank and a steam outlet line. They are necessary in order to remove excessively superheated water and generated steam. Many drivers ask a logical question - why can’t they use the heat that is released from the main radiator? The fact is that the air with which it is blown is not cleaned in any way; accordingly, it contains dust and other pollutants.
Having a separate radiator with fan and filter not only improves the safety and cleanliness of the air, but also allows you to regulate the heat level. It is possible to implement such a system based on a large radiator at the front of the car, but it will be too complex and ineffective. Also, do not confuse the radiator of the Renault Logan air conditioner with the heat exchanger for the stove. These are different parts in the car, and the latter contains a capacitor, to be precise.
Naturally, if the heating radiator is damaged, the stove will function with low efficiency or will not warm up the interior at all. Moreover, a coolant leak can cause a wide variety of problems. Ultimately, it will not be enough to cool the engine, which will lead to overheating and all the ensuing consequences. For example, overheating for 20 minutes can cause:
- deformation of the cylinder head;
- the appearance of cracks in the cylinder head,
- burnout of the cylinder head gasket;
- destruction of the interring septum;
- destruction of seals.
In this regard, you should not be careless about stove breakdowns, especially if it is related to the radiator itself.
Replacing the stove radiator
Before starting repair work, you must remove the negative terminal from the car battery.
Since replacing the radiator will require draining the coolant (antifreeze) from the cooling system, it will be most convenient to carry out repair work in an inspection hole. The car engine must be completely cool.
What tools will you need?
To work you need:
- screwdrivers with flat and Phillips blades;
- Torx key T-10;
- socket wrenches “10” and “13”;
- clean container with a volume of 6 liters.
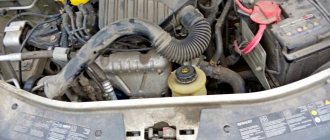
Removing the engine protection
The Renault Logan car does not have special drain holes for replacing antifreeze. The coolant is drained through a hose removed from the lower radiator pipe. To access this hose, you will need to remove the protection at the bottom of the engine. For this:
- Using a 10mm socket, unscrew the mounting bolts (6 pieces), indicated by arrows in the figure.
Unscrew the engine protection mounting bolts
We take out the engine protection: it’s convenient to do this together with an assistant
Coolant drain
To prevent loss of antifreeze during draining, it is advisable to use a wide container, for example a basin, with a volume of 6 liters or more.
When draining antifreeze, be careful and wear gloves. Antifreeze contains a toxic substance, ethylene glycol, which if ingested causes serious poisoning, and upon contact with skin can cause severe irritation.
The procedure looks like this:
- To relieve excess pressure in the cooling system, open the cap on the expansion tank, then close it again to reduce the initial rate of antifreeze leakage during draining.
- We find the lower radiator pipe and place the prepared container under it.
Find the lower radiator pipe and the hose clamp
Disconnect the lock of the fastening clamp
Unscrew the cap of the air bleeder from the cooling system
We fix the hose with a worm clamp with a diameter of 40 mm
Removing the radiator
To access the heater radiator, you must first remove the lower trim of the instrument console. The console is secured on the sides with two spring latches. To remove it, proceed as follows:
- By prying the cladding on both sides by the lower edges, we snap them out of the landing slots.
We snap out the lower edges of the instrument console trim from the mounting holes
Removing the lower trim of the instrument console
Carefully move the carpet to the side
Unscrew the bolts securing the cross beam bracket
Unscrew the nuts securing the cross beam bracket
We take out the wiring harness from the latches and remove the bracket
Unscrew the screw securing the pressure plate of the radiator tubes
Removing the tubes from the radiator
Carefully remove the two screws securing the radiator
We press out all the plastic latches
We remove the radiator from the heater - the goal is achieved
Installing a new radiator and reassembling the removed parts
We install the new heater radiator and parts removed during disassembly in the reverse order:
- Before installing a new radiator, wipe the internal cavities of the heater dry.
- We must replace the rubber sealing rings on the radiator pipes with new ones. Usually these rings come with the purchased radiator.
Be sure to replace the rubber O-rings with new ones
Related Posts
We unscrew the screw securing the pressure plate of the radiator tubes. Before removing the tubes from the radiator, place a dry rag underneath it to collect the remaining antifreeze. We disconnect the tubes from the radiator pipes and move them forward.
We remove the tubes from the radiator. Use a Torx T wrench to remove the two radiator mounting screws. This allows access to the heater bracket with two bolts.
The two upper bolts of the heater bracket are unscrewed with a 14 socket socket. Behind the heater bracket there is an electrical wiring harness. It is held in place by plastic latches at the bottom. They are opened manually, after which the harness is carefully removed from behind the bracket. It is tightly placed on the radiator tubes and screwed to them.