Repair / From Igor Taranenko
- Features of the Chevrolet Lanos interior heating system
Design and operation of the stove - Stove controls
- Video: main malfunctions of the Chevrolet Lanos stove
- Video: replacing the heater radiator with dismantling the dashboard
A comfortable microclimate in the interior of any car is maintained by a heating system or stove. Another function of this system is to prevent glass from fogging and freezing. The central element of the stove is the radiator. Any malfunction can lead to very unpleasant consequences, especially in the cold season.
Functions, structure and principle of operation of the stove radiator
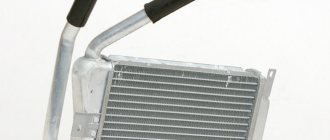
The radiator (convector, heat exchanger) of the stove is the most important component of the interior heating system of any car. The stove ensures the creation and maintenance of a comfortable temperature for the driver. This is especially true during the cold season. In addition, the heater prevents fogging of car windows.
The heating system consists of the following components and parts:
- frame;
- stove radiator;
- heat exchanger pipes;
- control valve;
- fan;
- electric fan motor;
- air ducts and distribution dampers.
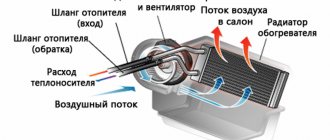
The heating system heats the air entering the cabin.
The role of the coolant is played by antifreeze circulating through the cooling system. When the power unit is warmed up and the coolant temperature reaches 50 °C, it can be used to heat the passenger compartment. Depending on the position of the tap, a certain amount of hot antifreeze enters the radiator. The fan directs air flow from the engine compartment into the passenger compartment. This air passes through the radiator honeycombs, receiving heat from the heated antifreeze. The more antifreeze passes through the heat exchanger, the more heat is transferred to the air. The flow of heated coolant in the radiator can be adjusted using a tap.
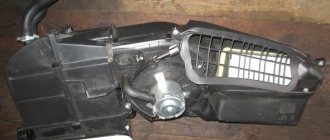
The Chevrolet Lanos heater radiator has a fairly simple design
Depending on the car model, the air temperature in the cabin is regulated in various ways - by a control valve, fan rotation speed and the position of the air dampers. The heated air flow is regulated and distributed in different directions. By directing warm air onto the windshield and front side windows, you can prevent them from fogging up. Using the flaps, you can direct air to the area of the legs, face and certain places on the side windows. Blowing the windshield is also necessary to create slightly increased pressure so that dust and dirt from the street do not enter the cabin. This ensures the most comfortable microclimate for the driver and passengers.
The design features of the heater somewhat limit its operation. So, the stove cannot be turned on when the engine is cold.
You need to wait until the coolant heats up to 50–60 °C. Otherwise, the engine will take much longer to warm up, especially in severe frost. In addition, due to the increased humidity in the cabin, the windows will begin to fog up. Therefore, water and air heaters are sometimes installed as additional ones. This depends on the design features of the heating system of a particular car model.
Features of the Chevrolet Lanos interior heating system
The design of the Chevrolet Lanos heater is similar to most interior heaters of other cars. Its design provides for both independent and combined heating of the interior with air conditioning.
The radiator is installed under the casing of the middle part of the center panel, located between the driver and passenger.
In Chevrolet Lanos, the heater radiator is located under the casing of the middle part of the central panel, located between the driver and passenger
There is no control valve, so when the engine is running, antifreeze constantly heats the heat exchanger.
Construction and operation of the stove
The Chevrolet Lanos heating system includes the following components.
- A damper that distributes air flow into the interior or onto the windows.
- Upper distribution air damper.
- Stove radiator.
- An air damper that regulates the temperature of the air flow.
- Air conditioner evaporator radiator.
- Fan with electric motor.
- Damper for changing the air supply mode (position A - recirculation mode, B - air supply from outside).
- Lower distribution air damper.
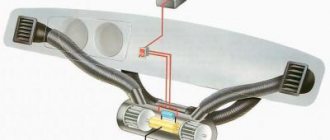
- Heater and air conditioner duct.
- Windshield blower pipes.
- Channels for blowing side windows.
The Chevrolet Lanos interior heating system can operate in various modes.
The amount of air supplied to the heat exchanger is controlled by the air control damper (4). Its position determines that part of the air flow that passes into the radiator (3) and heats up. In addition, the electric motor of the fan (6) also has several operating modes, increasing or decreasing the intensity of the air flow. Mixing in a certain proportion, heated and cool air creates a comfortable temperature for the driver.
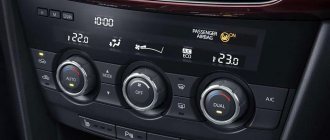
Stove controls
The heater is controlled by the following switches and controls located on the center panel.
- Incoming air temperature regulator.
- Fan operating mode regulator.
- Air distributor handle.
- Rear window heating switch button.
- Slider that controls the fresh air and recirculation damper.
- Air conditioner on/off button.
A comfortable microclimate in the cabin is set using six regulators of the control unit.
Fan operating modes are selected independently of the positions of other regulators. The dampers are adjusted using cables connected to them.
When is it necessary to replace the interior heater?
Replacing the heater radiator on a Lada Priora (with and without air conditioning)
Unfortunately, the design of the stove itself is not very reliable. Most often, the radiator mounts break, which leads to the passage of cold air. The nominal temperature drops and even at the extreme position of the regulator, cool air blows. Known issues also include the following:
- the radiator is clogged;
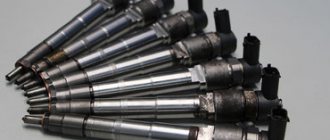
- leakage of working fluid;
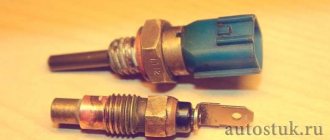
- problems with the thermostat.
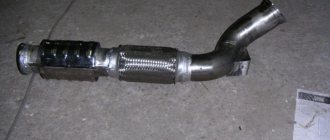
It is quite easy to identify damage in pipes. If stains appear and the amount of working fluid in the expansion tank decreases, you need to completely inspect the pipeline. If the low efficiency of the heating system is associated with a non-working thermostat, then the arrow on the instrument panel will be in the extreme position even when the engine is warm.
The heater radiator heats the air that is supplied to the cabin
Diagnostics and troubleshooting
Since all elements of the heating system are interconnected, finding out the cause of the malfunction can sometimes be quite difficult. Similar symptoms can occur for various reasons. In the cold season, the main sign of a malfunctioning stove is poor heating - cold or slightly warm air enters the cabin. This may happen for the following reasons.
- Engine cooling system thermostat malfunction. As a result, the antifreeze does not heat up to operating temperature. This can be checked without removing the thermostat. You need to touch the hose with your hand that goes from the thermostat outlet to the cooling radiator. If, after starting a cold engine, it immediately begins to heat up, the thermostat does not block the flow of coolant, allowing it to flow in a large circle through the radiator of the cooling system. If the thermostat is working properly, the hose temperature should increase gradually to 70–80 °C.
- The formation of an air plug inside the radiator, impeding the movement of coolant. The heater radiator stops heating, and the forced cooling fan of the main radiator often turns on. Getting rid of an air lock is quite simple. You need to stop the car on any steep incline or drive onto an overpass at an angle of 30–35 °C. Then you should open the expansion tank and, at idle speed, sharply press the accelerator pedal several times. If this doesn't help, the radiator is most likely clogged with dirt and deposits.
- Blockage of the heater radiator channels. Coolant flows through the radiator with difficulty or does not flow at all. A sign of this malfunction is a large temperature difference between the inlet and outlet pipes of the radiator. Most often, this situation occurs when using low-quality antifreeze. The easiest way in this case is to replace the radiator. However, you can try to wash it with special chemically aggressive solutions or citric acid. It is easy to prepare a solution of citric acid. 400 g of acid is dissolved in 1 liter of warm water, then another 3 liters of cold water is added, and the solution is poured into the radiator.
The radiator can be washed with special chemically active compounds or citric acid solution - Clogging the radiator honeycomb with leaves, fluff and other debris from the street. This does not allow air flow to pass through the radiator honeycombs and heat up. In this case, the temperature of the inlet and outlet pipes is almost the same. The problem can be solved by fully opening the dampers and placing a hose from a vacuum cleaner into the outside air inlet. A reverse draft is created and debris that interferes with air movement is removed.
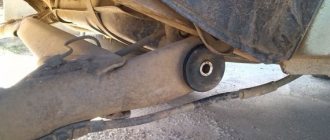
- Destruction of the radiator mounting. This creates a gap through which cold air, bypassing the radiator, enters the cabin. The radiator mount is designed extremely poorly. It is made of plastic, which due to low quality and temperature changes is easily deformed. To prevent this from happening, the radiator mount should be strengthened with additional devices.
Since the standard radiator mount is designed extremely poorly, it is reinforced with additional brackets - Violation of the tightness of the seams of the ventilation duct. As a result, cold outside air enters the cabin. The problem can be solved simply - the seams are filled with any sealant or closed with a sealant.
If the tightness of the seams is broken, sealant is applied to the joints of the central panel
Video: main malfunctions of the Chevrolet Lanos stove
When is it necessary to replace the interior heater?
Unfortunately, the design of the stove itself is not very reliable. Most often, the radiator mounts break, which leads to the passage of cold air. The nominal temperature drops and even at the extreme position of the regulator, cool air blows. Known issues also include the following:
- the radiator is clogged;
- leakage of working fluid;
- problems with the thermostat.
It is quite easy to identify damage in pipes. If stains appear and the amount of working fluid in the expansion tank decreases, you need to completely inspect the pipeline. If the low efficiency of the heating system is associated with a non-working thermostat, then the arrow on the instrument panel will be in the extreme position even when the engine is warm.
The heater radiator heats the air that is supplied to the cabin
Replacing the stove radiator
The heater radiator is the main problem of incorrect operation of the Chevrolet Lanos interior heating system. The easiest way to solve this problem is to replace the radiator. The work is quite complex, labor-intensive and expensive. When replacing a radiator, car service specialists completely disassemble the dashboard in the cabin.
However, the work can be done with your own hands without removing the dashboard. To do this, you will need an inspection hole or overpass and the following tools:
- a set of wrenches and sockets;
- Phillips and slotted screwdrivers;
- stationery knife;
- glue "Moment";
- platypuses.
To replace the radiator, you will need a standard set of plumbing tools.
The design and fastening of the heater body does not depend on the presence of air conditioning in the car. Therefore, for all Chevrolet Lanos models, the procedure for replacing the heater radiator is the same.
- The car is driven into a viewing hole (the best option).
- The front seats are removed. To do this, 4 bolts are unscrewed under each of them.
- The seat belt sensor is disconnected under the driver's seat.
- Three self-tapping screws are unscrewed and the plastic gearbox cover is removed.
- Two self-tapping screws are unscrewed and the handbrake housing is removed.
When replacing the heater radiator, the front seats, plastic covers of the manual transmission and hand brake are removed - The gearbox linkage mounting clamp is removed from the inspection hole.
To remove the gearbox control rod from the inspection hole, it is necessary to remove the clamp - The pipe through which the condensate from the air conditioner is drained is removed.
To remove the manual transmission control mechanism, remove the condensate drain pipe - The four fastening bolts are unscrewed, and the gearbox lever together with the rod is removed from the passenger compartment.
The gearbox control mechanism can only be removed from the passenger compartment - The fastening nuts and bolts are unscrewed, and the side panels connecting the center panel casing to the body are removed.
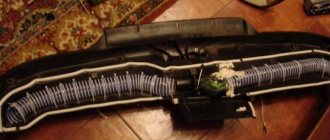
The sidewalls connecting the center panel casing to the body are removed, and the casing itself is released. - The lower part of the distributor, which directs air flow to the leg area, is removed. To do this, unscrew three screws - two at the top near the radio and one at the bottom. If the tourniquet gets in the way, use a screwdriver to tighten the tendrils of the clip, and the tourniquet is pulled out of the hole.
The lower part of the distributor, which directs air flow to the leg area, is secured with three self-tapping screws - The lower part of the heater housing is dismantled, which is secured with 10 screws. Only 8 are unscrewed, since 2 screws were already unscrewed when the distributor was removed. Since the design does not provide for such a dismantling option, you should remove the casing in a confined space extremely carefully and carefully so as not to damage it.
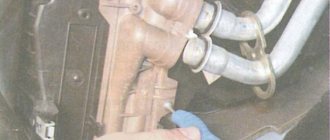
To remove the lower part of the stove housing covering the radiator, eight screws are unscrewed - Access to the radiator is provided. Before removing it, it is necessary to drain the coolant from the system and disconnect the pipes through which antifreeze enters the radiator.
- The radiator is released from the latch located outside. In addition, the bracket is removed from the back. After this, the radiator can be removed.
To remove the heater radiator, you need to disconnect the bracket and latch - Having gained access to the damper that regulates the temperature, its functionality is checked. It may not completely block the flow of cold air when the temperature control is set to the maximum position. In this case, you can stick a seal on it or adjust the control cable.
If the damper does not completely block the flow of cold air, a sealant is glued to it
Installing a new or flushed heater radiator is done in the reverse order.
The radiator can be replaced in another way. To do this, you will need to remove and remove the dashboard from the interior. This operation can be performed on your own in half an hour, without removing the front seats. The dashboard is removed from the passenger compartment along with the stove body, providing access to the elements of the passenger compartment heating system.
Video: replacing the heater radiator with dismantling the dashboard
Choosing a new heater radiator for Chevrolet Lanos
For Chevrolet Lanos, a heater radiator from the Chevrolet Sens model, which has the same dimensions, is suitable. Heat exchangers can be purchased with a strip or plate cooling fin system. In addition, on the market you can find prefabricated strip-plate and tubular-strip brazed aluminum radiators from such manufacturers as NISSENS, AVA, NRF, DAC, GROG, KMC with the number of main tubes from 16 to 22. The cost of products can vary greatly depending on design, workmanship and manufacturer.
Thus, it is quite simple to repair and replace the heater radiator of a Chevrolet Lanos car, consistently following the instructions of professionals. All you need is free time and a standard set of plumbing tools.
Do-it-yourself repair and replacement of the Niva Chevrolet car heater
Do-it-yourself fault diagnosis and repair of the Daewoo Nexia stove
Analysis of a torpedo
1) First, disconnect the center console, move the front seats forward and unscrew the bolts (photo 1) and remove the body by lifting it up and pulling it out through the handbrake.
2) Unscrew the central screw that secures the back of the front part of the front console (photo 2) and two on the sides (photo 3).
3) The console must be pulled out carefully, having first disconnected the gas switch wires. Then raise the handbrake all the way and smoothly pull the console towards you to disconnect the cigarette lighter connector.
4) Release the steering ring. You need to unscrew the plastic panel under the steering column (photo 4), follow steps 4.1 and 4.2, and then remove the four nuts that will be behind the steering column (photo 5) and the fifth is hidden below the steering column (photo 6). Advice: to prevent the steering column from falling prematurely and crushing you, leave one nut attached several turns.
4.1) Remove the steering casing (photo 7), do not forget about the fasteners hidden behind the steering wheel (2 pcs.), to do this, turn the steering wheel 90 degrees (photo 8).
4.2) We remove the switches and turn off the signal (photo 9), the switches are removed by simply pressing the mount (arrow indicates).
5) Remove the upper sides (photo 10), to do this you need to pry them off with something.
6) Unscrew the top fastening (photo 11).
7) Open the side (photo 12) and unscrew the torpedo mounting nuts (photo 13), remove the lower side (photo 14).
 We unscrew the lower fastenings (photo 15), 2 more bolts are hidden under the mat on both sides.
9) Disconnect the torpedo electrics (photo 16).
10) Disconnect the hood cable (photo 17) (the hood must be open), it can be pulled out through the removed side of the torpedo.
11) Disconnect the wires (photo 18) of the heater motor and the heater speed switch, which are located behind the motor.
12) Unscrew the fastening of the torpedo to the stove (photo 19).
13) Remove the glove compartment (photo 20) and unscrew another self-tapping screw securing the dashboard to the stove (photo 21).
14) Remove the tape recorder and the stove control console. We disconnect the damper cables behind the glove compartment, the heater control console closer to the heater, and on the steering wheel side, unscrew the fastenings of the dashboard and air ducts (photo 22).
15) If all the previous steps are completed correctly, then by lowering the steering column and unscrewing the bolts that you temporarily left on the dashboard, you can remove it.