In previous posts on replacing the steering wheel and dashboard, I referred to the fact that I was faced with an unconnected airbag in the steering wheel and a non-lit dashboard light, this began an almost week and a half ninja journey, climbing the Internet, on d2, the first trip to the AvtoVAZ dealers for for the last almost 7 years of owning Russian cars.
But I would like to start a little differently, I want to form this post in the form of a detailed mini-review on the problems of airbags (Airbags), of which there are a lot of the same symptoms, but there are very few real answers to these questions (as my experience and surfing the Internet).
I also want to post this post in my BZ and in the VAZ Community, and in this community there are a lot of people who, despite having 0 entries in the BZ and Blog, and having no practice at all in unscrewing bolts, screws, nuts, and I’m not even talking about block electronics , with their advice and unnecessary flood opinions, they get into a real thread where people communicate about real problems (and this cannot be changed, unfortunately). The repair of an airbag specifically on my car by one of the previous owners of my car, as it were, shows the mentality of people, their technical literacy, dexterity and the number of specialists per square meter of our mother Russia. And the same people often write to me here that I am nothing important I don’t post it and all this information is absolute rubbish. In part, many of my posts are only review topics and do not pretend to be the ultimate truth, but even in such posts there are sofa wars, dreaming of a wheelbarrow, jerking off to a Mercy with a badge and having difficulty moving on a minibus at the same time. After fighting with such people and wiping off the fat leaking from my monitor, I can’t help but wonder if it’s really worth spending time on this and supporting D2 in the form in which it began its development, as a thematic resource with practical knowledge and experience, real experience, where it can be beautifully designed and decently presented. So after this shit, one gives up on generally engaging in this kind of reviews with information. Well, oh well, without a fat troll, a normal post is not a post, as they say.
Safety system
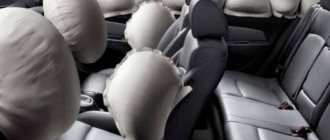
The Lada Priora has a built-in safety system that is activated in the event of a collision. This system is represented by an inflatable soft pillow that expands at the time of an accident. The Priora has 4 airbags: one for each passenger, including the driver. They operate only in the event of a sharp collision at a speed of over 20 km/h, so they never open accidentally.
The driver's airbag is located directly in the Priora's steering wheel, which can cause some difficulties when trying to remove or replace the steering wheel or its elements. If you are going to install a new steering wheel, then it is worth finding out a little about the features of the location of the cushion.
The design itself is quite simple and consists of the following elements:
- gas generator;
- pillows;
- control module.
In the event of a collision, a special sensor sends a signal to the module, which, in turn, turns on the gas generator. In about a second, the device fills an empty bag with nitrogen, which unfolds towards the driver.
If you bought a used Priora, check for the airbag: press just below the center of the steering wheel. A soft-touch center means the cushion is in place.
What to do when the security light comes on?
Any modern car is equipped with various safety features.
When the airbag light comes on, it clearly indicates that the airbags are not working at the moment. The icon can not only be constantly on, but also blink, like a check engine, thereby indicating a specific error code in the security system.
The SRS system, like any other complex automotive component, can fail due to the breakdown of a certain part or loss of reliability of the relationship between elements. This is exactly what happened to you if the airbag light came on on your dashboard, the indicator of which varies in different car models.
How do Prior airbags work?
The essence of the action of the gas-generating element located in the pillow is as follows:
- The gas generator itself will produce gas directly inside the module: it will fill the airbag.
- Here, a substance of pyrotechnic origin will be ignited with the help of a fuse, which is built into the body of this gas generator itself.
There are two types of gas generators:
- pyrotechnic;
- hybrid.
The first will consist of a body that will be filled with a solid pyrotechnic substance and the igniter itself. As for the second, it will consist of a casing material containing compressed gas of inert origin, as well as all the components already listed above.
The gas generator will operate according to the following algorithm:
- When struck, an electrical signal will be generated.
- The electrical resistance will heat up and ignite the pyrotechnic substance.
- The rest of the mass ignites.
Adjusting the airbag status
The status of the airbag on the Priora is regulated by a special sensor located on the dashboard. The light will indicate each existing fault. If it lights up, it helps to monitor the airbag data, as well as keep these systems in working order, which will be the key to saving the driver’s life on the road.
In the appropriate situation in which an accident occurred and the airbag was ejected, an appropriate replacement will be made. It should be carried out by a specialist, which will help avoid potential failure in a traffic accident.
Removing and installing the steering wheel on a Lada Granta car
Let's consider removing the steering wheel with an airbag, since without an airbag, removing the steering wheel is not particularly difficult and is performed in the same way as on models 2108-2110.
To complete the job, you will need a special airbag remover and a new steering wheel nut.
If you don’t have a puller, you can make one from an old slotted screwdriver with a blade width of 5 mm; to do this, you need to make a small groove in the middle of the blade.
1. Remove the terminal from the negative terminal of the battery.
On a vehicle equipped with an airbag, to prevent the airbag from deploying, wait at least five minutes after disconnecting the battery before continuing to operate.
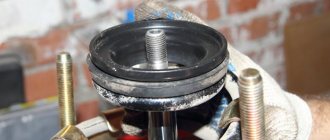
The driver's airbag is mounted on the steering wheel with two plastic hooks 2 and 4, Figure 1, and two positioning hooks 8.
The hooks of the pillow fit into the holes in the bracket for fixation 2 and are fixed with spring clips. The airbag latches fit into recesses 3 on the steering wheel.
We set the steering wheel to the “straight” position and, by removing the key from the ignition switch, fix this position.
Use a thin flat screwdriver to pierce the hole marked on the steering wheel.
We also pierce a hole on the other side of the steering wheel.
Using two screwdrivers, press out the spring clamps through the holes (in the picture with the airbag removed), pulling the airbag towards you, we remove the hooks of the airbag from engagement with the clamps on the steering wheel.
We pull the pillow towards ourselves, overcoming the resistance of the clamps, and remove it from the recesses of the steering wheel.
Move the airbag away from the steering wheel
Disconnect the horn wire ends
Use a screwdriver to pry the clamp out of the wire block
Disconnect the wire block from the airbag connector
Removing the airbag
The removed airbag should be stored in a place protected from moisture and excessive heat, with its cover facing up.
Installing the airbag is done in the reverse order.
We connect the block of wires to the airbag connector, insert the lock into the block.
We connect the wire lugs to the terminals of the signal switch.
We install the cushion on the steering wheel so that the cushion clamps fit into the recess of the steering wheel, and the hooks of the cushion fit into the corresponding holes in the steering wheel.
Press the cushion until the hooks of the cushion snap into place with the steering wheel latches.
In a factory or car service center, plastic wedges are used to remove airbags (Figure 10).
And devices for removing pillows are used (Figure 11).
Place the removed airbag module with the actuator down and away from the workplace.
Set the front wheels of the car to the straight-ahead position.
Using a 24mm socket, unscrew the steering wheel mounting nut.
We mark the position of the steering wheel relative to the shaft, for which we use a core to put a mark on the shaft opposite the triangle mark on the steering wheel
We tighten the steering wheel fastening nut several turns in order to avoid injury when the steering wheel is suddenly released.
While rocking, pull the steering wheel towards you and remove it from the shaft splines
Unscrew the steering wheel fastening nut and block the drum device from turning
To do this, remove the blocking plate from the holder on the steering wheel
We insert the blocking plate through the hole in the steering wheel hub into the slot of the drum device until it stops
How to remove the driver's airbag
Removing the driver's airbag is required in exceptional cases, and some of them are listed below:
- removing the steering wheel
- replacing an airbag after it has deployed
- replacing electric power steering
If for any reason you need to remove the driver's airbag on a Priora, you will need the following tool for this repair.
- 5 mm hexagon
- Thin screwdriver with flat blade
Procedure for replacing the driver's airbag on a Priora
Depending on the vehicle configuration, the Priora was equipped with either one or two airbags. This article will look at an example with a driver's AIRBAG.
Attention! Before performing any manipulations with the airbag, it is necessary to turn off the power to the car by disconnecting the battery terminal, and then wait at least 10 minutes. This is necessary so that the AirBag activator capacitor is completely discharged
Now you can start repairing. First of all, on the back of the steering wheel, you need to unscrew two 5 mm hexagon screws on both sides:
After which you can carefully lift the pillow up and move it slightly to the side.
Now we turn it over so that you can conveniently disconnect the power wires. Then, using a thin screwdriver, carefully pry up the pad retainer on both sides.
And we move the block away from the pillow, carefully lifting it up, as shown in the photo below.
Carefully, without sudden movements, remove the Priora pillow and put it aside. If necessary, we install a new one in its original place. If it was triggered, you will have to “reset” its control unit, or buy a new one. And only after that you can put the AirBag module in its place.
You should also be careful after installation. Reconnect the battery terminal
When you first turn on the ignition, you must do this in such a way that there is no person in front of the airbag (that is, you). This is necessary to avoid injury if it is triggered.
Video review on removing and installing the driver's airbag on the Lada Priora
To present this topic in the most clear and accessible way, you should familiarize yourself with the video review below, embedded from my channel.
priora-remont.ru
Abnormal operation of the Airbag indicator
If the engine is started, everything works like a clock, and the Airbag indicator remains on, which means that there is some kind of failure in the SRS passive safety system. It should be borne in mind that this does not mean that the pillows are not working! They can still work in the event of an accident. However, there is a risk of malfunctions in which your airbags actually do not work, or they work, but not all of them. This is why the Airbag indicator lights up red, which is why if it is not working properly, you need to go to a specialized car service center to diagnose the system.
A common cause of a constantly lit Airbag indicator is a simple lack of contact in the steering column slip ring. If the car was not purchased from a dealership and this indicator was always on, it makes sense to think about whether the airbags are in their proper place in this car at all? It would not have happened that they worked for the previous owner, but he did not bother to install new ones. In this case, we can only sympathize with you, since restoring airbags in a modern car can cost a considerable sum.
The following failure scenarios are also common:
- lack of contact with the airbag and seat belt;
- no response from the shock sensor;
- false activation of the airbag control unit as a result of battery disconnection (for example, as a result of an accident).
Regardless of the reason, we advise you not to put the problem of the airbag sensor on to the back burner, but to go to a specialized auto repair shop as soon as possible.
Removing seat belts with pretensioner
Unscrew the two screws securing the trim 1, Figure 15, of the rear door threshold, remove the trim.
Remove the trims and caps from the seat belt bolt heads.
Unscrew bolt 4, Figure 16, securing the belt branch 3 on the floor threshold.
Remove the lower trim 2 of the central pillar.
Disconnect block 1, Figure 17, from inertial coil gas generator 2.
Unscrew bolt 1, Figure 18, securing the seat belt bracket 2 on the central pillar.
Unscrew bolt 3, Figure 17, securing reel 2 and remove the front seat belt with the reel assembly.
Unscrew the bolt securing the front seat belt buckle to the seat bracket and remove the buckle.
Installing seat belts with pretensioner
Install seat belts in the reverse order of removal.
After opening the locks, seat belts must return from their working position to their original position freely without jamming.
Before installing the seat belts, remove the transport washers. The tightening torque of the seat belt bolts is from 18 to 32 Nm.
After completing work on removing/installing the components of the SNBP, connect the ground wire terminal to the battery.
When connecting the ground wire terminal to the battery, the ignition must be turned off. In this case, no one should be inside the car.
Check the functionality of the SNPB
For safety reasons, the first time you turn on the ignition on a vehicle with a replaced driver airbag module, proceed as follows:
– open the driver’s door;
– without sitting down on the seat, with your right hand, placing it under the steering wheel, turn on the ignition, while the head of the specialist performing this operation should not be between the steering wheel and the driver’s seat.
After turning on the ignition, if there are no faults, the diagnostic indicator (orange symbol) should turn on for 3-4 seconds and turn off.
Turn off the ignition.
When removing/installing the steering wheel by pressing the switches located in the horizontal spokes of the steering wheel, make sure there is a sound signal.
Troubleshooting
When srs is on, a strictly verified sequence of actions is needed:
- At first, the system works on its own - it checks its functionality when the ignition is turned on, and if an error is detected, it records its code;
- then the mechanic comes in - he reads the code and determines the cause of the breakdown;
- the system is checked with specialized diagnostic equipment;
- repair operations are carried out;
- The control unit memory is updated.
The Russian automobile industry does not stand still, and driver airbags have finally appeared in the basic configuration of the AvtoVAZ Priora model. This addition pleases not only the car owner, but also the diagnostician. Are you happy? Perhaps we'll put this word in quotation marks. This addition has only made the diagnostician's work even more work. And so, on an ordinary weekday day, a Priora’s car, covered in poplar fluff, which delights the residents of Yekaterinburg every summer, stopped by for our visit. We ask the client about the problem and immediately receive an answer: “Guys, the “pregnant man” light came on on the dashboard. This is what some people humorously call the airbag icon, but what it really looks like is