Parking sensor malfunctions and their elimination
Parktronic is a transceiver device.
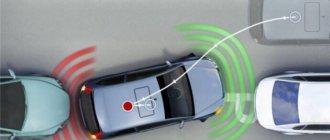
The purpose of this device is to detect unexpected obstacles in front or behind the vehicle and warn the driver about it. Parking sensors work on the principle of radar. That is, the device sends a sound signal in all directions, usually ultrasonic frequencies are used. The signal, encountering an obstacle, is reflected from it and returns to the parking sensor receiving device. In the parking sensor control unit, the signal is processed and the driver is given a warning about an obstacle that has arisen.
Structurally, the parking sensors are made in three versions:
- In the first case, it consists of a control unit, sensors, and connecting wires.
- In the second case, there are no wires.
- In the third, metallized tape is used instead of sensors. It is believed that such tape parking sensors are devoid of dead zones. It is installed on the inside of the bumper.
You can learn about installing parking sensors with your own hands in a practical guide: how to install sensors, equipment and conduct testing.
Basic parking sensor malfunctions
It doesn’t matter what kind of equipment the parking sensors are installed on, a car or a warehouse cart, the faults are, in principle, the same, except for minor insignificant damage related to the specifics of the car or cart.
- The first trouble that can happen to the device is a manufacturing defect. In this case, there is only one way to solve the problem - return the device to the manufacturer and get a new one.
- Parking sensor malfunctions most often occur in connecting wires, sensors or metallized tape, more precisely at the place where it is attached to the bumper of the vehicle.
- Much less often, a malfunction occurs in the parking sensor control unit. It must be said that the control unit is equipped with its own fault detection system. If it detects a malfunction, the driver is given a corresponding signal.
- Troubles related to water and dirt can happen to the parking sensors or tape. The sensor may also be damaged by stones caught in it. The parking sensor tape must be constantly cleaned of dirt and moisture. To do this you have to remove it and clean it, it’s worth cleaning the bumper at the same time. The sensor is not particularly afraid of moisture and water, but if it accumulates, moisture or water can damage it.
- The control unit most often fails if dirt, dust, or moisture gets on the printed circuit. A short circuit may occur. Block failures are rare. Determine the simplest, for example. short circuit, malfunction, you can do it yourself. The rest depends on the skill and knowledge of the parking sensor owner.
- Parking sensor wiring may become unusable if the wires are poorly secured. As a result, they may melt or break. You can call and replace the wiring or part of it yourself.
The main signs and causes of malfunctions of the parking sensor and its components
If the device begins to work incorrectly, this may cause unpleasant consequences for the car owner. The test can be performed if the user is aware of the causes and symptoms of the malfunction.
Why might the parking sensor not work?
Reasons indicating the need to diagnose and repair the device:
- Problems with wiring, electrical circuits are pinched or damaged. Depending on the type, the parking radar can be wired or wireless. If the device is wired, then there is a possibility of a break or pinching of the power lines, which will lead to problems in the functioning of the system. There will be interruptions in signal transmission.
- Errors made when fixing the device. If you did the installation yourself, the controller or touch strip may not be properly fixed. One of the mistakes that car owners make is to attach the sensor incorrectly, as a result of which it is directed not at potential obstacles, but upwards. When installing, the device must be properly fixed to prevent it from vibrating during driving, which will lead to distorted results.
- Factory defect, not a single electronic device is protected from this. The parking system includes several components, so a breakdown of one of them will lead to malfunctions of the entire device. If an electronic unit breaks down, the car owner is usually warned about this, while the breakdown of controllers is more difficult to diagnose.
- Negative effects of moisture and dirt on the controllers or control unit. When water gets on the sensors, the sensor elements begin to function intermittently. Therefore, when choosing a place to install the devices, you need to think about it so that they cannot get hit by a stone from under the wheel of a car coming from behind. And in humid weather, water should not settle on the devices. The electronic module must be placed in the passenger compartment so that it is not exposed to moisture or dust.
- Short circuit of the microprocessor module of the parking system. If a short circuit occurs on the microprocessor unit board, the device fails or functions intermittently. The cause of the short circuit may be contamination of the board or exposure to high temperatures.
Main signs of device malfunction
A damaged parking radar must be repaired after the first signs of damage appear. If the system was installed regularly during car production, then there should be a corresponding indicator on the control panel. The appearance of this symbol on the device may indicate a device malfunction.
If you installed the parking sensors yourself, you can determine the problem by monitoring its operation. When approaching an obstacle, the parking sensors will continuously signal the presence of an object or not react to it at all.
Sergei Lavrov showed what malfunctions can be encountered when purchasing cheap Chinese-made parking sensors.
Diagnostics and repair options
The system must respond to emerging obstacles.
If this does not happen, then the first thing to do is to clean the sensors or tape from dirt and moisture. They very often cause malfunctions of the device. You also need to clean the places where they are located. That is, the inside of the bumper under the tape and the sockets in which the sensors are installed. It doesn’t help - we inspect the transceiver devices.
If there is no damage on the metallized tape, then the cause of the malfunction of the parking sensor tape is in other parts of the device.
When you determine that the sensor is not working, you should first dry it, perhaps moisture just got into it. If so, then after drying it will begin to work normally, if not, we will open it, it is possible that the membrane is damaged, it can be replaced. But it is better to entrust the replacement of the membrane to a specialist, since such work requires skills.
A malfunction of the parking sensor control unit is probably the biggest problem with this device. You can only visually inspect the device yourself and check for a short circuit. To inspect the device's printed circuit board, you need to remove the cover.
It is possible that during the inspection the cause of the malfunction will be determined, for example, a coating of dirt or dust, or scale. Scale may indicate that radio components, such as capacitors, have become unusable.
The most common malfunctions and how to fix them
- Reverse gear is engaged, but the parking sensors do not give a signal. It is possible that the control unit is not connected to power or is not installed correctly, or the wiring is broken. In this case, we change the connection diagram and restore the integrity of the wiring. Be sure to check whether the grounding of the unit is reliable.
- The distance to the obstacle is determined incorrectly. It is possible that the sensors are dirty. The sensors need to be cleaned.
- The device often triggers on non-existent obstacles. It is possible that the parking sensors are set to high sensitivity or the sensors are dirty. It is necessary to reconfigure the control unit or clean the sensors.
- Parktronic does not detect any interference at all. It is possible that the device is set to low sensitivity, again the sensors are dirty, or the interference is in the so-called dead zone of the parking sensors. It is necessary to either increase the sensitivity of the device, or clean the sensors, rebuild the sensor installation circuit, or add, for example, a few more pieces to the existing circuit.
- The strip parking sensors experience the same malfunctions as parking sensors with sensors. The parking sensor tape may be damaged. Malfunctions can also occur if the location of the tape is dirty. There are malfunctions of the connecting wires and the parking sensor control unit. The steps for diagnosing the device and repairing it are, in fact, the same as when working with other types of parking sensors.
How to avoid parking sensor malfunctions?
First of all, you need to follow basic safety measures.
Sensors, metallized tape, wires, contacts must be inspected regularly; if dirt appears on the sensors and tape, it must be removed, as well as moisture. No moisture or dirt should accumulate under the metallized tape. Therefore, you need to periodically remove it and clean the inside of the bumper.
Dirt can also collect in the control unit; it is worth opening it occasionally and cleaning it from the dirt and dust accumulated inside. Please note that dirt, dust and water are excellent conductors of electricity, which means they can cause a malfunction.
It is necessary to strictly follow the recommendations and requirements set out in the parking sensor operating instructions. It is very important to correctly install and select the device, as well as fine-tune it. You can find out more detailed information about choosing parking sensors in the following detailed article. Following the instructions, correct installation, and fine-tuning of the parking sensors is the key to its long, trouble-free service.
Causes of malfunctions
There are a lot of negative factors that cause damage to the parking sensor. These include:
- Problems with wires (short circuit, loss of insulation, etc.). Any damage to the wiring causes the unit to malfunction, as a result of which it inaccurately measures the distance to the obstacle, exhibits false alarms, or stops functioning altogether. A similar malfunction occurs when the wires become loose or come into contact with hot mufflers.
- Mechanical defects. Appear as a result of external factors, including contact with moisture or dirt. Mechanical failure can also be caused by improper handling of the device or impact with a heavy object.
- Membrane damage. In this case, the system continues to work as before, but the driver does not hear a sound warning about approaching an object. The problem is resolved by replacing the sound source. You can buy a membrane at any car service center at an affordable price, and the installation process does not require much effort and takes a couple of minutes.
- Module failure. The inoperability of the radars may be due to damage to the module. This often happens when liquid gets inside the structure.
Diagnostics
Testing the car parking sensor is required when problems and errors occur:
- the device does not signal when reversing in a parking lot;
- false alarms of parking sensors occur, caused by vibrations due to unreliable installation of the sensor;
- unstable operation of the device due to temperature changes;
- Error messages appear on the parking sensor display after self-diagnosis.
Diagnosis of parking sensors can be performed in several ways. The first of them is checking for clicks produced by the touch controller included in the design. You can also detect malfunctions of the parking assistant sensors by vibration when touched or using a multimeter.
Click test
To check the parking sensors for functionality, you must first turn the key in the ignition and engage reverse to activate the system. Then you need to go to the bumper on which the touch controller is located. If it is working properly, you will hear a click. It is best to perform this operation in a garage or quiet place.
If you cannot hear the click, you can record it on a voice recorder or video camera with a sensitive microphone. If the click is clearly audible in the recording, then the sensor is working. You can also record the warning sound produced by the parking sensors inside the car. If there are no clicks or sounds, in both cases the rear parking sensor is faulty. It needs a more detailed check or replacement.
Vibration test
Some parking sensors can be tested for serviceability by vibration. In this case, you need to start the car engine by turning on neutral gear. After this, you should touch the controller housings. If they are working properly they should vibrate. It is worth considering that not all parking sensors can be checked in this way.
Using a multimeter
The condition of the car parking system sensors can be determined by resistance using a multimeter. Checking two-contact sensors using a measuring device is carried out as follows:
- The tester switches to ohmmeter mode at the 2 kOhm limit.
- The multimeter probes are connected to the terminals of the part.
- To check a three-pin sensor, you should alternately connect the probes of an autotester to each of its outputs.
If the resistance is in the range of 100-900 Ohms, then the sensor is considered to be working. If the meter reads 0, a short circuit has been detected.
If the resistance is infinitely large, a break is suspected due to the failure of the semiconductor components of the sensors.
You can test the parking system wiring with a multimeter to ensure its integrity.
How to replace
Replacing the parking sensor is necessary in cases where the part was damaged not by dirt or water, but by a collision with a stone or other heavy object at high speed. And even if the stone is small in size, when it hits the radar mirror, it damages it. In this case, the only solution is to replace the sensors.
In case of a complex breakdown, it is better to contact a car repair shop and entrust the task to experienced professionals. However, this course of events has one drawback. The service staff will offer to replace the failed part with an original model from the USA. And this will entail unjustified costs.
Therefore, it is better to implement the replacement yourself.
When choosing a suitable spare part, it is important to make sure that it matches the dimensions and parameters of the parking sensors.
By following a few rules and following the manual, you can quickly replace the part and restore the system.
How to determine that the parking sensors have stopped working?
Determining that the parking sensors have stopped working is quite simple. If your car has a parking sensor installed from the factory, there is an indicator on the dashboard that will indicate that it is broken. But if you installed an acoustic parking system yourself, then in order to identify a breakdown you should observe its operation. It will either be constantly silent until you crash into something, or it will constantly give signals about non-existent obstacles. But recognizing what exactly has gone wrong is a little more difficult.
How to disassemble
To disassemble the sensor, you need to know about its design and location. It is also necessary to understand the main causes of failure and how to eliminate them.
Today, there are three types of parking sensors available on the parking equipment market:
- The first is characterized by complex execution. It is a system of a control unit and wires connecting all the nodes together.
- The second type is equipped with similar parts, but there are no wires.
- The third type does not use classic sensors, but a metallized tape. Such models are characterized by high reliability and operating efficiency, because they have virtually no “dead zones”. Regardless of the location of the obstacle, the system will be able to notify the driver of the danger long before it approaches. Such devices are fixed on the inside of the bumper, which protects them from negative factors and accidental breakdowns.
Due to the simplicity of the design, there are no difficulties in disassembling the sensor. But before starting work, it is better to consult with a friend who has already dismantled and replaced the part.
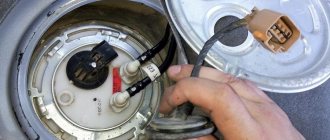
Initially, we disassemble the bumper and disconnect the terminals with wires from the old radar. If there were wires with it, they need to be disconnected from the control unit. Sometimes you have to dismantle the rear bumper.
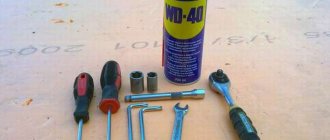
Required tools and materials
To create a parking sensor, some materials and tools are required. Cars for sale are often supplied with this option, which is considered one of the most useful. To carry out the work you need:
- The controller is called "Arduino Duemilanove". This device is represented by a hardware computer that processes all incoming information.
- Ultrasonic sensors that act as a device that determines distance.
- To protect important elements of the system, a plastic case or box is used. It is often placed in the luggage compartment.
- It is recommended to use special adapters to connect individual elements. The use of the soldering method complicates the installation and dismantling procedure.
- LED light sources. The diode is installed in a visible place inside the car. It acts as a signal by which the degree of proximity to various obstacles is determined. Instead of a diode, it can set a PWM signal timer.
- Bread board.
- Wires of the appropriate length, which are used to connect all elements. Connecting the parking sensors located in the bumper to the controller requires extensive wiring. The cable is laid under the body trim or various plastic panels.
- 9V power supply. In some cases, power is supplied from the standard radio or multimedia system, since they are turned on with the ignition.
To carry out the work, a soldering iron, knife, pliers and insulation are required. To remove the bumper and other elements, you need screwdrivers with different tips and a set of keys.
DIY repair
There are several situations in which repair of parking sensors is necessary. Step-by-step instructions for restoring a part depend on the cause and nature of the failure.
- If the system does not signal after engaging reverse, you need to check whether it is connected to a power source. The next reason may be improper wiring. To fix the problem, you should try to restore the ECU connection diagram and repair the power circuit. You will also need to check the grounding of the unit.
- If the accuracy of the data display decreases or the parking radar does not determine the distance to the nearest obstacle in time, it may be dirty. To prevent a collision with a foreign object, you must immediately clean the part from dust, dirt and water.
- If there are no traces of contamination, damaged wiring or other signs, but frequent false alarms of the sensor, you need to check its settings. Manufacturers often set high sensitivity, due to which the device reacts to the smallest objects.
- Common types of failures include the inability of the sensor to detect interference. In such cases, repairs begin with checking the parameters and cleaning the radar from dirt. Sometimes the device remains inactive due to the signal entering the “dead zone”. To solve the problem, you will need to rebuild the circuit or install additional nodes.
- If the car has parking sensors with a metallized tape, similar manipulations are performed with it. If there is no signal or frequent false alarms, it is enough to assess the external condition of the device and make sure that it is not dirty. Otherwise, you will need to clean the surface from dust, dirt or traces of liquid.
If repairing the device yourself turns out to be too difficult, it is advisable to abandon doing it yourself and turn to specialists for help. For residents of large cities such as Moscow, it will not be a problem to find the nearest service. But for representatives of remote settlements, visiting a car repair shop is often expensive. Therefore, the ability to repair your parking radar yourself is a good way to reduce costs and return the system to its previous functionality.
Circuit diagram on a microcontroller
This circuit diagram of the parking sensors corresponds to that shown in Fig. 1 functional.
The circuit diagram is assembled on an 8-bit microcontroller Z86E0208PSC brand ZiLOG (DD1). DA1 is a 7805 voltage stabilizer that provides +5 V power. A resonant amplifier is assembled using transistors VT1–VT3. Four ultrasonic emitters and receivers (BQ) are used.
A circuit based on a ZQ quartz oscillator (8 MHz) and capacitors C3, C4 is used as a timing circuit. Ultrasonic emitters are connected to pins 15-18 of port 2 of the controller. Pulse packets with a duration of 1 ms and an exciting voltage swing of 10 V are supplied to the inputs of the emitters.
Reflected ultrasonic waves are received by receivers BQ1, BQ5-7, connected to the input circuit of a three-stage amplifier using KT3102 transistors. From the output of the amplifier, the signal is fed to input P32 of the controller - the non-inverting input of the comparator. From the divider R1–R3, a reference voltage of +2.7 V is supplied to the inverting input P33. Additional protection against interference is provided by the limiting diode VD1 with capacitor C1. To limit the instantaneous values of the received pulse to levels of 0 and 5 V, diodes VD2 and VD3 are used.
The electrical circuit diagram of this parking radar involves connecting power to the vehicle's reverse lamp, left and right turn signals. This ensures that the system starts when reverse gear is engaged or the start of a lane change/turn.
The DA1 chip converts 12 V into the supply voltage of the Z86E02 MS + 5 V and stabilizes it. A filter is assembled on resistor R6 and capacitors C2, C8 and C13 to suppress interference. A 2.7 V voltage divider is implemented on resistors R1 and R5.
How to avoid breakdowns
First of all, you need to remember to periodically thoroughly inspect the working units and clean them of contamination. If traces of dirt appear on the surface of the sensors, they must be removed immediately. You will have to do the same with moisture.
If we are talking about strip parking sensors, it is necessary to pay attention not only to the external parts, but also to the internal ones. Dirt often accumulates under the housing.
Another vulnerable point is the control unit. It needs to be cleaned from time to time, being careful not to damage important components and working elements.
The key to long and trouble-free operation of the parking radar is the correct installation and connection of connections. However, it doesn't end with one installation. A high-quality setting of operating modes will be required so that the system responds to obstacles in a timely manner and the likelihood of false alarms is minimal.
Taking these recommendations into account, you can extend the life of the sensor, ensuring a comfortable and safe driving experience.
Parking sensors do not work correctly, a simple repair method
Parking sensors help the driver a lot during maneuvers and parking, but when they fail.
Hello, dear readers of the channel! I am very glad that you visited my channel, I hope the information will be interesting and useful to you.
Innovation inevitably fills our lives, more and more. Already, many drivers cannot imagine parking without electronic assistants - parking sensors. I'm not saying that this is bad, in the past perhaps experienced drivers would have laughed at this, but times have changed.
If anyone doesn’t already know, parking sensors are special ultrasonic sensors that are usually installed on the rear and front bumpers. They look like protruding circles around the perimeter of the bumper. Usually, 4 pieces are installed on each bumper. In the cabin, there is a special panel that displays the operation of the parking sensors.
The parking sensor control unit is usually installed near the bumper, trunk, or even inside the bumper.
There are several types of parking sensors. The main two types are ultrasonic (circles on the bumper) and tape.
Tape ones differ in the sensor design. The sensor is installed in the form of a tape on the back of the bumper, almost along the entire perimeter of the bumper. It creates an electromagnetic field and when an object enters the coverage area, it gives a signal to the unit, which in turn transmits readings to the display.
Tape parking sensors are considered the most effective, since their coverage area is larger than that of ultrasonic ones and, accordingly, the readings are more accurate.
Audi was the first to use strip parking sensors, and to this day most of their cars are equipped with strip parking sensors.
Let's move on to malfunctions and repair methods
.
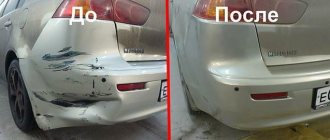
The parking sensor band begins to provide incorrect information or simply refuses to work, most often due to dirt getting on the band, poor contact of the wires, or peeling off from the bumper, either completely or partially.
Complete failure occurs more often due to an accident where both the bumper and parking sensors are damaged.
How can you repair the strip parking sensors yourself without special knowledge?
— First you have to remove the bumper. And find where the control unit is hidden (the Internet will help). We carefully examine all available contacts (maybe the chip is not holding well). We clean the belt from dust and dirt. If it wobbles and does not hold tightly, it must be secured so that it does not have free movement, otherwise the readings will be incorrect. If the tape is damaged and therefore does not work, order a new one online and install it in place of the old one.
- Why on the Internet? Much cheaper, but the product is the same. And you definitely shouldn’t look for original parking sensors for your car, you’ll just overpay for the same product!
As for ultrasonic parking sensors, things are a little more complicated with them. To make it clear, I am now talking about repairs that any person is capable of, so I will not go deeper into repairing the parking sensors or display unit. If my advice does not solve the problem, you can find more detailed videos on the Internet or just go to the specialist, thank you for your understanding!
So, ultrasonic parking sensors have 4 (on average) sensors on the bumper. 2 are responsible for the left side and 2 for the right.
Various malfunctions in the form of an audible signal from the parking sensors when there is no obstacle or it is far away. The sound signal not triggering, when there is an obstacle or not triggering constantly, etc. can be determined and “treated” as follows:
1. Wash all sensors thoroughly. Contamination causes incorrect operation. We check the work.
2. We check each sensor separately. Namely. We touch the sensor with our finger, it should emit vibration and a quiet clicking sound. If there is none of this, then this sensor is faulty.
3. Perhaps all the sensors are working, but the readings are still incorrect. Then you need to disconnect all the sensors (usually you don't even need to remove the bumper to do this) and make sure that they are all clean and dry. If not, clean and dry.
4. Another faulty sensor can be detected by sequentially disconnecting the sensors. For example, your parking sensors are faulty and see a non-existent obstacle. Turn on the ignition, reverse. Then, turn off the sensors one by one. If the glitch disappears when, say, 3 sensors are disconnected, it means it is faulty and needs to be replaced.
They are sold on the Internet, even individually, and cost pennies. While you are waiting for delivery, you can disconnect the faulty sensor and drive without it. The remaining sensors will continue to work.
5. Find the main parking sensor unit and check the connection of all the chips. If everything seems to be in good order, but the problem does not go away, you can disassemble the unit and visually verify that there are no burnt elements.
Perhaps a banal adjustment to the operation of the sensors is needed, but it is better to entrust this to specialists.
Keep your parking sensors clean and try not to drive your city car on dirt or off-road, and then the sensors will work well for a long time.
How does the parking sensor work?
Operating principle of parking sensors
Before we move on to the question of how to check the parking sensor, you need to understand how it works in general, since parking sensors come in two types - ultrasonic and electromagnetic. The former are more common. The principle of their operation is based on the fact that they emit ultrasonic waves and catch their reflection from an obstacle. The distance between the sensor and the interference is calculated by the main unit based on the difference in emission time.
Electromagnetic sensors are a tape that emits an electromagnetic field. The tape is installed on the inside of the front and rear bumpers. Such sensors are more modern and reliable, but quite expensive, so they are rare and only on premium cars.
Parking sensor malfunctions and their elimination
Parktronic is a transceiver device.
The purpose of this device is to detect unexpected obstacles in front or behind the vehicle and warn the driver about it. Parking sensors work on the principle of radar. That is, the device sends a sound signal in all directions, usually ultrasonic frequencies are used.
The signal, encountering an obstacle, is reflected from it and returns to the parking sensor receiving device. In the parking sensor control unit, the signal is processed and the driver is given a warning about an obstacle that has arisen.
Structurally, the parking sensors are made in three versions:
- In the first case, it consists of a control unit, sensors, and connecting wires.
- In the second case, there are no wires.
- In the third, metallized tape is used instead of sensors. It is believed that such tape parking sensors are devoid of dead zones. It is installed on the inside of the bumper.
You can learn about installing parking sensors with your own hands in a practical guide: how to install sensors, equipment and conduct testing.
Basic parking sensor malfunctions
It doesn’t matter what kind of equipment the parking sensors are installed on, a car or a warehouse cart, the faults are, in principle, the same, except for minor insignificant damage related to the specifics of the car or cart.
- The first trouble that can happen to the device is a manufacturing defect. In this case, there is only one way to solve the problem - return the device to the manufacturer and get a new one.
- Parking sensor malfunctions most often occur in connecting wires, sensors or metallized tape, more precisely at the place where it is attached to the bumper of the vehicle.
- Much less often, a malfunction occurs in the parking sensor control unit. It must be said that the control unit is equipped with its own fault detection system. If it detects a malfunction, the driver is given a corresponding signal.
- Troubles related to water and dirt can happen to the parking sensors or tape. The sensor may also be damaged by stones caught in it. The parking sensor tape must be constantly cleaned of dirt and moisture. To do this you have to remove it and clean it, it’s worth cleaning the bumper at the same time. The sensor is not particularly afraid of moisture and water, but if it accumulates, moisture or water can damage it.
- The control unit most often fails if dirt, dust, or moisture gets on the printed circuit. A short circuit may occur. Block failures are rare. Determine the simplest, for example. short circuit, malfunction, you can do it yourself. The rest depends on the skill and knowledge of the parking sensor owner.
- Parking sensor wiring may become unusable if the wires are poorly secured. As a result, they may melt or break. You can call and replace the wiring or part of it yourself.
Instructions for installing parking sensors on a car with your own hands
The technology for installing radar on cars of different manufacturers and models is not much different, and therefore the instructions given for self-installation of parking sensors using the example of a Hyundai Getz car will be useful to the owner of any car.
Laying the wire from the monitor to the electronic unit
It was decided to stretch the cable from the monitor to the electronic parking sensor unit between the ceiling trim and the roof of the car. This is the shortest route and does not require removal of the casing.
The ceiling trim near the rear-view mirror was moved down a couple of centimeters and a piece of foam plastic was inserted into the resulting gap for ease of work.
At the ceiling of the trunk door, the trim was freed from the rubber seal and also moved down a couple of centimeters. Next, an attempt was made to stretch a steel wire with a diameter of about two millimeters through the resulting gaps from the trunk to the rear-view mirror. But, unfortunately, the wire rested on something and despite numerous attempts it was not possible to thread it through.
I solved the problem by pulling the wire in several stages. First, from the rearview mirror into the gap that I made by freeing the headliner at the top of the driver's door from the rubber seal, then through the second gap at the left rear door and then through the gap in the trunk. The rope was first stretched using wire.
To prevent damage to the monitor connector, it was attached to a rope using electrical tape, as in the photo. All that remains is to carefully pull the rope and the wire will easily pass behind the trim to the trunk. I completed this job in a parking lot in the yard of the house in 15 minutes.
Removing plastic panels
To conceal the wiring from the ultrasonic sensors and supply power to the electronic unit, it is necessary to free the left side of the trunk from the plastic panel.
The first step is to recline the rear seats and remove the trunk floor covering. It is secured with several screws and clips. Can be removed without difficulty.
Next you need to remove the plastic panel on the rear wall of the trunk. To do this, all visible screws and bolts are unscrewed, and the panel moves upward with considerable force. It is held on by four clips and can be removed easily.
To begin installing the parking sensors, all that remains is to remove the left side panel of the trunk. Again you need to unscrew all visible screws. Next, from the left door side, pull it away from the car body and when the two clips are released, pull the panel towards you.
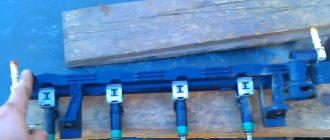
Installing ultrasonic parking sensors on the bumper
Radar manufacturers recommend installing rear parking sensors at a height of 50-70 mm from the road surface. Thus, the sensors could be installed on the black molding or on the top of the bumper. I chose the second option.
Since the diameter of the sensors was 22 mm, a 40 mm indent was made from the top line of the bumper. The drill hole centers were marked directly on the bumper surfaces using an alcohol marker.
Since the end mill had a drill bit in the center, it was easy to accurately drill the holes using an electric drill. The edges of the holes turned out neat, without burrs. You can also use a cordless screwdriver for drilling.
There was a hole in the rear wall of the trunk through which the wire from the rear fog lamp passed. It was decided to lay wires from the ultrasonic sensors through it. The rubber o-ring was removed and a rope was pulled through the drilled hole next to the fog light using a steel wire.
The sensor connector was attached to the rope using insulating tape, as shown in the photo, and the wire was pulled through it into the trunk. Pulling should be done effortlessly so as not to damage the wires and sensor connectors.
To prevent the sensor wires from rubbing against the steel edges of the car body and to seal it, a slot was made in the O-ring with a knife through which the wires were threaded. Next, the seal was installed in place.
When installing sensors in the bumper, they must be oriented so that the arrow on their housings points upward.
An attempt to mount the ultrasonic sensor in the bumper was unsuccessful the first time. The sensor did not want to hold on. It turned out that the silicone clips were designed for mounting on a thin wall, and the thickness of the bumper was 2.5 mm. I had to use a knife to remove part of each clamp so that the gap between them and the sensor flange was 2.5 mm. After modification, the sensors were firmly fixed. It was impossible to pull them out with a fingernail. Therefore, no glue was needed.
After attaching the ultrasonic rear sensors to the car's bumper, the wires coming from them were tied together using plastic clamps with the wires coming from the fog lamp.
Installation of electrical wiring for parking sensors in the trunk of a car
The installation of the monitor and ultrasonic sensors is complete and all that remains for testing is to connect the power wires to the vehicle’s on-board network.
Since the parking sensors should only turn on when the car is reversing, it is convenient to connect it to the wires that supply power to the reversing lights. They turn on only when the gearshift lever is in position R. The connector for connecting the rear lights was located right next to the planned installation location of the electronic parking sensor control unit.
If the colors of the wire insulation are not known, they can be determined using a multimeter turned on in DC voltage measurement mode. To do this, turn on the ignition and, without starting the engine, set the gear selector lever to the reverse position. Next, touch the negative probe of the multimeter to the bare body of the car, touch the positive one in turn to the connector terminals until the device shows the presence of a voltage of +12-14 V. Next, leave the positive probe connected to the found contact, and disconnect the negative one from the body, and find it in the connector ground contact. In this case, the device should again show +12-14 V. After this, you need to remember the colors of the wire insulation, remove the key from the ignition switch and set the lever to the neutral position.
It is best to connect the parking sensor power wires using the soldering method. To do this, you need to heat the insulation in the right places with a soldering iron and remove it. Next, twist the attached wires around the standard ones and solder them with a soldering iron. The photo shows an example of a connection for a Hyundai Getz car. The white wire is positive, and the black wire is negative (ground).
After soldering, the exposed wire sections must be covered with three layers of insulating tape. In order to prevent chafing of the soldered conductors, the wire going to the electronic unit must be tied to the standard harness with electrical tape, as shown in the photo below.
The wiring has been installed and now before installing the panels in place, you need to check the operation of the parking sensors. To do this, connect all connectors to the electronic unit, observing the order in which the sensors are connected. Turn on the ignition and reverse gear. When placing an obstacle in front of the sensors, make sure that the monitor shows the correct distance to the obstacle.
I did not hide the electronic parking sensor unit under the trim, since if the parking sensor malfunctions, it will be impossible to carry out diagnostics and repairs without removing the panels. Therefore, I decided to install it in the trunk pocket. To do this, using an existing cutter, a hole was drilled in the side panel pocket.
The parking sensor wires were threaded through the hole made in the pocket and the side panel was installed in place. Next, the connectors were inserted into the electronic parking sensor unit.
The electronic unit was glued to the vertical back wall of the pocket using double-sided tape, which was included in the kit.
As you can see in the photo, the presence of ultrasonic parking sensors on the bumper, from my point of view, even improved the appearance of the car.
After installing the parking sensors, I did not immediately glue the monitor to the mirror, but drove around a little. As a result, the most convenient place that did not interfere with the view turned out to be the place to the right of the mirror mounting post to the windshield. The monitor was glued there using double-sided tape supplied by the manufacturer.
As the practice of operating the radar has shown, it lived up to expectations. Reversing, especially in crowded places, has become safer and this makes it much calmer. Now I am not afraid that one of the restless kids will accidentally fall under the wheels of my car.
If you have even minor technical skills, then after reading this article you will see how simple and affordable it is to install parking sensors, and you will be able to install it on your car yourself.
Diagnostics and repair options
The system must respond to emerging obstacles.
If this does not happen, then the first thing to do is to clean the sensors or tape from dirt and moisture. They very often cause malfunctions of the device. You also need to clean the places where they are located. That is, the inside of the bumper under the tape and the sockets in which the sensors are installed. It doesn’t help - we inspect the transceiver devices.
If there is no damage on the metallized tape, then the cause of the malfunction of the parking sensor tape is in other parts of the device.
When you determine that the sensor is not working, you should first dry it, perhaps moisture just got into it. If so, then after drying it will begin to work normally, if not, we will open it, it is possible that the membrane is damaged, it can be replaced. But it is better to entrust the replacement of the membrane to a specialist, since such work requires skills.
A malfunction of the parking sensor control unit is probably the biggest problem with this device. You can only visually inspect the device yourself and check for a short circuit. To inspect the device's printed circuit board, you need to remove the cover.
It is possible that during the inspection the cause of the malfunction will be determined, for example, a coating of dirt or dust, or scale. Scale may indicate that radio components, such as capacitors, have become unusable.
The most common malfunctions and how to fix them
- Reverse gear is engaged, but the parking sensors do not give a signal. It is possible that the control unit is not connected to power or is not installed correctly, or the wiring is broken. In this case, we change the connection diagram and restore the integrity of the wiring. Be sure to check whether the grounding of the unit is reliable.
- The distance to the obstacle is determined incorrectly. It is possible that the sensors are dirty. The sensors need to be cleaned.
- The device often triggers on non-existent obstacles. It is possible that the parking sensors are set to high sensitivity or the sensors are dirty. It is necessary to reconfigure the control unit or clean the sensors.
- Parktronic does not detect any interference at all. It is possible that the device is set to low sensitivity, again the sensors are dirty, or the interference is in the so-called dead zone of the parking sensors. It is necessary to either increase the sensitivity of the device, or clean the sensors, rebuild the sensor installation circuit, or add, for example, a few more pieces to the existing circuit.
- The strip parking sensors experience the same malfunctions as parking sensors with sensors. The parking sensor tape may be damaged. Malfunctions can also occur if the location of the tape is dirty. There are malfunctions of the connecting wires and the parking sensor control unit. The steps for diagnosing the device and repairing it are, in fact, the same as when working with other types of parking sensors.
Schematic diagram of parking sensors on a meter-divider
Let's consider an example of a circuit diagram of a parking sensor assembled on a decimal counter-divider. In our case, this is MS K561IE8.
Two different devices are used as sensors - an ultrasonic emitter (TX, MA40S4S) and a receiver (RX, MA40S4R). The ultrasonic pulse generator is assembled on the K561TL MS. Here DD1.5 plays the role of an output buffer, DD1.6 is an output signal amplifier, and DD1.4 is a generator itself. The generated frequency is approximately 40 kHz, and this indicator can be adjusted using resistor R14.
The parking sensors are powered from a 12 V network (it is advisable to take power from the reversing lamp or use alternative options when connecting front sensors). The input voltage stabilizer is made on element DA1.
At the moment the decimal counter is reset, a control electrical pulse is generated at output Q0, which triggers the TX emitter to transmit. The remaining outputs of the K561IE8 are used to indicate the distance from an obstacle.
The reflected signal, after detection at RX, is amplified by the VT1–VT4 cascade and switches the trigger (DD1.1 and DD1.2). Thus, the counter's operation is temporarily stopped. One of the LEDs turns on, indicating the distance to the obstacle. The inclusion of diode HL9 indicates the maximum distance to the obstacle, and HL1 indicates the minimum. Simultaneously with the HL1 diode, the sound alarm is turned on on the BF buzzer.
The described circuit diagram provides for the possibility of manual adjustment of a number of parameters. Potentiometer R14 adjusts the sensitivity of the device. Using R15, the response range between the LEDs is set. For example, you can set a gap of 10 cm for each of the diodes, then the parking sensors will operate at a distance of 90 cm from the obstacle.
Note that the given electrical circuit of the parking sensors allows you to connect it with only one pair of sensors. This is a very simple and inexpensive option for organizing a parking system.
How to avoid parking sensor malfunctions?
First of all, you need to follow basic safety measures.
Sensors, metallized tape, wires, contacts must be inspected regularly; if dirt appears on the sensors and tape, it must be removed, as well as moisture. No moisture or dirt should accumulate under the metallized tape. Therefore, you need to periodically remove it and clean the inside of the bumper.
Dirt can also collect in the control unit; it is worth opening it occasionally and cleaning it from the dirt and dust accumulated inside. Please note that dirt, dust and water are excellent conductors of electricity, which means they can cause a malfunction.
It is necessary to strictly follow the recommendations and requirements set out in the parking sensor operating instructions. It is very important to correctly install and select the device, as well as fine-tune it. You can find out more detailed information about choosing parking sensors in the following detailed article. Following the instructions, correct installation, and fine-tuning of the parking sensors is the key to its long, trouble-free service.