Kia Spectra generator: which one is installed and do-it-yourself replacement
Separate the back cover and stator. The resistance should be approximately 3 ohms. If the brushes are worn to the maximum permissible length, replace them. If, when rotating the bearing, you feel play between the rings, rolling or jamming of the rolling elements, damaged protective rings or lubricant leaks, the bearing should be replaced.
Kia Spectra. REMOVAL AND INSTALLATION OF GENERATOR
VALEO / KIA Sorento generator repair
Home Cars - Kia Kia Spectra (production from this year) petrol engine l (S6D, DOHC) -…
Just in case, I now slow down at every puddle; indeed, the generator is not installed in a deep-sea, blah, submersible, but is open to all puddles and is flooded.
Remove the three screws securing the generator casing. Use a screwdriver to pry off the stator housing
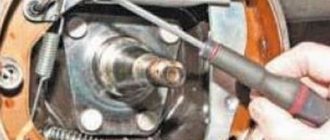
Check the ease of rotation of the bearing on the side of the rotor slip rings.
If, when rotating the bearing, you feel play between the rings, rolling or jamming of the rolling elements, damaged protective rings or lubricant leaks, the bearing should be replaced. To do this, press the bearing off the rotor shaft with a puller and install a new one, applying force to the inner ring. Check the resistance of the rotor winding with a tester by connecting it to the slip rings.
The resistance should be approximately 3 ohms. If the tester shows infinity, it means there is a break in the windings and the rotor needs to be replaced. Check the rotor winding for short to ground.
If the surface of the slip ring is rough or shows signs of wear, sand it with sandpaper. Using an ohmmeter, check the continuity between the stator coil wires.
If there is no continuity, replace the stator. Use an ohmmeter to check the continuity between the stator coils.
If there is continuity, replace the stator. If the measured resistance approaches infinity, the stator must be replaced.
Check the stator windings for short circuits to the housing. The measured resistance must be very large and tend to infinity.
Generator repair
Otherwise, replace the stator. To do this, connect the tester probes to the terminal of the stator phase winding and the air radiator of the diodes. If the tester readings are the same in both cases, the rectifier unit is faulty and requires replacement. Check the other two alternator diode circuits in the same way.
As I understand it, the idea was that it should go into the technological hole and thus free the lower ear of the fastening. For some reason, for me and other spectroguides, this hole is smaller than the diameter of the bottom bolt head.
since 1995 release
Now I want to understand what will happen if you unscrew those bolts that are in the photo in the text and how to get to them, if unscrewing them is not scary.
I unscrewed all three suspension bolts with an L-shaped wrench with an extension and a head. Moreover, thank God, I borrowed 2 wrenches at once, with different distances on the short side; due to the limited limited space, it only fit with a very short end.
Check the stator windings for short circuits to the housing. The measured resistance must be very large and tend to infinity.
Otherwise, replace the stator. To do this, connect the tester probes to the terminal of the stator phase winding and the air radiator of the diodes. If the tester readings are the same in both cases, the rectifier unit is faulty and requires replacement. Check the other two alternator diode circuits in the same way.
The procedure for replacing the alternator belt on a Kia Spectra
The drive that ensures the functioning of the Kia Spectra generator and water pump, like other parts of any car, needs to be changed from time to time. Determining when a replacement is needed is quite simple; it is also possible to independently install a new element by following the detailed instructions on our website.
In what cases is it necessary to change the generator and water pump drive?
So, let’s decide how to determine whether it’s time to install a new Kia Spectra alternator belt. To do this, you need to carefully examine it.
If wear of the working element is noticeable, if the belt is oily or stretched, replacement is urgent. Often a characteristic sound when the engine is running helps to detect a weak alternator belt tension.
Insufficient tension provokes accelerated wear of the drive.
The service life of the Kia Spectra alternator belt may depend on factors such as driving style, conditions of use, load, quality of product manufacturing, and correct installation.
How to check the tension force and tighten the drive
During operation, the Kia Spectra alternator belt gradually stretches. However, this is a normal process and the car has a system to tighten it. It is important not to overdo it here, since both excessive and insufficient tension have equally bad effects:
- if the tension is weak, noise is produced and the drive wears out quickly;
- if the element is pulled too tightly, it can even damage the generator.
To check the tension force you do not need any special equipment. It is enough to hook the product with the hook of the steelyard scale and pull. With a tension of 9.8 kg, the deflection should be 8–10 mm. Adjusting the drive tension level on the Kia Spectra is quite simple:
- Slightly loosen the fastening of the generator to the bracket that comes from the engine, as well as to the tension bar;
- Unscrew/screw in the adjusting bolt to the desired degree of tension. To increase tension, the generator must be moved away from the cylinder block, and to decrease it, towards it.
If you were unable to adjust the belt tension on your Kia Spectra, you should prepare to replace it.
Instructions for replacing the alternator belt on a Kia Spectra
The procedure for replacing the drive on a Kia Spectra is quite simple and even novice car enthusiasts can do it. This is exactly the case when it is not at all necessary to resort to the services of service stations and car services, but you can save money.
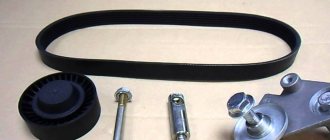
- To carry out the procedure, you will need keys for 12 and 14, as well as a new part, of course.
- The replacement itself is carried out in the following order:
- Slightly loosen the bolt that secures the generator to the tension bar.
- Loosen the bolt securing the device to the engine.
- Use the adjusting bolt to loosen the tension.
- Remove the drive from the pulleys.
- Install the prepared new part into place.
- Using the instructions above, adjust the tension force of the drive using the adjusting bolt.
- Tighten the mounting bolts.
If the drive squeaks
Sometimes the Kia Spectra alternator belt can make a rather unpleasant sound, resembling a whistle, squeaking and squeaking at the same time. Obviously, this brings discomfort to the driver, passengers and even those around them, since the sound power is quite high. There may be several reasons for this noise:
- weak drive tension;
- poor quality of the item;
- contamination on the working surface (oil or other technical liquids);
- distortion of the tensioning device;
- Driving with a cold engine in winter.
Obviously, some problems can only be solved by replacing the element. Sometimes a whistle can occur due to a faulty bearing in the tension roller. In this case, a thorough diagnosis of these nodes is required. But most often the reason is weak belt tension.
Thus, incorrect installation, wear or other problems with the Kia Spectra alternator belt can lead to some unpleasant moments and even breakdowns. Timely replacement of the element can prevent or eliminate negative consequences.
VESKO-TRANS.RU
AutoNews / Reviews / Tests
- Home
- Auto garage
- How to Remove the Alternator on a Kia Spectra Video
How to Remove the Alternator on a Kia Spectra Video
KIA Spectra Black Angel ›Logbook› Generator repair, sex continues.
Hello dear drivers, drivers. Now I got up at 10:00 and ran to repair generators where needed, S. Bogorodskaya 57 (for residents of Ufa). A fully charged battery was 12 km away and still had a charge. They said it cost $1,000 to remove and install. I think Nafig is overpaying because he didn’t do it with his finger. While others were sitting by the car and waiting in line, I bent under the hood. the generator was removed 5 times quite quickly - in 10-15 minutes. generator contributed to me being carried back. You have 1400 for the voltage regulator and 600 rubles for work. Perhaps its true meaning, please tell me I can't believe it. On the Volga I bought this regular hearing regulator for 350 rubles. But it was a much simpler device. Raising the machine to 3.5 sockets. I went down to put it on. I also expressed it amazingly quickly - within 20-25 minutes. Beginning - Hurray! Works great. I went home. On the way home, I ordered the window to completely die. Hell there are already 4 windows and still the same. Inside the mechanism the cable is tangled and extends to our client, there are marks on the chassis that it needs to wrap. Then it's not sold anywhere. After 3 hours of pain, I got scared, kicked the door, took a piece of wood and closed the window.
The generator on the KIA SPECTRA does not work. Alternator malfunction on KIA Spectra
How to remove Kia Spectrum video generator |
We are looking for and eliminating the cause of the lack of charging. Diagnostics and repair. Now I'm going to roll the office windows forward
Issue cost: $4,000
Replacing the generator on a Kia Spectra
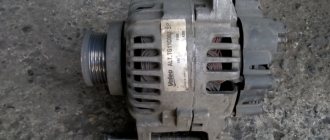
Have you noticed that the battery is losing its voltage? They may also offer you repairs to the unit, but in some cases restoring an old generator may cost more than buying a new one.
Does it make sense to spend extra money? Of course not, so let's go to a specialized store and buy a spare part. But before you pay money, you need to make sure that the new generator fits the car and is fully compatible with its engine.
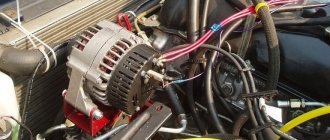
In order to remove the old device, we tilt the negative terminal of the battery aside, move the power cable of the power steering pump aside and unscrew the generator bracket using a socket wrench. We remove its cover, completely disconnect all electrical connections, loosen the hinge and tension bolts securing the generator, but do not completely unscrew them.
We loosen the tension of the drive belt, this is done by rotating the bolt counterclockwise. After this, completely unscrew the tensioner mounting bolt and remove it.
We install the new generator, this is done in the reverse order, thoroughly tighten the mounting bolts, put the belt in place, and adjust its tension. By the way, the belt tension should not be too weak and not too strong; the approximate deflection value is 15 mm.
We connect all the electrical wires, the power steering pump, connect the negative terminal to the battery and start the engine.
Listen carefully to the operation of the generator; there should be no extraneous sounds coming out of it; if there are any, then it makes sense to return the spare part to the store, because most likely they sold you a defective product.
After this, you need to drive for about half an hour, during which time the battery can be properly charged and there will be no more problems with recharging. If after some time the generator stops charging again, check its brushes; they may have worn out; replacing a cheap part will fix the problem.
Kia Spectra repair prices. Price list Kia Spectra
Prices for mechanic repairs of Kia Spectra
Engine repair:
- Engine diagnostics (mechanical) from RUB 600.
- Computer diagnostics of the engine 800 rub.
- Replacement of internal combustion engine from 10,000 rubles.
- Replacing the cylinder head of the Kia Spectra cylinder head 9,000 rub.
- Cylinder head repair (depending on complexity) from RUB 2,000.
- Crimping of the cylinder head cylinder head RUB 2,500.
- Replacing the cylinder head gasket RUB 9,000.
- Replacement of valve stem seals RUB 5,000.
- Replacing timing belt and rollers Kia Spectra 3500 rub.
- Replacing the valve cover gasket RUB 1,200.
- Replacement of spark plugs 300 rub.
- Replacement of the intake manifold gasket RUB 1,800.
- Replacement of the exhaust manifold gasket RUB 1,600.
- Replacement of the oil pump RUB 3,500.
- Replacement of the piston group 12800 RUR.
- Replacing the Kia Spectra crankshaft RUB 12,300.
Required Tools
To repair and replace the generator on a Kia Spectra, you need tools, the list of which is given in the table below.
Table - List of necessary tools for replacing the generator
| Name | Note |
| Socket head | "at 14" |
| open-end wrench | "at 15" |
| Puller | For bearings |
| Soldering iron | Power 25-60 W |
| Penetrating lubricant | For loosening threaded connections that have become acidic or corroded |
| Rags and wire brush | For cleaning fixtures and work surfaces |
Replacing the Kia Spectra alternator belt
The Kia Spectra alternator belt is the same consumable item as the filter, spark plugs and oil - it’s not for nothing that they are all listed in the regulations for periodic maintenance procedures. This means that it needs to be changed from time to time, which, however, is quite easy to do with your own hands.
Frequency of alternator belt replacement
Some maintenance cards indicate that the alternator belt on the Spectra must be changed every 45,000 km. This does not mean that it does not last longer. Or less - and this happens.
To be sure that the drive belt will not fail on the road, you should check its condition at every maintenance (every 15,000 km). A visual inspection will help determine that replacing the Kia Spectra alternator belt is about time - cracks, delamination, stretching - all these are signs of replacement. In addition, this part may require replacement by whistling and squeaking.
Adjusting the tension of the generator belt
However, if the old belt has only stretched a little, this is not yet a reason to look for a replacement. For this case, the design provides a tension roller.
Checking the tension is very simple, just hang a lever scale on the belt and pull. At a pressure close to 10 kg (9.8), the deflection should be 8-10 mm. Otherwise, adjustment is required.
To tighten the belt you should:
slightly loosen the mount of the generator to the bracket going from the engine to the tension bar;
Tighten the adjusting bolt until the required tension is achieved. To increase the tension, the generator must be moved away from the cylinder block, and to decrease it, towards it.
It is worth remembering that excessive tension, as well as too weak, negatively affects the operation of the unit in the following way. If the belt tension is too tight, a malfunction may occur in the generator itself. And too weak a tension threatens accelerated wear of the part and extraneous noise during operation.
Replacing the alternator belt
To replace, you will need keys for “12” and “14” and a new strap. In general, the procedure is not considered difficult - the replacement can be done with your own hands.
To change the alternator belt, you must first loosen the bolt securing the alternator to the tension bar and the bolt securing the structure to the engine. Then release the tension using the adjusting bolt and remove the drive from the pulleys.
Installing the alternator belt occurs in the reverse order. Place the strap on the pulley and then adjust its tension. Finally, tighten the fastening screws that were unscrewed at the beginning of the procedure.
If after replacing the belt begins to whistle, read this article. The main mistakes when changing a belt are also indicated here.
VESKO-TRANS.RU
AutoNews / Reviews / Tests
- Home
- Auto garage
- How to Remove the Alternator on a Kia Spectra Video
How to Remove the Alternator on a Kia Spectra Video
KIA Spectra Black Angel ›Logbook› Generator repair, sex continues.
Hello dear drivers, drivers. Now I got up at 10:00 and ran to repair generators where needed, S. Bogorodskaya 57 (for residents of Ufa). A fully charged battery was 12 km away and still had a charge. They said it cost $1,000 to remove and install. I think Nafig is overpaying because he didn’t do it with his finger. While others were sitting by the car and waiting in line, I bent under the hood. the generator was removed 5 times quite quickly - in 10-15 minutes. generator contributed to me being carried back. You have 1400 for the voltage regulator and 600 rubles for work. Perhaps its true meaning, please tell me I can't believe it. On the Volga I bought this regular hearing regulator for 350 rubles. But it was a much simpler device. Raising the machine to 3.5 sockets. I went down to put it on. I also expressed it amazingly quickly - within 20-25 minutes. Beginning - Hurray! Works great. I went home. On the way home, I ordered the window to completely die. Hell there are already 4 windows and still the same. Inside the mechanism the cable is tangled and extends to our client, there are marks on the chassis that it needs to wrap. Then it's not sold anywhere. After 3 hours of pain, I got scared, kicked the door, took a piece of wood and closed the window.
The generator on the KIA SPECTRA does not work. Alternator malfunction on KIA Spectra
How to remove Kia Spectrum video generator |
We are looking for and eliminating the cause of the lack of charging. Diagnostics and repair. Now I'm going to roll the office windows forward
Issue cost: $4,000
Quick replacement of the timing belt for a Kia Spectra with a 1.6 engine and automatic transmission
Today an old Kia Spectra came to us to replace the timing belt, rollers and all technical fluids. The replacement procedure will take approximately 45 minutes and will not require any special devices or incredible skills of an auto mechanic.
- Replacement interval
- Necessary tools and preparatory work
- Replacement procedure
- Crankshaft lock
- Installing a new timing belt
- Video of replacing the Kia Spectra timing belt
Replacement interval
All instructions recommend changing the timing belt at 60,000 kilometers, but somewhere I’ve come across 45,000. We recommend changing the timing belt at 40, 45 thousand kilometers, since we all know very well the quality of our spare parts.
Attention! If the timing belt breaks, all valves are turned.
Necessary tools and preparatory work
To work, we will need a set of socket heads, spanners and one and a half liters of mineral water.
We block the rear wheels with wheel chocks, remove the front right wheel and crankcase protection. Disconnect the negative terminal of the battery. Let the engine cool down.
Replacement procedure
Remove the decorative engine cover. Unscrew the four bolts on the 10th upper timing cover.
Upper timing belt cover.
Unscrew the tension bolt of the power steering pump and remove the power steering belt. Somehow I photographed it poorly, it didn’t turn out very clear.
Power steering belt tensioner.
Next, before you remove the alternator belt, loosen the three #10 bolts securing the pump pulley.
Fastening the pump pulley.
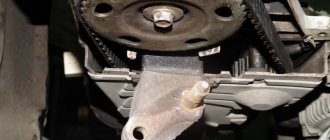
We loosen the locking bolt by 13 and the tension bolt by 10 and, moving the generator, remove the generator belt. Then remove the pump pulley.
Alternator belt tensioner.
Crankshaft lock
We lock the crankshaft, in the case of an automatic transmission, by inserting a specially trained screwdriver into the flywheel.
If you have a mechanic, you can lock the crankshaft by engaging fifth gear by inserting a screwdriver into the ventilation holes of the brake disc in the caliper area.
Attention! Never unscrew, much less tighten, the crankshaft bolt using the starter.
Unscrew the crankshaft bolt and the four bolts securing the pulley.
Fastening the crankshaft pulley.
Unscrew the four ten bolts securing the lower timing belt cover.
Fastening the lower timing belt cover.
Well, and two more bolts of the middle timing cover.
Fastening the middle timing belt cover.
Set the top dead center. To do this, temporarily tighten the crankshaft bolt and rotate it, always clockwise until the marks on the camshaft sprockets and the rear timing cover match.
Intake camshaft mark.
Exhaust camshaft mark.
Accordingly, the mark on the crankshaft sprocket should coincide with the mark on the oil pump.
Crankshaft mark.
Loosen the bolt 13 of the timing belt tension roller and remove the belt.
Fastening the tension roller.
Please note that the timing belt is tensioned using a spring.
Tension spring.
Remove the tension and deflection rollers. We install new rollers, tighten the bypass bolt, and simply tighten the tension bolt. Don't forget about the spring. It’s convenient for me to install it right away; some people install it after installing the belt.
New timing kit.
Installing a new timing belt
We check that all marks match, then install a new timing belt in the following sequence: crankshaft sprocket, idler pulley, camshaft sprockets, tension roller.
Don't forget about the direction of rotation!
We check that all the branches of the belt are tensioned and the marks do not run away, and tighten the tension roller. We turn the crankshaft two turns and check the marks again.
We install all parts in the reverse order of removal. Everything is very simple.