07/16/2021 7,362 Auxiliary systems
Author: Ivan Baranov
Parktronic is a device designed to help motorists park a vehicle. Drivers, as they say, are divided into two types - those who never recognize such a device and those who simply cannot park without it. So how is it installed, what do you need to know about the parking sensor operation scheme - read about it below.
[Hide]
Required Tools
To install the equipment on the car, you will need the following tools:
- a special cutter for plastic (the diameter must correspond to the size of the sensor body);
- electric drill or cordless screwdriver;
- set of wrenches;
- screwdrivers with flat and Phillips blades;
- a set of keys with Torx-type heads (required for European-made machines);
- test device;
- masking tape;
- tape measure and level;
- pencil or marker.
Typical breakdowns
Many parking sensors are connected in such a way that when reverse gear is engaged, sensors and cameras are activated, displaying a picture on the screen inside the cabin. They are connected to a regular multimedia system. That is, you don’t even need a button to turn on the parking sensors.
But sometimes the video does not show, or strange signals are issued, and some kind of bacchanalia occurs with the parking sensors. Everything is clear, something is wrong with him. And what?
There are several typical faults. In some cases, simple simple repairs are needed, and sometimes replacement of elements is required.
Let's look at a few common situations.
- The danger signal is constantly on. Here we are talking about a short circuit in the system or the sensor being blocked by some object. For example, a piece of dirt, a leaf or snow has stuck to it. Even if water gets on the sensor, it begins to produce incorrect information and makes the driver panic. First, check the device for foreign objects. If they are not there, you will have to do the wiring. How to check its integrity? Take a multimeter and measure the parameters. Most often, it is the wiring that causes all the problems.
- Doesn't signal obstacles, although they exist. Here the sensor or several parking devices at once have broken down. The test is simple - cover each sensor with your hand in turn and listen to which one does not react. So solve problems with it by completely changing it or carrying out repairs.
- Overreacting to minor obstacles. You park on the grass, where there is nothing in the way, but the parking sensors are screaming. Why? It probably has increased sensitivity, so for the device even a blade of grass is an object of danger. The sensitivity can be adjusted, so there is nothing complicated here.
- Mechanical damage. They are not difficult to check visually. But the problem with such problems is that in most cases you have to change the sensors. Repairs are not enough here.
If your parking sensors start acting up, be sure to check the wiring first. It sometimes breaks, the integrity of the insulating shell is damaged, and the contacts come loose. Otherwise, some are already buying new sensors, although in fact they just needed to tighten the wiring fasteners a little tighter with a screwdriver. Don't spend extra money or jump to conclusions until you've checked all potential problems.
The most unpleasant breakdown is the failure of the control unit of your parking sensors. It is the most expensive to change. But let's hope this doesn't happen.
Share your impressions of the material, tell your stories related to parking sensors or ask questions.
How to install parking sensors
To install parking sensors yourself, you need to mount the sensors in the car’s bumpers and install a warning module in the car’s interior. The installation diagram includes a separate control unit, which is connected to the vehicle’s on-board network. The parts are connected to each other by cables included in the kit.
Before starting installation work, it is recommended to check the functionality of the parking assistant components. The parts are connected in accordance with the factory wiring diagram, then a 12 V DC source is switched, designed for a current of up to 1 A. To test the sensors, a sheet of cardboard is used, in which holes are drilled for installing the products. Then an obstacle is placed in front of each of the sensitive elements, and the accuracy of the distance measurement is checked with a tape measure.
When installing sensors, it is necessary to take into account the orientation of the parts in space.
On the back there is the inscription UP, which is complemented by an arrow pointer. During installation, the device is positioned with the arrow pointing upward, but it is allowed to rotate the sensor 180° if the bumper is located at a height of more than 600 mm or if the surface of the bumper is tilted upward, which impairs the sensitivity of the ultrasonic device.
Scheme
The installation diagram provides for the placement of ultrasonic sensors in the front and rear bumpers. The sensors are located on the end plane, as well as in the corners of the bumper, providing an expansion of the monitored area. The parking assistant can work in conjunction with a rear view camera, which displays the image on the radio screen or a separate display. The control unit is mounted under the trunk trim or in the passenger compartment (in an area protected from moisture). An information panel with a buzzer is placed on the instrument panel or built into the mirror.
Installing rear parking sensors
Installation of rear parking sensors begins with marking the surface of the bumper. The accuracy of the assistant’s work depends on the quality of the markings, so it is necessary to study the manufacturer’s recommendations in advance. If installed incorrectly, “dead” zones are formed in which an obstacle may appear.
Sequence of actions when installing rear ultrasonic sensors:
- Apply markings to the plastic bumper trim and stick pieces of masking tape at the sensor locations. The equipment set may contain a pattern that allows the owner to mark the surface of the bumper and install the sensitive elements himself. Equipment manufacturers recommend installing sensitive elements at a height of 550-600 mm from the ground.
- Determine the location of the centers of the holes using a tape measure and a hydraulic or laser level. Ultrasonic sensors should be located symmetrically at the same height.
- Mark the centers of the channels with a thin awl so that the cutter does not slip. For drilling, use the tool supplied by the parking aid manufacturer. The diameter of the hole must match the size of the sensor body to prevent elements from slipping out during operation.
- Secure the cutter in the chuck of the electric tool and start drilling. The cutting tool must be positioned perpendicular to the surface being processed, while the horizontal position of the cutter is controlled. Please note that under the plastic shell there is a metal beam that can break the tool.
- Install sensor housings with patch cables into the holes provided. If a foam damper is installed in the design of the machine, then it is necessary to carefully drill the part; the resulting channel is used to output connecting cords. If work is carried out on a removed plastic shell, then the cables are laid along the inner surface to the entry point into the body.
- Fix the sensors using the mounting rings from the kit; letters are printed on the body of the parts, allowing you to determine the purpose of the sensitive element. It is prohibited to swap elements, since the accuracy of the device will be impaired. On the rear of the housing there are explanatory marks (eg arrows) indicating the correct position in the bumper.
- Route the cables from the sensors through the rubber O-ring of the standard wiring or the plastic plug into the luggage compartment. If the entry was made through a plug, then the entry point is sealed with a layer of sealant. The cables are pulled through using a piece of rope or elastic wire.
The owner can install rear parking assist on any car equipped with a plastic bumper. It is allowed to paint the plastic housings of the sensors in the color of the body; this does not affect the performance of the products. If you plan to use a parking device with a towbar, then the sensitive elements are placed on the sides of the towing hook. The length of the device does not exceed 150 mm, so the tow bar does not cause false alarms of the sensors.
Installing front parking sensors
If you plan to install parking sensors with 8 sensors, you will need to drill holes in the front bumper and install sensors in them. When drilling channels, it should be taken into account that the car’s standard electrical wiring is installed inside the plastic shell, so it is recommended to carry out work on a removed bumper. After marking the centers of the holes, drilling is performed. When installing sensors, do not press on the central part of the housing.
The connection cables are routed through the engine compartment away from the cooling system radiator and exhaust manifold. It is recommended to lay the cables in a separate protective sleeve, which is secured with clamps to the standard electrical wiring harness. Entry into the cabin is made through the technological holes available in the engine panel.
Ways to activate the front assistant:
- Based on a signal from the reversing lights. When you start moving backwards, ultrasonic sensors operate in front and behind the car. The disadvantages of this method include the inability to turn on the front sensitive elements when parking the front of the car near a wall.
- Using a separate button, the owner turns on the equipment only when maneuvering in cramped conditions. The key is mounted on the instrument panel or center console; the switch design has an LED to determine the operating mode.
After installing the sensors, it is necessary to check the correct installation and laying of connecting cables.
The control unit supports automatic diagnostics; after power is applied, the sensors are polled.
When faulty elements are detected, a sound signal is given, and segments flash on the display of the information module, indicating an incorrectly operating element. The machine owner needs to check the integrity of the cable and insulation, as well as the correct connection of the wiring to the controller.
Installation
Let's see how to install front parking sensors yourself. This will require some free time and accuracy.
The bumper must be removed. Then it is thoroughly washed to remove dirt. Manufacturers have already made markings on new car models - they are accurate, as they are done at the factory. The markings represent four points for mounting ultrasonic parking sensors. But on older models there is no such marking - in this case you need to do it yourself.
During the marking process, it must be taken into account that the sensors must be installed at a height of approximately 50 centimeters from the ground surface. There is no point in setting it lower - efficiency and usefulness are lost. The installation point is marked so that it is approximately in the middle of the bumper
It is also important to ensure that the distance from the edges of the bumper is the same. The distance between the sensors should also be the same - this is important if the parking sensors have 4 sensors
But most inexpensive models only offer two sensors. When marking, you should be aware that it is not allowed for the sensor to be covered by a license plate or moldings.
When the markings are completed, it is necessary to make holes in the bumper for installing ultrasonic parking sensors. Usually a cutter is included in the kit. Its diameter corresponds to the diameter of the sensor. Using an electric drill, carefully make holes at the marked points with a cutter at low speeds. Next, a sensor is installed in the hole
It is important that the installation is carried out without distortions
Information display
After installing the sensors, the owner begins to place an information board in the cabin, which is made in the form of a small-sized liquid crystal display or a block with control light indicators. There are modifications of assistants with an information panel made in the form of a rear-view mirror. When installing the display on the windshield, the cables are routed into the luggage compartment under the headliner and plastic lining of the roof pillars.
To install the information block yourself, you must:
- Find a free space on the instrument panel; the equipment should not block the view from the driver’s seat. Consider the route of laying the patch cable to the controller; the cord is routed inside the panel, and then goes to the luggage compartment parallel to the standard wiring harnesses.
- Clean the plastic surface from dust and degrease it with a compound that does not destroy the base.
- Remove the protective film from the double-sided tape glued to the base of the device. The information module does not have its own power supply; the voltage is supplied from the parking assistant controller.
- Install the module on the instrument panel and connect the patch cord. If the equipment supports scanning of “dead” spots based on a signal from the steering column switch, then LEDs are installed on the front roof pillars. The indicators are connected to the control unit, the cables are routed along with the wiring of the main display.
Scheme with a button
This option is much easier to implement, and it works quite effectively. True, you need to launch it manually - if necessary. To implement the scheme, you need a button that needs to be installed in any place convenient and easily accessible to the driver.
Power can be taken from the same place where the DVR or interior lighting is powered. The principle of this connection of the front parking sensors is simple - when the engine is started, power is supplied. If the engine is turned off, then the system will turn off. Of course, this option is not ideal - according to all the rules, the parking system should turn on automatically if the speed is 20 kilometers per hour or lower.
How to connect the device
To connect parking sensors to 4 sensors, you need to route the cables from the ultrasonic elements to the control controller, and then connect the information display. The control unit requires power supply only when reverse gear is activated. Installation of equipment for 8 sensors differs in the installation of an additional cable braid from the sensors located in the front bumper. The controller is attached to the wall of the luggage compartment using screws or plastic clamps; the device can be mounted under decorative trims.
For example, the schematic diagram for connecting the SPARK-4F assistant controller provides for the input of cables from the sensors; a positive power signal is supplied from the reverse gear lamp. This technique ensures that the equipment operates only when the vehicle is in reverse. The negative wire is attached to special bolts welded to the body. The control unit has a block for switching direction indicator lamps; the signals are used to enter the programming mode and switch menu sections.
The parking sensor circuit involves activating a quiet mode, which allows you to determine the distance to cars standing behind or in front. The controller is additionally connected to a limit switch located in the brake pedal. It is allowed to supply power from the brake lamps located in the rear lights. When you press the pedal and the gear selector is in neutral, the display shows the distance to obstacles. The display design includes a button to force the display to turn off.
Some assistants support the function of warning the driver about cars in blind spots. The sensors turn on when a warning signal is given by the turn signal; when a car or motorcycle is detected, the warning LED on the pillar trim turns on, and the signal is duplicated on the display. It is possible to permanently or temporarily disable the function by sending a signal to a separate contact (performed with a toggle switch or by pressing the brake pedal).
Installing parking sensors yourself
Parktronic is a device designed to facilitate the parking process for a novice motorist. You can install parking sensors at numerous car dealerships or do it yourself. We will consider the last option, when there is no desire or opportunity to go to a car service center.
First you need to decide on the choice of device. At the moment, stores offer an unlimited number of different models and modifications. In fact, there are not enough differences among this huge number. The main differences lie in the appearance of the monitor, and the properties of the sensors themselves are no different. A different number of sensors can be installed on car bumpers. Typically, car owners install 4 on each bumper, and some car owners only install them on the rear bumper. Parking sensors on tinted cars are especially important when, in conditions of limited visibility, you have to back out into the darkness.
How to setup
Installed parking sensors and a control controller require programming. To enter the setup mode, you must turn on the ignition and then activate reverse gear, which supplies power to the control unit. The further algorithm depends on the parking assistant model. For example, to enter the programming mode of the SPARK-4F product, you will need to press the turn direction indicator lever 6 times. The display of the control device will show PI, allowing you to begin adjustment.
Before programming begins, the gearbox lever is placed in the neutral position and the brake pedal is held depressed. The transition between menu sections is made by single pressing the direction indicator lever (forward and backward). Entering and exiting the settings section is done by turning the reverse gear on and off.
To adjust the sensitivity of the rear sensors in the car, you need to park the car on a level surface with no obstacles behind it. Ultrasonic sensors scan the area behind the machine for 6-8 seconds, then a sound signal is given, accompanied by the inclusion of an indication on the control device. Some assistants are equipped with a display that can be installed in different positions. The screen orientation is selected in the corresponding menu section.
You can select the duration of the beeps that sound when an obstacle is detected. Some devices take into account a tow hook or spare tire located at the rear of the car. The controller remembers the departure of such elements and takes it into account when operating the sensors. Some products provide a mode for amplifying the signal coming from the sensors. The owner empirically selects the required value and then re-adjusts the sensitivity of the elements.
- How to remove the parking sensor from the bumper
- How to paint parking sensors with your own hands
- How to check parking sensor
- Why does the rear view camera show backwards?
Installation process
Specifically, before installing parking sensors, you should wash the car. Next you need to find places that are more suitable for installing sensors. For example, in an SUV, the spare wheel mount, which can fit on the rear door, is the last dimensional point.
The next step requires removing the car bumper. During the dismantling process, you should be careful not to confuse the fasteners for the front and rear bumpers. Then you need to make markings and drill holes for the parking sensors (Fig. 1). Installing parking sensors with your own How to install Sensors are installed with. But you don’t have to remove the bumper - you can drill holes anyway, only then you will need some skill and patience to route the wires into the car’s interior. To get a taste and start enjoying watching group sex, you just need to try it - and everything will work out. You will immediately have a desire to watch FF porn https://gangbang.com/jmj via a direct link around the clock, enjoying fucking several girls at once. The girls were ready to do anything for the sake of popularity, including being on several dicks at the same time, and also in front of the cameras.
When marking locations for sensors, it is important to be as careful as possible: it will be impossible to remove excess drilled holes. To better navigate when parking in the future, parking sensors are located at a similar distance from each other.
The next step is laying the wires (Fig. 2) and connecting the device’s sensors to the car’s electronic circuit. Engine ZMZ 402 repair How to install correctly How to put rings on. Before connecting the sensors and parking sensors, it is necessary to de-energize the vehicle's electronic circuit. It is necessary to lay the wires from the sensors to the parking sensors panel very carefully. Rear bumper sensors can be connected to the power supply for the reversing lights. Thus, the parking sensors will only work when you have reverse gear engaged. This is comfortable - once again there will be no squeaking in the car when, for example, in a traffic jam someone comes close from behind.
Next, the display is installed (Fig. 3) and all sensors are connected. How to properly install parking sensors. The location of the parking sensors display should be extremely favorable for the driver: he should see the readings of the display without changing the position of his head.
That's all! The whole procedure takes 2-3 hours - it’s not that long, but at the same time it’s educational. Below we offer you to watch the whole process in the video.
Possible causes of malfunctions
Taking into account everything discussed earlier, we can say that parking sensors are inherently a fairly simple device. It consists of a minimum set of components. Hence the corresponding number of malfunctions.
Their appearance does not depend on the car itself. Someone was lucky to receive the radar as a complete set. Others customize their cars themselves. Parking sensors are often found on a wide variety of cars. Especially on things like:
- Lada Priora;
- Toyota Rav 4;
- Kia Sorento;
- Lada Largus;
- Hyundai ix35;
- Lada Vesta;
- Volkswagen Passat;
- UAZ Patriot;
- Chevrolet Captiva;
- Chevrolet Cruze;
- Kia Sportage 3;
- Skoda Octavia;
- Mercedes;
- Hyundai Solaris, etc.
The list could go on forever. But something else is much more important here.
There are several main reasons why the parking sensors suddenly stopped working, or began to display incorrect information, or send alerts prematurely or late.
If you notice problems with your car, then the reason probably lies in one of the following factors.
Damage to wiring. Systems can be wired or wireless. When using wiring, it is not so difficult to damage and compress it; Incorrect installation of sensors
Here it is important to understand how to find out which sensor is not working. Check their fastening and degree of immobility
If the element wobbles and does not hold well, this is the reason; Manufacturing defects. This cannot be ruled out. Especially when buying cheap kits from dubious manufacturers. Therefore, it is better not to save money, but also to order installation at a certified car service center; Dirt and moisture. If the system was functioning normally, and then problems appeared, the reason may be trivial. The sensors are dirty or wet. This is a pressing problem for most parking sensors that require periodic maintenance; Short circuit in the control unit. Even with a wireless system, the radar's electronic brain can short out. Again due to dirt, moisture, dust or high temperature.
All of the above reasons can objectively be considered banal, obvious and probable. But no one says that parking sensors are an incredibly complex system, in order to find the causes of malfunctions of which you must be a master of computer diagnostics.
Checking the sensors
If your system was working normally, but suddenly problems arose, be sure to start checking by cleaning the sensors from dirt.
Moreover, it is important to perform cleaning not only on the surface of the sensor, but also in the mounting area. At each check, do not forget to make sure that the fixation remains normal, the sensors do not wobble or move from their seats
If cleaning does not produce any results, you will have to check the devices for their functioning. To do this, start the engine at idle, and then you put your finger on each sensor. If the sensor is not working, it will crackle or vibrate.
If there is no response, we can say that the sensor has failed. Next, act according to the situation, repairing or changing the device.
Metallized tape
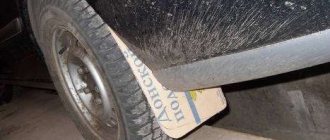
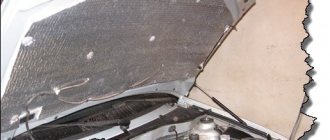
If you use electromagnetic parking sensors, then a special tape will be used instead of sensors.
Its diagnosis is even simpler than in the situation with sensors. The tape device is elementary. It may not work if some mechanical damage has been caused. Therefore, the check comes down to making sure that there are no or no deep scratches, cracks or other defects.
If everything is fine with the tape, there is no visible damage, then the electronic control unit is checked.