How to make car mud flaps with your own hands
It often happens that as the season passes, mud flaps in cars lose their original appearance or even break down. This is due to the fact that they are subject to constant mechanical impact, be it impacts from small pebbles bouncing off the wheel or dirt falling on its surface. Typically, mud flaps last only a year, or even less, after which it is recommended to replace them with new ones.
The main function of mud flaps, also called mud flaps, is to protect your car, as well as the cars moving behind you, from dirt and stones flying out from under the moving wheel. They can severely damage the car's paint, and sometimes even lead to death, so the presence of mud flaps in the car is mandatory.
The replacement can be carried out either independently or at a service station, although this, as a rule, costs a little more, and the set of mud flaps itself, today, costs a lot of money. Therefore, in order not to waste your nerves and money, we have prepared for you an article on how to make homemade mud flaps for a car at home.
For production we will need:
To begin with, we make mock-ups of future mudguards from cardboard and try them on.
Having determined the required length and width of the mudguards, we place cardboard mock-ups on a piece of tin and cut out shapes of the same size from it. We perform a similar action with pieces of foam plastic.
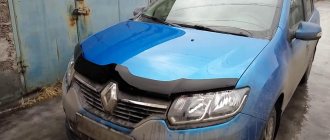
Finally we start painting. You can paint it at your discretion; in our case, we painted the mudguards with green (metallic) paint that matches the color of the car body. In the end, this is what happened:
Summarize
Enlarged mud flaps can protect the bumper and rear door panels of the Renault Duster from intense pollution. In addition, they will give moments of joy to traffic participants moving behind. Off-road driving will bring much greater peace of mind to the owner. Front mudguards are not capable of solving the problem of body protection, and their service life is short. Therefore, only you, the owners of a practical Renault Duster, should decide whether to equip your car with these accessories.
How to make mud flaps for your car yourself
Hello, everyone can’t get around to mudguards...And without them, 35 slippers quickly dirty the car...Maybe there are some ready-made ones, otherwise we want to make one out of two relatives! Any thoughts, please share! Cutting it out of a piece of rubber is not an option...
Without mudguards it’s a little different, but that’s my opinion.
Nissan Frontier 2005, petrol engine 4.0 l., 750 l. p., all-wheel drive, manual transmission — styling
Why is rubber bad? You take 4 mats under the battery and sculpt =)))
Look at my blog, I made it from leatherette, I’m very pleased! www.drive2.ru/l/8497266/
I want to make these for myself www.drive2.ru/l/2088919/
There is such material Kozhvalon 3 mm sold in shoe stores, the best is Italian or Turkish. In your case, 2 sheets will be enough (for a field you get 4 pieces).
An aluminum plate is riveted down and tied with a cable to the machine with self-tapping screws.
They walk perfectly, the only thing is that at minus more than 25 degrees you shouldn’t kick the snow with your foot) You can also use a conveyor belt, but it looks less aesthetically pleasing, although it is stronger.
It is worth paying attention to the Elegant mudguards. Description and varieties here Elegant mud flaps I’ll add from myself Cool mud flaps, they don’t stiffen even in severe frost, they are larger and wider than my standard ones by an order of magnitude, the snow sticks to them less, although there is also a collar at the bottom, you can bend them in a knot even in the cold, they stand like family . I bought No. 3 and No. 4, front and rear. SATISFIED.
It often happens that as the season passes, mud flaps in cars lose their original appearance or even break down. This is due to the fact that they are subject to constant mechanical impact, be it impacts from small pebbles bouncing off the wheel or dirt falling on its surface. Typically, mud flaps last only a year, or even less, after which it is recommended to replace them with new ones.
The main function of mud flaps, also called mud flaps, is to protect your car, as well as the cars moving behind you, from dirt and stones flying out from under the moving wheel. They can severely damage the car's paint, and sometimes even lead to death, so the presence of mud flaps in the car is mandatory.
The replacement can be carried out either independently or at a service station, although this, as a rule, costs a little more, and the set of mud flaps itself, today, costs a lot of money. Therefore, in order not to waste your nerves and money, we have prepared for you an article on how to make homemade mud flaps for a car at home.
For production we will need:
Two tin plates will be used as the basis of the mudguards; Styrofoam; Molar tape; Fiberglass; Spatula and soil mixture; Paint and varnish mixture;
A piece of newspaper and PVA glue;
To begin with, we make mock-ups of future mudguards from cardboard and try them on.
Manufacturing and installation of oversized mudguards - Community “Do It Yourself” on DRIVE2
Good afternoon everyone! The past winter showed the need to replace the standard mudguards with larger ones that would protrude beyond the dimensions of the wings by a certain distance.
The thing is that the sand-salt mixture (this is at best, or maybe a mixture of various chemicals), which is generously sprinkled on our roads in winter, together with wet snow, flies from under the wheels and gets packed into the gap between the body sills and the running boards , exerting a strong corrosive effect on the sills and fenders. And on the eve of this winter, having begun the search for universal mudguards of a suitable size, I was surprised to find that the cost of the kit varies from 150 to 700 USD. starting from products from noname companies to products from JAOS. Considering such prices not entirely justified, I began to study the experience and reviews of people who were engaged in the manufacture of mudguards on their own.
a sheet of stainless steel, 1.5 mm thick and the corresponding fittings (also stainless steel), namely a chain, bolts and self-locking nuts, washers, carabiners, hooks (they were later abandoned). The total budget spent on materials is 37 USD.
First of all, 4 mudguards, measuring 36 by 52 cm, were cut out of leatherette sheets.
Next, we cut out reinforcing plates from a stainless steel sheet for the bottom of the mudguards, 5 cm wide
This is what the workpiece looks like
Drill holes in the plates for fasteners
cut holes in leather fiber
and actually attach the plate to the mudguard
Next, we dismantle the standard mudguards
At the same time, we remove from the sinuses under plastic protection all accumulated debris in the form of leaves, twigs, etc.
And we actually install the manufactured mudguards
Thank you all, I hope the post was useful.
Do-it-yourself installation of mudguards (universal), video
Many drivers do not think about the importance of the functions performed by the shields installed behind the wheels of the car. Installing mud flaps prevents small stones and dirt particles from flying out from under the wheels of the car. Let's look at how to install the shields correctly so as not to damage the paintwork of the car.
Is installation required?
If no one can forbid you to neglect the safety of the body of your car, then you can be really punished for causing inconvenience to other road users. a fine of 500 rubles to the driver of a car without mudguards . The inspector will refer to part 1 of Article 12.5 of the Code of Administrative Violations, which refers us to the list of provisions for permission to operate vehicles. Mud flaps are one of the elements that must be installed on a car. The exception is cases when mud flaps are simply not provided for by the design of the car. In this case, the installation of protective shields is not necessary, but highly desirable.
Options for protecting vehicles from scratches
This function is partially performed by mudguards, but mainly it is directed only to the bottom. Therefore, to protect the machine the following can also be used:
- Various polishes and wax compounds that can be applied to the body without changing its basic color.
- Liquid glass, which can also provide excellent appearance to the car.
- Protective film. It can transform the appearance of a vehicle due to the abundance of colors.
- Covers with a fabric base. They are characterized by ease of installation, but at the same time they cost a lot.
- Plastic deflectors are available in almost every car, but if necessary, additional installation can be made.
DIY mud flaps, we make them together
Installation or replacement of mudguards can be carried out at a service station or independently, which will be much cheaper, and a set of new mudguards is quite expensive today. That is why we will talk about how it is possible to make mud flaps for a car with your own hands.
Homemade mudguards: when is it really needed?
The main task of mud flaps is to protect the car from stones and dirt that fly out from under the wheels and can severely damage the car’s paintwork or lead to more serious problems. Due to the constant mechanical impact of stones, sand and dirt, they lose their original appearance, or even break down, then they have to be replaced with new ones.
Important! Rubber mud flaps have certain advantages over plastic ones: they are more flexible, therefore, they are more difficult to break, and they are easier to clean in winter.
Mud flaps are selected based on the size of the arches, wheels and fender liners, respectively, and their sizes vary.
Their width is equal to or slightly larger than the fender liner, and the length varies depending on the model, but, in any case, the mudguard should not touch the ground. Sometimes purchased mud flaps are not suitable in design, characteristics or size, and therefore it makes sense to make the mud flaps yourself and install them on the car yourself.
Useful for making
Homemade mudguard - algorithm of actions
First of all, you need to make mock-ups of future homemade mudguards out of cardboard and try them on. After the required length and width of the mudguards have been established, we put cardboard models on a piece of tin and cut out shapes of the same size from it, we also do the same with foam plastic (we put cardboard models on the foam and cut out the shapes we need). Using masking tape, we attach the foam forms to the tin bases and sharpen their shapes for our future mudguards. Then we cover the foam blanks with newspaper using PVA glue (like papier-mâché). When the blanks have dried, we try them on the car and determine the places where the mounting holes will be. Then the workpieces need to be treated with a primer and sanded using a piece of foam plastic. At the end we paint our mudguards.
Types of products
Customized products are produced by machine manufacturers and are distinguished by a higher price. If universal “mud guards” absolutely do not fit into the overall design of the car or do not fulfill their role, then the cost of purchasing individual mud flaps is quite appropriate. Typically, retail auto stores do not sell such models.
Plastic guards are strong enough for light vehicles. They can withstand various weather conditions and prevent road particles from causing dents on any part of the vehicle. But in very severe frosts, some of them are damaged due to fragility.
On the other hand, rubber material is as strong as plastic but is more flexible, so will provide more coverage for larger vehicles.
Hard mud guards can get stuck on tires, especially for larger vehicles at high speeds. Rubber ones can “float” due to their flexible design. But such accessories are not durable and their service life usually does not exceed one season, after which they require replacement.
Do-it-yourself mudguard installation
A mudguard is a special device, the main purpose of which is to protect the fender from dirt and stones from under the wheels of the vehicle. Among car enthusiasts, such a product is jokingly called an “apron.”
The presence of the part guarantees an extension of the life of the metal from the point of view of the appearance of rust. Another interesting fact is that today, without mudguards, it is unlikely to pass a technical inspection.
Watch the video “Installing mud flaps on a Toyota Camry” below
What types of products are there? How to install mudguards with your own hands, and what should you pay attention to when solving such a problem? We will consider these questions in detail in the article.
Types and purpose of mud flaps
In the process of producing the “apron”, polymers with high ductility and strength are used. The automotive market offers the following options for mud flaps:
ORIGINAL - products that are suitable for installation on a specific model (configuration) of the vehicle. Product advantages:
UNIVERSAL - modification of mud flaps that are not intended for a specific car model. Product advantages:
The protective “apron” is mounted in close proximity to the wheels (in special recesses). According to their location, mudguards are divided into:
FRONT - made using soft material (most often rubber). Their main features:
REAR - products in the production process of which polyurethane is used. Main features:
Useful tips: rules for washing car fenders
Mudguards should be cleaned of dirt and washed as often as possible, since with regular use dirt can accumulate in a large layer. But it is also important to follow some important rules that will help extend the life of these products:
1. Always use water at the same temperature when washing. If the dirt was washed off with hot water, do not hose down the fenders with ice water, as they may crack.
2. To keep the fenders and wheel arches dry after washing, do this immediately before driving.
3 Be extremely careful with detergents and wash them thoroughly. If you leave the soapy surface of the wing, it will become very dirty; in some cases, the detergent may even damage the surface of the element.